2008 FORD TAURUS clock
[x] Cancel search: clockPage 21 of 320

3.MENU:Press repeatedly to
access the following settings:
Setting the clock:Press MENU until SET HOURS or SET MINUTES is
displayed. Use
/to manually increase/decrease. Press MENU again
to disengage clock mode. Press OK to close and return to the main
menu.
If your vehicle is equipped with an in-dash clock, refer toClockin the
Driver Controlschapter.
CATEGORY (satellite radio, if equipped - early availability):Press
MENU until the currently active category appears in the display
(CATEGORY MODE). In CATEGORY MODE, press
/to scroll
through the list of available SIRIUS channel Categories (Pop, Rock,
News, etc.) Press
SEEK, SEEKor SCAN to select the category.
After a category is selected, press SEEK to search for that specific
category of channels only (i.e. ROCK). To select a different category,
press MENU until the category appears in the display. Press
/to
select a different category. You may also select CATEGORY ALL to seek
all available SIRIUS categories and channels. Press OK to close and
return to the main menu.
Satellite radio is available only with a valid SIRIUS radio
subscription. Check with your authorized dealer for availability.
Note:If your vehicle is equipped with Satellite Radio, you will either
have the CATEGORY option above or the CATEOGRY option within the
SATELLITE RADIO MENU below.
SATELLITE RADIO MENU (if equipped — late availability):Press
MENU when satellite radio mode is active to access. Press OK to enter
into the satellite radio menu. Press
/to cycle through the
following options:
•CATEGORY:Press OK to enter category mode. Press
/to
scroll through the list of available SIRIUS channel Categories (Pop,
Rock, News, etc.) Press OK when the desired category appears in the
display. After a category is selected, press SEEK to search for that
specific category of channels only (i.e. ROCK). You may also select
CATEGORY ALL to seek all available SIRIUS categories and channels.
Press OK to close and return to the main menu.
2008 Taurus(tau)
Owners Guide (post-2002-fmt)
USA(fus)
Entertainment Systems
21
Page 28 of 320

1./(Tune/Disc selector):
In radio mode,press to manually
go up (
) or down ()the
radio frequency. Press and hold for
a fast advance through radio frequencies.
In menu mode,use to select various settings.
In CD/MP3 mode,press to select the desired disc.
In CATEGORY mode (if equipped),press to scroll through the list of
available SIRIUS channel categories.
Satellite radio is available only with a valid SIRIUS radio
subscription. Check with your authorized dealer for availability.
2.
(Phone):Your vehicle may be
equipped with the SYNC™ system
which has special phone features.
For further information, refer to theSYNC supplement.
3.MENU:Press repeatedly to
access to the following settings:
Setting the clock:Press until SELECT HOURS or SELECT MINUTES is
displayed. Press
/to adjust the hours/minutes. Press MENU again
to disengage clock mode. Press OK to close and return to the main
menu.
If your vehicle is equipped with an in-dash clock, refer to “Setting the
clock” in theDriver Controlschapter.
CATEGORY (satellite radio, if equipped — early availability):
Press MENU until the currently active category appears in the display
(CATEGORY MODE). In CATEGORY MODE, press
/to scroll
through the list of available SIRIUS channel Categories (Pop, Rock,
News, etc.) Press
SEEKor SCAN to select the category. After a
category is selected, press SEEK to search for that specific category of
channels only (i.e. ROCK). To select a different category, press MENU
until the category appears in the display. Press
/to select a
different category. You may also select CATEGORY ALL to seek all
available SIRIUS categories and channels. Press OK to close and return
to the main menu.
Satellite radio is available only with a valid SIRIUS radio
subscription. Check with your authorized dealer for availability.
2008 Taurus(tau)
Owners Guide (post-2002-fmt)
USA(fus)
Entertainment Systems
28
Page 79 of 320

HEADLAMP CONTROL
Turns the lamps off.
Turns on the parking lamps,
instrument panel lamps, license
plate lamps and tail lamps.
Turns the headlamps on.
Autolamp control (if equipped)
The autolamp system provides light
sensitive automatic on-off control of
the exterior lights normally
controlled by the headlamp control.
•To turn autolamps on, rotate the
control counterclockwise to
.
•To turn autolamps off, rotate the
control clockwise to
.
The autolamp system also keeps the
lights on for a predetermined
amount of time after the ignition switch is turned to LOCK. You can
change the amount of time the lamps stay on by using the programming
procedure that follows:
Note:If the vehicle is equipped with autolamps it will have the
headlamps on with windshield wipers feature.If the windshield
wipers are turned on (for a fixed period of time) the exterior lamps will
turn on with headlamp control in the Autolamp position.
Autolamps - Programmable exit delay
Programmable exit delay allows the length of the autolamp exit delay to
be changed.
To program the auto lamp exit time delay:
1. Start with the ignition in the LOCK position and the headlamp control
in the autolamp position.
2. Turn the headlamp switch to
.
P
2008 Taurus(tau)
Owners Guide (post-2002-fmt)
USA(fus)
Lights
79
Page 82 of 320

Vertical aim adjustment
1. Park the vehicle directly in front of a wall or screen on a level surface,
approximately 25 feet (7.6 meters) away.
•(1) 8 feet (2.4 meters)
•(2) Center height of lamp to
ground
•(3) 25 feet (7.6 meters)
•(4) Horizontal reference line
2. Measure the height of the
headlamp bulb center from the
ground and mark an 8 foot
(2.5 meter) horizontal reference line
on the vertical wall or screen at this
height (a piece of masking tape works well).
3. Turn on the low beam headlamps to illuminate the wall or screen and
open the hood.
To see a clearer light pattern for adjusting, you may want to block the
light from one headlamp while adjusting the other.
4. On the wall or screen you will
observe an area of high intensity
light. The top of the high intensity
area should touch the horizontal
reference line, if not, the beam will
need to be adjusted using the next
step.
5. Locate the vertical adjuster on
each headlamp. Using a Phillips #2
screwdriver, turn the adjuster either
clockwise (to adjust down) or
counterclockwise (to adjust up).
The horizontal edge of the brighter
light should touch the horizontal
reference line.
6. Close the hood and turn off the
lamps.
HORIZONTAL AIM IS NOT REQUIRED FOR THIS VEHICLE AND IS
NON-ADJUSTABLE.
2008 Taurus(tau)
Owners Guide (post-2002-fmt)
USA(fus)
Lights
82
Page 85 of 320

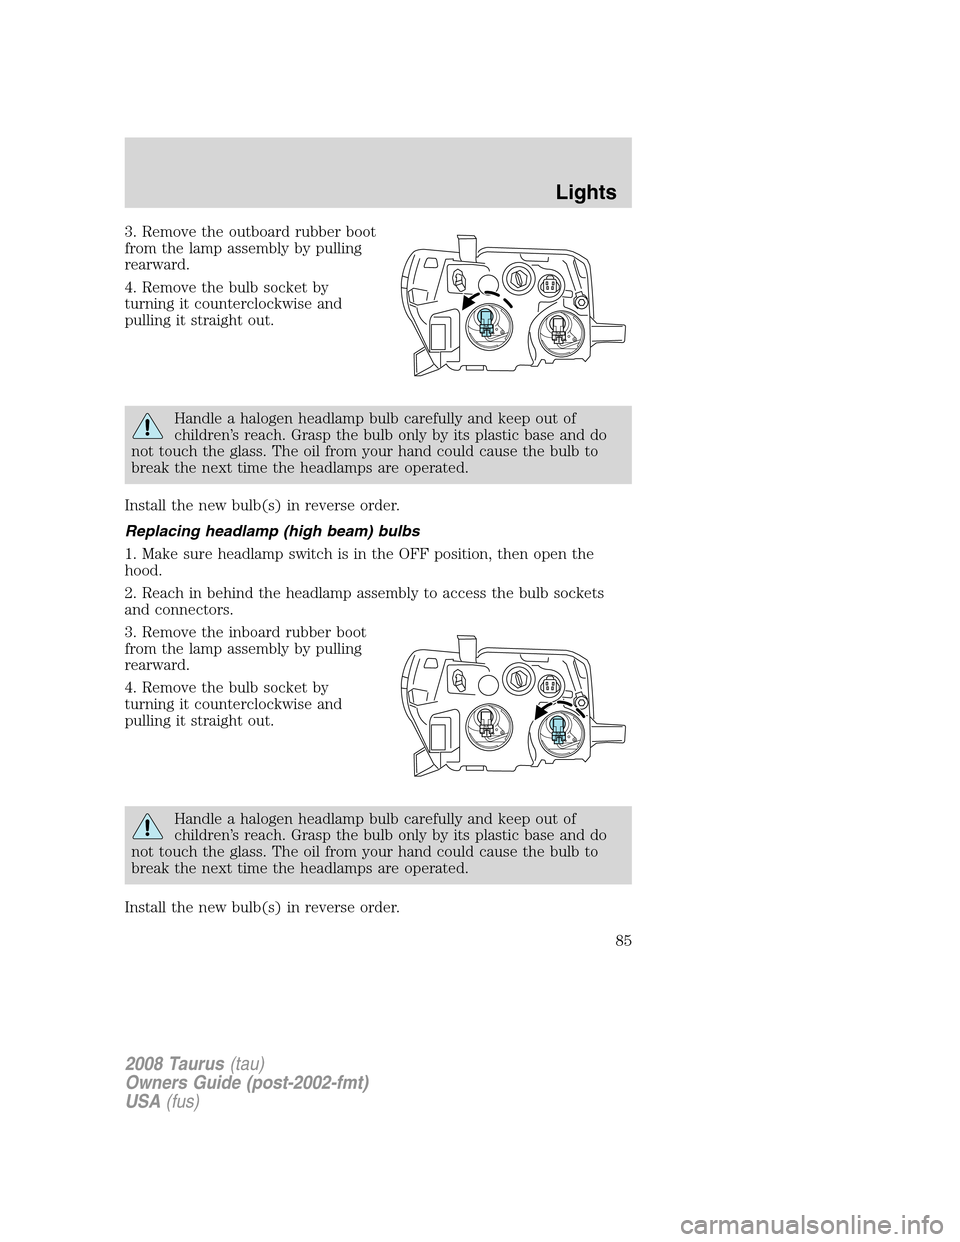
3. Remove the outboard rubber boot
from the lamp assembly by pulling
rearward.
4. Remove the bulb socket by
turning it counterclockwise and
pulling it straight out.
Handle a halogen headlamp bulb carefully and keep out of
children’s reach. Grasp the bulb only by its plastic base and do
not touch the glass. The oil from your hand could cause the bulb to
break the next time the headlamps are operated.
Install the new bulb(s) in reverse order.
Replacing headlamp (high beam) bulbs
1. Make sure headlamp switch is in the OFF position, then open the
hood.
2. Reach in behind the headlamp assembly to access the bulb sockets
and connectors.
3. Remove the inboard rubber boot
from the lamp assembly by pulling
rearward.
4. Remove the bulb socket by
turning it counterclockwise and
pulling it straight out.
Handle a halogen headlamp bulb carefully and keep out of
children’s reach. Grasp the bulb only by its plastic base and do
not touch the glass. The oil from your hand could cause the bulb to
break the next time the headlamps are operated.
Install the new bulb(s) in reverse order.
2008 Taurus(tau)
Owners Guide (post-2002-fmt)
USA(fus)
Lights
85
Page 86 of 320

Replacing front parking lamp/turn signal/sidemarker bulbs
1. Make sure headlamp switch is in the OFF position, then open the
hood.
2. Reach in behind the headlamp assembly to access the bulb sockets
and connectors.
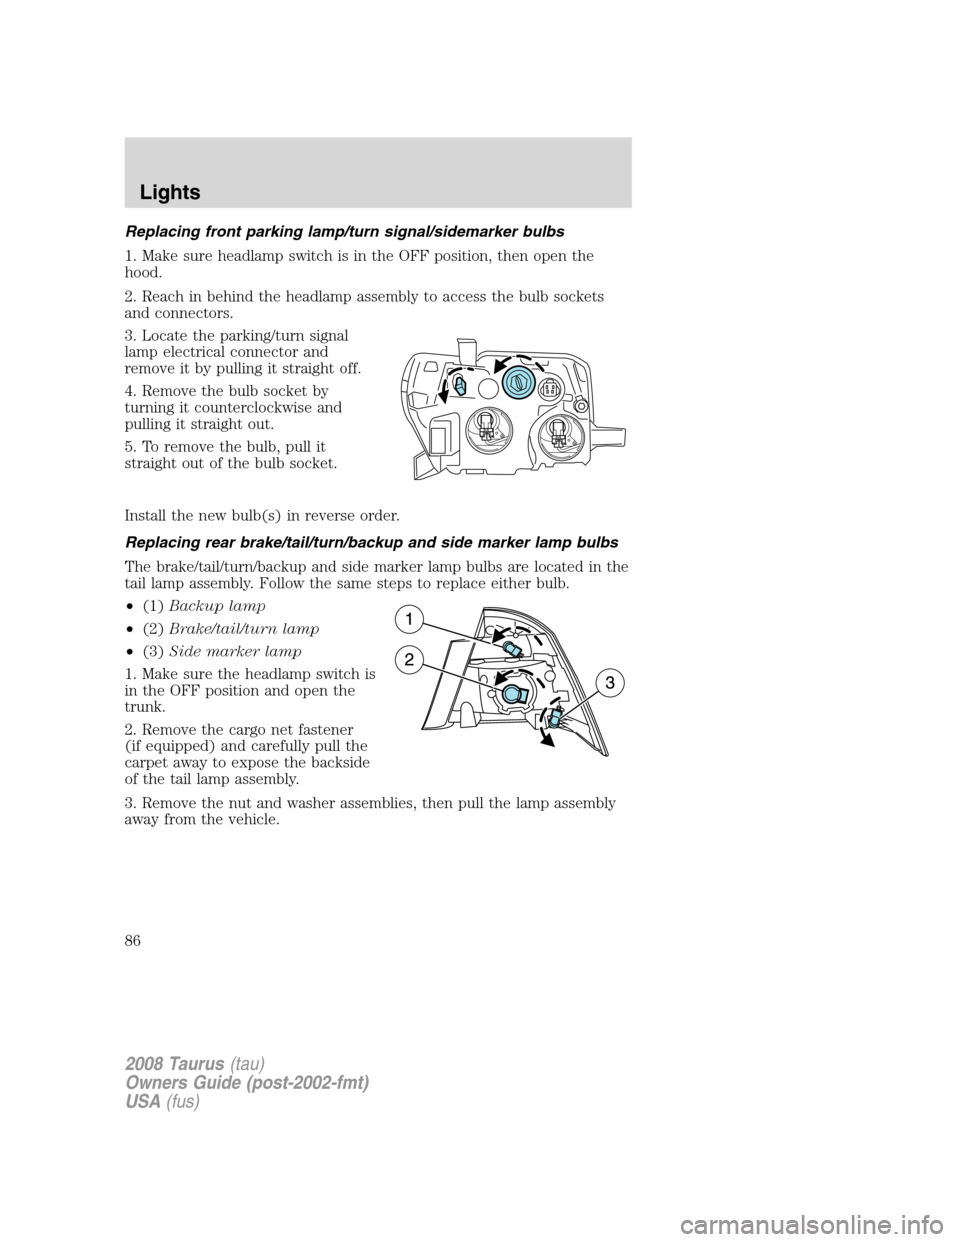
3. Locate the parking/turn signal
lamp electrical connector and
remove it by pulling it straight off.
4. Remove the bulb socket by
turning it counterclockwise and
pulling it straight out.
5. To remove the bulb, pull it
straight out of the bulb socket.
Install the new bulb(s) in reverse order.
Replacing rear brake/tail/turn/backup and side marker lamp bulbs
The brake/tail/turn/backup and side marker lamp bulbs are located in the
tail lamp assembly. Follow the same steps to replace either bulb.
•(1)Backup lamp
•(2)Brake/tail/turn lamp
•(3)Side marker lamp
1. Make sure the headlamp switch is
in the OFF position and open the
trunk.
2. Remove the cargo net fastener
(if equipped) and carefully pull the
carpet away to expose the backside
of the tail lamp assembly.
3. Remove the nut and washer assemblies, then pull the lamp assembly
away from the vehicle.
2008 Taurus(tau)
Owners Guide (post-2002-fmt)
USA(fus)
Lights
86
Page 87 of 320

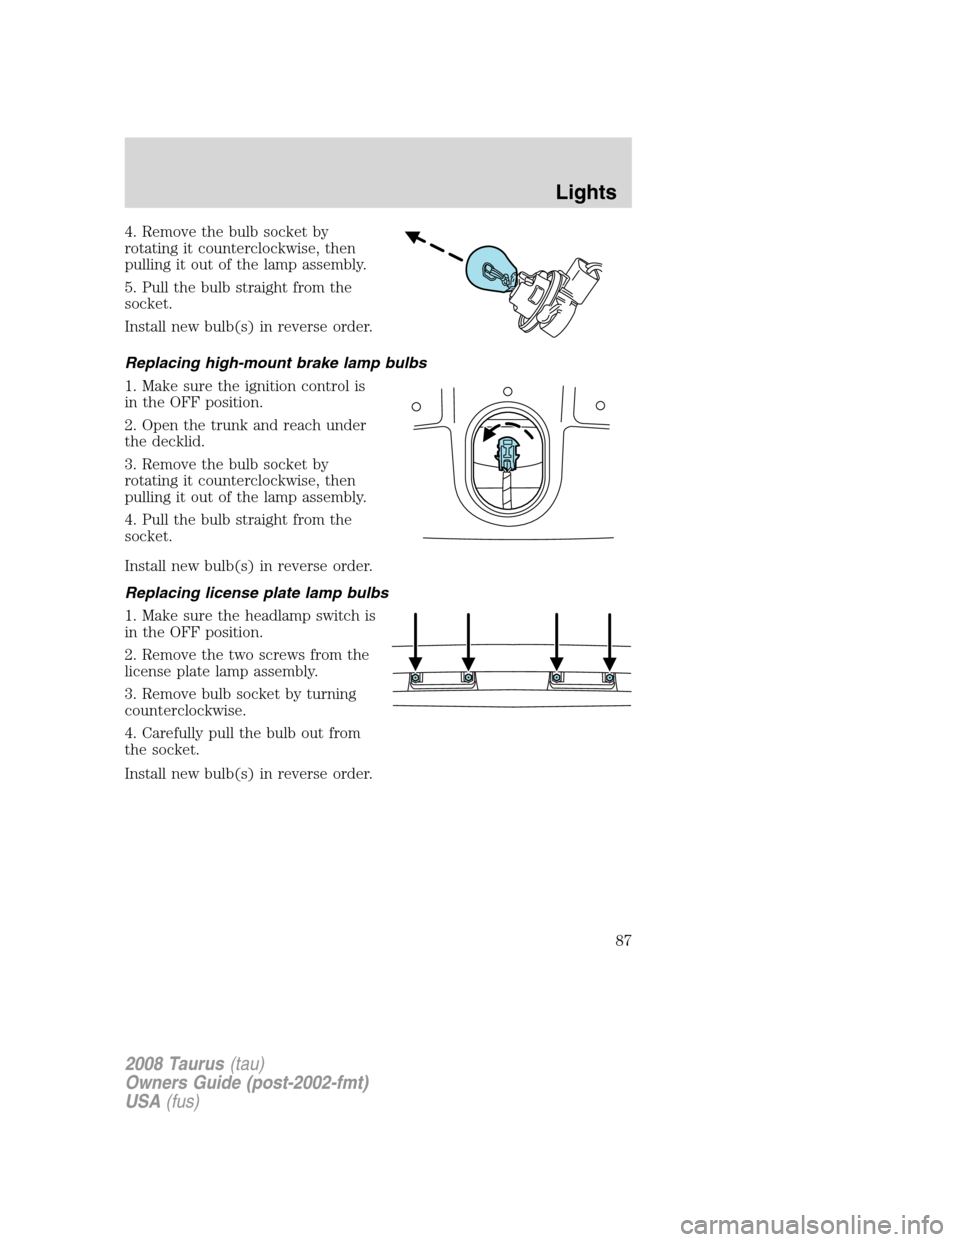
4. Remove the bulb socket by
rotating it counterclockwise, then
pulling it out of the lamp assembly.
5. Pull the bulb straight from the
socket.
Install new bulb(s) in reverse order.
Replacing high-mount brake lamp bulbs
1. Make sure the ignition control is
in the OFF position.
2. Open the trunk and reach under
the decklid.
3. Remove the bulb socket by
rotating it counterclockwise, then
pulling it out of the lamp assembly.
4. Pull the bulb straight from the
socket.
Install new bulb(s) in reverse order.
Replacing license plate lamp bulbs
1. Make sure the headlamp switch is
in the OFF position.
2. Remove the two screws from the
license plate lamp assembly.
3. Remove bulb socket by turning
counterclockwise.
4. Carefully pull the bulb out from
the socket.
Install new bulb(s) in reverse order.
2008 Taurus(tau)
Owners Guide (post-2002-fmt)
USA(fus)
Lights
87
Page 88 of 320

Replacing foglamp bulbs
1. Make sure the foglamp switch is
in the OFF position.
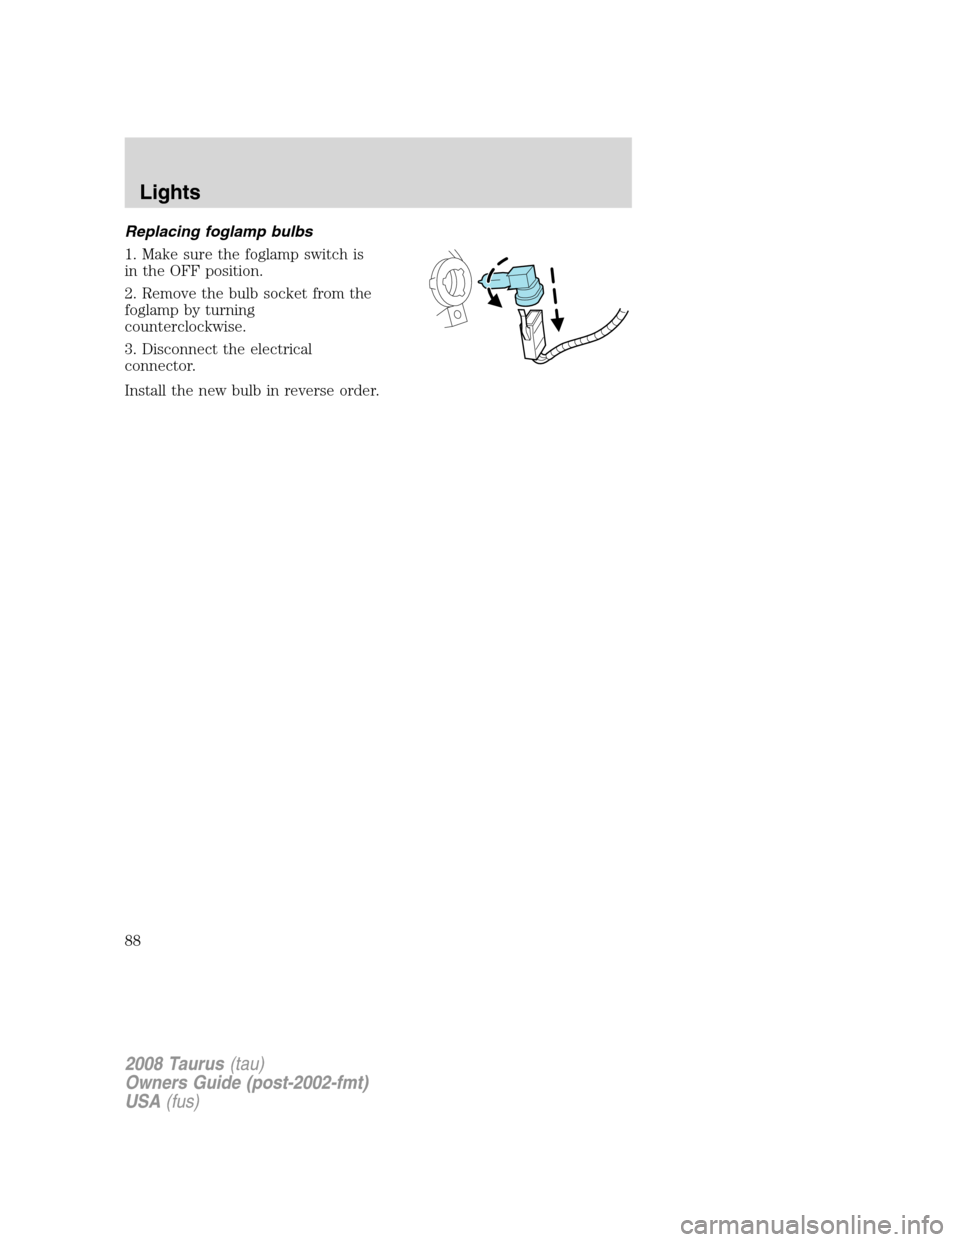
2. Remove the bulb socket from the
foglamp by turning
counterclockwise.
3. Disconnect the electrical
connector.
Install the new bulb in reverse order.
2008 Taurus(tau)
Owners Guide (post-2002-fmt)
USA(fus)
Lights
88