Page 84 of 320

Using the right bulbs
Replacement bulbs are specified in the chart below. Headlamp bulbs
must be marked with an authorized “D.O.T.” for North America and an
“E” for Europe to ensure lamp performance, light brightness and pattern
and safe visibility. The correct bulbs will not damage the lamp assembly
or void the lamp assembly warranty and will provide quality bulb burn
time.
Function Number of bulbsTrade
number
Headlamp high beam 2 9005
Headlamp low beam 2 H11
Front park/turn lamp 23457A or
3457AK
(amber)
Sidemarker lamp (front) 2194A
(amber)
Sidemarker lamp (rear) 2 194A
Tail lamp/brake/turn signal 2 3157K
Backup lamp 2 921
License plate lamp 2 168
High-mount brake lamp 1 921
Foglamp (if equipped) 2 H11
Map lamp 2 12V6W
Dome/reading lamps 3 578
All replacement bulbs are clear in color except where noted.
To replace all instrument panel lights - see your authorized dealer.
Replacing the interior bulbs
Check the operation of all bulbs frequently.
Replacing exterior bulbs
Check the operation of all the bulbs frequently.
Replacing headlamp (low beam) bulbs
1. Make sure headlamp switch is in the OFF position, then open the
hood.
2. Reach in behind the headlamp assembly to access the bulbs and
connectors.
2008 Taurus(tau)
Owners Guide (post-2002-fmt)
USA(fus)
Lights
84
Page 85 of 320

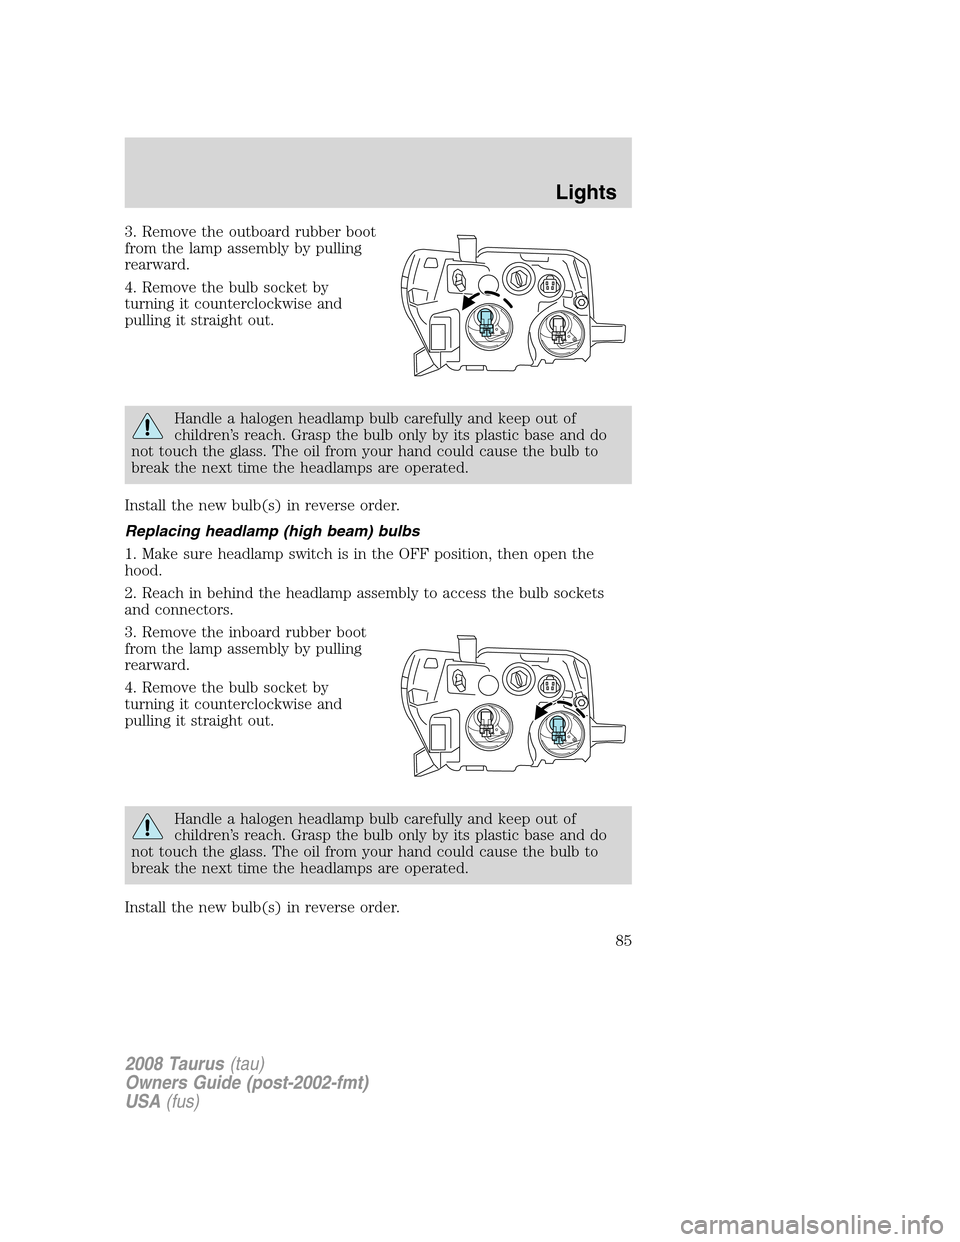
3. Remove the outboard rubber boot
from the lamp assembly by pulling
rearward.
4. Remove the bulb socket by
turning it counterclockwise and
pulling it straight out.
Handle a halogen headlamp bulb carefully and keep out of
children’s reach. Grasp the bulb only by its plastic base and do
not touch the glass. The oil from your hand could cause the bulb to
break the next time the headlamps are operated.
Install the new bulb(s) in reverse order.
Replacing headlamp (high beam) bulbs
1. Make sure headlamp switch is in the OFF position, then open the
hood.
2. Reach in behind the headlamp assembly to access the bulb sockets
and connectors.
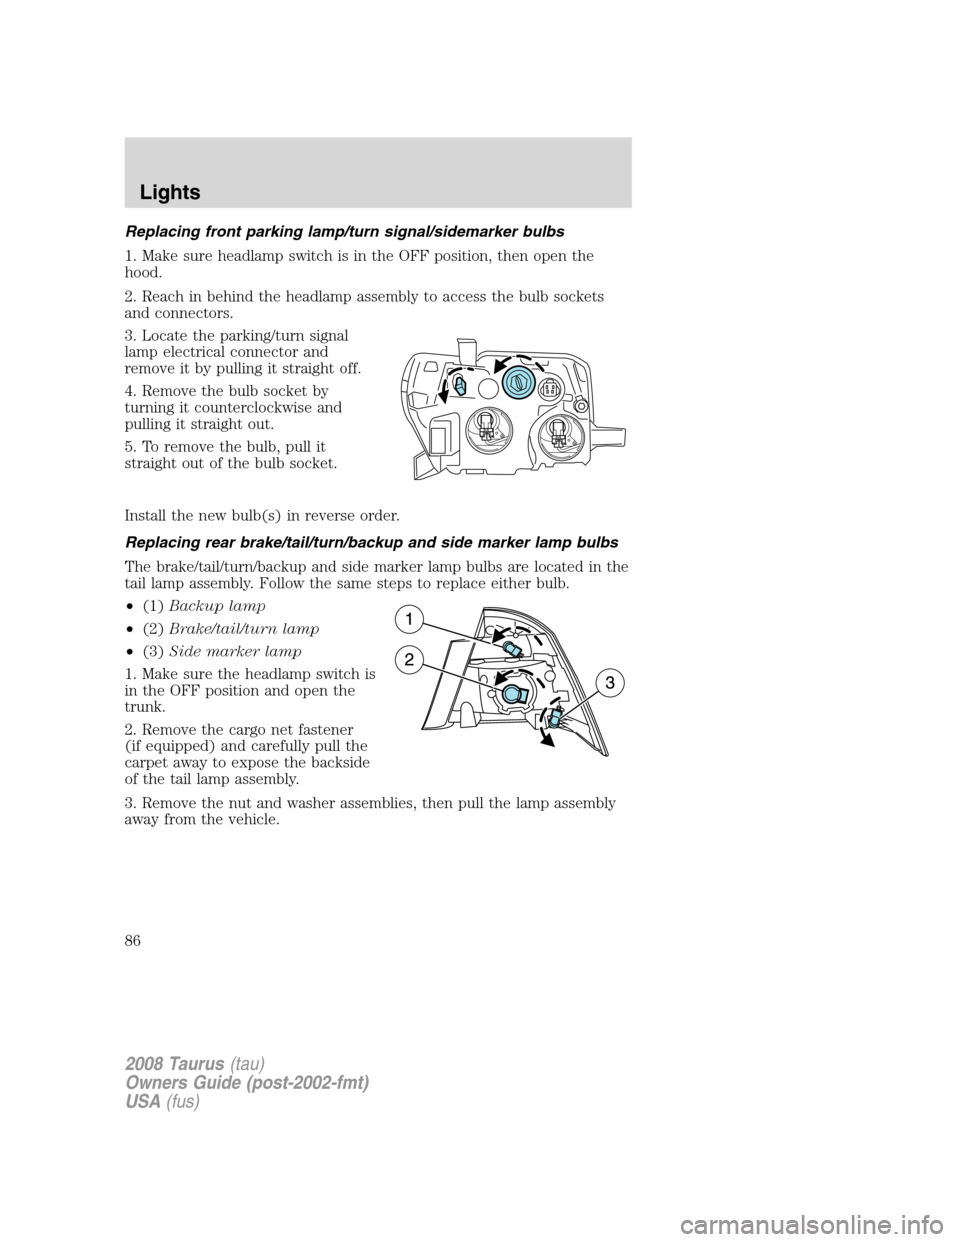
3. Remove the inboard rubber boot
from the lamp assembly by pulling
rearward.
4. Remove the bulb socket by
turning it counterclockwise and
pulling it straight out.
Handle a halogen headlamp bulb carefully and keep out of
children’s reach. Grasp the bulb only by its plastic base and do
not touch the glass. The oil from your hand could cause the bulb to
break the next time the headlamps are operated.
Install the new bulb(s) in reverse order.
2008 Taurus(tau)
Owners Guide (post-2002-fmt)
USA(fus)
Lights
85
Page 86 of 320

Replacing front parking lamp/turn signal/sidemarker bulbs
1. Make sure headlamp switch is in the OFF position, then open the
hood.
2. Reach in behind the headlamp assembly to access the bulb sockets
and connectors.
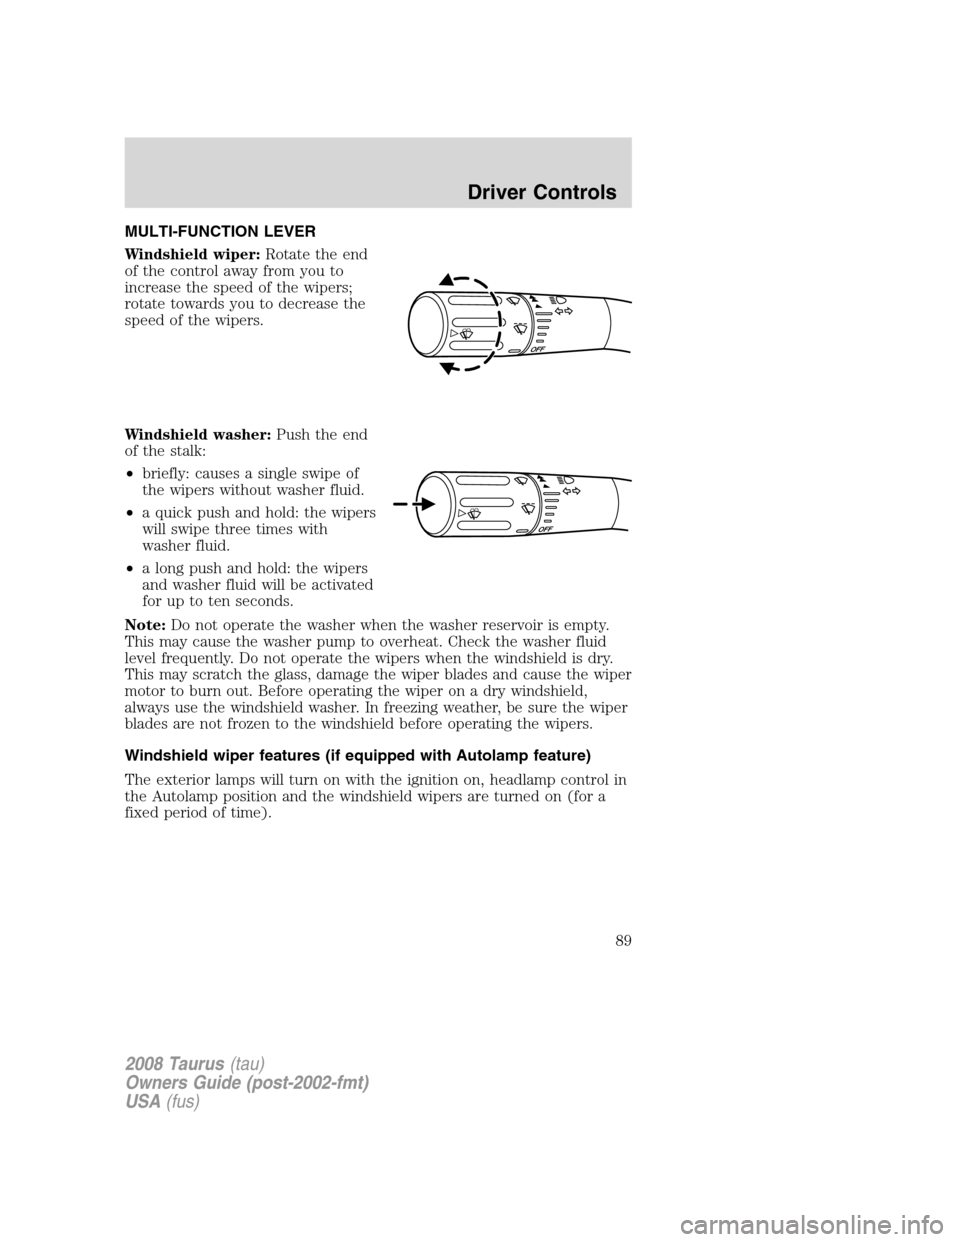
3. Locate the parking/turn signal
lamp electrical connector and
remove it by pulling it straight off.
4. Remove the bulb socket by
turning it counterclockwise and
pulling it straight out.
5. To remove the bulb, pull it
straight out of the bulb socket.
Install the new bulb(s) in reverse order.
Replacing rear brake/tail/turn/backup and side marker lamp bulbs
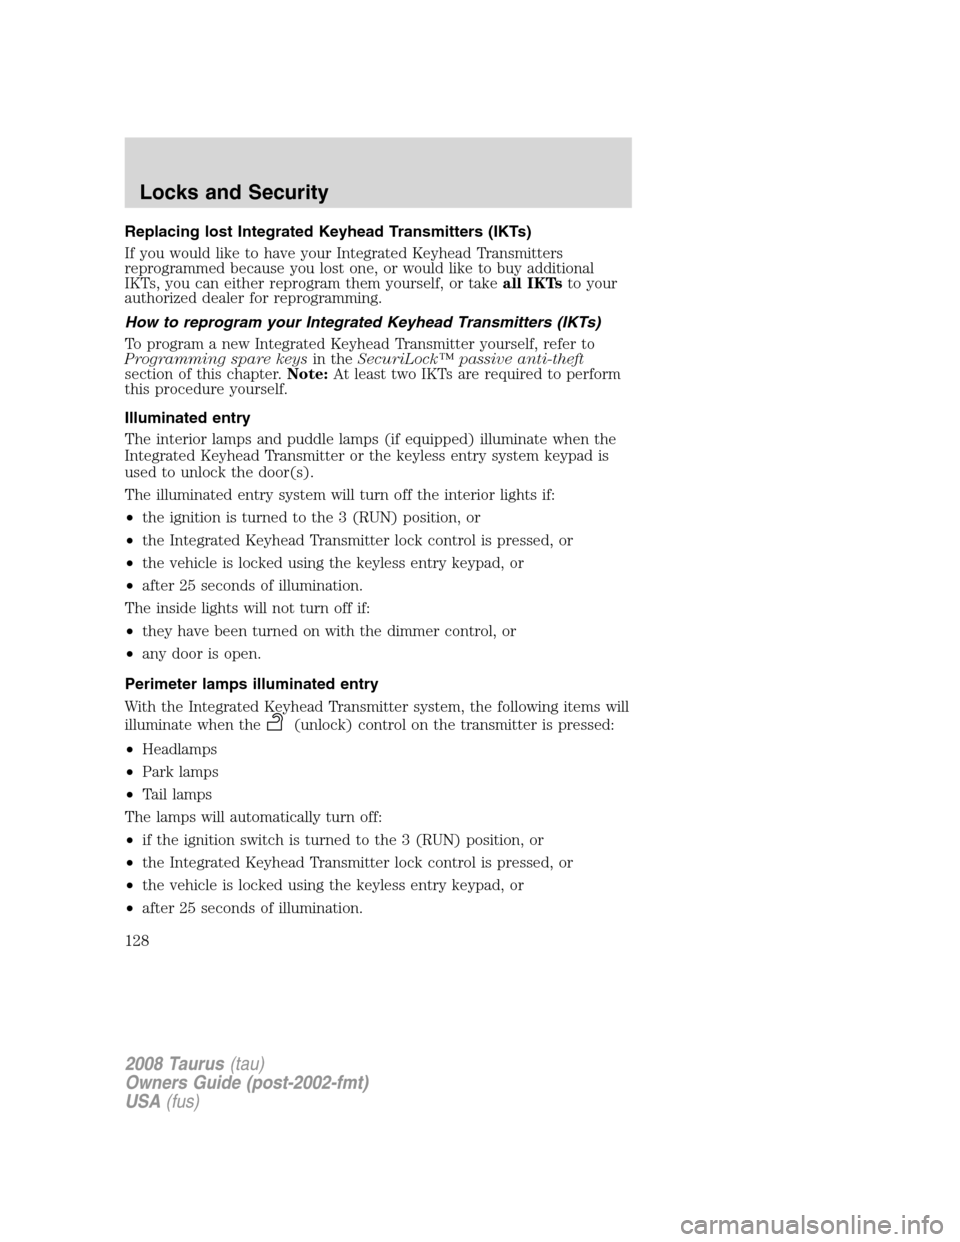
The brake/tail/turn/backup and side marker lamp bulbs are located in the
tail lamp assembly. Follow the same steps to replace either bulb.
•(1)Backup lamp
•(2)Brake/tail/turn lamp
•(3)Side marker lamp
1. Make sure the headlamp switch is
in the OFF position and open the
trunk.
2. Remove the cargo net fastener
(if equipped) and carefully pull the
carpet away to expose the backside
of the tail lamp assembly.
3. Remove the nut and washer assemblies, then pull the lamp assembly
away from the vehicle.
2008 Taurus(tau)
Owners Guide (post-2002-fmt)
USA(fus)
Lights
86
Page 87 of 320
4. Remove the bulb socket by
rotating it counterclockwise, then
pulling it out of the lamp assembly.
5. Pull the bulb straight from the
socket.
Install new bulb(s) in reverse order.
Replacing high-mount brake lamp bulbs
1. Make sure the ignition control is
in the OFF position.
2. Open the trunk and reach under
the decklid.
3. Remove the bulb socket by
rotating it counterclockwise, then
pulling it out of the lamp assembly.
4. Pull the bulb straight from the
socket.
Install new bulb(s) in reverse order.
Replacing license plate lamp bulbs
1. Make sure the headlamp switch is
in the OFF position.
2. Remove the two screws from the
license plate lamp assembly.
3. Remove bulb socket by turning
counterclockwise.
4. Carefully pull the bulb out from
the socket.
Install new bulb(s) in reverse order.
2008 Taurus(tau)
Owners Guide (post-2002-fmt)
USA(fus)
Lights
87
Page 89 of 320

MULTI-FUNCTION LEVER
Windshield wiper:Rotate the end
of the control away from you to
increase the speed of the wipers;
rotate towards you to decrease the
speed of the wipers.
Windshield washer:Push the end
of the stalk:
•briefly: causes a single swipe of
the wipers without washer fluid.
•a quick push and hold: the wipers
will swipe three times with
washer fluid.
•a long push and hold: the wipers
and washer fluid will be activated
for up to ten seconds.
Note:Do not operate the washer when the washer reservoir is empty.
This may cause the washer pump to overheat. Check the washer fluid
level frequently. Do not operate the wipers when the windshield is dry.
This may scratch the glass, damage the wiper blades and cause the wiper
motor to burn out. Before operating the wiper on a dry windshield,
always use the windshield washer. In freezing weather, be sure the wiper
blades are not frozen to the windshield before operating the wipers.
Windshield wiper features (if equipped with Autolamp feature)
The exterior lamps will turn on with the ignition on, headlamp control in
the Autolamp position and the windshield wipers are turned on (for a
fixed period of time).
2008 Taurus(tau)
Owners Guide (post-2002-fmt)
USA(fus)
Driver Controls
89
Page 128 of 320

Replacing lost Integrated Keyhead Transmitters (IKTs)
If you would like to have your Integrated Keyhead Transmitters
reprogrammed because you lost one, or would like to buy additional
IKTs, you can either reprogram them yourself, or takeall IKTsto your
authorized dealer for reprogramming.
How to reprogram your Integrated Keyhead Transmitters (IKTs)
To program a new Integrated Keyhead Transmitter yourself, refer to
Programming spare keysin theSecuriLock™ passive anti-theft
section of this chapter.Note:At least two IKTs are required to perform
this procedure yourself.
Illuminated entry
The interior lamps and puddle lamps (if equipped) illuminate when the
Integrated Keyhead Transmitter or the keyless entry system keypad is
used to unlock the door(s).
The illuminated entry system will turn off the interior lights if:
•the ignition is turned to the 3 (RUN) position, or
•the Integrated Keyhead Transmitter lock control is pressed, or
•the vehicle is locked using the keyless entry keypad, or
•after 25 seconds of illumination.
The inside lights will not turn off if:
•they have been turned on with the dimmer control, or
•any door is open.
Perimeter lamps illuminated entry
With the Integrated Keyhead Transmitter system, the following items will
illuminate when the
(unlock) control on the transmitter is pressed:
•Headlamps
•Park lamps
•Tail lamps
The lamps will automatically turn off:
•if the ignition switch is turned to the 3 (RUN) position, or
•the Integrated Keyhead Transmitter lock control is pressed, or
•the vehicle is locked using the keyless entry keypad, or
•after 25 seconds of illumination.
2008 Taurus(tau)
Owners Guide (post-2002-fmt)
USA(fus)
Locks and Security
128
Page 130 of 320

Battery saver
The battery saver will shut off the interior lamps 10 minutes after the
ignition has been turned to the 1 (LOCK) position.
•If the dome lamps were turned on using the panel dimmer control, the
battery saver will shut them off 10 minutes after the ignition has been
turned to the 1 (LOCK) position.
•If the courtesy lamps were turned on because one of the vehicle doors
or the trunk was opened, the battery saver will shut off them off 10
minutes after the ignition has been turned to the 1 (LOCK) position.
•The battery saver will shut off the headlamps 10 minutes after the
ignition has been turned to the 1 (LOCK) position.
KEYLESS ENTRY SYSTEM
You can use the keyless entry
keypad to:
•lock or unlock the doors without
using a key.
•open the trunk.
•recall memory seat/power mirrors
positions (if equipped).
The keypad can be operated with
the factory set 5–digit entry code;
this code is located on the owner’s
wallet card in the glove box and is
available from your authorized
dealer. You can also create up to
three of your own 5–digit personal
entry codes.
When pressing the controls on the keypad, press the middle of the
controls to ensure a good activation.
Programming a personal entry code and keypad association to
memory seats and mirrors (if equipped)
To create your own personal entry code:
1. Enter the factory set code.
2. Within five seconds press the 1•2 on the keypad.
3. Enter your personal 5-digit code. Each number must be entered
within five seconds of each other.
2008 Taurus(tau)
Owners Guide (post-2002-fmt)
USA(fus)
Locks and Security
130
Page 241 of 320
Passenger compartment fuse panel
The fuse panel is located under the instrument panel to the left of the
steering wheel.
The fuses are coded as follows.
Fuse/Relay
LocationFuse Amp
RatingPassenger Compartment Fuse
Panel Description
1 30A Smart window motor
2 15A Brake on/off switch,
High-mounted brake lamp
3 15A SDARS, Bluetooth, Family
entertainment system (FES)/Rear
seat control
4 30A Spare
5 10A SPDJB logic power
6 20A Turn signals
7 10A Low beam headlamps (left)
2008 Taurus(tau)
Owners Guide (post-2002-fmt)
USA(fus)
Roadside Emergencies
241