Page 45 of 304

Radio Display Condition Action Required
NO TEXT Song title information
not available.Song title information
not available at this
time on this channel.
The system is working
properly.
NO TEXT Category information
not available.Category information
not available at this
time on this channel.
The system is working
properly.
NO SIGNAL Loss of signal from
the SIRIUS satellite or
SIRIUS tower to the
vehicle antenna.You are in a location
that is blocking the
SIRIUS signal (i.e.,
tunnel, under an
overpass, dense foliage,
etc). The system is
working properly. When
you move into an open
area, the signal should
return.
UPDATING Update of channel
programming in
progress.No action required. The
process may take up to
three minutes.
CALL SIRIUS
1–888–539–7474Satellite service has
been deactivated by
SIRIUS Satellite
Radio.Call SIRIUS at
1–888–539–7474 to
re-activate or resolve
subscription issues.
NAVIGATION SYSTEM (IF EQUIPPED)
Your vehicle may be equipped with a Navigation System. Refer to the
Navigation supplementfor further information.
SYNC SYSTEM (LATE AVAILABILITY — IF EQUIPPED)
Your vehicle may be equipped with SYNC, a multi-media system with
special phone and media features. Refer to yourSYNC supplementfor
further information.
2008 Fusion(fsn)
Owners Guide (post-2002-fmt)
USA(fus)
Entertainment Systems
45
Page 53 of 304

2. Select A/C.
3. Adjust the temperature control to maintain comfort.
4. Set the fan speed to the highest setting.
5. Direct the outer instrument panel vents towards the side windows.
To increase airflow to the outer instrument panel vents, close the vents
located in the middle of the instrument panel.
Do not place objects on top of the instrument panel as these
objects may become projectiles in a collision or sudden stop.
REAR WINDOW DEFROSTER
R
The rear defroster control is located on the climate control panel and
works to clear the rear window of fog and thin ice.
The ignition must be in the 3 (RUN) position to operate the rear window
defroster.
The rear defroster turns off automatically after 10 minutes or when the
ignition is turned to the 1 (LOCK) position. To manually turn off the
defroster before 10 minutes have passed, push the control again.
Do not use razor blades or other sharp objects to clean the inside
of the rear window or to remove decals from the inside of the
rear window. This may cause damage to the heated grid lines and
will not be covered by your warranty.
2008 Fusion(fsn)
Owners Guide (post-2002-fmt)
USA(fus)
Climate Controls
53
Page 54 of 304
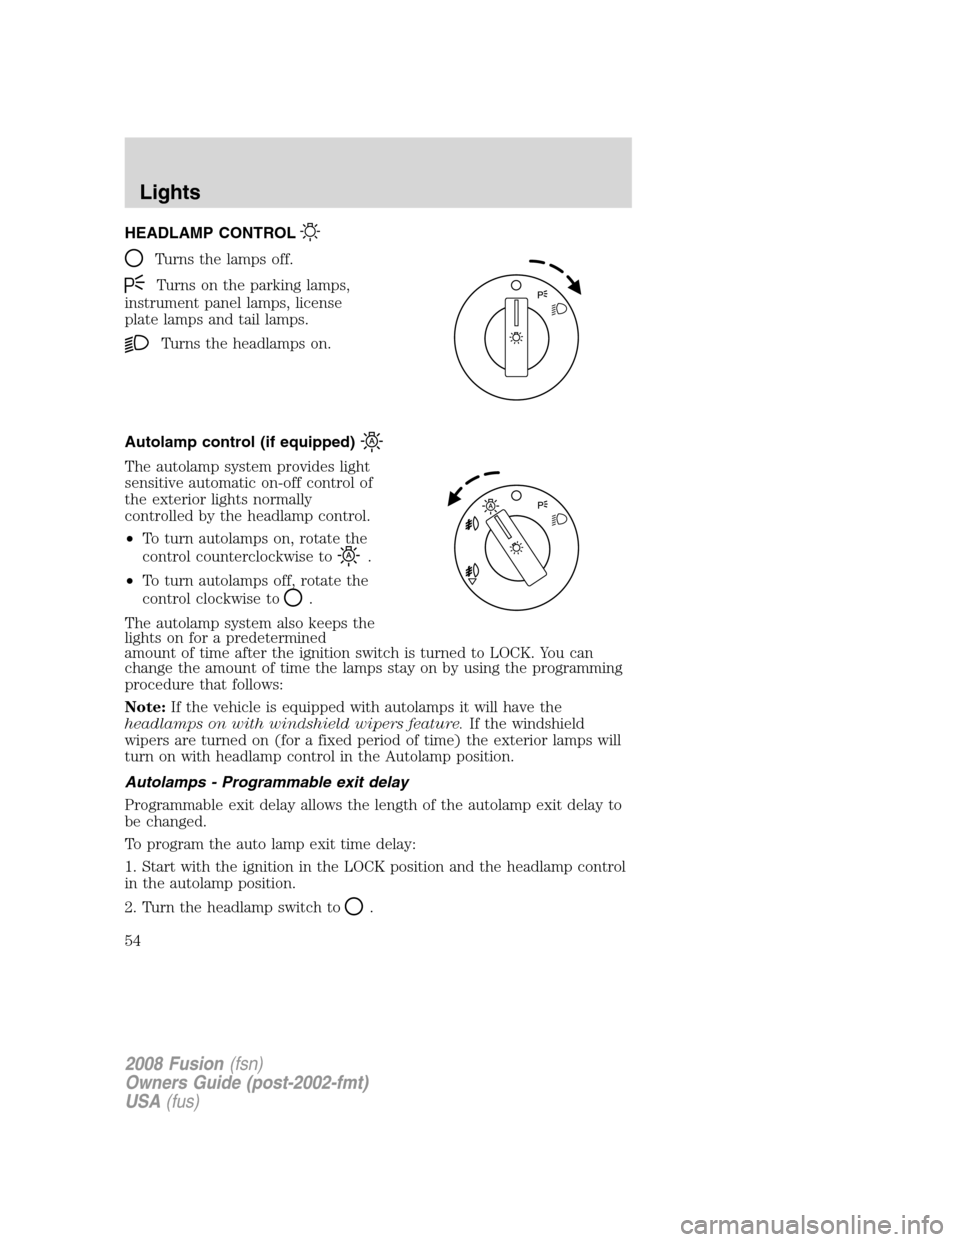
HEADLAMP CONTROL
Turns the lamps off.
Turns on the parking lamps,
instrument panel lamps, license
plate lamps and tail lamps.
Turns the headlamps on.
Autolamp control (if equipped)
The autolamp system provides light
sensitive automatic on-off control of
the exterior lights normally
controlled by the headlamp control.
•To turn autolamps on, rotate the
control counterclockwise to
.
•To turn autolamps off, rotate the
control clockwise to
.
The autolamp system also keeps the
lights on for a predetermined
amount of time after the ignition switch is turned to LOCK. You can
change the amount of time the lamps stay on by using the programming
procedure that follows:
Note:If the vehicle is equipped with autolamps it will have the
headlamps on with windshield wipers feature.If the windshield
wipers are turned on (for a fixed period of time) the exterior lamps will
turn on with headlamp control in the Autolamp position.
Autolamps - Programmable exit delay
Programmable exit delay allows the length of the autolamp exit delay to
be changed.
To program the auto lamp exit time delay:
1. Start with the ignition in the LOCK position and the headlamp control
in the autolamp position.
2. Turn the headlamp switch to
.
2008 Fusion(fsn)
Owners Guide (post-2002-fmt)
USA(fus)
Lights
54
Page 55 of 304
3. Turn the ignition switch to RUN and then back to LOCK.
4. Turn the headlamp switch to the autolamp position. The headlamps
will turn on.
5. Wait the desired amount of time for the exit delay you want (up to
three minutes), then turn the headlamp switch to
. The headlamps
will turn off.
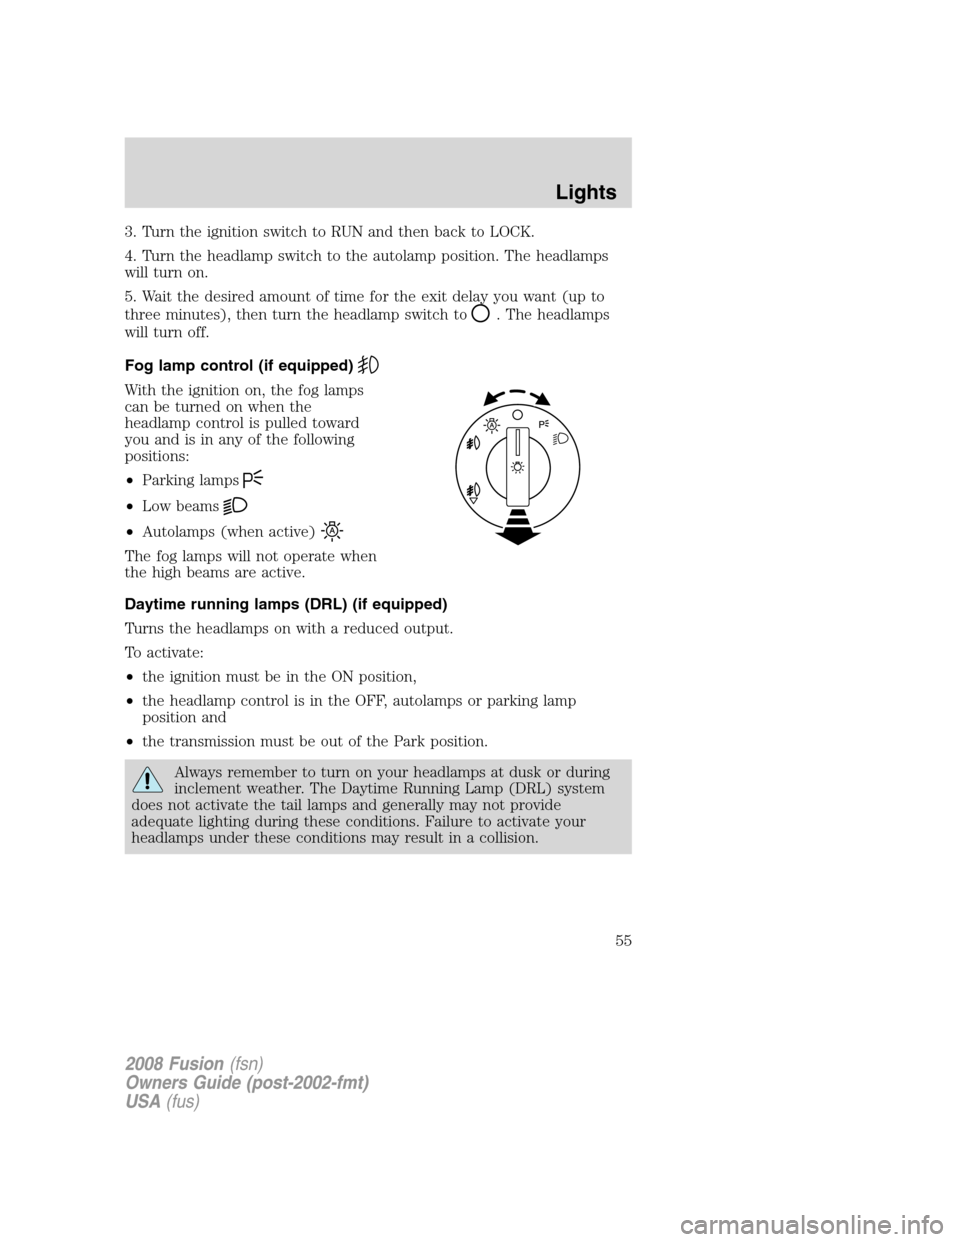
Fog lamp control (if equipped)
With the ignition on, the fog lamps
can be turned on when the
headlamp control is pulled toward
you and is in any of the following
positions:
•Parking lamps
•Low beams
•Autolamps (when active)
The fog lamps will not operate when
the high beams are active.
Daytime running lamps (DRL) (if equipped)
Turns the headlamps on with a reduced output.
To activate:
•the ignition must be in the ON position,
•the headlamp control is in the OFF, autolamps or parking lamp
position and
•the transmission must be out of the Park position.
Always remember to turn on your headlamps at dusk or during
inclement weather. The Daytime Running Lamp (DRL) system
does not activate the tail lamps and generally may not provide
adequate lighting during these conditions. Failure to activate your
headlamps under these conditions may result in a collision.
2008 Fusion(fsn)
Owners Guide (post-2002-fmt)
USA(fus)
Lights
55
Page 57 of 304
AIMING THE HEADLAMPS
The headlamps on your vehicle are properly aimed at the assembly plant.
If your vehicle has been in an accident the alignment of your headlamps
should be checked by your authorized dealer.
Vertical aim adjustment
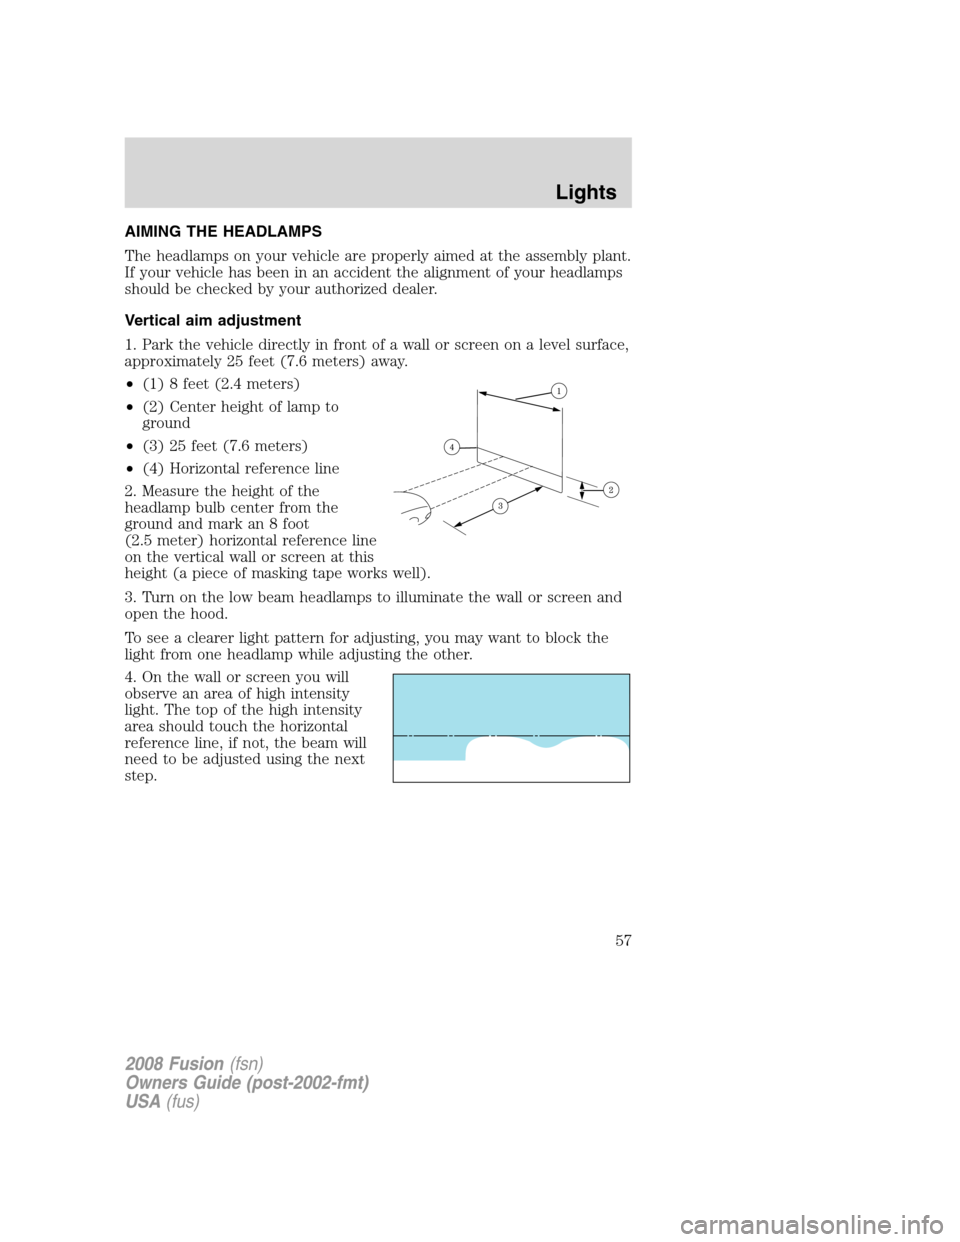
1. Park the vehicle directly in front of a wall or screen on a level surface,
approximately 25 feet (7.6 meters) away.
•(1) 8 feet (2.4 meters)
•(2) Center height of lamp to
ground
•(3) 25 feet (7.6 meters)
•(4) Horizontal reference line
2. Measure the height of the
headlamp bulb center from the
ground and mark an 8 foot
(2.5 meter) horizontal reference line
on the vertical wall or screen at this
height (a piece of masking tape works well).
3. Turn on the low beam headlamps to illuminate the wall or screen and
open the hood.
To see a clearer light pattern for adjusting, you may want to block the
light from one headlamp while adjusting the other.
4. On the wall or screen you will
observe an area of high intensity
light. The top of the high intensity
area should touch the horizontal
reference line, if not, the beam will
need to be adjusted using the next
step.
2008 Fusion(fsn)
Owners Guide (post-2002-fmt)
USA(fus)
Lights
57
Page 58 of 304
5. Locate the vertical adjuster on
each headlamp. Using a Phillips #2
screwdriver, turn the adjuster either
clockwise (to adjust down) or
counterclockwise (to adjust up).
The horizontal edge of the brighter
light should touch the horizontal
reference line.
6. Close the hood and turn off the
lamps.
HORIZONTAL AIM IS NOT REQUIRED FOR THIS VEHICLE AND IS
NON-ADJUSTABLE.
TURN SIGNAL CONTROL
•Push down to activate the left
turn signal.
•Push up to activate the right turn
signal.
INTERIOR LAMPS
Dome lamps and map lamps
The map lamps are located on the
overhead console. Press the controls
to turn on the lamps.
2008 Fusion(fsn)
Owners Guide (post-2002-fmt)
USA(fus)
Lights
58
Page 61 of 304

3. Disengage top of flexible washer
bottle filler neck from snap strap
attachment and position it to gain
access path to the high beam bulb
(Passenger Side Only with ABS).
Note:After completing Step 3. if the bulb is not accessible, see your
authorized dealer for bulb replacement.
4. Remove the protective cap/grill
from the headlamp housing by
grabbing it and pulling rearward.
5. Remove the bulb socket by
rotating it counterclockwise, then
pulling it straight out of the lamp
assembly.
6. Carefully pull bulb straight out of
socket and push in the new one.
Handle a halogen headlamp
bulb carefully and keep out
of children’s reach. Grasp the bulb
only by its plastic base and do not
touch the glass. The oil from your
hand could cause the bulb to
break the next time the
headlamps are operated.
7. For ease of bulb socket installation into the lamp assembly, hold the
bulb socket at 15 degrees clockwise from a vertical position. Using the 2
lead wires oriented exactly up to represent the vertical reference
position.
8. From the 15 degree position rotate the bulb socket clockwise to a
locked position.
2008 Fusion(fsn)
Owners Guide (post-2002-fmt)
USA(fus)
Lights
61
Page 62 of 304
9. Tuck the 2 lead wires into the lamp housing to assure that they are
not pinched when installing the protective rubber cap.
10. Install the protective cap/grill to the housing circular ring by pushing
and pressing it forward.
11. Re-apply pressure around the complete circular ring on the housing
to make sure the protective cap is completely seated.
12. Reconnect the washer bottle neck by reversing Step 3 (Passenger
side only with ABS).
13. Turn the headlamps on and make sure they work properly. If the
headlamp was correctly aligned before you changed the bulb, you should
not need to align it again.
Lowbeam bulb (upper) replacement
1. Make sure headlamp switch is in OFF position, then open the hood.
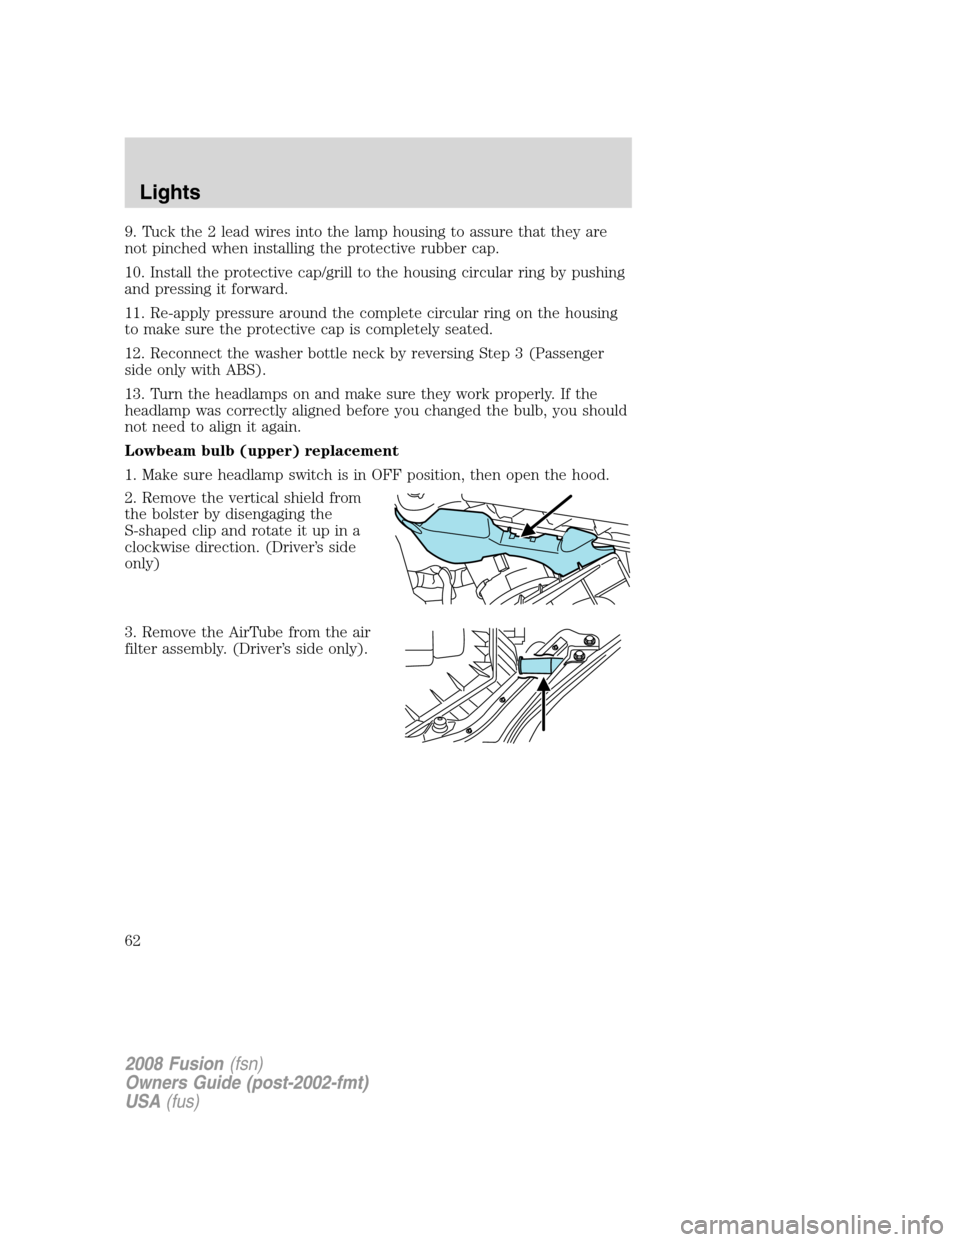
2. Remove the vertical shield from
the bolster by disengaging the
S-shaped clip and rotate it up in a
clockwise direction. (Driver’s side
only)
3. Remove the AirTube from the air
filter assembly. (Driver’s side only).
2008 Fusion(fsn)
Owners Guide (post-2002-fmt)
USA(fus)
Lights
62