2008 FORD F750 brake fluid
[x] Cancel search: brake fluidPage 189 of 273

BRAKE FLUID
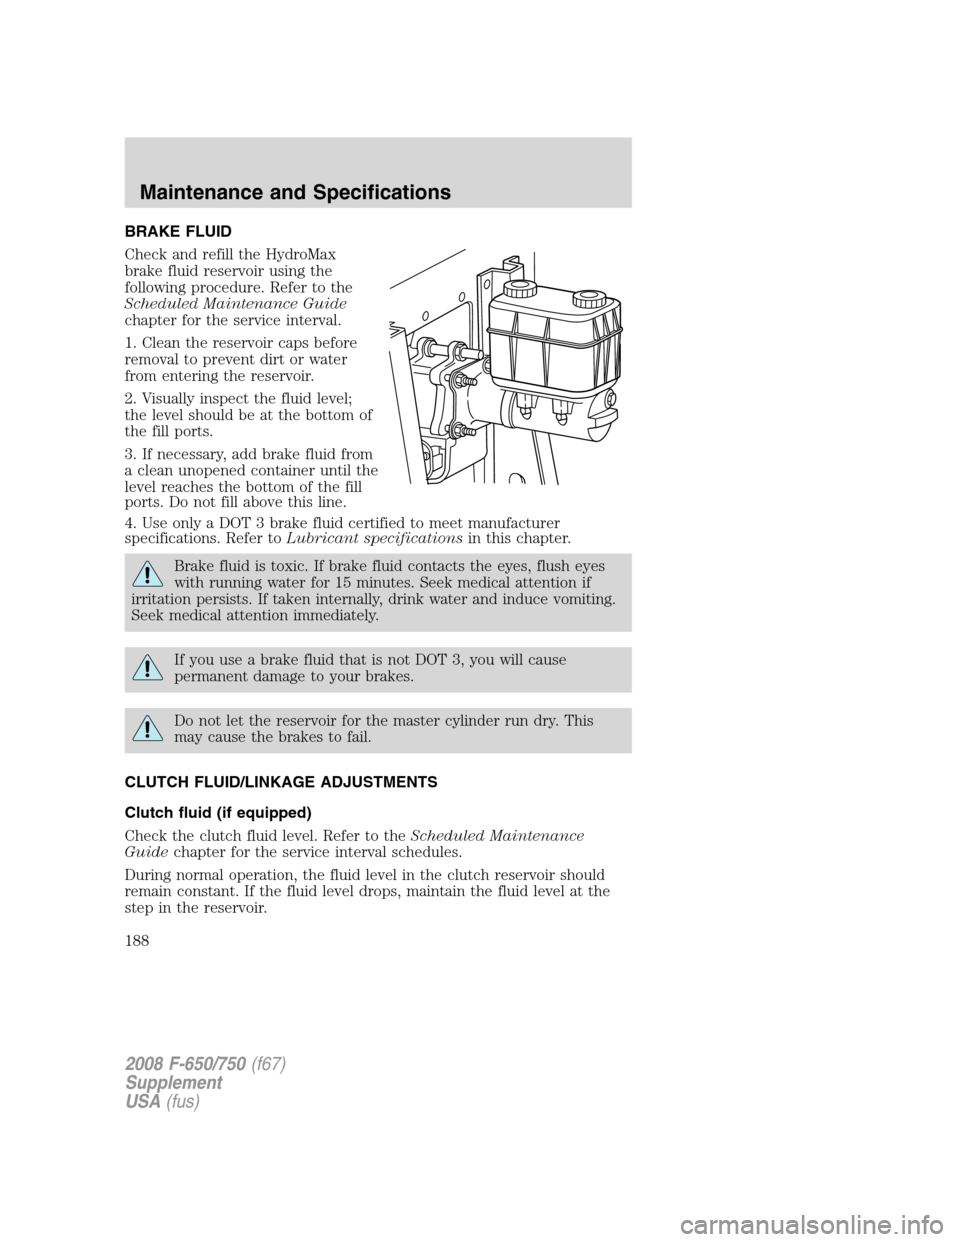
Check and refill the HydroMax
brake fluid reservoir using the
following procedure. Refer to the
Scheduled Maintenance Guide
chapter for the service interval.
1. Clean the reservoir caps before
removal to prevent dirt or water
from entering the reservoir.
2. Visually inspect the fluid level;
the level should be at the bottom of
the fill ports.
3. If necessary, add brake fluid from
a clean unopened container until the
level reaches the bottom of the fill
ports. Do not fill above this line.
4. Use only a DOT 3 brake fluid certified to meet manufacturer
specifications. Refer toLubricant specificationsin this chapter.
Brake fluid is toxic. If brake fluid contacts the eyes, flush eyes
with running water for 15 minutes. Seek medical attention if
irritation persists. If taken internally, drink water and induce vomiting.
Seek medical attention immediately.
If you use a brake fluid that is not DOT 3, you will cause
permanent damage to your brakes.
Do not let the reservoir for the master cylinder run dry. This
may cause the brakes to fail.
CLUTCH FLUID/LINKAGE ADJUSTMENTS
Clutch fluid (if equipped)
Check the clutch fluid level. Refer to theScheduled Maintenance
Guidechapter for the service interval schedules.
During normal operation, the fluid level in the clutch reservoir should
remain constant. If the fluid level drops, maintain the fluid level at the
step in the reservoir.
2008 F-650/750(f67)
Supplement
USA(fus)
Maintenance and Specifications
188
Page 190 of 273

Use only a DOT 3 brake fluid designed to meet manufacturer
specifications. Refer toLubricant specificationsin this chapter.
Carefully read cautionary information on product label. For
MEDICAL EMERGENCY INFORMATION, contact a physician or
Poison Control Center immediately; on Ford-Motorcraft products call:
1-800-959-3673 (FORD). Failure to follow these instructions may result
in personal injury.
1. Set the parking brake, shift into 1
(First) and turn the engine off.
2. Open the hood.
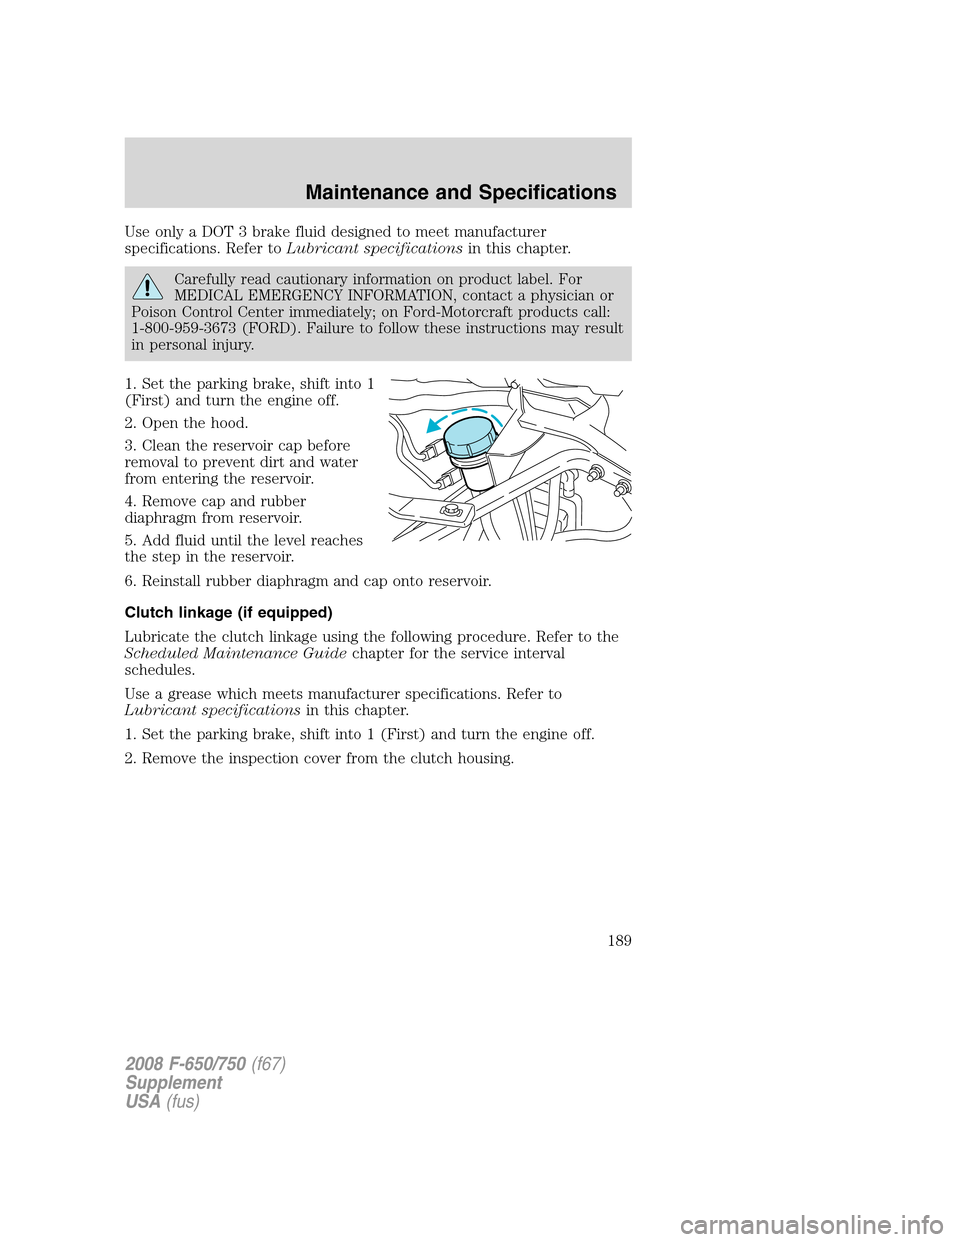
3. Clean the reservoir cap before
removal to prevent dirt and water
from entering the reservoir.
4. Remove cap and rubber
diaphragm from reservoir.
5. Add fluid until the level reaches
the step in the reservoir.
6. Reinstall rubber diaphragm and cap onto reservoir.
Clutch linkage (if equipped)
Lubricate the clutch linkage using the following procedure. Refer to the
Scheduled Maintenance Guidechapter for the service interval
schedules.
Use a grease which meets manufacturer specifications. Refer to
Lubricant specificationsin this chapter.
1. Set the parking brake, shift into 1 (First) and turn the engine off.
2. Remove the inspection cover from the clutch housing.
2008 F-650/750(f67)
Supplement
USA(fus)
Maintenance and Specifications
189
Page 191 of 273

•Transmission and clutch
removed for clarity.
3. With a grease gun, lubricate the clutch release bearing (at one
location) and the clutch release shaft (at two locations) using the grease
fittings provided.
4. Lubricate clutch release wear pads at the two locations where they
contact the clutch release bearing using a brush or similar tool.
5. Install the inspection cover onto the clutch housing.
TRANSMISSION FLUID
Always dispose of used automotive fluids in a responsible manner.
Follow your community’s standards for disposing of these types of fluids.
Call your recycling center to find out about recycling automotive fluids.
Automatic transmission fluid
Refer to your Allison Automatic Transmission Operator’s Manual for
scheduled intervals for transmission fluid checks and changes. Your
transmission does not consume fluid. However, the fluid level should be
checked if the transmission is not working properly, i.e., if the
transmission slips or shifts slowly or if you notice some sign of fluid
leakage.
Automatic transmission fluid expands when warmed. To obtain an
accurate fluid check, drive the vehicle until it is warmed up
(approximately 20 miles [30 km]). If your vehicle has been operated for
an extended period at high speeds, in city traffic or during hot weather,
the vehicle should be turned off for about 30 minutes to allow fluid to
cool before checking.
1. Drive the vehicle 20 miles (30 km) or until it reaches normal operating
temperature.
2. Park the vehicle on a level surface and engage the parking brake.
2008 F-650/750(f67)
Supplement
USA(fus)
Maintenance and Specifications
190
Page 192 of 273

3. With the parking brake engaged and your foot on the brake pedal,
start the engine and move the gearshift lever through all of the gear
ranges. Allow sufficient time for each gear to engage.
4. Place the gearshift lever in N (Neutral) or P (Park) and leave the
engine running.
5. Remove the dipstick, wiping it clean with a clean, dry lint free rag.
6. Install the dipstick making sure it is fully seated in the filler tube.
7. Remove the dipstick and inspect the fluid level.
If you must add transmission fluid, make sure the correct type of fluid is
being used. The type of fluid used is indicated in your Allison Automatic
Transmission Operator’s Manual.
Fluid levels above the safe range may result in transmission failure; an
overfill condition of transmission fluid may cause shift and/or
engagement concerns and/or possible damage.
Use of a non-approved automatic transmission fluid may cause
internal transmission component damage.
Manual transmission fluid
Refer to theScheduled Maintenance Guidechapter for transmission
fluid level checks and fluid change intervals.
Your manual transmission may be filled with an optional synthetic fluid
which allows the use of extended service intervals. A tag on the filler
plug will identify the use of the synthetic fluid.
Use only fluid that meets manufacturer specifications (refer to
Lubricant specificationsin this chapter.
Use of a non-approved transmission fluid may cause internal
transmission component damage.
Check your transmission fluid level using the following procedure:
1. Park the vehicle on level ground.
2. Set the parking brake and shift into 1 (First) and turn the engine off.
3. Clean any dirt from around the filler plug.
4. Remove the filler plug and inspect the fluid level.
5. The fluid level should be up to the bottom of the filler plug opening.
6. If necessary, add enough fluid through the filler plug opening so that
the fluid level is at the bottom of the opening.
7. Clean and install the filler plug securely.
2008 F-650/750(f67)
Supplement
USA(fus)
Maintenance and Specifications
191
Page 193 of 273

Drain and refill your transmission fluid using the following procedure:
1. Drain the transmission while the fluid is warm.
2. Park the vehicle on level ground.
3. Set the parking brake and shift into 1 (First) and turn the engine off.
4. Clean any dirt from around the filler and drain plugs.
5. Remove the filler and drain plugs and drain the fluid into a suitable
container. Dispose all used automotive fluids in a responsible manner
following your local authorized standards.
6. Clean and install the drain plug securely.
7. Add enough fluid through the filler plug opening so that the fluid level
is up to the bottom of the opening.
8. Clean and install the filler plug securely.
CHASSIS-MOUNTED CHARGE AIR COOLER
Inspect charge air cooler daily
With the engine off, visually inspect the charge air cooler core assembly
for debris and clogging of external fins. Prior to engine operation,
remove any debris blocking the core.
•Turbocharger-to-charge air cooler
•Charge air cooler-to-intake manifold pipe
•Mounting bracket
•Chassis-mounted charge air cooler core
Inspect air intake piping
•Check for accumulation of salt deposits (where applicable). If present,
disassemble and clean the complete air intake piping system. If the
intake piping is pitted, use Motorcraft Silicone Gasket and Sealant
TA-30 to seal joints against leakage.
•Check for loose hoses and clamps.
•Check for ruptured or collapsed hoses.
•Check air cleaner housing for cracks.
ELECTRICAL SYSTEM INSPECTIONS
Periodically inspect electrical connectors on the outside of the cab, on
the engine and frame for corrosion and tightness. Exposed terminals
2008 F-650/750(f67)
Supplement
USA(fus)
Maintenance and Specifications
192
Page 197 of 273

Your rear axle may be filled with an optional synthetic lubricant which
allows the use of extended service intervals. A tag on the filler plug will
identify the use of the synthetic lubricant.
Use only a lubricant that meets manufacturer specifications (refer to
Lubricant specificationsin this chapter).
Use of a non-approved rear axle lubricant may cause internal axle
component damage.
Checking the rear axle lubricant level
1. Park the vehicle on level ground.
2. Set the parking brake and shift into N (Neutral) (automatic
transmission) or 1 (First) (manual transmission) and turn the engine off.
3. Clean any dirt from around the rear axle filler plug.
4. Remove the filler plug and inspect the lubricant level.
5. The lubricant level should be up to the bottom of the filler plug
opening.
6. If necessary, add enough lubricant through the filler plug opening so
that the lubricant level is at the bottom of the opening.
7. Clean and install the filler plug securely.
Draining and refilling the rear axle lubricant
1. Drain the rear axle while the lubricant is warm.
2. Park the vehicle on level ground.
3. Set the parking brake and shift into N (Neutral) (automatic
transmission) or 1 (First) (manual transmission) and turn the engine off.
4. Clean any dirt from around the rear axle filler and drain plugs.
5. Remove the filler and drain plugs and drain the lubricant into a
suitable container. Dispose of all used automotive fluids in a responsible
manner following your local authorized standards.
6. Clean and install the drain plug securely.
7. Add enough lubricant through the filler plug opening so that the
lubricant level is up to the bottom of the opening.
8. Clean and install the filler plug securely.
WHEELS
General
Wheel bearings should be inspected, lubricated and adjusted at regular
intervals. This is especially important if operating in deep sand, mud, or
water. Refer toLubricant specificationsin this chapter.
2008 F-650/750(f67)
Supplement
USA(fus)
Maintenance and Specifications
196
Page 213 of 273

ComponentLubrication
typeViscosity /
Ambient
temperature /
NotesEquivalent
Ford part
name / number
Steering column
U-joints / slip
jointGC/LB NLGI #2
lithium
complex-based
moly grease or
multi-purpose
lithium complex
grease— Motorcraft
Premium Long
Life Grease /
XG-1-C
Driveshaft
U-joint GC/LB NLGI #2
lithium
complex-based
moly grease or
multi-purpose
lithium complex
grease— Motorcraft
Premium Long
Life Grease /
XG-1-C
Clutch
Release bearing
/ shafts / forkGC/LB NLGI #2
lithium
complex-based
moly grease or
multi-purpose
lithium complex
grease— Motorcraft
Premium Long
Life Grease /
XG-1-C
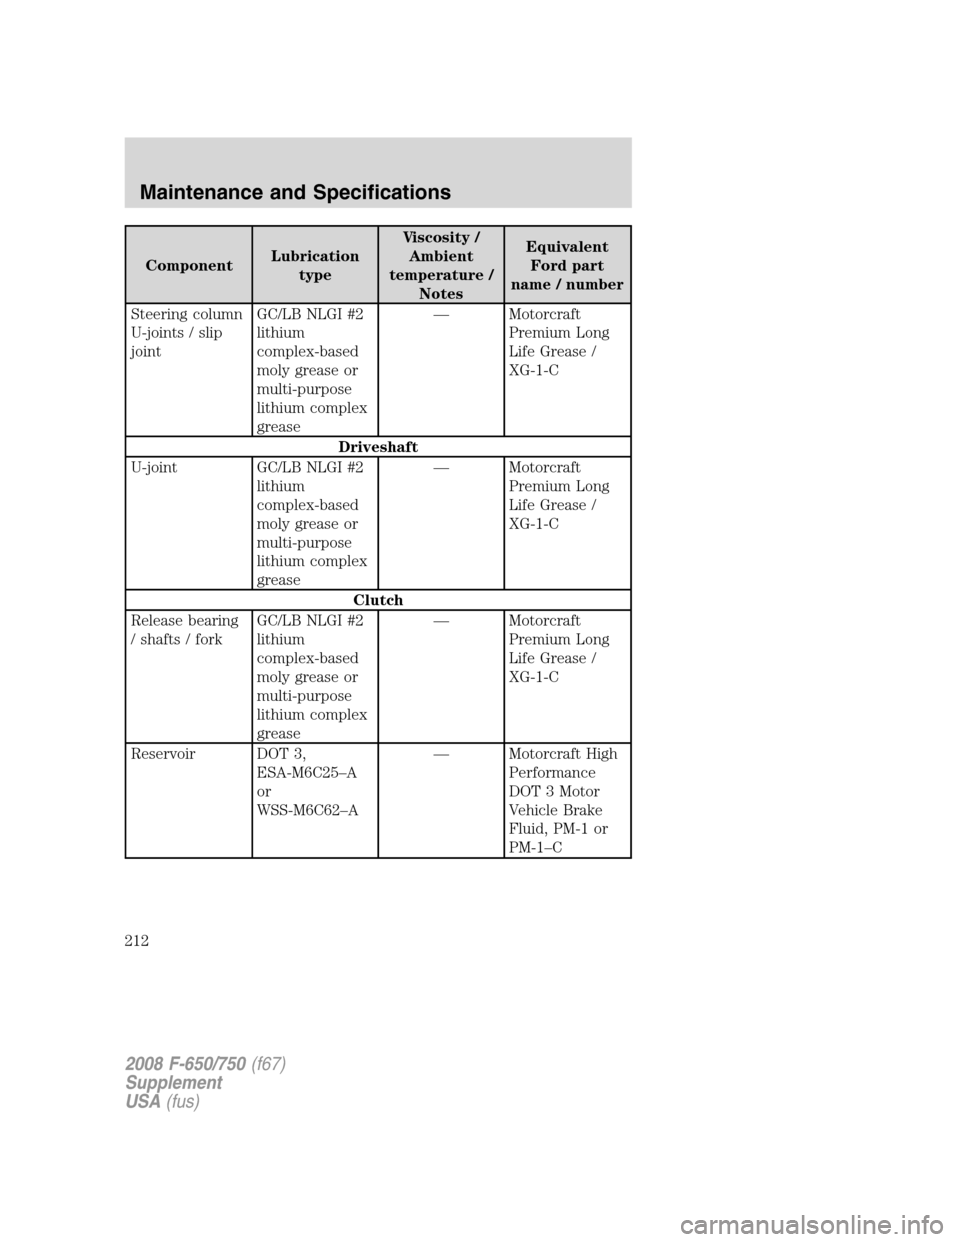
Reservoir DOT 3,
ESA-M6C25–A
or
WSS-M6C62–A— Motorcraft High
Performance
DOT 3 Motor
Vehicle Brake
Fluid, PM-1 or
PM-1–C
2008 F-650/750(f67)
Supplement
USA(fus)
Maintenance and Specifications
212
Page 223 of 273

ComponentLubrication
typeViscosity /
Ambient
temperature /
NotesEquivalent
Ford part
name / number
Door window
regulatorsNGLI #2
multipurpose
lithium complex
grease— Motorcraft
Multi-Purpose
Grease Spray /
XL-5 or
Motorcraft
Multi-Purpose
Grease / XG-4
Weatherstripping Silicone
lubricant— Motorcraft
Silicone Spray /
XL-6
Engine oil
Refer to engine operator manual
Brake fluid
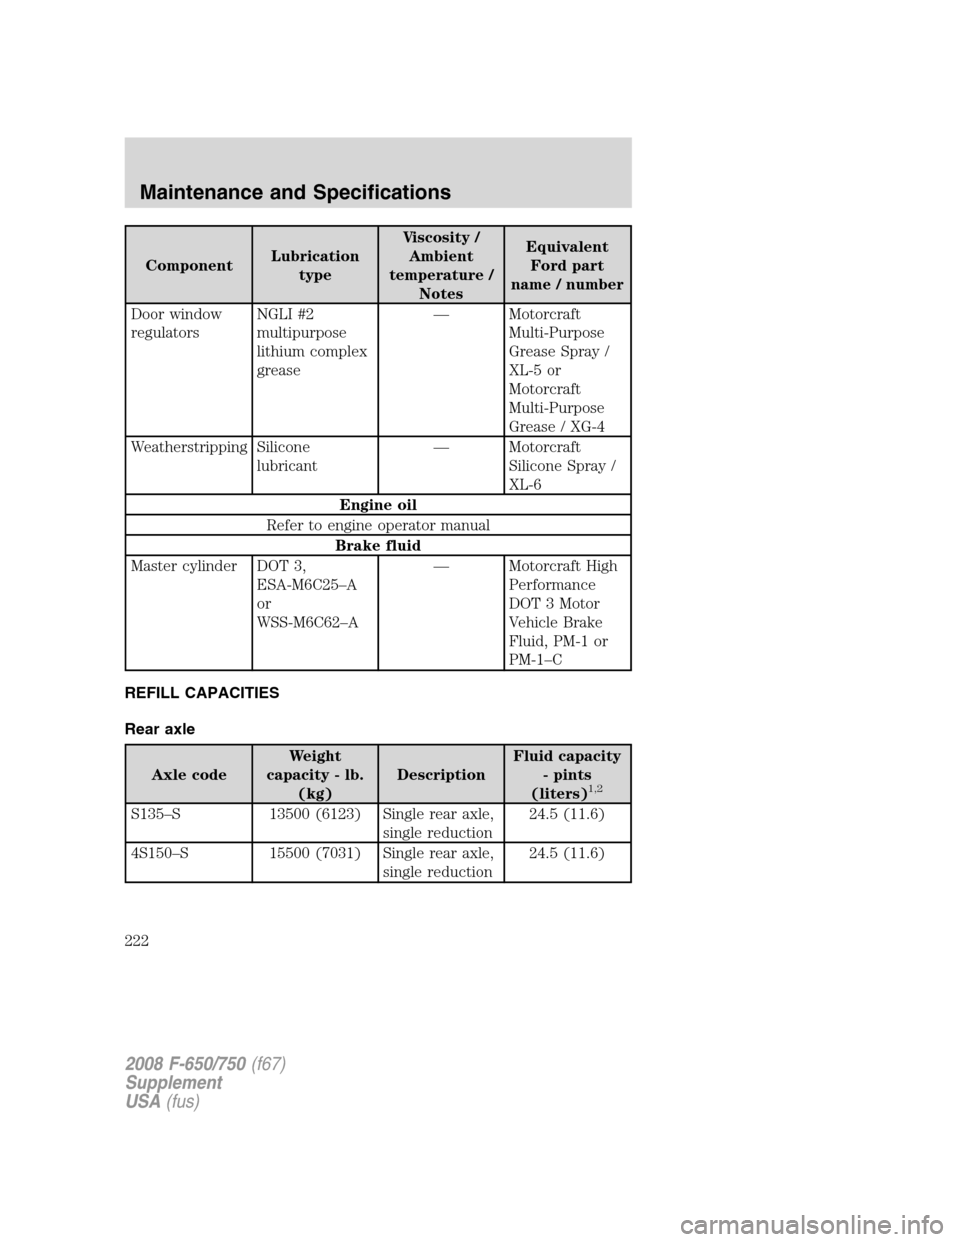
Master cylinder DOT 3,
ESA-M6C25–A
or
WSS-M6C62–A— Motorcraft High
Performance
DOT 3 Motor
Vehicle Brake
Fluid, PM-1 or
PM-1–C
REFILL CAPACITIES
Rear axle
Axle codeWeight
capacity - lb.
(kg)DescriptionFluid capacity
- pints
(liters)1,2
S135–S 13500 (6123) Single rear axle,
single reduction24.5 (11.6)
4S150–S 15500 (7031) Single rear axle,
single reduction24.5 (11.6)
2008 F-650/750(f67)
Supplement
USA(fus)
Maintenance and Specifications
222