2008 FORD F650 belt
[x] Cancel search: beltPage 84 of 273

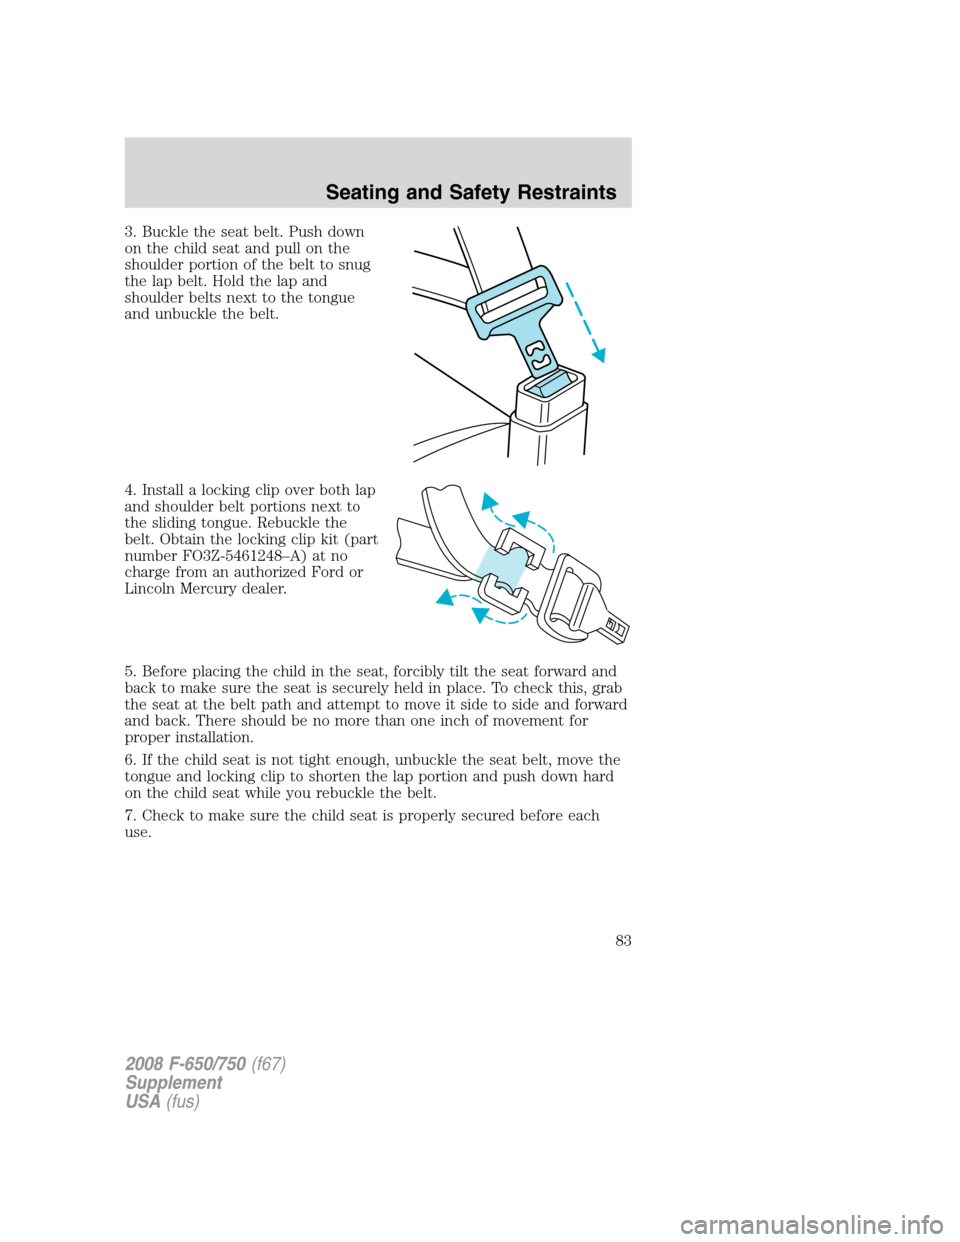
3. Buckle the seat belt. Push down
on the child seat and pull on the
shoulder portion of the belt to snug
the lap belt. Hold the lap and
shoulder belts next to the tongue
and unbuckle the belt.
4. Install a locking clip over both lap
and shoulder belt portions next to
the sliding tongue. Rebuckle the
belt. Obtain the locking clip kit (part
number FO3Z-5461248–A) at no
charge from an authorized Ford or
Lincoln Mercury dealer.
5. Before placing the child in the seat, forcibly tilt the seat forward and
back to make sure the seat is securely held in place. To check this, grab
the seat at the belt path and attempt to move it side to side and forward
and back. There should be no more than one inch of movement for
proper installation.
6. If the child seat is not tight enough, unbuckle the seat belt, move the
tongue and locking clip to shorten the lap portion and push down hard
on the child seat while you rebuckle the belt.
7. Check to make sure the child seat is properly secured before each
use.
2008 F-650/750(f67)
Supplement
USA(fus)
Seating and Safety Restraints
83
Page 145 of 273

4. Make the final connection of the negative (-) cable to an exposed
metal part of the stalled vehicle’s engine, away from the battery and the
carburetor/fuel injection system.Do notuse fuel lines, engine rocker
covers or the intake manifold asgroundingpoints.
Do not connect the end of the second cable to the negative (-)
terminal of the battery to be jumped. A spark may cause an
explosion of the gases that surround the battery.
5. Ensure that the cables are clear of fan blades, belts, moving parts of
both engines, or any fuel delivery system parts.
Jump starting
1. Start the engine of the booster vehicle and run the engine at
moderately increased speed.
2. Start the engine of the disabled vehicle.
3. Once the disabled vehicle has been started, run both engines for an
additional three minutes before disconnecting the jumper cables.
+–+–
2008 F-650/750(f67)
Supplement
USA(fus)
Roadside Emergencies
144
Page 158 of 273

•For routine cleaning, use Motorcraft Detail Wash (ZC-3–A).
•If tar or grease spots are present, use Motorcraft Bug and Tar
Remover (ZC-42).
WINDOWS AND WIPER BLADES
The windshield, rear and side windows and the wiper blades should be
cleaned regularly. If the wipers do not wipe properly, substances on the
vehicle’s glass or the wiper blades may be the cause. These may include
hot wax treatments used by commercial car washes, tree sap, or other
organic contamination. To clean these items, please follow these tips:
•The windshield, rear windows and side windows may be cleaned with
a non-abrasive cleaner such as Motorcraft Ultra Clear Spray Glass
Cleaner (ZC-23), available from your dealer.
•Do not use abrasives, as they may cause scratches.
•Do not use fuel, kerosene, or paint thinner to clean any parts.
•Wiper blades can be cleaned with isopropyl (rubbing) alcohol or
windshield washer solution. Be sure to replace wiper blades when they
appear worn or do not function properly.
INSTRUMENT PANEL AND CLUSTER LENS
Clean the instrument panel with a damp cloth, then dry with a dry cloth.
•Avoid cleaners or polish that increase the gloss of the upper portion of
the instrument panel. The dull finish in this area helps protect the
driver from undesirable windshield reflection.
•Be certain to wash or wipe your hands clean if you have been in
contact with certain products such as insect repellent and suntan
lotion in order to avoid possible damage to the painted surfaces.
INTERIOR TRIM
•Clean the interior trim areas with a damp cloth, then dry by wiping
with a dry, soft, clean cloth.
•Do not use household or glass cleaners as these may damage the
finish.
INTERIOR
For fabric, carpets, cloth seats and safety belts:
•Remove dust and loose dirt with a vacuum cleaner.
•Remove light stains and soil with Motorcraft Professional Strength
Carpet and Upholstery Cleaner (ZC-54).
2008 F-650/750(f67)
Supplement
USA(fus)
Cleaning
157
Page 159 of 273

•If grease or tar is present on the material, spot-clean the area first
with Motorcraft Spot and Stain Remover (ZC-14).
•Never saturate the seat covers with cleaning solution.
•Do not use household cleaning products or glass cleaners, which can
stain and discolor the fabric and affect the flame retardant abilities of
the seat materials.
Do not use cleaning solvents, bleach or dye on the vehicle’s seat
belts, as these actions may weaken the belt webbing.
LEATHER SEATS (IF EQUIPPED)
Your leather seating surfaces have a clear, protective coating over the
leather.
•To clean, use a soft cloth with Motorcraft Deluxe Leather and Vinyl
Cleaner (ZC-11–A). Dry the area with a soft cloth.
•To help maintain its resiliency and color, use the Motorcraft Deluxe
Leather Care Kit (ZC-11–D), available from your authorized dealer.
•Do not use household cleaning products, alcohol solutions, solvents or
cleaners intended for rubber, vinyl and plastics, or oil/petroleum-based
leather conditioners. These products may cause premature wearing of
the clear, protective coating.
UNDERBODY
Flush the complete underside of your vehicle frequently. Keep body and
door drain holes free from packed dirt.
FORD CAR CARE PRODUCTS
Your vehicle’s dealer has many quality products available to clean your
vehicle and protect its finishes. These quality products have been
specifically engineered to fulfill your automotive needs; they are custom
designed to complement the style and appearance of your vehicle. Each
product is made from high quality materials that meet or exceed rigid
specifications. For best results, use the following products or products of
equivalent quality:
Motorcraft Bug and Tar Remover (ZC-42)
Motorcraft Car Care Kit (ZC-26)
Motorcraft Car Wash (Canada only) (CXC-21)
Motorcraft Custom Bright Metal Cleaner (ZC-15)
2008 F-650/750(f67)
Supplement
USA(fus)
Cleaning
158
Page 162 of 273

vehicle at least once a year. Remember that regular maintenance and
replacement of worn components will usually prevent serious problems
from developing later.
Making modifications to various parts, components and systems
of the vehicle, such as brake and steering systems can adversely
affect the quality, reliability and operation of your vehicle and could
result in property damage, personal injury or death. Such modifications
must be avoided.
The lubrication intervals present a good opportunity to inspect the
vehicle. It is suggested that the various points listed herein be checked
at the lubrication or other recommended intervals.
Failure to properly perform maintenance and servicing
procedures could result in vehicle damage, personal injury or
death.
If the owner/operator of the vehicle is a skilled technician and intends on
performing the vehicle maintenance and service, he is strongly urged to
purchase a service manual.
Take care when performing any maintenance, system check or
service on your vehicle. Some of the materials may also be
hazardous if used, serviced or handled improperly and could result in
property damage, personal injury or death.
Air conditioning system checks
Have your air conditioning system checked each spring. The refrigerant
charge, cleanliness of the condenser-evaporator cores and belt condition
are essential to air conditioning performance.
When the air conditioning system is being used daily, remove the fresh
air filter (if equipped) once each season and check for dirt, lint, etc.
Replace the filter if necessary. Vehicles operating in unusually dusty
conditions may require inspecting and replacing the fresh air filter more
often.
Front axle - general service information
Maintaining the front axle alignment to specifications is very important
and should only be performed by a qualified technician. Toe-in
adjustment is particularly important with radial tires.
2008 F-650/750(f67)
Supplement
USA(fus)
Maintenance and Specifications
161
Page 206 of 273

Tires should be properly inflated to manufacturers recommended
pressure for the size and service load in which the vehicle is being used.
Refer to the tire manufacturer in which your vehicle is equipped for the
latest information concerning service load and inflation pressure.
It is particularly important to keep moisture from the inside of tires, and
proper selection of air compressor equipment, proper air line routing,
and the use of shop air dryers is strongly recommended to avoid
moisture in the high pressure air used for tire inflation.
Under-inflation
Tires should not be permitted to become under-inflated. Increased
flexing due to under-inflation causes heat build-up within the tire
components. This leads to reduced strength, breakdown of the rubber
compounds, and possible separation of the tire components (i.e., ply and
tread separation and reduced retreadability).
Under-inflation is the primary cause of premature tire concerns including
sudden loss of air. In addition, low inflation causes an increase in rolling
resistance. This results in reduced fuel mileage, a loss in tread mileage,
and uneven wear due to increased tread movement. To determine proper
inflation refer to the tire manufacturer load/inflation guide which can be
found on the tire manufacturer website or at your local truck tire dealer.
Inspection
Check condition of tires for abnormal wear patterns, and proper inflation
pressures. Cut or broken tire casing must be repaired or replaced.
Tires should be inspected for the following conditions. If any are present,
the tire should be removed and repaired, retreaded or scrapped as the
condition indicates.
•Any blister, bump or raised portion anywhere on the surface of the
tire tread or sidewall (other than a bump made by a repair). These
indicate the start of internal separation.
•Any cut that reaches to the belt or ply cords, or any cut that is large
enough to grow in size and depth.
•Any nail or puncturing object.
•If any stone or object is held by a tread groove and is starting to drill
into the tread base, remove the object.
Proper tire inflation, toe-in adjustment, loads, and road speeds are
important factors governing tire mileage, steering ease and
maneuverability.
2008 F-650/750(f67)
Supplement
USA(fus)
Maintenance and Specifications
205
Page 208 of 273

If rib tire is used on front axle and lug or off-road type on rear axle
positions:
1.Front (Steering) Axle:Replace tires at front wheels when tread is
worn to 4/32 inch (3 mm) or less.
2.Rear Axles:Tires must be removed when the tread is worn to
2/32 inch (2 mm) or less. Tires identified with the word “re-groovable”
molded on the sidewall can be re-grooved. A minimum of 3/32 inch
(2.5 mm) of under-tread must be left at the bottom of the grooves.
Wheel and tire balancing
Out-of-round or out-of-balance wheels or tires can cause vehicle
vibration, bounce and shimmy. Replace damaged or out-of-round wheels.
Out-of-round tires and wheel assemblies can be corrected by re-clocking
the tire relative to the wheel.
The tire and wheel assembly should then be dynamically balanced.
Wear
Radial tires can exhibit three types of normal wear patterns: 1) Even,
2) Erosion, 3) Chamfer.
Even wearis a sign that the tire is being properly used and maintained.
Erosion wearhas also been called rolling wear, channel or river wear.
Erosion wear is found more often at free rolling tires. This is an
indication that the tire is being used in a slow wearing operation. What
happens is that the belt plies are held very rigid and the tread is not
allowed to distort as it passes through the contact area. Wear will only
occur at the edge of the tread. No corrective action required. If erosion
gets to be 1/16 inch (2 mm) or more, the tire may be rotated to a drive
axle.
Chamfer or shoulder wear,with tires inflated properly, is a normal
tendency of most radial tire designs. If both inside and outside shoulders
are wearing evenly around the tire, no further action is required.
Over-inflation is not effective in correcting this effect.
Tires: Irregular Wear
If irregular wear is present, check the axle alignment, tire pressure,
wheel balancing, shock and suspension component condition, and wheel
bearing end play.
This condition not only shortens tire life, but will adversely affect the
handling of your vehicle, which is dangerous.
2008 F-650/750(f67)
Supplement
USA(fus)
Maintenance and Specifications
207
Page 237 of 273

Check every oil change
Engine systemCheck the engine cooling system -
hoses, clamps and protection*.
Inspect the drive belts.
Exhaust systemInspect the entire exhaust system
(including the inlet pipe(s),
muffler(s), outlet pipe(s), clamps and
fasteners) for holes, leakage,
breakage, corrosive damage and
separation from other components.
Adjust, service or replace with the
same or the equivalent part. (Also a
noise emission control service).
Suspension systemTighten the front and rear spring
U-bolts to the specified torque.
Driveline and rear axle
systemLubricate the U-joints and the slip
yoke.
Brake systemLube the air brake foot control valve,
hinge and roller.
Inspect the drum brake linings
through the inspection holes.
Lubricate the brake camshafts (air
brakes only).
Lubricate the brake slack adjuster (air
brakes only).
Lubricate rear caliper slide rails.
Inspect the disc brake pads and the
piston boots (hydraulic brakes only).
Clutch systemLubricate the clutch release cross
shaft and all linkages.
Check the clutch fluid.
Fuel systemDrain the accumulated water or
sediment from the fuel tank(s).
2008 F-650/750(f67)
Supplement
USA(fus)
Scheduled Maintenance Guide
236