2008 FORD F350 rear view mirror
[x] Cancel search: rear view mirrorPage 81 of 400

•DATC with heated seats and heated mirrors
Temperature conversion:To switch between Fahrenheit and Celsius,
refer toUnits (English/Metric)under eitherStandard Message Center
orOptional Message Centerin theDriver Controlschapter
In order to achieve maximum cooling performance, press
, A/C,,
and set the temperature to 60°F (16°C) and the highest blower setting.
1.
Defrost:Distributes outside air through the windshield defroster
and demister vents. Can be used to clear thin ice or fog from the
windshield. To exit
select another mode.
2.Passenger temperature control:Press to increase/decrease the
passenger side temperature in the vehicle cabin.
3A.Dual:(Single/dual electric temperature control): Allows the driver to
have full control of the cabin temperature settings (single zone) or
allows the passenger to have control of their individual temperature
settings (dual zone control). Press to turn on dual zone mode, press
again to return to single zone.
3B.
Heated mirrors:Press to defrost the outside rear view
mirrors. The heated mirrors will turn off after 10 minutes or can be
turned off by pressing the button again. Refer toPower mirrorsin the
Driver Controlschapter for more information.
2008 F-250/350/450/550(f23)
Owners Guide (post-2002-fmt)
USA(fus)
Climate Controls
81
ProCarManuals.com
Page 103 of 400

When closing the power windows, you should verify they are free
of obstructions and ensure that children and/or pets are not in
the proximity of the window openings.
If your vehicle is equipped with a
power rear slide window, the switch
is located on the instrument panel
behind the right-hand side of the
steering wheel.
•Press the right side of the control
to open the window.
•Pull the right side of the control
to close the window.
Window lock (if equipped)
The window lock feature allows only
the driver to operate the power
windows.
To lock out all the window controls
except for the driver’s, press the
right side of the control. Press the
left side to restore the window
controls.
Accessory delay (if equipped)
With accessory delay, the window switches may be used for up to ten
minutes after the ignition switch is turned to the OFF position or until
any front door is opened.
INTERIOR MIRRORS
The interior rear view mirror has two pivot points on the support arm
which lets you adjust the mirror UP or DOWN and from SIDE to SIDE.
Do not adjust the mirror while the vehicle is in motion.
2008 F-250/350/450/550(f23)
Owners Guide (post-2002-fmt)
USA(fus)
Driver Controls
103
ProCarManuals.com
Page 104 of 400

Automatic dimming inside rear view mirror (if equipped)
Your vehicle may be equipped with
an inside rear view mirror which has
an auto-dimming function. The
electronic day/night mirror will
change from the normal (high
reflective) state to the non-glare
(darkened) state when bright lights (glare) reach the mirror. When the
mirror detects bright light from behind the vehicle, it will automatically
adjust (darken) to minimize glare.
The mirror will automatically return to the normal state whenever the
vehicle is placed in R (Reverse) (when the mirror is on) to ensure a
bright clear view when backing up.
Do not block the sensors on the front and back of the inside rear
view mirror since this may impair proper mirror performance.
Do not clean the housing or glass of any mirror with harsh
abrasives, fuel or other petroleum-based cleaning products.
Note:If equipped with a Reverse Camera System (RCS), a video image
will display in the mirror when the vehicle is put in (R) Reverse. Refer to
Reverse Camera System (RCS)in theDrivingchapter.
POWER SIDE VIEW MIRRORS (IF EQUIPPED)
To adjust your mirrors:
1. Rotate the control clockwise to
adjust the right mirror and rotate
the control counterclockwise to
adjust the left mirror.
2. Move the control in the direction
you wish to tilt the mirror.
3. Return to the center position to lock mirrors in place.
The spotter mirror below the main glass (if equipped) must be adjusted
manually.
2008 F-250/350/450/550(f23)
Owners Guide (post-2002-fmt)
USA(fus)
Driver Controls
104
ProCarManuals.com
Page 107 of 400

Note:If the power fold/telescope mirror glass appears loose or vibrates
when driving, it is possible that the mirrors have been manually folded or
telescoped. To minimize the vibration, ensure that the mirrors are
electronically folded and telescoped in/out with the switches on the door
trim panel.
Telescoping mirrors (if equipped)
The telescoping feature allows the
mirror to extend approximately 2.75
inches (70 mm). This feature is
especially useful to the driver when
towing a trailer. Mirrors can be
manually pulled out or pushed in to
the desired telescopic position.
If equipped with power telescoping
mirrors, you can simultaneously
position both mirrors using the
power telescope switch found on
the door trim panel.
•To telescope the mirrors
outboard, press and hold the left
side of the power telescope
switch until the mirrors reach their desired position. When the end of
travel is reached, it is normal to hear the power telescoping motors
running as long as you continue to hold the switch.
•To telescope the mirrors inboard, press and hold the right side of the
power telescope switch until the mirrors reach their desired position.
Memory mirrors (if equipped)
This system allows automatic positioning of the outside rearview mirrors.
For more information on this feature, refer toMemory seats/power
mirrors/adjustable pedalsin theSeating and Safety Restraints
chapter.
2008 F-250/350/450/550(f23)
Owners Guide (post-2002-fmt)
USA(fus)
Driver Controls
107
ProCarManuals.com
Page 251 of 400

Driving while you tow
When towing a trailer:
•Do not drive faster than 70 mph (113 km/h) during the first 500 miles
(800 km) of trailer towing and don’t make full-throttle starts.
•Turn off the speed control. The speed control may shut off
automatically when you are towing on long, steep grades.
•Consult your local motor vehicle speed regulations for towing a trailer.
•To eliminate excessive transmission shifting, activate the Tow/Haul
feature. This will also assist in transmission cooling. (For additional
information, refer to theUnderstanding the shift positions of the
5–speed automatic transmissionsection in theDrivingchapter.
•Anticipate stops and brake gradually.
•Do not exceed the GCWR rating or transmission damage may occur.
•Your vehicle may be equipped with a temporary or conventional spare
tire. If the spare tire is different in size (diameter and/or width), tread
type (All-Season or All-Terrain) or is from a different manufacturer
other than the road tires on your vehicle, your spare tire is considered
“temporary”. Consult information on the spare Tire Label or Safety
Compliance Certification Label for limitations when using.
Servicing after towing
If you tow a trailer for long distances, your vehicle will require more
frequent service intervals. Refer to yourscheduled maintenance
informationfor more information.
Trailer towing safety tips
General
•Ensure that the trailer, safety chains and 7–pin electrical connectors
are securely fastened.
•Make sure the truck receiver, draw bar, and coupler are properly
connected and adjusted.
•Check rear view and side mirrors for proper visibility especially when
towing trailer wider than the truck.
•When towing, operate the vehicle at lower speeds than you would
when not towing a trailer. The likelihood of trailer sway is greater at
higher speeds.
2008 F-250/350/450/550(f23)
Owners Guide (post-2002-fmt)
USA(fus)
Tires, Wheels and Loading
251
ProCarManuals.com
Page 274 of 400

If your vehicle sustains damage to the rear bumper/fascia, leaving
it misaligned or bent, the sensing zone may be altered causing
inaccurate measurement of obstacles or false alarms.
REVERSE CAMERA SYSTEM (IF EQUIPPED)
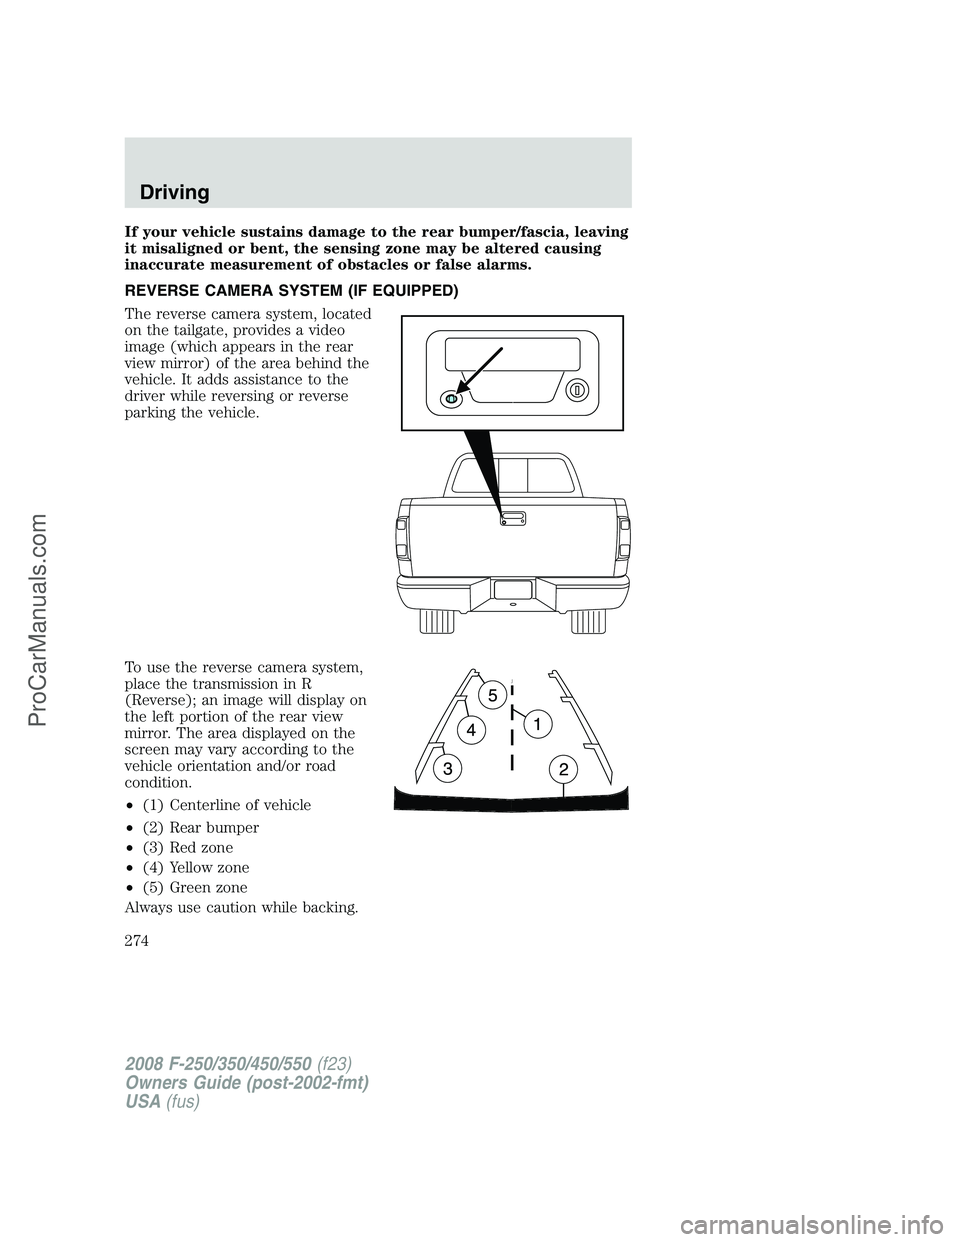
The reverse camera system, located
on the tailgate, provides a video
image (which appears in the rear
view mirror) of the area behind the
vehicle. It adds assistance to the
driver while reversing or reverse
parking the vehicle.
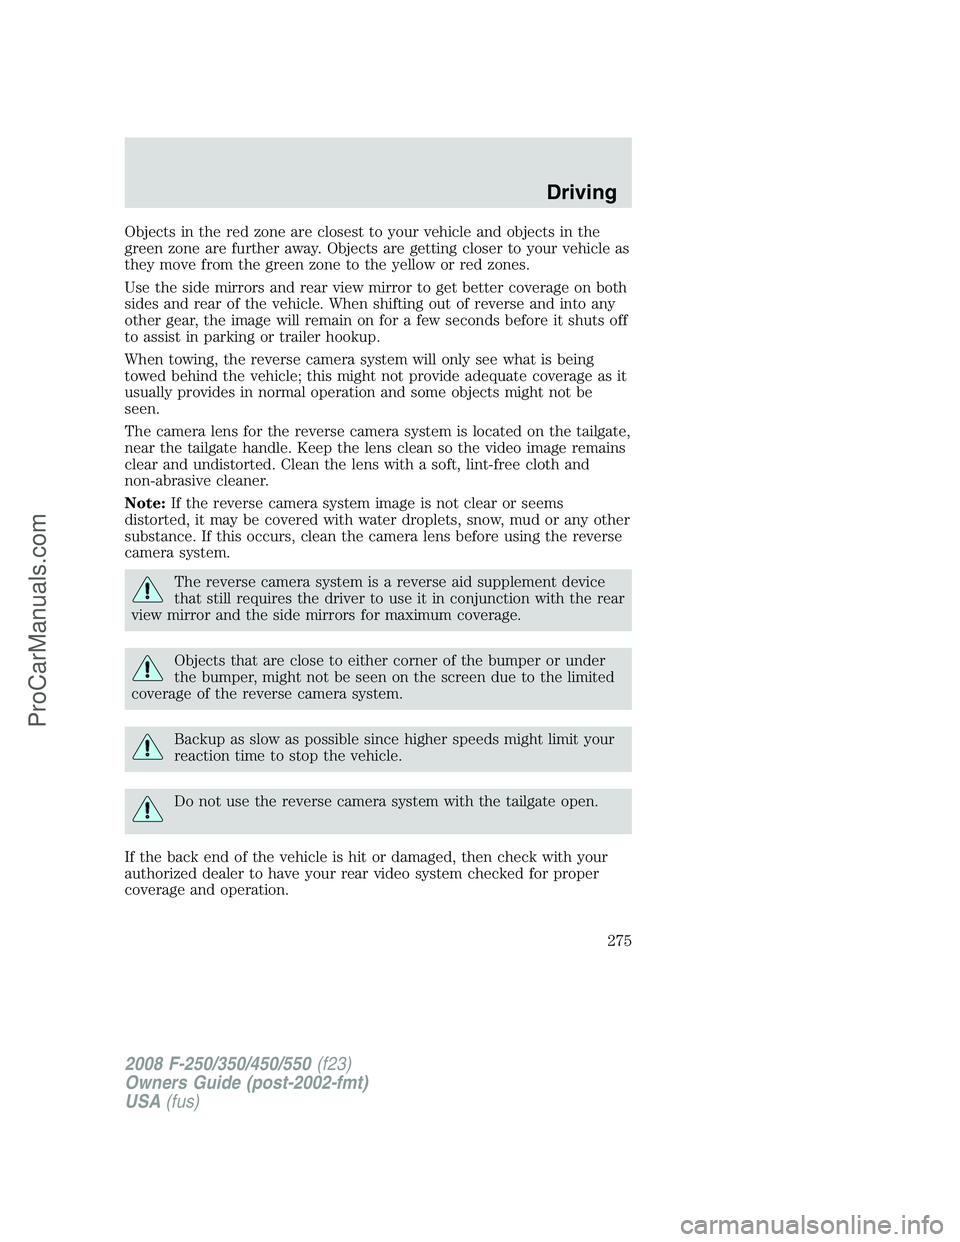
To use the reverse camera system,
place the transmission in R
(Reverse); an image will display on
the left portion of the rear view
mirror. The area displayed on the
screen may vary according to the
vehicle orientation and/or road
condition.
•(1) Centerline of vehicle
•(2) Rear bumper
•(3) Red zone
•(4) Yellow zone
•(5) Green zone
Always use caution while backing.
2008 F-250/350/450/550(f23)
Owners Guide (post-2002-fmt)
USA(fus)
Driving
274
ProCarManuals.com
Page 275 of 400

Objects in the red zone are closest to your vehicle and objects in the
green zone are further away. Objects are getting closer to your vehicle as
they move from the green zone to the yellow or red zones.
Use the side mirrors and rear view mirror to get better coverage on both
sides and rear of the vehicle. When shifting out of reverse and into any
other gear, the image will remain on for a few seconds before it shuts off
to assist in parking or trailer hookup.
When towing, the reverse camera system will only see what is being
towed behind the vehicle; this might not provide adequate coverage as it
usually provides in normal operation and some objects might not be
seen.
The camera lens for the reverse camera system is located on the tailgate,
near the tailgate handle. Keep the lens clean so the video image remains
clear and undistorted. Clean the lens with a soft, lint-free cloth and
non-abrasive cleaner.
Note:If the reverse camera system image is not clear or seems
distorted, it may be covered with water droplets, snow, mud or any other
substance. If this occurs, clean the camera lens before using the reverse
camera system.
The reverse camera system is a reverse aid supplement device
that still requires the driver to use it in conjunction with the rear
view mirror and the side mirrors for maximum coverage.
Objects that are close to either corner of the bumper or under
the bumper, might not be seen on the screen due to the limited
coverage of the reverse camera system.
Backup as slow as possible since higher speeds might limit your
reaction time to stop the vehicle.
Do not use the reverse camera system with the tailgate open.
If the back end of the vehicle is hit or damaged, then check with your
authorized dealer to have your rear video system checked for proper
coverage and operation.
2008 F-250/350/450/550(f23)
Owners Guide (post-2002-fmt)
USA(fus)
Driving
275
ProCarManuals.com
Page 276 of 400

Nighttime and dark area use
At night time or in dark areas, the reverse camera system relies on the
reverse lamp lighting to produce an image. Therefore it is necessary that
both reverse lamps are operating in order to get a clear image in the
dark. If either of the lamps are not operating, stop using the reverse
camera system, at least in the dark, until the lamp(s) are replaced and
functioning.
Servicing
•If the vehicle is in R (Reverse) and the screen in the rear view mirror
appears blue for three seconds and turns blank afterwards, the camera
is not working properly; have the system inspected by your authorized
dealer.
•If the image comes on while the vehicle is not in R (Reverse), have
the system inspected by your authorized dealer.
•If the vehicle is in R (Reverse) and the screen is blank and no blue
screen is observed, the mirror is not working properly; have the
system inspected by your authorized dealer.
•If the image is not clear, then check if there is anything covering the
lens such as dirt, mud, ice, snow, etc. If the image is still not clear
after cleaning, have your system inspected by your authorized dealer.
FOUR-WHEEL DRIVE (4WD) OPERATION (IF EQUIPPED)
For important information regarding safe operation of this type
of vehicle, seePreparing to drive your vehiclein this chapter.
When four–wheel drive (4WD) is engaged, power is supplied to all four
wheels through a transfer case. 4WD can be selected when additional
traction is desired.
4WD operation is not recommended on dry pavement. Doing so could
result in difficult disengagement of the transfer case, increased tire wear
and decreased fuel economy.
2008 F-250/350/450/550(f23)
Owners Guide (post-2002-fmt)
USA(fus)
Driving
276
ProCarManuals.com