Page 45 of 400

4. Turn the radio on, using either a tuned FM station or a CD loaded into
the system. Adjust the volume to a comfortable listening level.
5. Turn the portable music player on and adjust the volume to 1/2 the
volume.
6. Press AUX on the vehicle radio repeatedly until LINE IN appears in
the display.
You should hear audio from your portable music player although it may
be low.
7. Adjust the sound on your portable music player until it reaches the
level of the FM station or CD by switching back and forth between the
AUX and FM or CD controls.
Troubleshooting:
1. Do not connect the audio input jack to a line level output. Line level
outputs are intended for connection to a home stereo and are not
compatible with the AIJ. The AIJ will only work correctly with devices
that have a headphone output with a volume control.
2. Do not set the portable music player’s volume level higher than is
necessary to match the volume of the CD or FM radio in your audio
system as this will cause distortion and will reduce sound quality. Many
portable music players have different output levels, so not all players
should be set at the same levels. Some players will sound best at full
volume and others will need to be set at a lower volume.
3. If the music sounds distorted at lower listening levels, turn the
portable music player volume down. If the problems persists, replace or
recharge the batteries in the portable music player.
4. The portable music player must be controlled in the same manner
when it is used with headphones as the AIJ does not provide control
(play, pause, etc.) over the attached portable music player.
5. For safety reasons, connecting or adjusting the settings on your
portable music player should not be attempted while the vehicle is
moving. Also, the portable music player should be stored in a secure
location, such as the center console or the glove box, when the vehicle is
in motion. The audio extension cable must be long enough to allow the
portable music player to be safely stored while the vehicle is in motion.
2008 F-150(f12)
Owners Guide (post-2002-fmt)
USA(fus)
Entertainment Systems
45
Page 135 of 400

Tailgate removal
Your tailgate is removable to allow more room for loading.
Note:If equipped with a Reverse Camera System (RCS), do steps 1
through 3 before removing the tailgate.
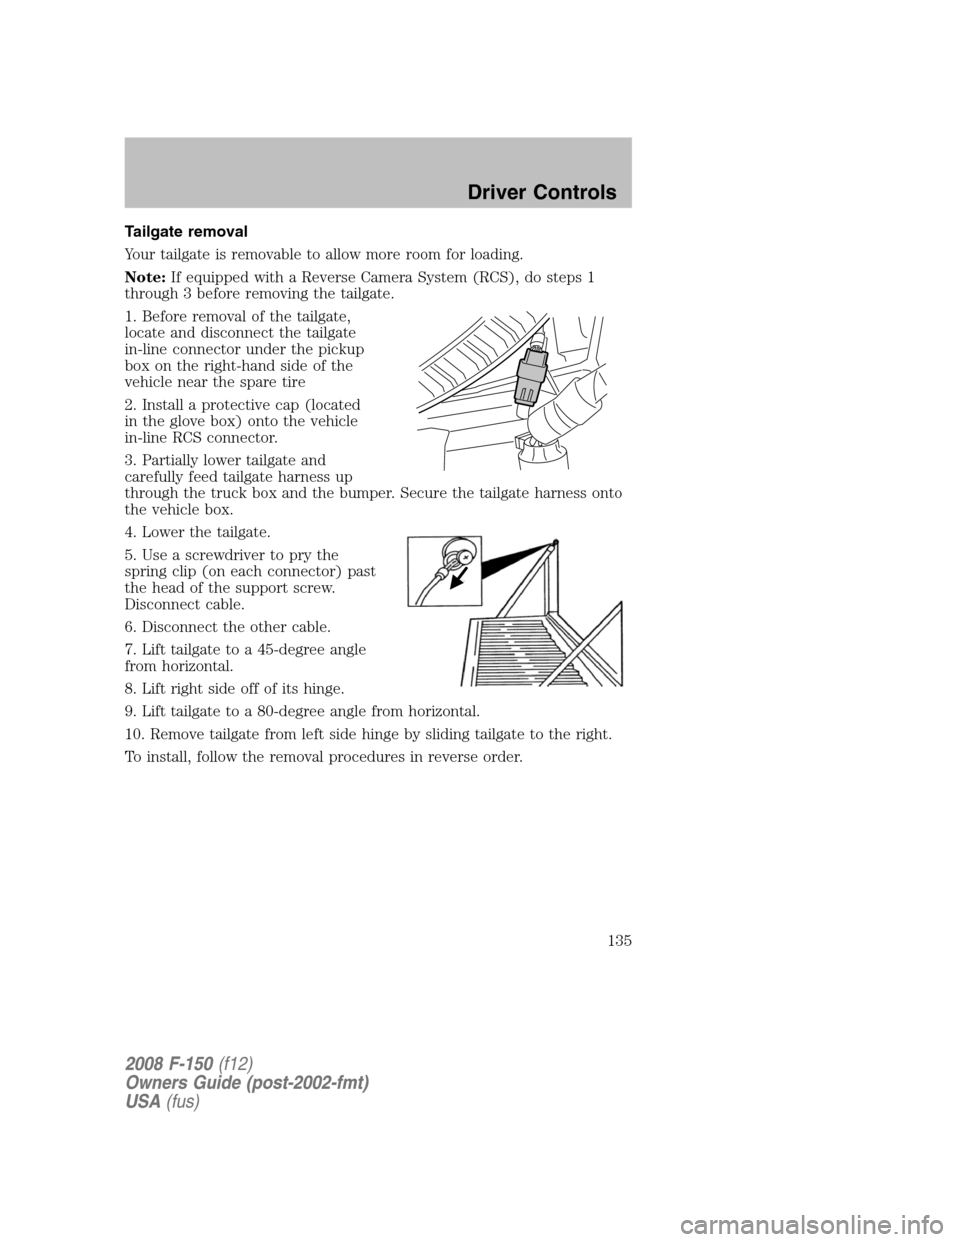
1. Before removal of the tailgate,
locate and disconnect the tailgate
in-line connector under the pickup
box on the right-hand side of the
vehicle near the spare tire
2. Install a protective cap (located
in the glove box) onto the vehicle
in-line RCS connector.
3. Partially lower tailgate and
carefully feed tailgate harness up
through the truck box and the bumper. Secure the tailgate harness onto
the vehicle box.
4. Lower the tailgate.
5. Use a screwdriver to pry the
spring clip (on each connector) past
the head of the support screw.
Disconnect cable.
6. Disconnect the other cable.
7. Lift tailgate to a 45-degree angle
from horizontal.
8. Lift right side off of its hinge.
9. Lift tailgate to a 80-degree angle from horizontal.
10. Remove tailgate from left side hinge by sliding tailgate to the right.
To install, follow the removal procedures in reverse order.
2008 F-150(f12)
Owners Guide (post-2002-fmt)
USA(fus)
Driver Controls
135
Page 153 of 400

4. Within five seconds, press thecontrol two times.Note:One horn
chirp should be heard, indicating the system has been disabled.
Conversely, a horn chirp followed by a honk will indicate the system is
enabled. Pressing the power door
control two times again will turn
the feature ON if it was previously OFF, or OFF if it was previously ON.
Every two consecutive presses of the
control after successfully
entering the configuration mode will change the enable/disable condition
of the feature.
5. Turn the ignition to the 1 (OFF/LOCK) position to exit programming.
Note:After exiting the driver configuration mode, the horn will chirp
once to indicate a feature has been activated/deactivated.
KEYLESS ENTRY SYSTEM (IF EQUIPPED)
You can use the keyless entry
keypad to:
•lock all vehicle doors.
•unlock only the driver’s door.
•unlock all vehicle doors.
•program/erase the customer keycode.
•enable/disable the autolocking feature.
The keypad can be operated with the factory set 5–digit entry code; this
code is located on the owner’s wallet card in the glove box, is marked on
the computer module, and is available from your authorized dealer. You
can also create your own 5–digit personal entry code.
When pressing the controls on the keypad, press the middle of the
controls to ensure a good activation.
Anti-scan feature
The keyless entry keypad is equipped with an anti-theft function called
“antiscan.” The antiscan feature provides a one-minute lockout feature,
where the user is unable to enter the vehicle using the keypad; this
lockout occurs when a valid entry code has not been entered by the user
within 7 attempts (35 consecutive button presses). During the lockout,
the keypad will flash and pressing the controls on the keypad will be
ignored, except for pressing the 7•8 and the 9•0 controls
simultaneously, which will still lock the vehicle.
The anti-scan feature will be turned off after:
•one minute, when the anti-scan feature times out.
2008 F-150(f12)
Owners Guide (post-2002-fmt)
USA(fus)
Locks and Security
153