2008 FORD F SERIES MOTORHOME AND COMMERCIAL CHASSIS light
[x] Cancel search: lightPage 37 of 130
13.Maximum Permissible Inflation Pressure:Indicates the tire
manufacturers’ maximum permissible pressure and/or the pressure at
which the maximum load can be carried by the tire. This pressure is
normally higher than the manufacturer’s recommended cold inflation
pressure which can be found on either the Safety Compliance
Certification Label. See the completed vehicle’s owner’s guide for the
location of the Safety Compliance Certification Label. The cold inflation
pressure should never be set lower than the recommended pressure on
the vehicle label.
The tire suppliers may have additional markings, notes or warnings such
as standard load, radial tubeless, etc.
Additional information contained on the tire sidewall for “LT” type
tires
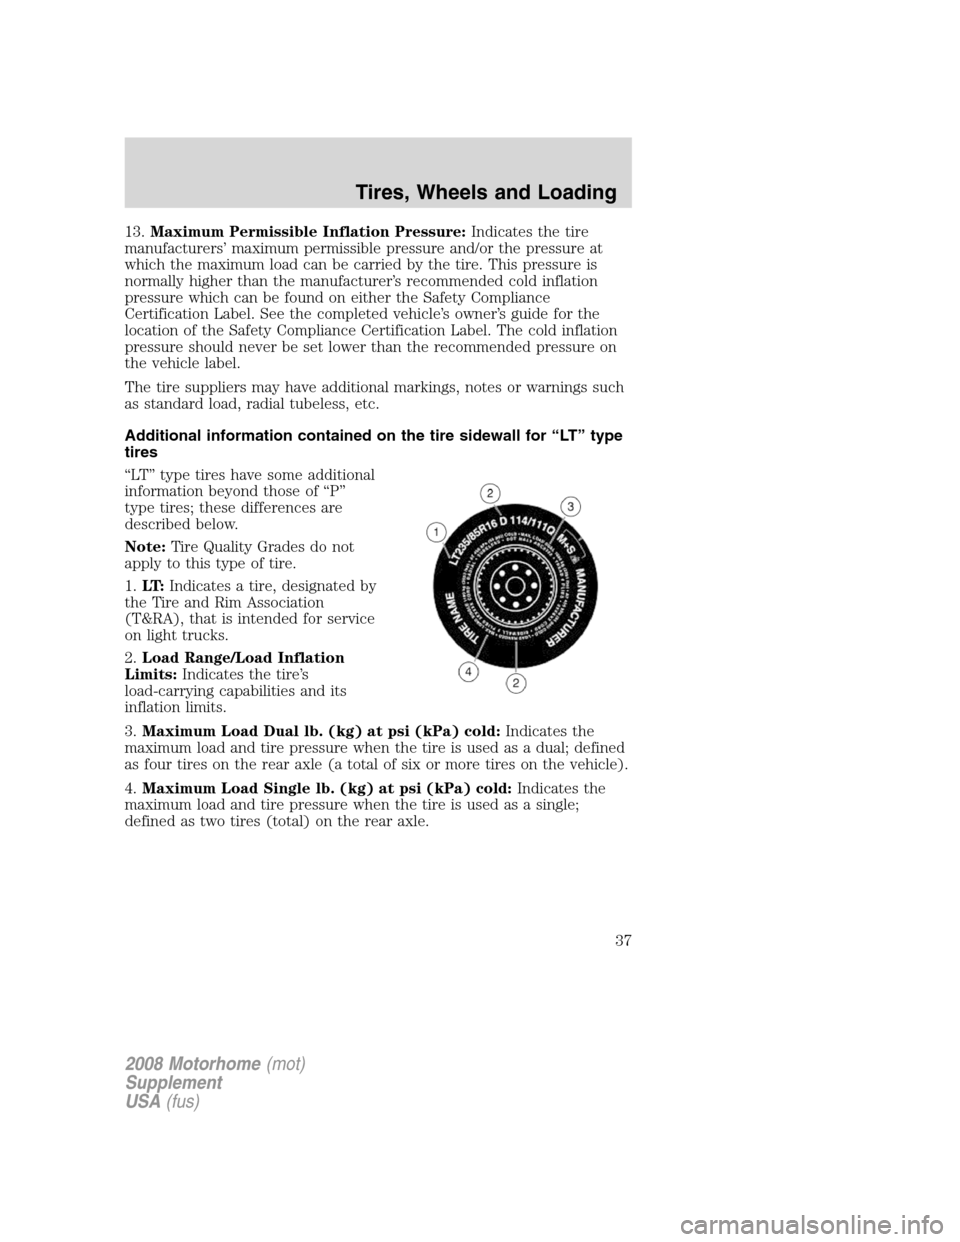
“LT” type tires have some additional
information beyond those of “P”
type tires; these differences are
described below.
Note:Tire Quality Grades do not
apply to this type of tire.
1.LT:Indicates a tire, designated by
the Tire and Rim Association
(T&RA), that is intended for service
on light trucks.
2.Load Range/Load Inflation
Limits:Indicates the tire’s
load-carrying capabilities and its
inflation limits.
3.Maximum Load Dual lb. (kg) at psi (kPa) cold:Indicates the
maximum load and tire pressure when the tire is used as a dual; defined
as four tires on the rear axle (a total of six or more tires on the vehicle).
4.Maximum Load Single lb. (kg) at psi (kPa) cold:Indicates the
maximum load and tire pressure when the tire is used as a single;
defined as two tires (total) on the rear axle.
2008 Motorhome(mot)
Supplement
USA(fus)
Tires, Wheels and Loading
37
Page 38 of 130
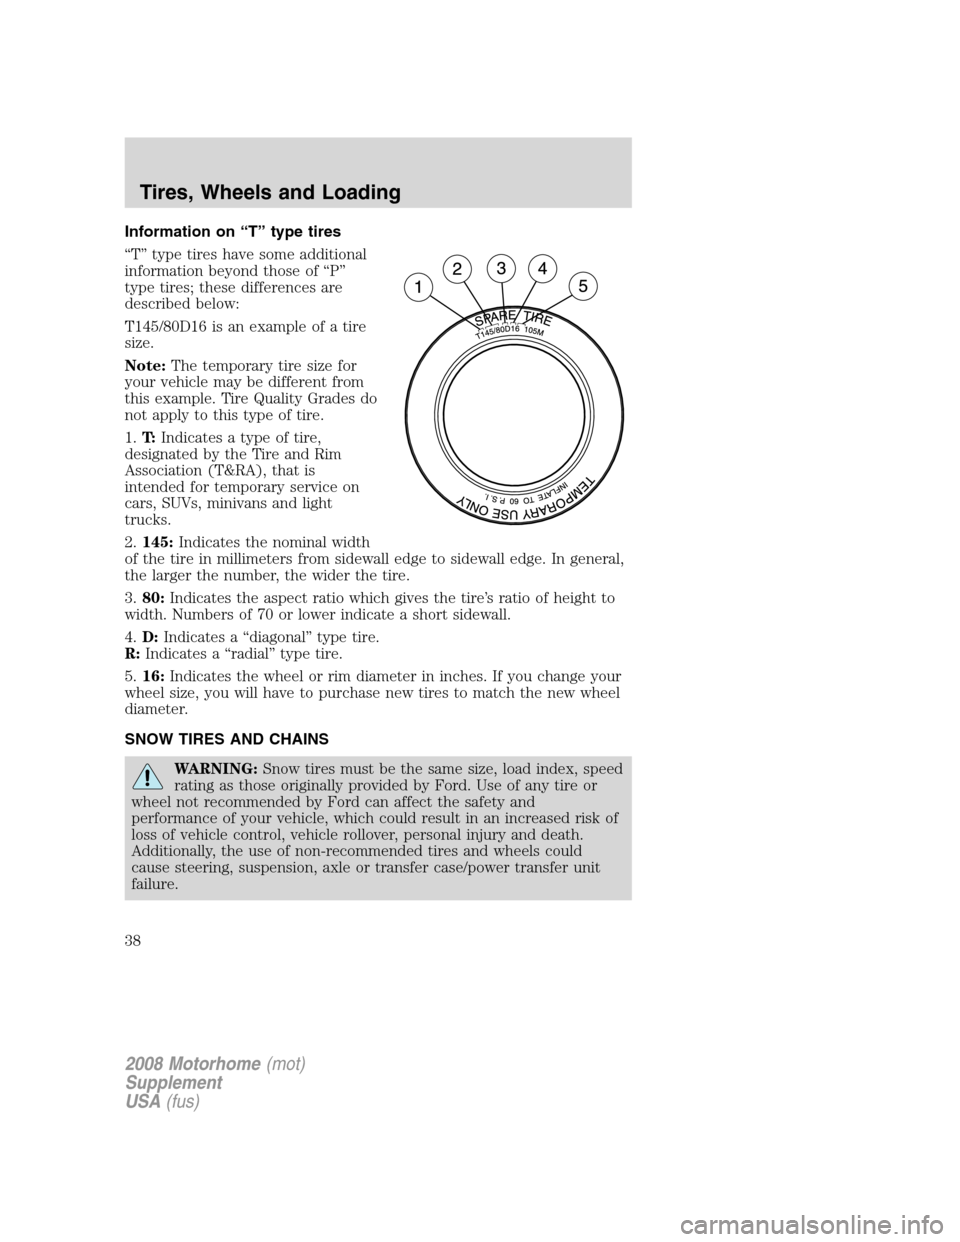
Information on “T” type tires
“T” type tires have some additional
information beyond those of “P”
type tires; these differences are
described below:
T145/80D16 is an example of a tire
size.
Note:The temporary tire size for
your vehicle may be different from
this example. Tire Quality Grades do
not apply to this type of tire.
1.T:Indicates a type of tire,
designated by the Tire and Rim
Association (T&RA), that is
intended for temporary service on
cars, SUVs, minivans and light
trucks.
2.145:Indicates the nominal width
of the tire in millimeters from sidewall edge to sidewall edge. In general,
the larger the number, the wider the tire.
3.80:Indicates the aspect ratio which gives the tire’s ratio of height to
width. Numbers of 70 or lower indicate a short sidewall.
4.D:Indicates a “diagonal” type tire.
R:Indicates a “radial” type tire.
5.16:Indicates the wheel or rim diameter in inches. If you change your
wheel size, you will have to purchase new tires to match the new wheel
diameter.
SNOW TIRES AND CHAINS
WARNING:Snow tires must be the same size, load index, speed
rating as those originally provided by Ford. Use of any tire or
wheel not recommended by Ford can affect the safety and
performance of your vehicle, which could result in an increased risk of
loss of vehicle control, vehicle rollover, personal injury and death.
Additionally, the use of non-recommended tires and wheels could
cause steering, suspension, axle or transfer case/power transfer unit
failure.
2008 Motorhome(mot)
Supplement
USA(fus)
Tires, Wheels and Loading
38
Page 46 of 130
WARNING:Do not connect a trailer’s hydraulic brake system
directly to your vehicle’s brake system. Your vehicle may not
have enough braking power and your chances of having a collision
greatly increase.
The towing vehicle braking system is rated for operation at the
GVWR, not the GCWR.
Separate functioning brake systems are required for safe control
of towed vehicles and trailers weighing more than 1500 lb.
(680 kg) when loaded.
Trailer lamps
Trailer lamps are required on most towed vehicles. Make sure all running
lights, brake lights, turn signals and hazard lights are working. See your
authorized dealer or trailer rental agency for proper instructions and
equipment for hooking up trailer lamps.
Driving while you tow
When towing a trailer:
•Keep your speed no faster than 70 mph (113 km/h) during the first
500 miles (800 km) of towing a trailer, and don’t make full throttle
starts.
•Turn off the speed control. The speed control may shut off
automatically when you are towing on long, steep grades.
•Consult your local motor vehicle speed regulations for towing a trailer.
•To eliminate excessive shifting, use a lower gear. This will also assist
in transmission cooling.
•Anticipate stops and brake gradually.
Servicing after towing
If you tow a trailer for long distances, your vehicle will require more
frequent service intervals. Refer to yourscheduled maintenance
informationfor more information.
Trailer towing tips
•Practice turning, stopping and backing up before starting on a trip to
get the feel of the vehicle trailer combination. When turning, make
wider turns so the trailer wheels will clear curbs and other obstacles.
•Allow more distance for stopping with a trailer attached.
2008 Motorhome(mot)
Supplement
USA(fus)
Tires, Wheels and Loading
46
Page 48 of 130
STARTING
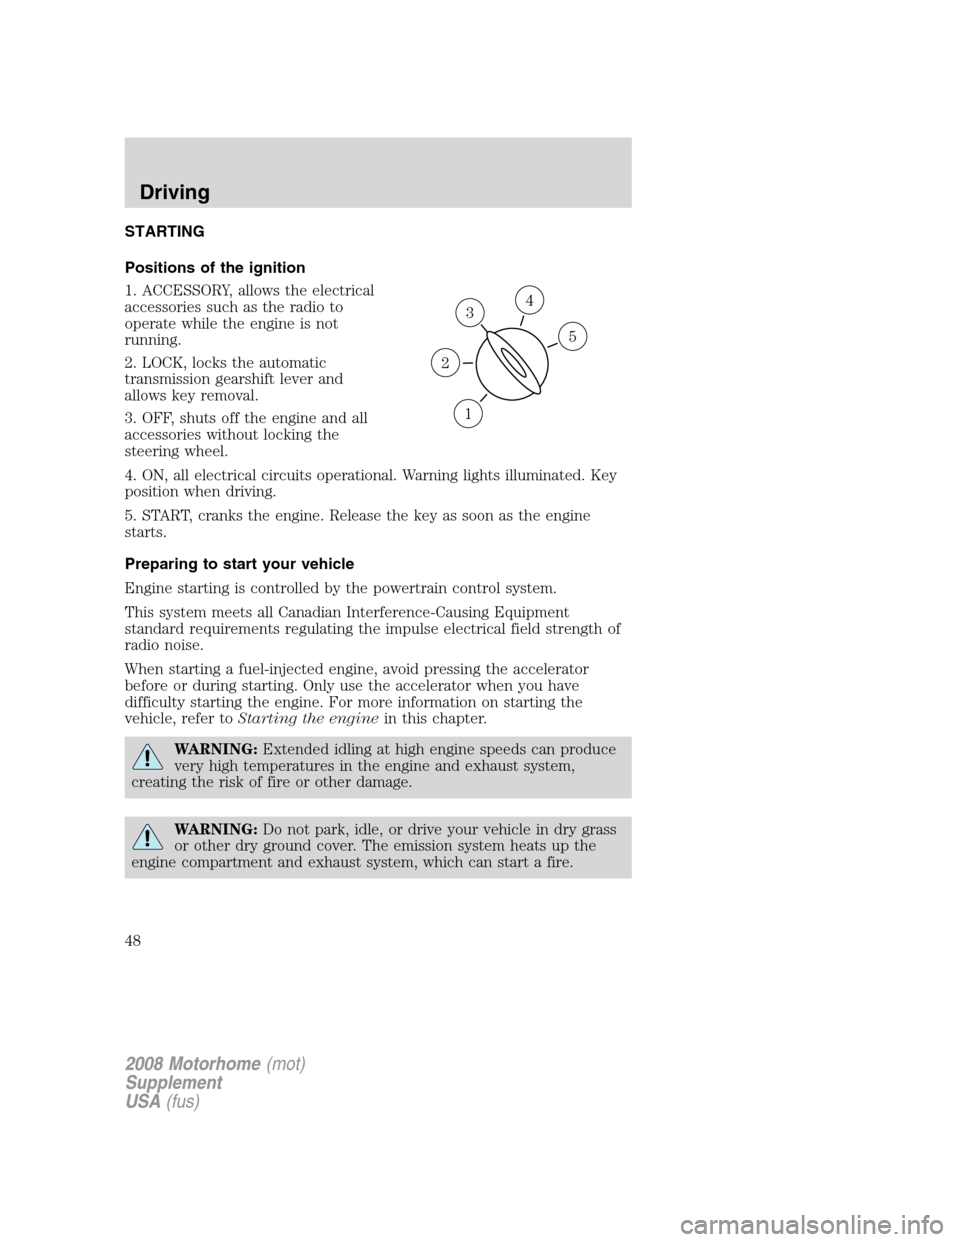
Positions of the ignition
1. ACCESSORY, allows the electrical
accessories such as the radio to
operate while the engine is not
running.
2. LOCK, locks the automatic
transmission gearshift lever and
allows key removal.
3. OFF, shuts off the engine and all
accessories without locking the
steering wheel.
4. ON, all electrical circuits operational. Warning lights illuminated. Key
position when driving.
5. START, cranks the engine. Release the key as soon as the engine
starts.
Preparing to start your vehicle
Engine starting is controlled by the powertrain control system.
This system meets all Canadian Interference-Causing Equipment
standard requirements regulating the impulse electrical field strength of
radio noise.
When starting a fuel-injected engine, avoid pressing the accelerator
before or during starting. Only use the accelerator when you have
difficulty starting the engine. For more information on starting the
vehicle, refer toStarting the enginein this chapter.
WARNING:Extended idling at high engine speeds can produce
very high temperatures in the engine and exhaust system,
creating the risk of fire or other damage.
WARNING:Do not park, idle, or drive your vehicle in dry grass
or other dry ground cover. The emission system heats up the
engine compartment and exhaust system, which can start a fire.
3
1
2
5
4
2008 Motorhome(mot)
Supplement
USA(fus)
Driving
48
Page 50 of 130
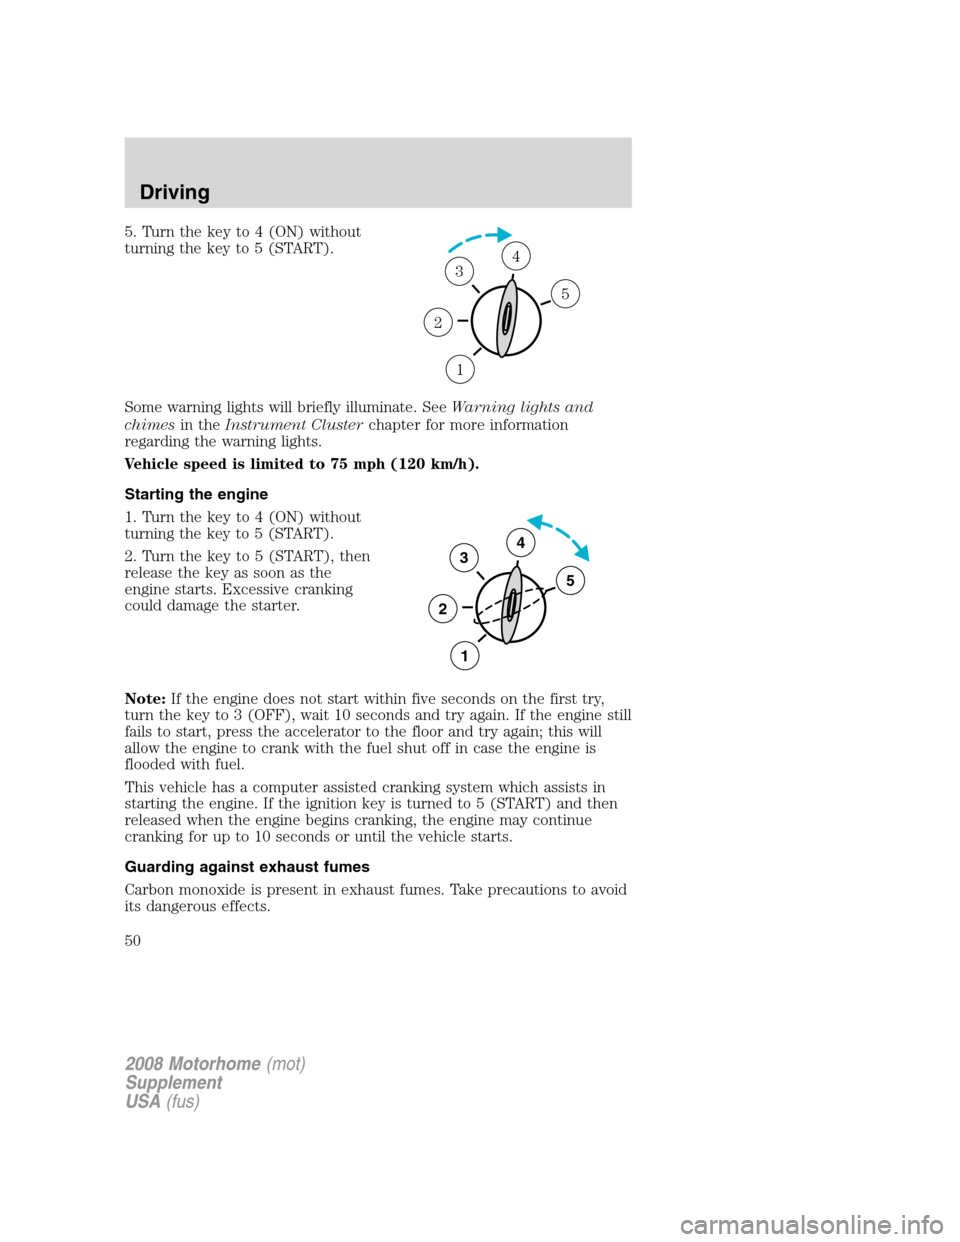
5. Turn the key to 4 (ON) without
turning the key to 5 (START).
Some warning lights will briefly illuminate. SeeWarning lights and
chimesin theInstrument Clusterchapter for more information
regarding the warning lights.
Vehicle speed is limited to 75 mph (120 km/h).
Starting the engine
1. Turn the key to 4 (ON) without
turning the key to 5 (START).
2. Turn the key to 5 (START), then
release the key as soon as the
engine starts. Excessive cranking
could damage the starter.
Note:If the engine does not start within five seconds on the first try,
turn the key to 3 (OFF), wait 10 seconds and try again. If the engine still
fails to start, press the accelerator to the floor and try again; this will
allow the engine to crank with the fuel shut off in case the engine is
flooded with fuel.
This vehicle has a computer assisted cranking system which assists in
starting the engine. If the ignition key is turned to 5 (START) and then
released when the engine begins cranking, the engine may continue
cranking for up to 10 seconds or until the vehicle starts.
Guarding against exhaust fumes
Carbon monoxide is present in exhaust fumes. Take precautions to avoid
its dangerous effects.
1
2
34
5
3
2
1
5
4
2008 Motorhome(mot)
Supplement
USA(fus)
Driving
50
Page 51 of 130
WARNING:If you smell exhaust fumes inside your vehicle, have
your dealer inspect your vehicle immediately. Do not drive if you
smell exhaust fumes.
Important ventilating information
If the engine is idling while the vehicle is stopped in an open area for
long periods of time, open the windows at least one inch (2.5 cm).
Adjust the heating or air conditioning (if equipped) to bring in fresh air.
Improve vehicle ventilation by keeping all air inlet vents clear of snow,
leaves and other debris.
BRAKES
Your service brakes are self-adjusting. Refer to thescheduled
maintenance guidefor scheduled maintenance.
Occasional brake noise is normal and often does not indicate a
performance concern with the vehicle’s brake system. In normal
operation, automotive brake systems may emit occasional or intermittent
squeal or groan noises when the brakes are applied. Such noises are
usually heard during the first few brake applications in the morning;
however, they may be heard at any time while braking and can be
aggravated by environmental conditions such as cold, heat, moisture,
road dust, salt or mud. If a “metal-to-metal,” “continuous grinding” or
“continuous squeal” sound is present while braking, the brake linings
may be worn-out and should be inspected by an authorized dealer.
Refer toBrake system warning
lightin theInstrument Cluster
chapter for information on the brake
system warning light.
WARNING:If you are driving down a long or steep hill, shift to
a lower gear. Do not apply your brakes continuously, as they may
overheat and become less effective.
Hydraulic brake booster system (Hydroboost or Hydromax)
The Hydroboost and Hydromax systems receive fluid pressure from the
power steering pump to provide power assist during braking.
The Hydromax booster receives backup pressure from the reserve
system electric pump whenever the fluid in the power steering system is
P!
BRAKE
2008 Motorhome(mot)
Supplement
USA(fus)
Driving
51
Page 52 of 130
not flowing. When the engine is OFF, the pump will turn on if the brake
pedal is applied, or if the ignition is turned to the ON position.
The sound of the pump operating may be heard by the driver, but this is
a normal characteristic of the system.
The reserve system provides reduced braking power, so the vehicle
should be operated under these conditions with caution, and only to seek
service repair and remove the vehicle from the roadway.
For Hydromax-equipped vehicles operating under normal
conditions,the noise of the fluid flowing through the booster may be
heard whenever the brake is applied. This condition is normal. Vehicle
service is not required.
If braking performance or pedal response becomes very poor, even when
the pedal is strongly depressed, it may indicate the presence of air in the
hydraulic system or leakage of fluid. Stop the vehicle safely as soon as
possible and seek service immediately.
Anti-lock brake system (ABS)
On vehicles equipped with an anti-lock braking system (ABS), a noise
from the hydraulic pump motor and pulsation in the pedal may be
observed during ABS braking events. Pedal pulsation coupled with noise
while braking under panic conditions or on loose gravel, bumps, wet or
snowy roads is normal and indicates proper functioning of the vehicle’s
anti-lock brake system. The ABS performs a self-check after you start
the engine and begin to drive away. A brief mechanical noise may be
heard during this test. This is normal. If a malfunction is found, the ABS
warning light will come on. If the vehicle has continuous vibration or
shudder in the steering wheel while braking, the vehicle should be
inspected by an authorized dealer.
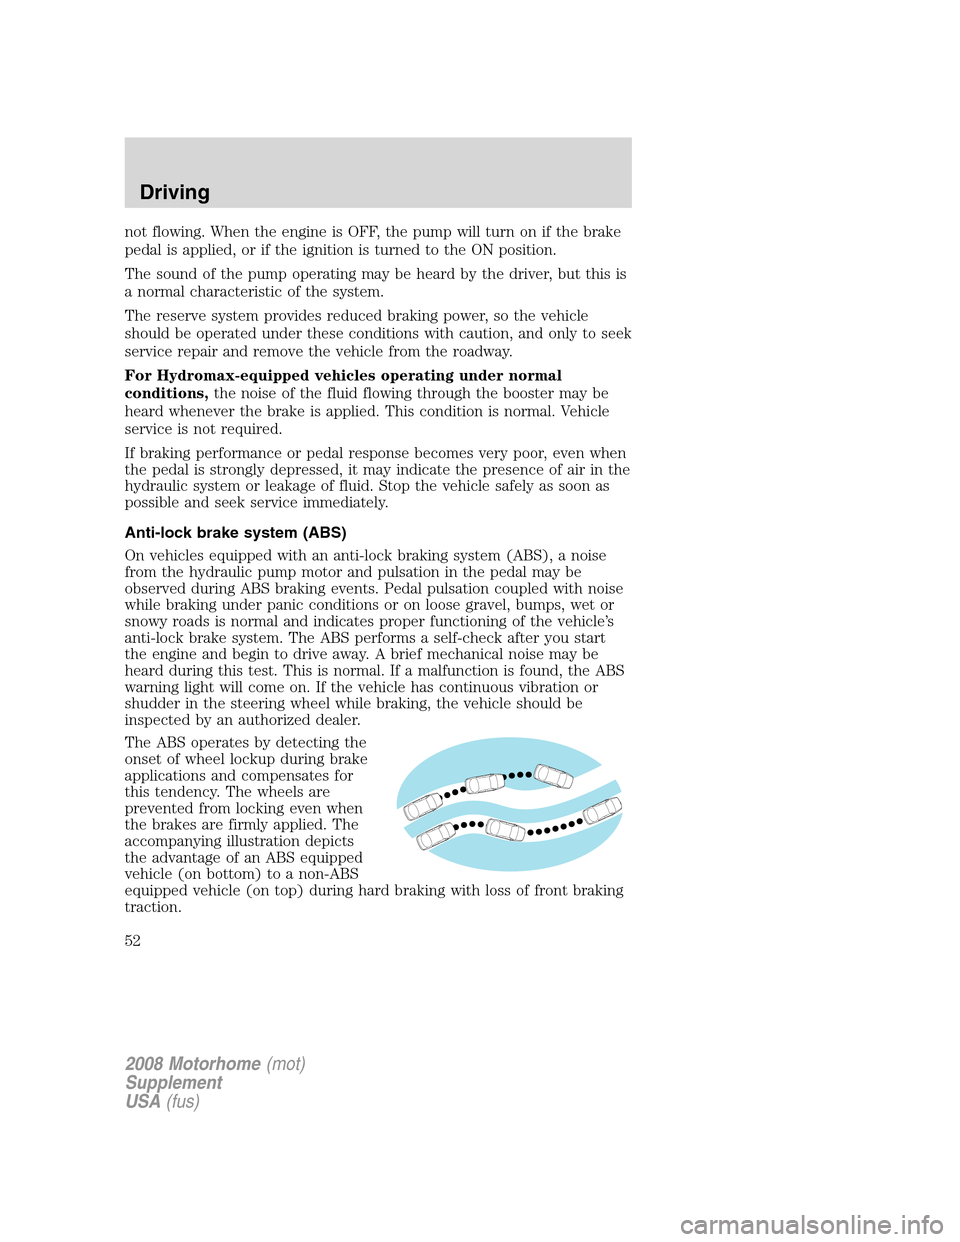
The ABS operates by detecting the
onset of wheel lockup during brake
applications and compensates for
this tendency. The wheels are
prevented from locking even when
the brakes are firmly applied. The
accompanying illustration depicts
the advantage of an ABS equipped
vehicle (on bottom) to a non-ABS
equipped vehicle (on top) during hard braking with loss of front braking
traction.
2008 Motorhome(mot)
Supplement
USA(fus)
Driving
52
Page 53 of 130
Using ABS
•In an emergency or when maximum efficiency from the four-wheel
ABS is required, apply continuous force on the brake. The four wheel
ABS will be activated immediately, thus allowing you to retain steering
control of your vehicle and, providing there is sufficient space, will
enable you to avoid obstacles and bring the vehicle to a controlled
stop.
•The anti-lock system does not reduce stopping distance. Always leave
enough room between your vehicle and the vehicle in front of you to
stop.
•We recommend that you familiarize yourself with this braking
technique. However, avoid taking any unnecessary risks.
ABS warning lamp
The ABS warning lamp in the
instrument cluster momentarily
illuminates when the ignition is
turned on. If the light remains on
after the vehicle is started,
continues to flash or fails to illuminate, have the system serviced
immediately.
With the ABS light on, the anti-lock
brake system is disabled and normal
braking is still effective unless the
brake warning light also remains
illuminated with parking brake
released. (If your brake warning lamp illuminates, have your vehicle
serviced immediately.)
ABS
P!
BRAKE
2008 Motorhome(mot)
Supplement
USA(fus)
Driving
53