2008 FIAT IDEA radio
[x] Cancel search: radioPage 51 of 165

51
CONNECT NAV+
“Compression” FUNCTION
This function optimizes MP3 CD
sound quality when playing it in the car.
To turn this function on/off, select
the “Compression” icon with the
knob 15-fig. 1and press it.
When the “Compression” function
is on, symbol “✓” is shown near the
corresponding icon.
“Scan” FUNCTION
(BRIEF PLAYBACK)
The “Scan” function is turned on/off
selecting the relevant icon key with
the knob 15-fig. 1and pressing it.
When this function is on, all the MP3
CD tracks are played for about 10 sec-
onds in the actual sequence on the
MP3 CD or the preset playlist is
played (depending on “Playlist” en-
able/disable).
To turn the function off, select the
“Scan” icon and press the knob 15-
fig. 1again. “Shuffle” FUNCTION
(RANDOM PLAYING)
To turn the “Shuffle” function on/off,
turn the knob 15-fig. 1 and press it af-
ter selecting the function.
When the Shuffle function is on, the
display shows “SHUFFLE”.
With this function on, the MP3 CD
tracks or the playlist are played in ran-
dom sequence (depending on
“Playlist” enable/disable).
To turn the function off, select the
“Shuffle” icon and press the knob 15-
fig. 1 again. “Audio setup” FUNCTION
(AUDIO ADJUSTMENTS)
To access the audio setup menu
while listening to a MP3 CD, select the
“Setup” icon rotating the knob 15-
fig. 1and press it to confirm.
For the description of the different
functions available in the menu, refer
to the corresponding paragraph in sec-
tion “RADIO MODE”.
021-059 Connect IDEA GB 17-01-2008 13:33 Pagina 51
Page 53 of 165

53
CONNECT NAV+
Starting from “Stop” state (stop
playing by pressing “
˙/I I” 9-fig. 1, user
can modify the playlist by means of the
“Define playlist” function or set a track
sequence by means of the “Playlist”
function. It is then possible to play the
MP3 CD by pressing again “
˙/I I” 9-
fig. 1(“Play” key).
PLAYING MP3 CD
When a MP3 CD (to which a play list
has not been matched previously) is
put into the player, the radio naviga-
tion system will start playing auto-
matically from the first piece of the
first folder available in the CD, then
it will go on in a sequence. After all of
the pieces found in a folder have been
played, the pieces found in the next
folder of the CD will be played.
Before starting to play the first track
of the new folder, the display shows
for five seconds the new folder name.The main screen shows also the fol-
lowing information:
– audio source (MP3);
– when available, author and song
name fig. 28, or file name fig. 29;
– current track numberfig. 28;
– current status of MP3 CD source
(play fig. 28, pause fig. 30, stopfig.
31);
– CD time information;
– list of available tracks;
– TA, SHUFFLE, REPEAT… accord-
ing to the active function.
Icon keys on the right of the screen
are all enabled, excluding “Define
playlist” and “Playlist” under “Play” and
“Pause” conditions fig. 28 and 30; stop
the MP3 CD (“Stop”) fig. 31to enable
these two functions.When playing MP3 CD, buttons
“
¯¯”5-fig. 1and “˙˙” 6-fig. 1on
the left of the CONNECT Nav+ key-
pad, perform the following functions:
– pressing the keys briefly will allow
you to shift to the previous/following
piece of the play list; shifting from one
section of the CD to the next one will
involve displaying the name of the new
folder for a few instants;
– with long push skips to previ-
ous/next 10 track with respect to one
being played (provided the folder is
not empty). Should there be in the
folder 10 tracks preceding or follow-
ing the track being played then, skip to
first track of the previous or next fold-
er with respect to the one being
played will take place. During this op-
eration the name of the new folder is
displayed for five seconds.
021-059 Connect IDEA GB 17-01-2008 13:33 Pagina 53
Page 106 of 165

106
CONNECT NAV+
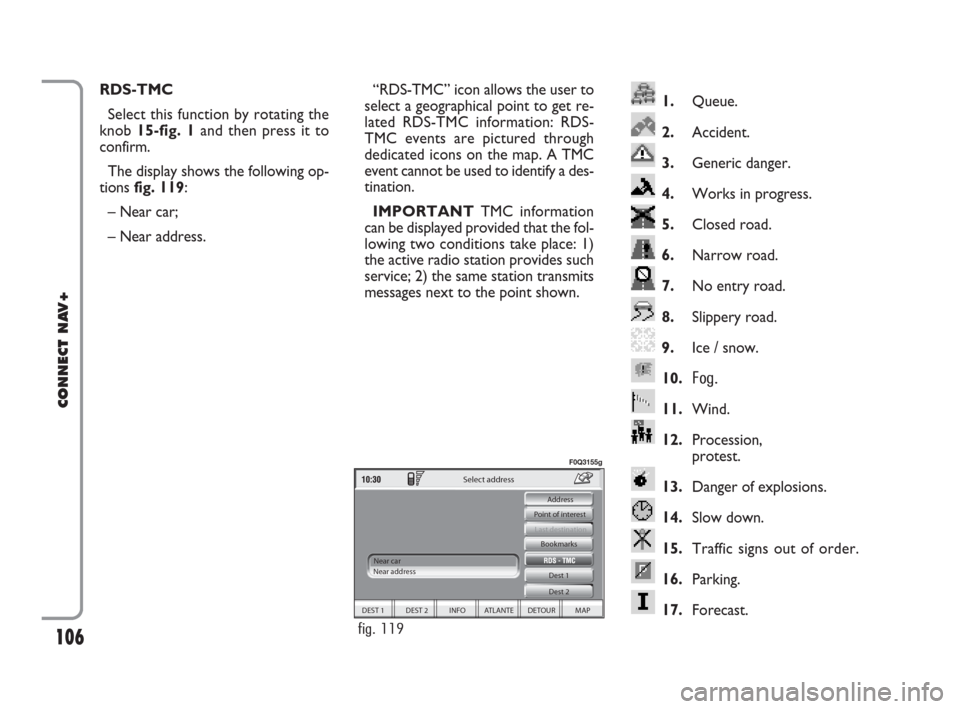
1.Queue.
2.Accident.
3.Generic danger.
4.Works in progress.
5.Closed road.
6.Narrow road.
7.No entry road.
8.Slippery road.
9.Ice / snow.
10.
Fog.
11.Wind.
12.Procession,
protest.
13.Danger of explosions.
14.Slow down.
15.Traffic signs out of order.
16.Parking.
17.Forecast.
RDS-TMC
Select this function by rotating the
knob 15-fig. 1and then press it to
confirm.
The display shows the following op-
tions fig. 119:
– Near car;
– Near address.“RDS-TMC” icon allows the user to
select a geographical point to get re-
lated RDS-TMC information: RDS-
TMC events are pictured through
dedicated icons on the map. A TMC
event cannot be used to identify a des-
tination.
IMPORTANTTMC information
can be displayed provided that the fol-
lowing two conditions take place: 1)
the active radio station provides such
service; 2) the same station transmits
messages next to the point shown.
DEST 1 DEST 2 INFO ATLANTE DETOUR MAP Dest 1
Dest 2 Bookmarks
Last destination
Select address
Near car
Near address Point of interest Address
fig. 119
F0Q3155g
092-115 Connect IDEA GB 17-01-2008 13:34 Pagina 106
Page 124 of 165

124Nero603 46 620 CONNECT CROMA ING
124
CONNECT NAV+
GENERAL INFORMATION
With the “Voice recognition” func-
tion the user can control the CON-
NECT Nav+ by voice. By means of
“Voice recognition”, the user can
send commands to the system to the
system through a microphone: short
push on
}1-fig. 1set on front pan-
el enables voice command interpre-
tation; CONNECT Nav+ will then
provide voice help to guide the user
get the required function.
Press again
}1-fig. 1to stop pro-
cedure.Voice recognition is performed in
two ways:
– voice recognition without
voice identification;
– voice recognition with voice
identification.
Commands without voice identi-
ficationactivate the main system
functions (TEL, RADIO, CD etc.).
Commands with voice identifica-
tionmakes it possible to enter / recall
names in the phone directory and/or
navigation addresses.
In the first case (voice recognition
without voice identification), the sys-
tem is able to receive the voice com-
mands regardless of the user’s sex and
voice tone and inflexion.No preliminary training phase is re-
quired, just follow the instructions giv-
en by the system each time.
In the second case (voice recognition
with voice identification), the system
is able to recognise the required com-
mand comparing the voice command
pronounced to the corresponding
voice sample previously stored by the
user.
IMPORTANTThe voice recogni-
tion and message store operations are
immediately interrupted in the event
of incoming calls; in this case, at the
end of the call, the whole operation
must be repeated. Conversely, in-
coming SMS text messages do not in-
terrupt the operations.
V V
O O
I I
C C
E E
R R
E E
C C
O O
G G
N N
I I
T T
I I
O O
N N
124-140 Connect IDEA GB 17-01-2008 13:37 Pagina 124
Page 125 of 165

125
CONNECT NAV+
125Nero603 46 620 CONNECT CROMA ING
VOICE COMMANDS
Voice commands, identified as “key-
words”, that the system is able to rec-
ognize are organized according to four
increasing levels: 1st level, 2nd level,
3rd level, 4th level. 1st level keywords
activate the following main system
functions: Memo; Radio; CD player;
CD Changer; Navigator, Telephone.
When a 1st level keyword is pro-
nounced, the system will activate 2nd
level keywords; when a 2nd level key-
word is pronounced, the system will
activate 3rd level keywords; when a
3rd level keyword is pronounced, thesystem will activate 4th level key-
words.
If the user pronounces a 1st level
keyword, then the submenu relevant
to that command will remain active
until another 1st level keyword is giv-
en; the same rule applies for the oth-
er lower levels (2, 3 and 4).
If too much time passes between a
command and another of lower level
the system will invite the user to con-
tinue by voice message “Can I help
you?”.1st level keywords are the following:
– Memo
– Radio
– CD player
– CD changer
– Navigator
– Call
– Dial
– Redial
– PIN code
– Address book
– Abort.
REQUIRED FUNCTION
Memo (“Voice memo” function)
Read a message
Delete all messages
Go to next message
Go to previous message
Record memo
KEYWORDS - Summary
The following tables show the list /divided according to function) of voice commands (“keywords”) that the system can
receive.
“Memo” function
VOICE COMMANDS - KEYWORDS
1
stLEVEL
KEYWORDS
Memo
2ndLEVEL
KEYWORDS
Read
Delete
Next
Previous
Record
3rdLEVEL
KEYWORDS4thLEVEL
KEYWORDS
124-140 Connect IDEA GB 17-01-2008 13:37 Pagina 125
Page 126 of 165

126
CONNECT NAV+
126Nero603 46 620 CONNECT CROMA ING
REQUIRED FUNCTION
Tuner
Tune next radio station
Tune previous radio station
Select FM band
Select MW band
Select LW band
Select one station in the band
If FM station is tuned: FMAST band
is selected. If LW or MW station is tuned: AMAST
band is selected.
Valid only if selected band is FMAST
or AMAST: autostore function activation.
Tuning on special frequency
“Radio” function
VOICE COMMANDS - KEYWORDS
1
stLEVEL
KEYWORDS
Radio
Once a command has been pronounced and executed, second level “keywords” and all first level keywords will remain available for further
commands. (*) After this command the system will ask: “The frequency, please”.
2ndLEVEL
KEYWORDS
Next
Previous
FM
MW
LW
Memory
Autostore
Tune
Frequency (*)
3rdLEVEL
KEYWORDS
(1 …. 3)
(1 …. 6)
(0 …. 9)
“Point”
Cancel
Delete
Abort
Repeat
Send
4thLEVEL
KEYWORDS
124-140 Connect IDEA GB 17-01-2008 13:37 Pagina 126
Page 132 of 165

132Nero603 46 620 CONNECT CROMA ING
132
CONNECT NAV+
EXAMPLES (voice commands)
Tuning a radio frequency
Pronouncing 1st level keyword “Ra-
dio” and then the 2nd level one “Fre-
quency”, opens a dialogue enabling the
following keywords:
– [0..9]
– Point
– Cancel
– Delete
– Abort
– Repeat
– Send.First example:
User: Radio - Frequency
CONNECT: The frequency, please
User: 1-0-5-Point-5
CONNECT: 1-0-5-Point-5
User: Send
CONNECT: The frequency is
being tuned.
Second example:
User: Radio - Frequency
CONNECT: The frequency, please
User: 9-6
CONNECT: 9-6
User: Point-5-0
CONNECT: Point-5-0
User: Send
CONNECT: The frequency is
being tuned.Third example:
User: Radio - Frequency
CONNECT: The frequency, please
User: 1-0-6
CONNECT: 1-0-6
User: Point-7
CONNECT: Point-7
User: Delete
CONNECT: 1-0-6
User: Point-6
CONNECT: Point-6
User: Repeat
CONNECT: 1-0-6-Point-6
User: Send
CONNECT: The frequency is
being tuned.
124-140 Connect IDEA GB 17-01-2008 13:37 Pagina 132
Page 156 of 165

156
CONNECT NAV+
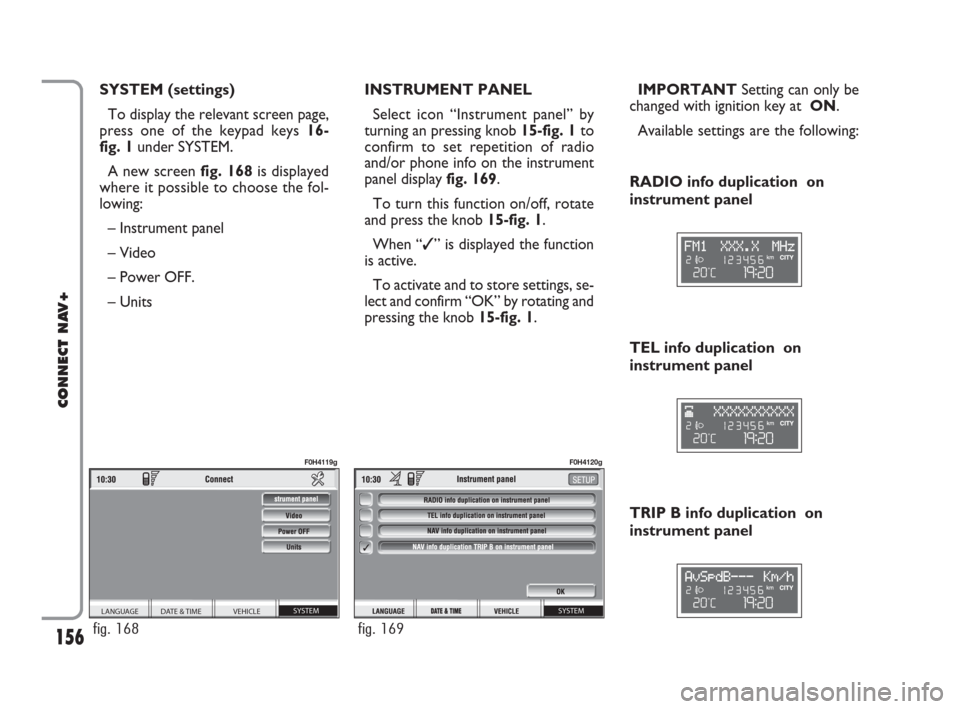
SYSTEM (settings)
To display the relevant screen page,
press one of the keypad keys 16-
fig. 1under SYSTEM.
A new screen fig. 168is displayed
where it possible to choose the fol-
lowing:
– Instrument panel
– Video
– Power OFF.
– UnitsIMPORTANTSetting can only be
changed with ignition key at ON.
Available settings are the following: INSTRUMENT PANEL
Select icon “Instrument panel” by
turning an pressing knob 15-fig. 1to
confirm to set repetition of radio
and/or phone info on the instrument
panel display fig. 169.
To turn this function on/off, rotate
and press the knob 15-fig. 1.
When “✓” is displayed the function
is active.
To activate and to store settings, se-
lect and confirm “OK” by rotating and
pressing the knob 15-fig. 1.
TRIP B info duplication on
instrument panel RADIO info duplication on
instrument panel
TEL info duplication on
instrument panel
SYSTEM VEHICLE DATE & TIME LANGUAGE
fig. 168
F0H4119g
SYSTEM
fig. 169
F0H4120g
148-158 Connect IDEA GB 15-02-2008 11:32 Pagina 156