Page 73 of 165
73
CONNECT NAV+
“Voice recognizer”: allows to man-
age a voice sample associated to
stored names/numbers.
“OK”: confirms the insertion of the
new entry, proceed as follows:
– rotate the knob 15-fig. 1, select
the icon key and then press the knob
to confirm; the display shows “Please
wait…” and the system will store the
new entry in the directory.IMPORTANTIf the same name is
already existing, the display will show
“Name already in phonebook”.
Voice recognition
(active only when phonebook has
been selected as stored phone
number location)
To enter this mode proceed as fol-
lows:
– rotate the knob 15-fig. 1, select
“Voice recognizer” and then press the
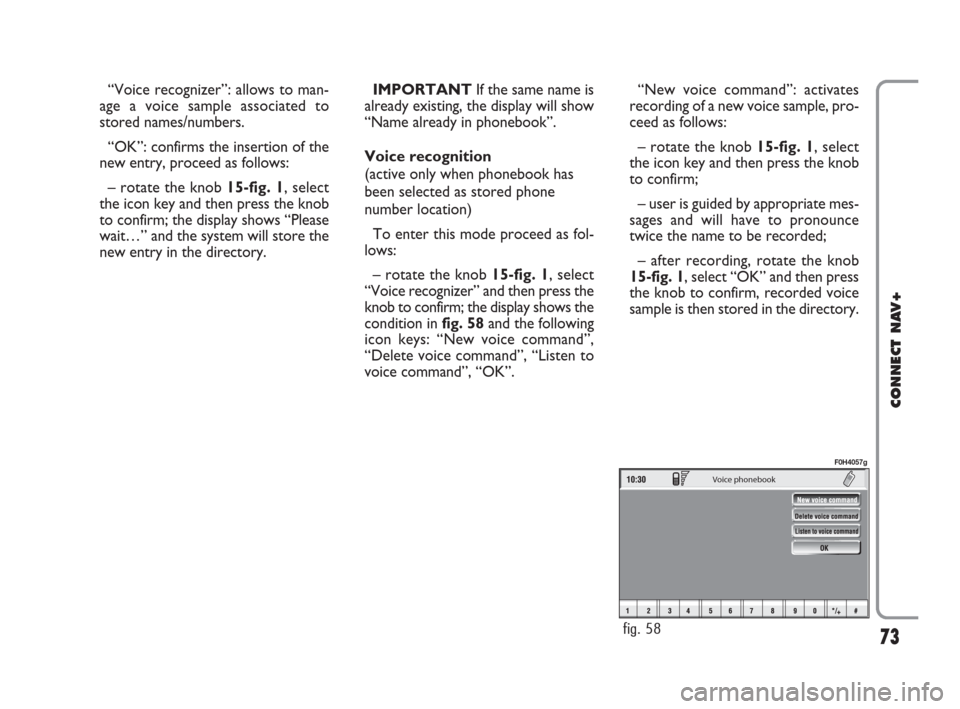
knob to confirm; the display shows the
condition infig. 58and the following
icon keys: “New voice command”,
“Delete voice command”, “Listen to
voice command”, “OK”.
Voice phonebook
fig. 58
F0H4057g
“New voice command”: activates
recording of a new voice sample, pro-
ceed as follows:
– rotate the knob 15-fig. 1, select
the icon key and then press the knob
to confirm;
– user is guided by appropriate mes-
sages and will have to pronounce
twice the name to be recorded;
– after recording, rotate the knob
15-fig. 1, select “OK” and then press
the knob to confirm, recorded voice
sample is then stored in the directory.
060-091 Connect IDEA GB 17-01-2008 13:33 Pagina 73
Page 89 of 165
Network operator
When selected and confirmed, “Net-
work operator” icon allows manage-
ment of network Providers; the dis-
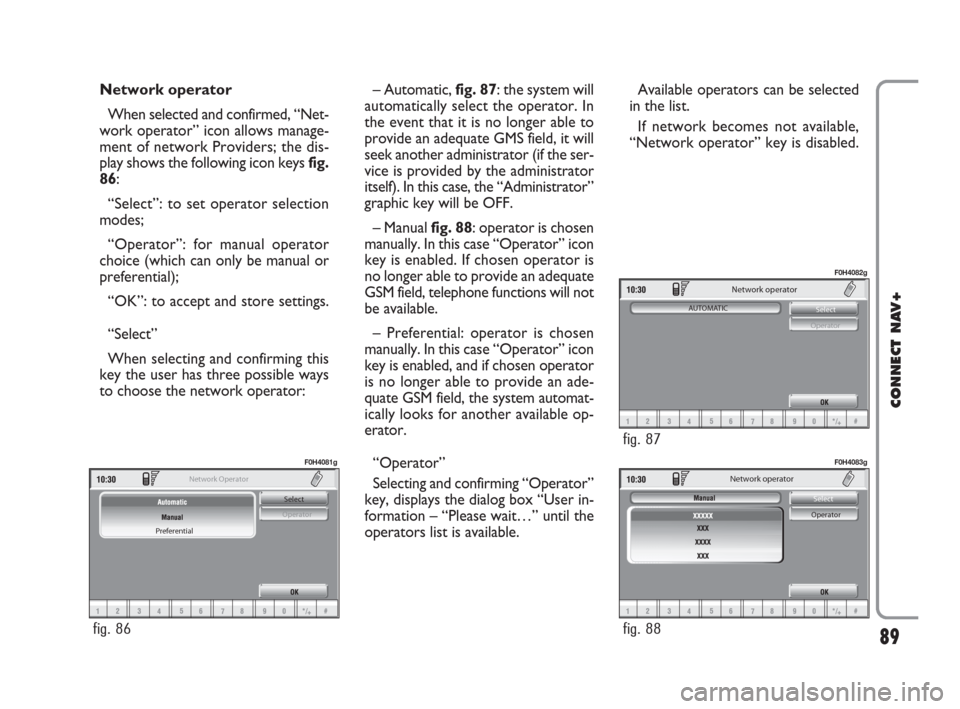
play shows the following icon keys fig.
86:
“Select”: to set operator selection
modes;
“Operator”: for manual operator
choice (which can only be manual or
preferential);
“OK”: to accept and store settings.
“Select”
When selecting and confirming this
key the user has three possible ways
to choose the network operator:– Automatic, fig. 87: the system will
automatically select the operator. In
the event that it is no longer able to
provide an adequate GMS field, it will
seek another administrator (if the ser-
vice is provided by the administrator
itself). In this case, the “Administrator”
graphic key will be OFF.
– Manual fig. 88: operator is chosen
manually. In this case “Operator” icon
key is enabled. If chosen operator is
no longer able to provide an adequate
GSM field, telephone functions will not
be available.
– Preferential: operator is chosen
manually. In this case “Operator” icon
key is enabled, and if chosen operator
is no longer able to provide an ade-
quate GSM field, the system automat-
ically looks for another available op-
erator.
“Operator”
Selecting and confirming “Operator”
key, displays the dialog box “User in-
formation – “Please wait…” until the
operators list is available. Available operators can be selected
in the list.
If network becomes not available,
“Network operator” key is disabled.
89
CONNECT NAV+
Select
Operator
Preferential Network Operator
fig. 86
F0H4081g
Network operator
Select
Operator
fig. 88
F0H4083g
Network operator
Select
Operator AUTOMATIC
fig. 87
F0H4082g
060-091 Connect IDEA GB 17-01-2008 13:34 Pagina 89
Page 129 of 165
129
CONNECT NAV+
129Nero603 46 620 CONNECT CROMA ING
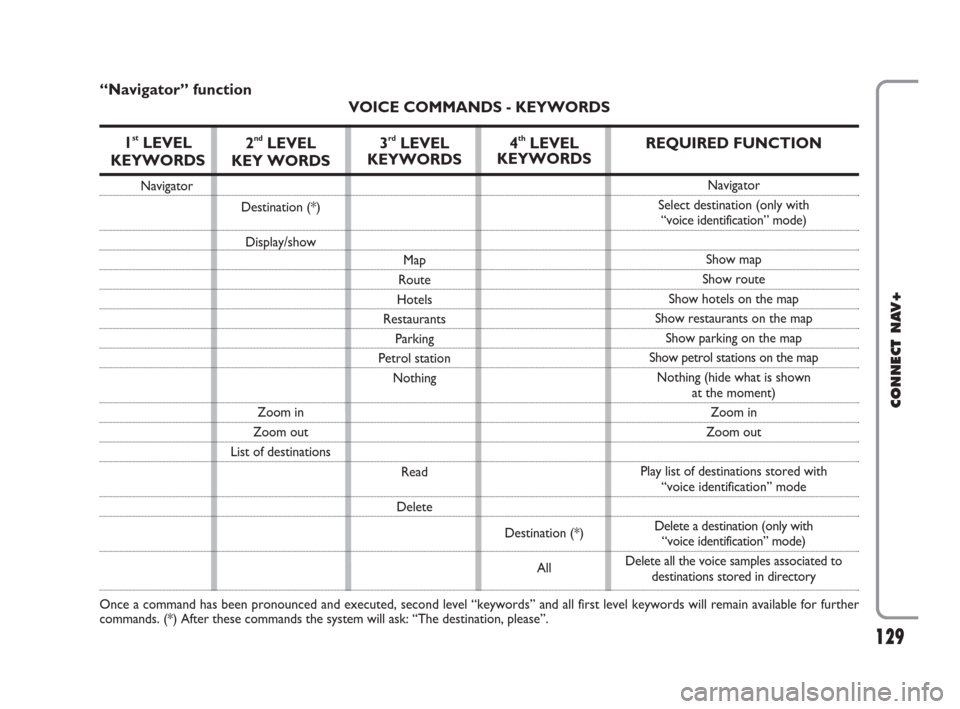
“Navigator” function
VOICE COMMANDS - KEYWORDS
1
stLEVEL
KEYWORDS
Navigator
Once a command has been pronounced and executed, second level “keywords” and all first level keywords will remain available for further
commands. (*) After these commands the system will ask: “The destination, please”.
2ndLEVEL
KEY WORDS
Destination (*)
Display/show
Zoom in
Zoom out
List of destinations
3rdLEVEL
KEYWORDS
Map
Route
Hotels
Restaurants
Parking
Petrol station
Nothing
Read
Delete
4thLEVEL
KEYWORDS
Destination (*)
All
REQUIRED FUNCTION
Navigator
Select destination (only with
“voice identification” mode)
Show map
Show route
Show hotels on the map
Show restaurants on the map
Show parking on the map
Show petrol stations on the map
Nothing (hide what is shown
at the moment)
Zoom in
Zoom out
Play list of destinations stored with
“voice identification” mode
Delete a destination (only with
“voice identification” mode)
Delete all the voice samples associated to
destinations stored in directory
124-140 Connect IDEA GB 17-01-2008 13:37 Pagina 129
Page 130 of 165
130
CONNECT NAV+
130Nero603 46 620 CONNECT CROMA ING
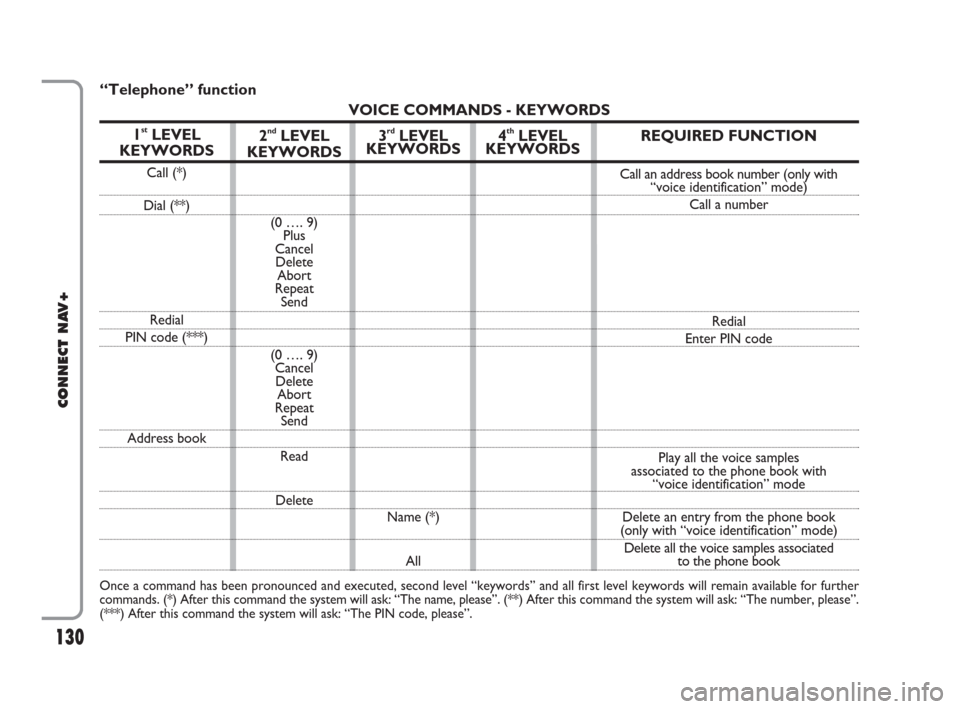
“Telephone” function
VOICE COMMANDS - KEYWORDS
1
stLEVEL
KEYWORDS
Call (*)
Dial (**)
Redial
PIN code (***)
Address book
Once a command has been pronounced and executed, second level “keywords” and all first level keywords will remain available for further
commands. (*) After this command the system will ask: “The name, please”. (**) After this command the system will ask: “The number, please”.
(***) After this command the system will ask: “The PIN code, please”.
2ndLEVEL
KEYWORDS
(0 …. 9)
Plus
Cancel
Delete
Abort
Repeat
Send
(0 …. 9)
Cancel
Delete
Abort
Repeat
Send
Read
Delete
3rdLEVEL
KEYWORDS
Name (*)
All
4thLEVEL
KEYWORDSREQUIRED FUNCTION
Call an address book number (only with
“voice identification” mode)
Call a number
Redial
Enter PIN code
Play all the voice samples
associated to the phone book with
“voice identification” mode
Delete an entry from the phone book
(only with “voice identification” mode)
Delete all the voice samples associated
to the phone book
124-140 Connect IDEA GB 17-01-2008 13:37 Pagina 130
Page 135 of 165
135Nero603 46 620 CONNECT CROMA ING
135
CONNECT NAV+
Storing an entry in the address
book with voice identification
The user can insert into the tele-
phone book a voice sample associat-
ed to a number (only with “voice
identification” mode).
Recording stage cannot be per-
formed through voice commands (for
further details see section “Cellular
telephone with voice commands” at
paragraph “Directory function – Voice
recognition”).
User can stop the operation only by
pressing the front panel key
}1-fig.
1:
First example:
CONNECT: The name, please
User: Barbara
CONNECT: Please, repeat
the name
User: Barbara
CONNECT: The name has been
stored.Second example:
CONNECT: The name, please
User: Francesca
CONNECT: Please, repeat the
name
User: Maria
CONNECT: The name has not
been stored.
The name, please
User: Francesca
CONNECT: Please, repeat
the name
User: Francesca
CONNECT: The name has been
stored.Calling an entry from the
address book with voice
recognition
Pronouncing 1st level keyword
“Call”, opens a dialogue enabling the
following keywords:
– Cancel
– Delete
– Abort
– Repeat
– Send.
First example:
User: Call
CONNECT: The name, please
User: Paola
CONNECT: Paola
User: Send
CONNECT: The number is
being dialled.
Second example:
User: Call
CONNECT: The address book is
empty.
124-140 Connect IDEA GB 17-01-2008 13:37 Pagina 135
Page 140 of 165
140Nero603 46 620 CONNECT CROMA ING
First example:
CONNECT: The destination,
please?
User: Office
CONNECT: Office
User: Abort
CONNECT Abort.
140
CONNECT NAV+
Fourth example:
User: Navigator -
List of destinations -
Delete -
Destination.
CONNECT: The destination,
please?
User: Office Milano
CONNECT: Do you wish to
delete (Office Mi-
lano)?
User: Cancel
CONNECT: The destination,
please?
User: Paola’s house
CONNECT: Do you wish to
delete (Paola’s
house)?
User: Yes
CONNECT: The destination has
been deleted.Stopping the dialogue
To stop a dialogue, pronounce
“Abort” keyword. Keywords entered
before pronouncing “Abort”, are
deleted.
“Abort” is recognized by the system
only in “voice recognition without
voice identification” mode.
124-140 Connect IDEA GB 17-01-2008 13:37 Pagina 140
Page 148 of 165
148
CONNECT NAV+
The MY CAR mode enables to set
different car and CONNECT Nav+
system operating modes and parame-
ters.
Parameters and operating modes
have been grouped in the following
four areas:
– LANGUAGE
– DATE & TIME
– VEHICLE
– SYSTEM.
Every above area is then divided in
different sub-areas. Read carefully
through this chapter to learn any fea-
tures offered by CONNECT Nav+
system.
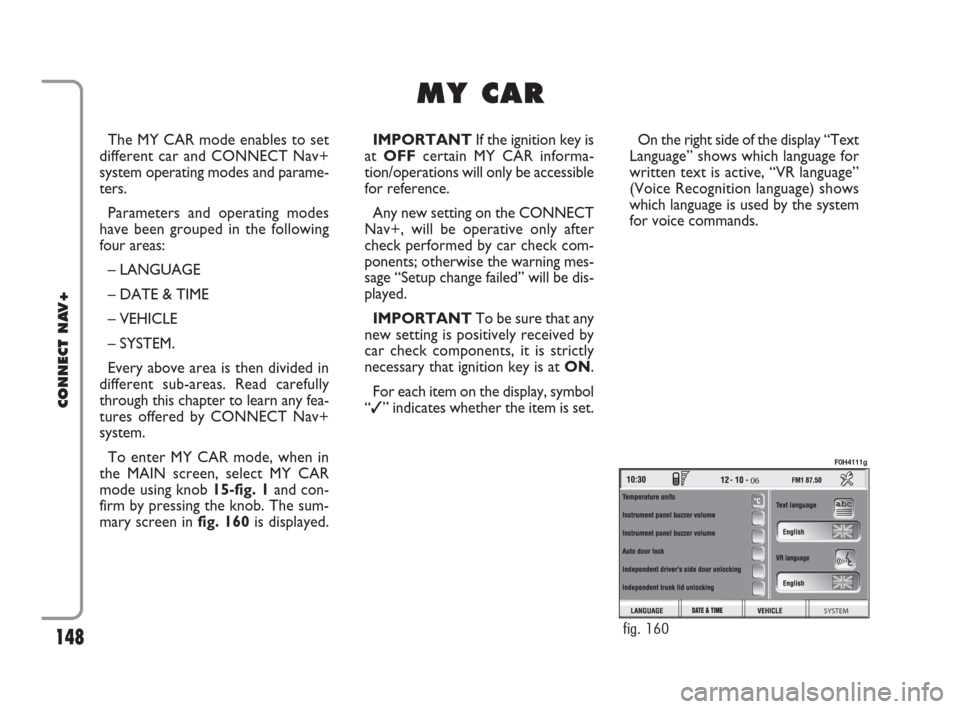
To enter MY CAR mode, when in
the MAIN screen, select MY CAR
mode using knob 15-fig. 1and con-
firm by pressing the knob. The sum-
mary screen infig. 160is displayed.IMPORTANTIf the ignition key is
at OFFcertain MY CAR informa-
tion/operations will only be accessible
for reference.
Any new setting on the CONNECT
Nav+, will be operative only after
check performed by car check com-
ponents; otherwise the warning mes-
sage “Setup change failed” will be dis-
played.
IMPORTANTTo be sure that any
new setting is positively received by
car check components, it is strictly
necessary that ignition key is at ON.
For each item on the display, symbol
“✓” indicates whether the item is set.On the right side of the display “Text
Language” shows which language for
written text is active, “VR language”
(Voice Recognition language) shows
which language is used by the system
for voice commands.
M M
Y Y
C C
A A
R R
06
SYSTEM
fig. 160
F0H4111g
148-158 Connect IDEA GB 15-02-2008 11:32 Pagina 148
Page 149 of 165
149
CONNECT NAV+
IMPORTANTSetting (whatever)
language will start the updating pro-
cedure for both the written text and
for voice commands and instructions.
The written text (strings) will be up-
dated immediately upon selecting the
language. To update voice command
and message language the Setup CD
shall be inserted. if the Setup CD is not
inserted when requested, the required
voice command and message language
will not be updated.
To change parameters and operating
modes, press keypad keys 16-fig. 1
under LANGUAGE, DATE & TIME,
VEHICLE or SYSTEM.
This operation will display the spe-
cific screen thus allowing the desired
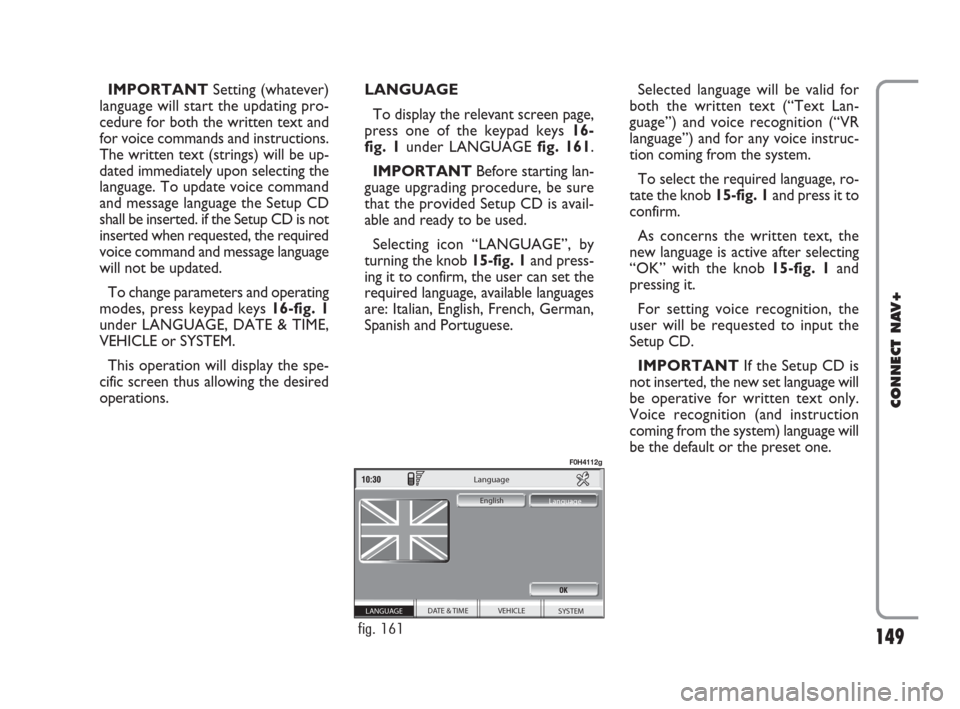
operations.LANGUAGE
To display the relevant screen page,
press one of the keypad keys 16-
fig. 1under LANGUAGE fig. 161.
IMPORTANTBefore starting lan-
guage upgrading procedure, be sure
that the provided Setup CD is avail-
able and ready to be used.
Selecting icon “LANGUAGE”, by
turning the knob 15-fig. 1and press-
ing it to confirm, the user can set the
required language, available languages
are: Italian, English, French, German,
Spanish and Portuguese.Selected language will be valid for
both the written text (“Text Lan-
guage”) and voice recognition (“VR
language”) and for any voice instruc-
tion coming from the system.
To select the required language, ro-
tate the knob 15-fig. 1and press it to
confirm.
As concerns the written text, the
new language is active after selecting
“OK” with the knob 15-fig. 1and
pressing it.
For setting voice recognition, the
user will be requested to input the
Setup CD.
IMPORTANTIf the Setup CD is
not inserted, the new set language will
be operative for written text only.
Voice recognition (and instruction
coming from the system) language will
be the default or the preset one.
SYSTEM VEHICLE
DATE & TIME
Language
English
Language
LANGUAGE
fig. 161
F0H4112g
148-158 Connect IDEA GB 15-02-2008 11:32 Pagina 149