2008 FIAT GRANDE PUNTO Central
[x] Cancel search: CentralPage 6 of 242

DASHBOARD
Left hand drive version
The presence and the position of the instruments and warning lights may vary according to the versions.
1. Side adjustable air vents - 2.Side fixed air vents - 3.Left steering column stalk: external lights - 4.Instrument panel - 5.Right
steering column stalk: windscreen,rear window wiper and trip computer controls - 6.Dashboard controls - 7.Central adjustable air
vents - 8.Upper fixed air vent - 9.Front passenger’s air bag - 10.Glovebox - 11.Sound system (where provided) - 12.Heating/ven-
tilation/climate controls - 13.Ignition switch - 14.Driver’s air bag - 15.Steering wheel adjusting lever - 16.Control plate: front
fog lights/rear fog lights/headlight aiming device/digital display/multifunction display.
5
SAFETY
DEVICES
CORRECT USE
OF THE CAR
WARNING
LIGHTS AND
MESSAGES
IN AN
EMERGENCY
CAR
MAINTENANCE
TECHNICAL
SPECIFICATIONS
INDEX
DASHBOARD
AND CONTROLS
F0M0400mfig. 1
001-036 Punto GDX GB 31-07-2008 17:35 Pagina 5
Page 7 of 242

6
SAFETY
DEVICES
CORRECT USE
OF THE CAR
WARNING
LIGHTS AND
MESSAGES
IN AN
EMERGENCY
CAR
MAINTENANCE
TECHNICAL
SPECIFICATIONS
INDEX
DASHBOARD
AND CONTROLS
Right hand drive version
The presence and the position of the instruments and warning lights may vary according to the versions.
1. Side adjustable air vents - 2.Side fixed air vents - 3.Left steering column stalk: external lights - 4.Instrument panel - 5.Right
steering column stalk: windscreen,rear window wiper and trip computer controls - 6.Dashboard controls - 7.Central adjustable air
vents - 8.Upper fixed air vent - 9.Front passenger’s air bag - 10.Glovebox - 11.Sound system (where provided) - 12.Heating/ven-
tilation/climate controls - 13.Ignition switch - 14.Driver’s air bag - 15.Steering wheel adjusting lever - 16.Control plate: front
fog lights/rear fog lights/headlight aiming device/digital display/multifunction display.
F0M426mfig. 1a
001-036 Punto GDX GB 31-07-2008 17:35 Pagina 6
Page 42 of 242

41
SAFETY
DEVICES
CORRECT USE
OF THE CAR
WARNING
LIGHTS AND
MESSAGES
IIN AN
EMERGENCY
CAR
MAINTENANCE
TECHNICAL
SPECIFICATIONS
INDEX
DASHBOARD
AND CONTROLS
fig. 37
F0M0355m
HEATING AND VENTILATION
1.Fixed upper vent - 2.Central swivel vents - 3.Fixed side vents - 4.Adjustable side vents - 5. Lower vents for front seats -
6.Lower vents for rear seats.
037-087 Punto GDX GB 31-07-2008 17:25 Pagina 41
Page 43 of 242

42
SAFETY
DEVICES
CORRECT USE
OF THE CAR
WARNING
LIGHTS AND
MESSAGES
IN AN
EMERGENCY
CAR
MAINTENANCE
TECHNICAL
SPECIFICATIONS
INDEX
DASHBOARD
AND CONTROLS
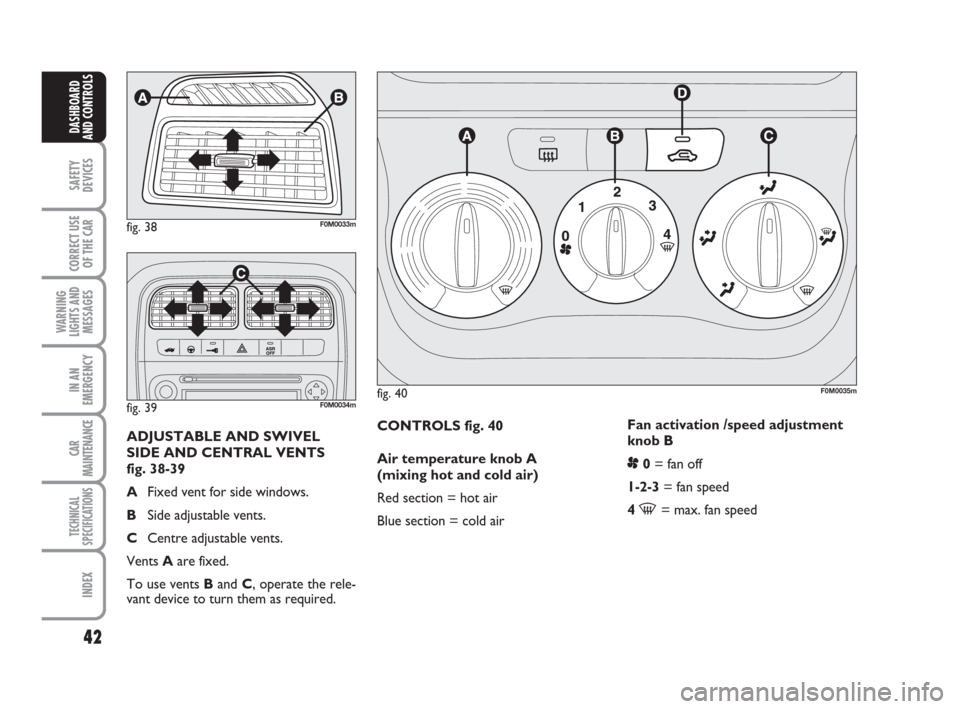
CONTROLS fig. 40
Air temperature knob A
(mixing hot and cold air)
Red section = hot air
Blue section = cold airFan activation /speed adjustment
knob B
p0= fan off
1-2-3= fan speed
4
-= max. fan speed
fig. 40F0M0035m
fig. 38F0M0033m
fig. 39F0M0034m
ADJUSTABLE AND SWIVEL
SIDE AND CENTRAL VENTS
fig. 38-39
AFixed vent for side windows.
BSide adjustable vents.
CCentre adjustable vents.
Vents Aare fixed.
To use vents Band C, operate the rele-
vant device to turn them as required.
037-087 Punto GDX GB 31-07-2008 17:25 Pagina 42
Page 54 of 242

53
SAFETY
DEVICES
CORRECT USE
OF THE CAR
WARNING
LIGHTS AND
MESSAGES
IIN AN
EMERGENCY
CAR
MAINTENANCE
TECHNICAL
SPECIFICATIONS
INDEX
DASHBOARD
AND CONTROLS
During fully automatic operation, the on-
ly manual settings required are the fol-
lowing:
❒MONO, to align the air temperature
and distribution set on the passenger’s
side with that on the driver’s side;
❒•air recirculation, to keep it always
on or off;
❒-to speed up demisting/defrosting of
windscreen, side windows, rear window
and door mirrors;
❒
(to demist/defrost heated rear win-
dow and door mirrors.
During full automatic system operation,
you can change at any time set tempera-
tures, air distribution and fan speed by us-
ing the relevant buttons or knobs: the sys-
tem will automatically change its settings
to adjust to the new requirements.During (FULL AUTO) operation, chang-
ing air distribution and/or flow and/or
compressor activation and/or air recircu-
lation will make the FULLwording dis-
appear. In this way the system will keep
on controlling automatically all functions,
excluding those changed manually. Fan
speed is the same for every area of the
passenger compartment.
Air temperature adjusting
knobs H - N
Turning the knobs clockwise or counter-
clockwise, respectively highers or lowers
the temperature of the air required re-
spectively in the front left zone (knob N) or
in the right zone (knob H) of the passenger
compartment. Since the system controls
two zones of the passenger compartment,
it is possible to personalise required tem-
peratures (driver and passenger) with a
maximum difference of 7 °C. The temper-
atures set are shown on the displays near
the relevant knobs. Pressing button A
(MONO) automatically aligns the temper-
ature on the passenger’s side with that on
the driver’s side; you can therefore set the
same temperature for both zones by turn-
ing knob Non driver side. Separate oper-
ation of air temperatures and distribution is
restored by turning knobs Hor pressing
again button A(MONO) when the button
led is on.Turn the knobs fully clockwise or counter-
clockwise to engage respectively HI(max-
imum heating) or LO(maximum cooling).
To deactivate these two functions, just
turn the temperature knob and set the re-
quired temperature.
Front air distribution buttons I-M
Pressing these buttons it is possible to
choose manually one of the seven possi-
ble air distributions to the passenger com-
partment (right or left side):NAir flow to the windscreen and front
side window vents to demist or de-
frost them.
˙Air flow at central and side dashboard
vents to ventilate the chest and the
face during the hot season.
OAir flow towards the front and rear
lower parts of the passenger com-
partment. Due to the natural tenden-
cy of heat to spread upwards, this type
of distribution allows heating of the
passenger compartment in the short-
est time, also giving a prompt feeling
of warmth.
037-087 Punto GDX GB 31-07-2008 17:25 Pagina 53
Page 55 of 242

54
SAFETY
DEVICES
CORRECT USE
OF THE CAR
WARNING
LIGHTS AND
MESSAGES
IN AN
EMERGENCY
CAR
MAINTENANCE
TECHNICAL
SPECIFICATIONS
INDEX
DASHBOARD
AND CONTROLS
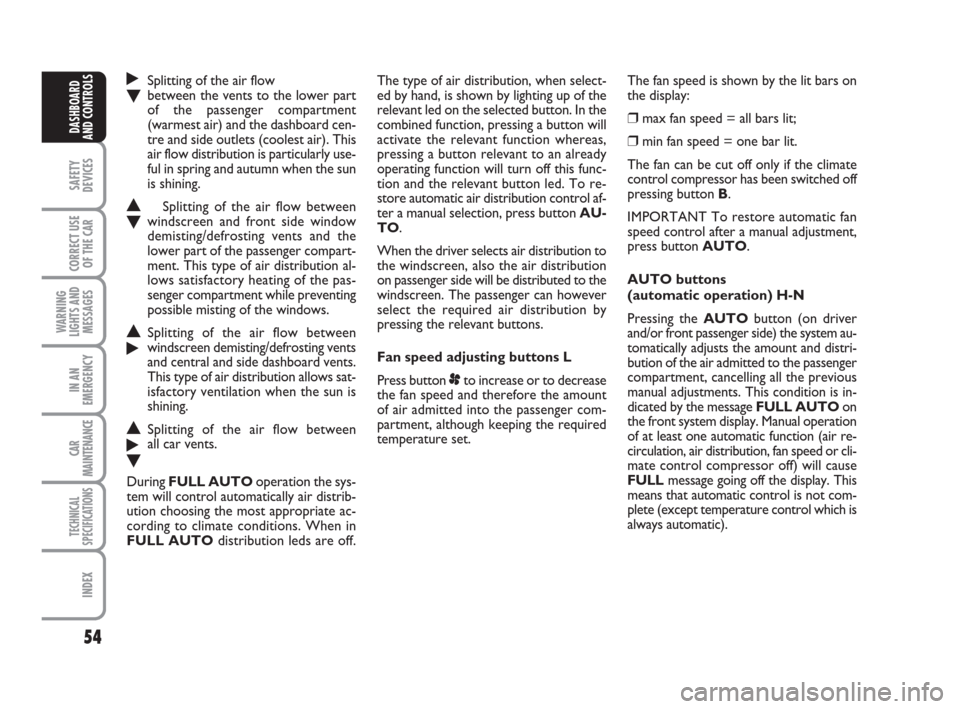
˙Splitting of the air flow
Obetween the vents to the lower part
of the passenger compartment
(warmest air) and the dashboard cen-
tre and side outlets (coolest air). This
air flow distribution is particularly use-
ful in spring and autumn when the sun
is shining.
NSplitting of the air flow between
Owindscreen and front side window
demisting/defrosting vents and the
lower part of the passenger compart-
ment. This type of air distribution al-
lows satisfactory heating of the pas-
senger compartment while preventing
possible misting of the windows.
NSplitting of the air flow between
˙windscreen demisting/defrosting vents
and central and side dashboard vents.
This type of air distribution allows sat-
isfactory ventilation when the sun is
shining.
NSplitting of the air flow between
˙all car vents.
O
During FULL AUTOoperation the sys-
tem will control automatically air distrib-
ution choosing the most appropriate ac-
cording to climate conditions. When in
FULL AUTOdistribution leds are off.The type of air distribution, when select-
ed by hand, is shown by lighting up of the
relevant led on the selected button. In the
combined function, pressing a button will
activate the relevant function whereas,
pressing a button relevant to an already
operating function will turn off this func-
tion and the relevant button led. To re-
store automatic air distribution control af-
ter a manual selection, press button AU-
TO.
When the driver selects air distribution to
the windscreen, also the air distribution
on passenger side will be distributed to the
windscreen. The passenger can however
select the required air distribution by
pressing the relevant buttons.
Fan speed adjusting buttons L
Press button pto increase or to decrease
the fan speed and therefore the amount
of air admitted into the passenger com-
partment, although keeping the required
temperature set.The fan speed is shown by the lit bars on
the display:
❒max fan speed = all bars lit;
❒min fan speed = one bar lit.
The fan can be cut off only if the climate
control compressor has been switched off
pressing button B.
IMPORTANT To restore automatic fan
speed control after a manual adjustment,
press button AUTO.
AUTO buttons
(automatic operation) H-N
Pressing the AUTObutton (on driver
and/or front passenger side) the system au-
tomatically adjusts the amount and distri-
bution of the air admitted to the passenger
compartment, cancelling all the previous
manual adjustments. This condition is in-
dicated by the message FULL AUTOon
the front system display. Manual operation
of at least one automatic function (air re-
circulation, air distribution, fan speed or cli-
mate control compressor off) will cause
FULLmessage going off the display. This
means that automatic control is not com-
plete (except temperature control which is
always automatic).
037-087 Punto GDX GB 31-07-2008 17:25 Pagina 54
Page 66 of 242

65
SAFETY
DEVICES
CORRECT USE
OF THE CAR
WARNING
LIGHTS AND
MESSAGES
IIN AN
EMERGENCY
CAR
MAINTENANCE
TECHNICAL
SPECIFICATIONS
INDEX
DASHBOARD
AND CONTROLS
CEILING LIGHTS
FRONT CEILING LIGHT WITH
MOVABLE LENS
The light will turn on/off by pressing the
movable lens rightwards or leftwards as
shown in fig. 51.
FRONT CEILING LIGHT WITH
SPOT LIGHTS
Switch A-fig. 52turn on/off these lights.
With switch A-fig. 52in central position,
lights Cand Dwill turn on/off when open-
ing/closing the front doors.
With switch A-fig. 52pressed on the left
side, lights Cand Dwill always stay off.
With switch A-fig. 52pressed on the right
side, lights Cand Dwill always stay on.
Light turning on/off is gradual.
Switch B-fig. 52performs the spot func-
tion; with light off, it will turn on:
❒light Cif pressed on the left side;
❒light Dif pressed on the right side.
fig. 52F0M0065m
IMPORTANT Before getting out of the
car, make sure the switch is at central po-
sition: lights off with doors closed in or-
der to avoid draining the battery.
In any case, if the switch is left inadver-
tently to the On position, the lights will
turn off automatically 15 minutes after
turning the engine off.
fig. 51F0M0067m
037-087 Punto GDX GB 31-07-2008 17:25 Pagina 65
Page 71 of 242

70
SAFETY
DEVICES
CORRECT USE
OF THE CAR
WARNING
LIGHTS AND
MESSAGES
IN AN
EMERGENCY
CAR
MAINTENANCE
TECHNICAL
SPECIFICATIONS
INDEX
DASHBOARD
AND CONTROLS
Door unlocking in the event
of a crash
In the event of a crash that triggers the fu-
el cut-off switch, the doors will unlock au-
tomatically to enable getting into the car
and at the same time the passenger’s com-
partment lights will turn on. It is howev-
er always possible to open the doors from
the passenger’s compartment by means of
the internal door handles.
If no fuel leaks are detected after the im-
pact and the car is ready to go, restore
correct operation following the instruc-
tions given below.
To reset car operation, follow this pro-
cedure:
❒turn the ignition key to MAR;
❒activate the right-hand indicator;
❒deactivate the right-hand indicator;
❒activate the left-hand indicator;
❒deactivate the left-hand indicator;
❒activate the right-hand indicator;
❒deactivate the right-hand indicator;
❒activate the left-hand indicator;
❒deactivate the left-hand indicator;
❒turn the ignition key to STOP. DOOR LOCK fig. 62
To lock all doors at the same time, press
button A, located on the central console
control panel, regardless of the position
of the ignition key.FUEL CUT-OFF SYSTEM
It intervenes in case of collision, activating:
❒switch off of fuel supply with resultant
engine switch off;
❒automatic door lock release;
❒switch on of all lights inside the car.
When the system is active, the message
“Fuel cut-off see handbook” is displayed.
Carefully check the car for fuel leaks, for
instance in the engine compartment, be-
low the car or near the tank area.
After the collision, position ignition key on
STOPto avoid battery draining.
fig. 62F0M0013m
If, after a crash, you smell fu-
el or notice leaks from the
fuel system, do not reset the system
to avoid fire risk.
WARNING
037-087 Punto GDX GB 31-07-2008 17:25 Pagina 70