Page 82 of 528
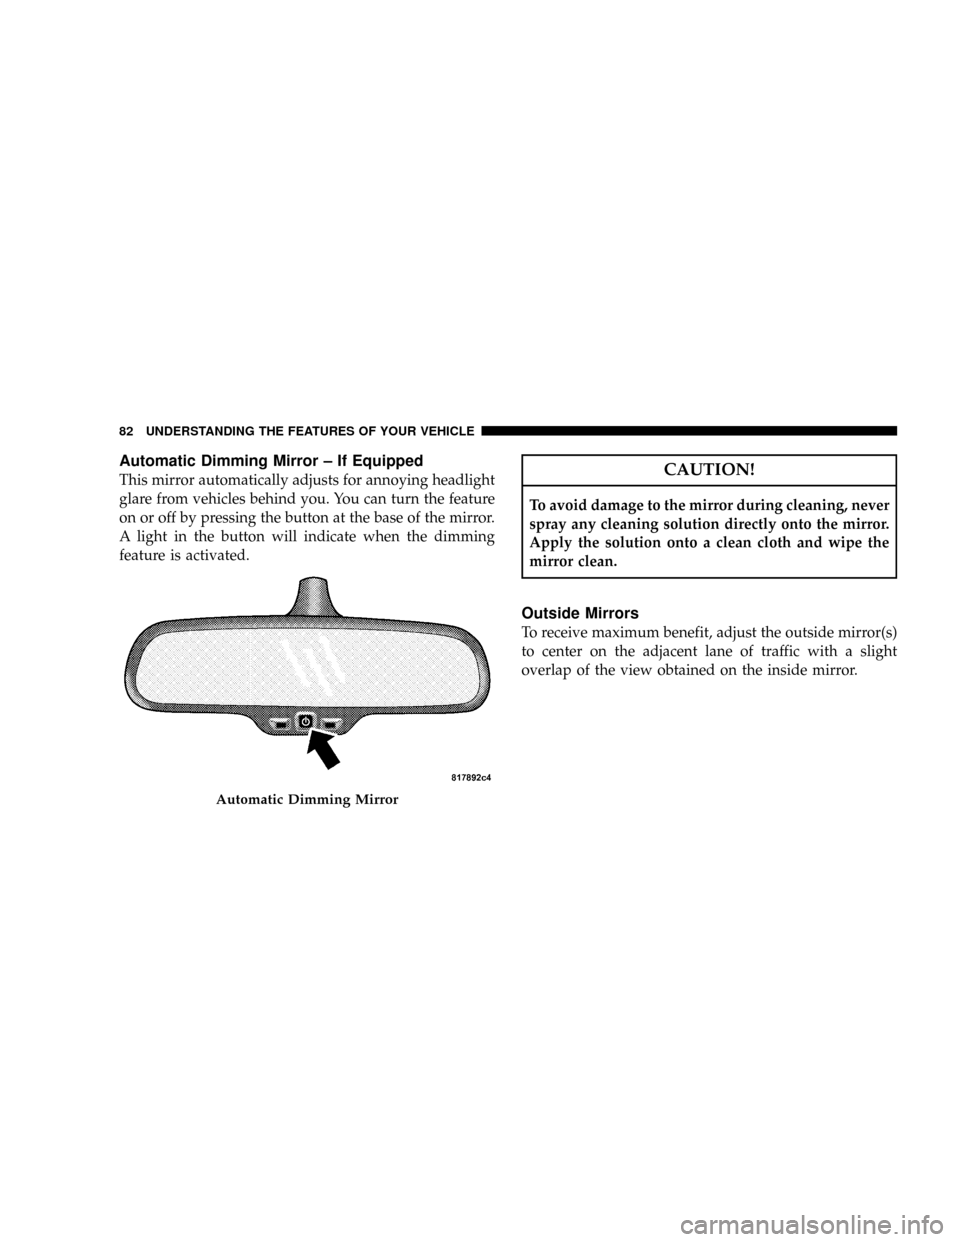
Automatic Dimming Mirror ± If Equipped
This mirror automatically adjusts for annoying headlight
glare from vehicles behind you. You can turn the feature
on or off by pressing the button at the base of the mirror.
A light in the button will indicate when the dimming
feature is activated.CAUTION!
To avoid damage to the mirror during cleaning, never
spray any cleaning solution directly onto the mirror.
Apply the solution onto a clean cloth and wipe the
mirror clean.
Outside Mirrors
To receive maximum benefit, adjust the outside mirror(s)
to center on the adjacent lane of traffic with a slight
overlap of the view obtained on the inside mirror.
Automatic Dimming Mirror
82 UNDERSTANDING THE FEATURES OF YOUR VEHICLE
Page 85 of 528

Electric Rear Window Defroster and Heated
Sideview Mirrors ± If Equipped
The Electric Rear Window Defroster and Heated
side view mirrors are activated by pressing the
heated grid button, located on the Climate Control panel,
with the ignition On. Turning Off the rear window
defroster or the ignition will deactivate the Electric Rear
Window Defroster and Heated side view mirrors feature.
These features turn off automatically after 15 minutes
have elapsed for the first activation per ignition cycle.
Each subsequent activation of these features per ignition
cycle will shutoff automatically after 10 minutes have
elapsed. To reactivate, simply press the button again.
Trailer Towing Mirrors ± If Equipped
These mirrors are designed with an adjustable mirror
head to provide a greater vision range when towing
extra-wide loads. To change position inboard or out-
board, the mirror head should be rotated (flipped Out or
In). A small blindspot mirror is integrated onto the main
mirror surface.
UNDERSTANDING THE FEATURES OF YOUR VEHICLE 85
3
Page 87 of 528

HANDS±FREE COMMUNICATION (UConnectŸ) Ð
IF EQUIPPED
NOTE: The sales code RER radio contains an inte-
grated Hands-Free Communication (UConnectŸ) sys-
tem. Refer to your ªNavigation User's Manualº for
UConnectŸ system operating instructions for this ra-
dio.
UConnectŸ is a voice-activated, hands-free, in- vehicle
communications system. UConnectŸ allows you to dial
a phone number with your cellular phone using simple
voice commands (e.g.,9Callº{ªMikeº{ºWork9or9Dialº
{ª248-555-12129). Your cellular phone's audio is trans-
mitted through your vehicle's audio system; the system
will automatically mute your radio when using the
UConnectŸ system.NOTE:The UConnectŸ system use requires a cellular
phone equipped with the Bluetooth9Hands-Free Profile,9
version 0.96 or higher. See www.chrysler.com/uconnect
for supported phones.
UConnectŸ allows you to transfer calls between the
system and your cellular phone as you enter or exit your
vehicle, and enables you to mute the system's micro-
phone for private conversation.
The UConnectŸ phonebook enables you to store up to 32
names and four numbers per name. Each language has a
separate 32-name phonebook accessible only in that
language. This system is driven through your Blue-
toothŸ Hands-Free profile cellular phone. UConnectŸ
features BluetoothŸ technology - the global standard
that enables different electronic devices to connect to
each other without wires or a docking station, so UCon-
nect works no matter where you stow your cellular
phone (be it your purse, pocket, or briefcase), as long as
UNDERSTANDING THE FEATURES OF YOUR VEHICLE 87
3
Page 98 of 528

Call Termination
To end a call in progress, momentarily press the8Phone'
button. Only the active call(s) will be terminated and if
there is a call on hold, it will become the new active call.
If the active call is terminated by the far end, a call on
hold may not become active automatically. This is cell
phone dependent. To bring the call back from hold, press
and hold the `Phone' button until you hear a single beep.
Redial
²
Press the 'Phone' button to begin.
²After the9Ready9prompt and the following beep, say
9Redial.9
²The UConnectŸ system will call the last number that
was dialed on your cellular phone. Note: this may not
be the last number dialed from the UConnectŸ sys-
tem.
Call Continuation
Call continuation is progression of a phone call on
UConnectŸ system after the vehicle ignition key has
been switched to off. Call continuation functionality
available on the vehicle can be any one of three types:
²After ignition key is switched off, a call can continue
on the UConnectŸ system either until the call ends or
until the vehicle battery condition dictates cessation of
the call on the UConnectŸ system and transfer of the
call to the mobile phone.
²After ignition key is switched to off, a call can continue
on the UConnectŸ system for certain duration, after
which the call is automatically transferred from the
UConnectŸ system to the mobile phone.
²An active call is automatically transferred to the
mobile phone after ignition key is switched to off.
98 UNDERSTANDING THE FEATURES OF YOUR VEHICLE
Page 119 of 528
Heated Seats Ð If Equipped
The heated seat switches are located in the instrument
panel under the climate controls.Each heated seat switch has two settings (HI and LOW).
Press the switch once to obtain High heat level, then
press the switch again to obtain Low heat level. Pressing
the switch a third time will turn the heated seats OFF. If
you do not purposefully turn the switch OFF, the seat
heating level will automatically change to the next lower
level, or OFF. The High heat level operates for 30 minutes
(approximate), the Low heat level operates for 30 min-
utes (approximate). The seat heat will also turn OFF
when the ignition is turned OFF. Both of the indicators
ON identifies High heat level. The lower indicator On
only, identifies Low heat level. Flashing indicator lights
on the switch indicate that the Heated Seat System needs
servicing.
Heated Seat Switches
UNDERSTANDING THE FEATURES OF YOUR VEHICLE 119
3
Page 123 of 528

open and the interior lights are on, rotating the dimmer
control all the way down to the OFF detent will cause all
the interior lights to go out. This is also known as the
9Party9mode because it allows the doors to stay open for
extended periods of time without discharging the vehi-
cle's battery.
The brightness of the instrument panel lighting can be
regulated by rotating the dimmer control up (brighter) or
down (dimmer). When the headlights are ON you can
supplement the brightness of the odometer, trip odom-
eter, radio and overhead console by rotating the control
up until you hear a click. This feature is termed the
ªParadeº mode and is useful when headlights are re-
quired during the day.
Club Cab/Quad Cab models may have an optional
switched dome lamp that may be operated by pressing
the lens.Battery Saver
To protect the life of your vehicle's battery, Load Shed-
ding is provided for both the interior and exterior lights.
If the ignition is off and any door is left ajar for 10
minutes or the dimmer control is rotated upwards for 10
minutes, the interior lights will automatically turn off.
If the headlamps remain on while the ignition is cycled
off, the exterior lights will automatically turn off after 8
minutes. If the headlamps are turned on and left on for 8
minutes while the ignition is off, the exterior lights will
automatically turn off.
NOTE:Battery Saver mode is cancelled if the ignition is
ON.
UNDERSTANDING THE FEATURES OF YOUR VEHICLE 123
3
Page 126 of 528

beam. An indicator light located in the instrument cluster
will illuminate when the fog lights are on. The fog lights
will turn off when the switch is pushed a second time,
when the headlight switch is rotated to the OFF position,
or the high beam is selected.
Multifunction Control Lever
The multifunction control lever is located on the left side
of the steering column.
Turn Signals
Move the lever up or down to signal a right-hand or
left-hand turn.
The arrow on either side of the instrument cluster flashes
to indicate the direction of the turn, and proper operation
of the front and rear turn signal lights. If a defective bulb
or wiring circuit is detected for the turn signal system, the
arrow indicators will flash at a faster rate. If an indicator
fails to light when the lever is moved, it would suggest
that the switch or indicator lamp is defective.You can signal a lane change by moving the lever
partially up or down.
Turn Signal Auto-Mode
Tap the multi-function control lever once and the turn
signal (left or right) will flash 3 times, and automatically
turn off.
Turn Signal Lever
126 UNDERSTANDING THE FEATURES OF YOUR VEHICLE
Page 134 of 528

Tapping the ACCEL button once will result ina2mph
(3km/h) speed increase. Each time the button is tapped,
speed increases so that tapping the button three times
will increase speed by 6 mph (10 km/h), etc.
Tapping the DECEL button once will result in a 1 mph (2
km/h) speed decrease. Each time the button is tapped,
speed will decrease. For example, tapping the button 3
times will decrease the speed by 3 mph (5 km/h), etc.
To decrease speed while the speed control is on, press
and hold the DECEL button. Release the button when the
desired speed is reached, and the new speed will be set.
To Accelerate For Passing
Depress the accelerator as you would normally. When the
pedal is released, the vehicle will return to the set speed.
NOTE:When driving uphill, at elevations above 2,000
ft. (610 meters), or when the vehicle is heavily loaded
(especially when towing) the vehicle may slow below theSET speed. If the vehicle speed drops below 35 mph (56
km/h), the speed control will automatically disengage. If
this happens, you can push down on the accelerator
pedal to maintain the desired speed.
Vehicles equipped with a 6±speed manual transmission
should be operated in 4th or 5th gear under the above
conditions.
WARNING!
Speed Control can be dangerous where the system
can't maintain a constant speed. Your vehicle could
go too fast for the conditions, and you could lose
control. An accident could be the result. Don't use
Speed Control in heavy traffic or on roads that are
winding, icy, snow-covered, or slippery.
134 UNDERSTANDING THE FEATURES OF YOUR VEHICLE