2008 DODGE RAM 4500 CHASSIS CAB ECO mode
[x] Cancel search: ECO modePage 214 of 528
Noise Reduction
The Dolby Noise Reduction System* is on whenever the
tape player is on, but may be switched off.
To turn off the Dolby Noise reduction System: Press
Preset 1 after you insert the tape. The NR light in the
display will go off when the Dolby System is off.
* ºDolbyº noise reduction is manufactured under license
from Dolby Laboratories Licensing Corporation. Dolby
and the double-D symbol are trademarks of Dolby Labo-
ratories Licensing Corporation.
Operation Instructions - (CD MODE for CD Audio
Play)
NOTE:The ignition switch must be in the ON or ACC
position to operate the radio.
NOTE:Note: This Radio is capable of playing compact
discs (CD), recordable compact discs (CD-R), rewritablecompact discs (CD-RW) compact discs with MP3 tracks
and multisession compact discs with CD and MP3 tracks
and WMA.
Inserting Compact Disc(s)
CAUTION!
This CD player will accept 4 3/4 inch (12 cm) discs
only. The use of other sized discs may damage the
CD player mechanism.
You may eject a disc with the radio OFF.
If you insert a disc with the ignition ON and the radio
ON, the unit will switch from radio to CD mode and
begin to play when you insert the disc. The display will
show the disc number, the track number, and index time
in minutes and seconds. Play will begin at the start of
track 1.
214 UNDERSTANDING YOUR INSTRUMENT PANEL
Page 215 of 528
SEEK Button (CD MODE for CD Audio Play)
Press the right side of the SEEK button for the next
selection on the CD. Press the left side of the button to
return to the beginning of the current selection, or return
to the beginning of the previous selection if the CD is
within the first 5 seconds of the current selection.
SCAN Button (CD MODE for CD Audio Play)
Press the Scan button to scan through each track on the
CD currently playing.
LOAD/EJECT Button (CD Mode for CD Audio
Play)
LOAD/EJECT - Load
Press the LOAD/EJT button and the push-
button with the corresponding number where
the CD is being loaded. The radio will display
PLEASE WAIT and prompt when to INSERT
DISC. After the radio displays9INSERT DISC,9insert the
CD into the player.Radio display will show9LOADING DISC9when the disc
is loading and ªREADING DISCº when the radio is
reading the disc.
LOAD/EJT - Eject
Press the LOAD/EJT button and the push-
button with the corresponding number where
the CD was loaded and the disc will unload
and move to the entrance for easy removal.
Radio display will show9EJECTING DISC9when the disc
is being ejected and prompt the user to remove the disc.
Press and hold the LOAD/EJT button for 5 seconds and
all CDs will be ejected from the radio.
If you have ejected a disc and have not removed it within
15 seconds, it will be reloaded. If the CD is not removed,
the radio will continue to play the non-removed CD. If
the CD is removed and there are other CD's in the radio,
the radio will play the next CD after a 2-minute timeout.
If the CD is removed and there are no other CD's in the
UNDERSTANDING YOUR INSTRUMENT PANEL 215
4
Page 216 of 528

radio, the radio will remain in CD mode and display
9INSERT DISCº for 2 minutes. After 2 minutes, the radio
will go to the previous tuner mode.
The disc can be ejected with the radio and ignition OFF.
TIME Button (CD MODE for CD Audio Play)
Press this button to change the display from a large CD
playing time display to a small CD playing time display.
RW/FF (CD MODE for CD Audio Play)
Press and hold FF (Fast Forward) and the CD player will
begin to fast forward until FF is released or RW or
another CD button is pressed. The RW (Reverse) button
works in a similar manner.
TUNE Control (CD MODE for CD Audio Play)
Pressing the TUNE control allows the setting of the Tone,
Fade, and Balance. See Radio Mode.
AM/FM Button (CD MODE for CD Audio Play)
Switches the Radio to the Radio mode.
RND/PTY Button (Random Play Button) (CD
MODE for CD Audio Play)
Press this button while the CD is playing to activate
Random Play. This feature plays the selections on the
compact disc in random order to provide an interesting
change of pace.
NOTE:MP3 and WMA Random Play are for file folders
only.
Press the SEEK button to move to the next randomly
selected track.
Press and hold the FF button to fast forward through the
tracks. Release the FF button to stop the fast forward
feature. If the RW button is pressed, the current track will
reverse to the beginning of the track and begin playing.
Press the RND button a second time to stop Random
Play.
216 UNDERSTANDING YOUR INSTRUMENT PANEL
Page 217 of 528
Buttons1-6(CDMODE for CD Audio Play)
Selects disc positions1-6forPlay/Load/Eject.
Notes On Playing MP3 Files
The radio can play MP3 files; however, acceptable MP3
file recording media and formats are limited. When
writing MP3 files, pay attention to the following restric-
tions.
Supported Media (Disc Types)
The MP3 file recording media supported by the radio are
CD-ROM, CD-R, and CD-RW.
Supported Medium Formats (File Systems)
The medium formats supported by the radio are ISO 9660
Level 1 and Level 2 and includes the Joliet extension.
When reading discs recorded using formats other than
ISO 9660 Level 1 and Level 2, the radio may fail to read
files properly and may be unable to play the file nor-
mally. UDF and Apple HFS formats are not supported.The radio uses the following limits for file systems:
²Maximum number of directory levels: 15
²Maximum number of files: 255
²Maximum number of folders: 100
²Maximum number of characters in file/folder names:
²Level 1: 12 (including a separator9.9and a
3-character extension)
²Level 2: 31 (including a separator9.9and a
3-character extension)
Multisession disc formats are supported by the radio.
Multisession discs may contain combinations of normal
CD audio tracks and computer files (including MP3 files).
Discs created with an option such as9keep disc open after
writing9are most likely multisession discs. The use of
multisession for CD audio or MP3 playback may result in
longer disc loading times.
UNDERSTANDING YOUR INSTRUMENT PANEL 217
4
Page 219 of 528
Playback of MP3 and WMA Files
When a medium containing MP3 data is loaded, the
radio checks all files on the medium. If the medium
contains a lot of folders or files, the radio will take more
time to start playing the MP3 files.
Loading times for playback of MP3 and WMA files may
be affected by the following:
²Media - CD-RW media may take longer to load than
CD-R media
²Medium formats - Multisession discs may take longer
to load than non-multisession discs
²Number of files and folders - Loading times will
increase with more files and folders
To increase the speed of disc loading, it is recommended
to use CD-R media and single-session discs. To create a
single-session disc, enable the Disc at Once option before
writing to the disc.
Operation Instructions - (CD Mode for MP3 and
WMA Audio Play)
SEEK Button (CD Mode for MP3 and WMA Play)
Pressing the right side of the SEEK button plays the next
file. Pressing the left side of the SEEK button plays the
beginning of the file. Pressing the button within the first
ten seconds plays the previous file.
LOAD/EJECT Button (CD Mode for MP3 and WMA
Play)
LOAD/EJT - Load
Press the LOAD/EJT button and the push-
button with the corresponding number where
the CD is being loaded. The radio will display
PLEASE WAIT and prompt when to INSERT
DISC. After the radio displays9INSERT DISC,9insert the
CD into the player.
The radio display will show9LOADING DISC9when the
disc is loading.
UNDERSTANDING YOUR INSTRUMENT PANEL 219
4
Page 220 of 528

LOAD/EJT - Eject
Press the LOAD/EJT button and the push-
button with the corresponding number where
the CD was loaded and the disc will unload
and move to the entrance for easy removal.
Radio display will show9EJECTING DISC9when the disc
is being ejected and prompt the user to remove the disc.
If you have ejected a disc and have not removed it within
15 seconds, it will be reloaded. If the CD is not removed,
the radio will continue to play the non-removed CD. If
the CD is removed and there are other CD's in the radio,
the radio will play the next CD after a 2-minute timeout.
If the CD is removed and there are no other CD's in the
radio, the radio will remain in CD mode and display
9INSERT DISCº for 2 minutes. After 2 minutes, the radio
will go to the previous tuner mode.
INFO Button (CD Mode for MP3 Play)
Press and INFO button while playing MP3 or WMA disc.
The radio scrolls through the following TAG information:
Song Title, Artist, File Name, and Folder Name (if avail-
able).
Press the INFO button once more to return to9elapsed
time9priority mode.
Press and hold the INFO button while in the message
display priority mode or elapsed time display priority
mode will display the song title for each file.
RW/FF (CD Mode for MP3 and WMA Play)
Press the FF side of the button to move forward through
the file or MP3 and WMA selection.
TUNE Control (CD Mode for MP3 Play)
Pressing the TUNE Control allows the adjustment of
Tone, Balance, and Fade.
220 UNDERSTANDING YOUR INSTRUMENT PANEL
Page 223 of 528
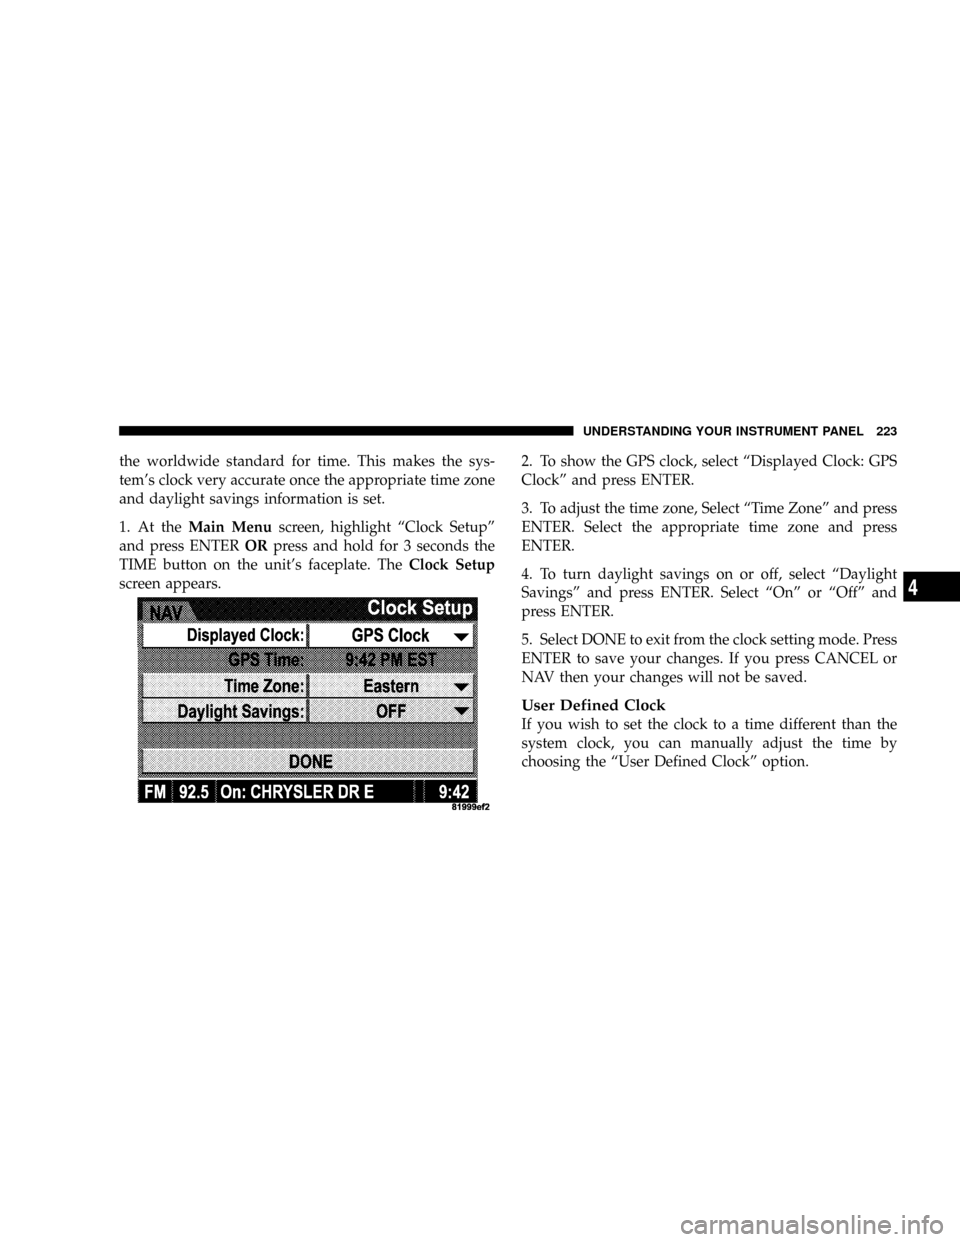
the worldwide standard for time. This makes the sys-
tem's clock very accurate once the appropriate time zone
and daylight savings information is set.
1. At theMain Menuscreen, highlight ªClock Setupº
and press ENTERORpress and hold for 3 seconds the
TIME button on the unit's faceplate. TheClock Setup
screen appears.2. To show the GPS clock, select ªDisplayed Clock: GPS
Clockº and press ENTER.
3. To adjust the time zone, Select ªTime Zoneº and press
ENTER. Select the appropriate time zone and press
ENTER.
4. To turn daylight savings on or off, select ªDaylight
Savingsº and press ENTER. Select ªOnº or ªOffº and
press ENTER.
5. Select DONE to exit from the clock setting mode. Press
ENTER to save your changes. If you press CANCEL or
NAV then your changes will not be saved.
User Defined Clock
If you wish to set the clock to a time different than the
system clock, you can manually adjust the time by
choosing the ªUser Defined Clockº option.
UNDERSTANDING YOUR INSTRUMENT PANEL 223
4
Page 227 of 528

Electronic Serial Number/Sirius Identification
Number (ESN/SID)
The Electronic Serial Number/Sirius Identification Num-
ber is needed to activate your Sirius Satellite Radio
system. To access the ESN/SID, refer to the following
steps:
ESN/SID Access with REF Radios
With the ignition switch in the ACCESSORY position and
the radio OFF, press the CD Eject and Time buttons
simultaneously for 3 seconds. The first four digits of the
twelve-digit ESN/SID number will display. Press the
SEEK UP button to display the next four digits. Continue
to press the SEEK UP button until all twelve ESN/SID
digits display. The SEEK DOWN will page down until
the first four digits display. The radio will exit the
ESN/SID mode when any other button is pushed, the
ignition is turned OFF, or 5 minutes has passed since any
button was pushed.
ESN/SID Access with RAQ and RAK Radios
With the ignition switch in the ACCESSORY position and
the radio OFF, press the CD Eject and TIME buttons
simultaneously for 3 seconds. All twelve ESN/SID num-
bers will display. The radio will exit the ESN/SID mode
when any other button is pushed, the ignition is turned
OFF, or 5 minutes has passed since any button was
pushed.
ESN/SID Access with REC Navigation Radios
Please refer to your Navigation User's Manual.
With the ignition in the ACCESSORY position and the
radio off, press the CD Eject and Set buttons simulta-
neously until the 12 digits of the ESN/SID appear on the
screen.
UNDERSTANDING YOUR INSTRUMENT PANEL 227
4