Page 254 of 527
Air Conditioning and Heating Ð If Equipped
Air Conditioning Operation
To turn on the Air Conditioning, set the fan
control at any speed and press the snowflake
button located at the right of the control panel.
Conditioned air will be directed through theoutlets selected by the mode control. A light in the
snowflake button shows that the air conditioning is on.
Press the button a second time to turn the air condition-
ing off.
Slight changes in engine speed or power may be noticed
when the air conditioning compressor is on. This is a
normal occurrence as the compressor will cycle on and
off to maintain comfort and increase fuel economy.
The mode control (at the right of the
control panel) can be set in any of the
following positions:
Air Conditioning And Heating
252 UNDERSTANDING YOUR INSTRUMENT PANEL
Page 258 of 527
Air Conditioning and Heating Operation
To turn on the Air Conditioning, set the fan control at any
speed and press the snowflake button located on the
control panel. Conditioned air will be directed through
the outlets selected by the mode control. A light in the
snowflake button shows that the air conditioning is on.
Press the button a second time to turn the air condition-
ing off.
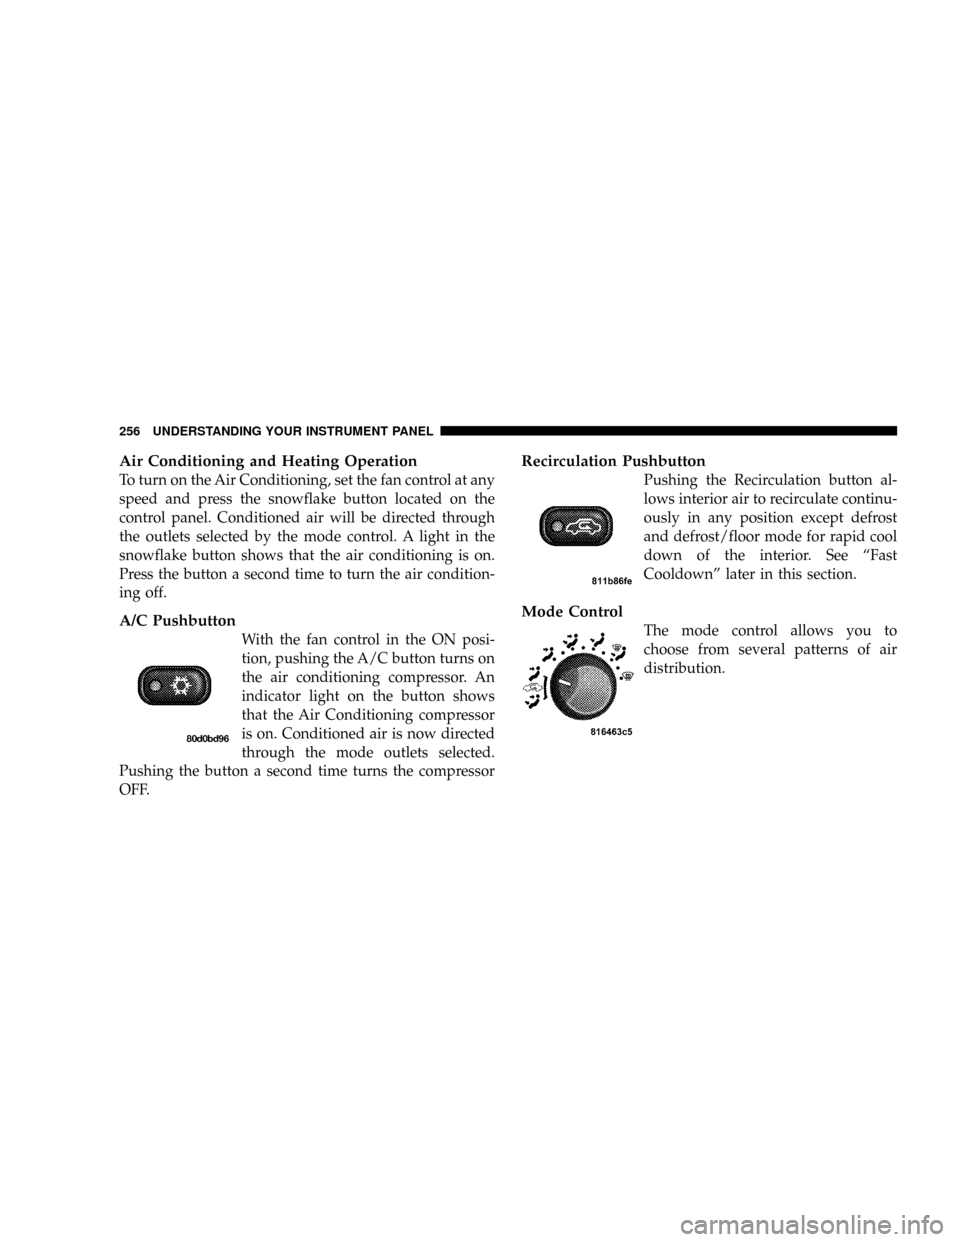
A/C Pushbutton
With the fan control in the ON posi-
tion, pushing the A/C button turns on
the air conditioning compressor. An
indicator light on the button shows
that the Air Conditioning compressor
is on. Conditioned air is now directed
through the mode outlets selected.
Pushing the button a second time turns the compressor
OFF.
Recirculation Pushbutton
Pushing the Recirculation button al-
lows interior air to recirculate continu-
ously in any position except defrost
and defrost/floor mode for rapid cool
down of the interior. See ªFast
Cooldownº later in this section.
Mode Control
The mode control allows you to
choose from several patterns of air
distribution.
256 UNDERSTANDING YOUR INSTRUMENT PANEL
Page 263 of 527
Summer Operation
Air conditioned vehicles must be protected with a high
quality antifreeze coolant during summer to provide
proper corrosion protection and to raise the boiling point
of the coolant for protection against overheating. A 50 %
concentration is recommended. For proper coolant type,
refer to ªRecommended Fluids and Genuine Partsº in
Section 7.
When using the air conditioner in extremely heavy traffic
in hot weather, especially when towing a trailer, addi-
tional engine cooling may be required. If this situation is
encountered, operate the transmission in a lower gear to
increase engine RPM, coolant flow and fan speed. When
stopped in heavy traffic, it may be necessary to shift into
NEUTRAL and depress the accelerator slightly for fast
idle operation to increase coolant flow and fan speed.NOTE:On models equipped with Diesel engines, the
idle speed will automatically increase to 1000 rpm at
elevated coolant temperatures to improve engine cooling.
Your air conditioning system is also equipped with an
automatic recirculation system. When the system senses
a heavy load or high heat conditions, it may use partial
Recirculation A/C mode to provide additional comfort.
Winter Operation
When operating the system during the Winter months,
make sure the air intake, located directly in front of the
windshield, is free of ice, slush, snow, or other obstruc-
tions.
UNDERSTANDING YOUR INSTRUMENT PANEL 261
4
Page 286 of 527
WARNING!
Do not use the Exhaust Brake feature when driving
in icy or slippery conditions as the increased engine
braking can cause the rear wheels to slide and the
vehicle to swing around with the possible loss of
vehicle control, which may cause an accident possi-
bly resulting in personal injury or death.
NOTE:For optimum braking power it is recommended
to use the Exhaust Brake while in Tow/Haul Mode.
The purpose of the exhaust brake (engine braking) fea-
ture is to supply negative (braking) torque to the engine.
Typically, the engine braking is used for, but not limited
to, vehicle towing applications where vehicle braking can
be achieved by the internal engine power, thereby spar-
ing the mechanical brakes of the vehicle.Benefits of the exhaust brake are:²vehicle driving control
²reduced brake fade
²longer brake life
²faster cab warm-up.
The exhaust brake feature can also be used to reduce the
engine warm up time. To use the exhaust brake as a
warm-up device, the vehicle must be moving less than 5
mph (8 km/h), the exhaust brake switch must be in the
ON position, and the coolant temperature must below
180ÉF (82ÉC) and ambient temperature below 60ÉF (16ÉC).
284 STARTING AND OPERATING
Page 290 of 527
NOTE:If the vehicle is started in extremely cold tem-
peratures, the transmission may not shift into Overdrive
and will automatically select the most desirable gear for
operation at this temperature. Normal operation will
resume when the transmission fluid temperature has
risen to a suitable level. Refer also to the Note under
torque converter clutch, later in this section.
If the transmission temperature gets extremely hot, the
transmission will automatically select the most desirable
gear for operation at this temperature. If the transmission
temperature becomes hot enough the TRANS TEMP light
may illuminate and the transmission may downshift out
of Overdrive until the transmission cools down. After
cooldown, the transmission will resume normal opera-
tion.
The transmission will downshift from Overdrive to Drive
if the accelerator pedal is fully depressed at vehicle
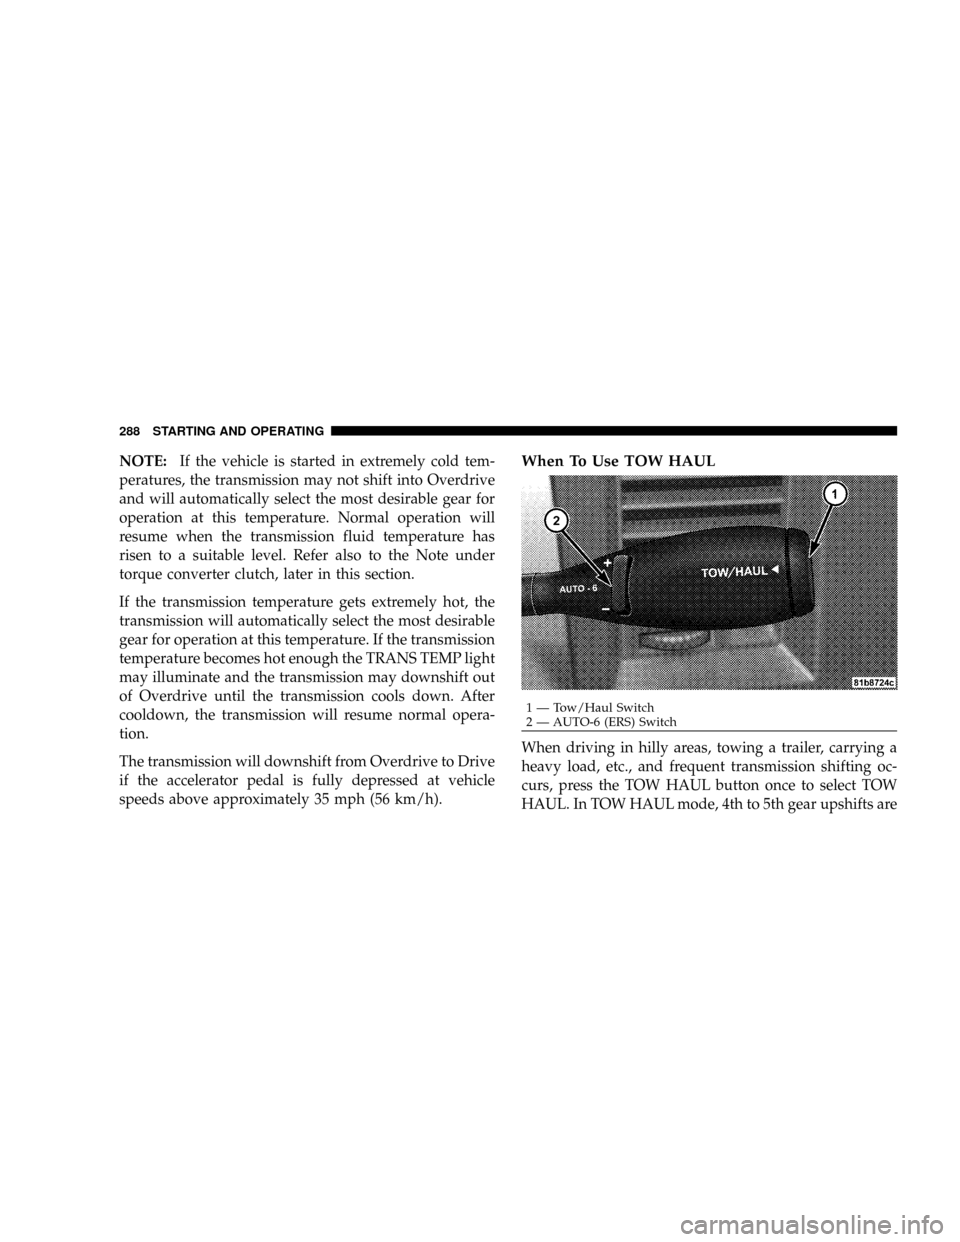
speeds above approximately 35 mph (56 km/h).When To Use TOW HAUL
When driving in hilly areas, towing a trailer, carrying a
heavy load, etc., and frequent transmission shifting oc-
curs, press the TOW HAUL button once to select TOW
HAUL. In TOW HAUL mode, 4th to 5th gear upshifts are
1 Ð Tow/Haul Switch
2 Ð AUTO-6 (ERS) Switch 288 STARTING AND OPERATING
Page 291 of 527
delayed. Shifts into 5th and 6th gear are still allowed
under steady cruise conditions. Closed throttle down-
shifts (for improved engine braking) may occur during
steady braking maneuvers. Pressing the switch a second
time restores normal operation. Normal operation is
always the default at engine start-up.
The TOW HAUL light will illuminate in the instrument
cluster to indicate when the switch has been activated. If
the TOW HAUL modes are desired, the button must be
pressed each time the engine is started.
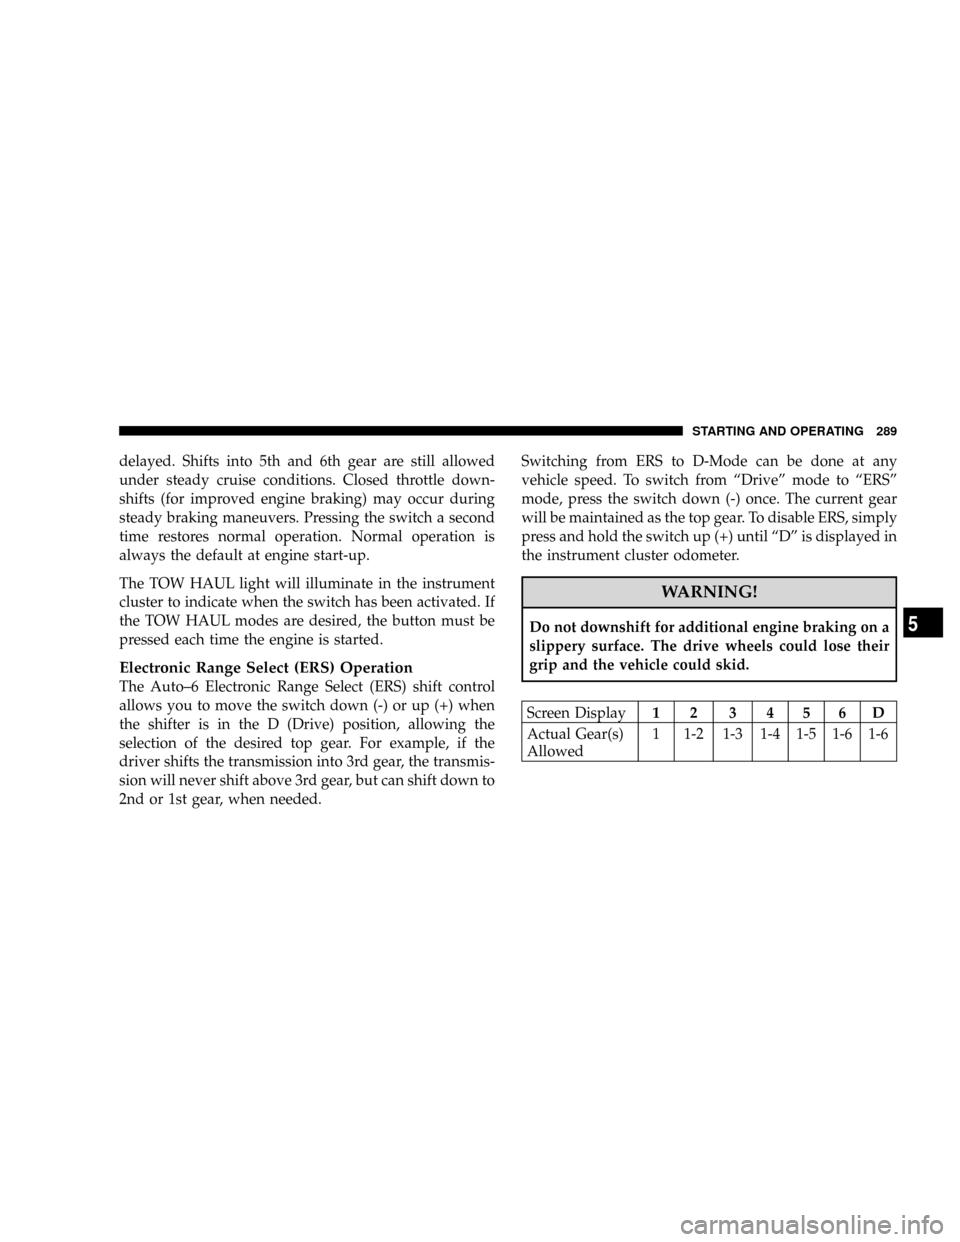
Electronic Range Select (ERS) Operation
The Auto±6 Electronic Range Select (ERS) shift control
allows you to move the switch down (-) or up (+) when
the shifter is in the D (Drive) position, allowing the
selection of the desired top gear. For example, if the
driver shifts the transmission into 3rd gear, the transmis-
sion will never shift above 3rd gear, but can shift down to
2nd or 1st gear, when needed.Switching from ERS to D-Mode can be done at any
vehicle speed. To switch from ªDriveº mode to ªERSº
mode, press the switch down (-) once. The current gear
will be maintained as the top gear. To disable ERS, simply
press and hold the switch up (+) until ªDº is displayed in
the instrument cluster odometer.
WARNING!
Do not downshift for additional engine braking on a
slippery surface. The drive wheels could lose their
grip and the vehicle could skid.
Screen Display12 3456D
Actual Gear(s)
Allowed1 1-2 1-3 1-4 1-5 1-6 1-6
STARTING AND OPERATING 289
5
Page 294 of 527
Truck models with manual transmission are equipped
with a clutch interlocking ignition system. The clutch
pedal must be fully depressed to start the vehicle.
Fully depress the clutch pedal before shifting gears. As
you release the clutch pedal, lightly depress the accelera-
tor pedal.
This transmission has a ªcreeperº 1st gear (L=low) which
should be used to start from a standing position when
carrying a payload or towing a trailer. Damage to the
clutch can result from starting in 2nd or 3rd gear with a
loaded vehicle. An unloaded vehicle may be launched in
2nd gear. Use each gear in numerical order ± do not skip
a gear.
You should use 1st gear when starting from a standing
position if under heavy load or when pulling a trailer.Recommended Vehicle Shift Speeds
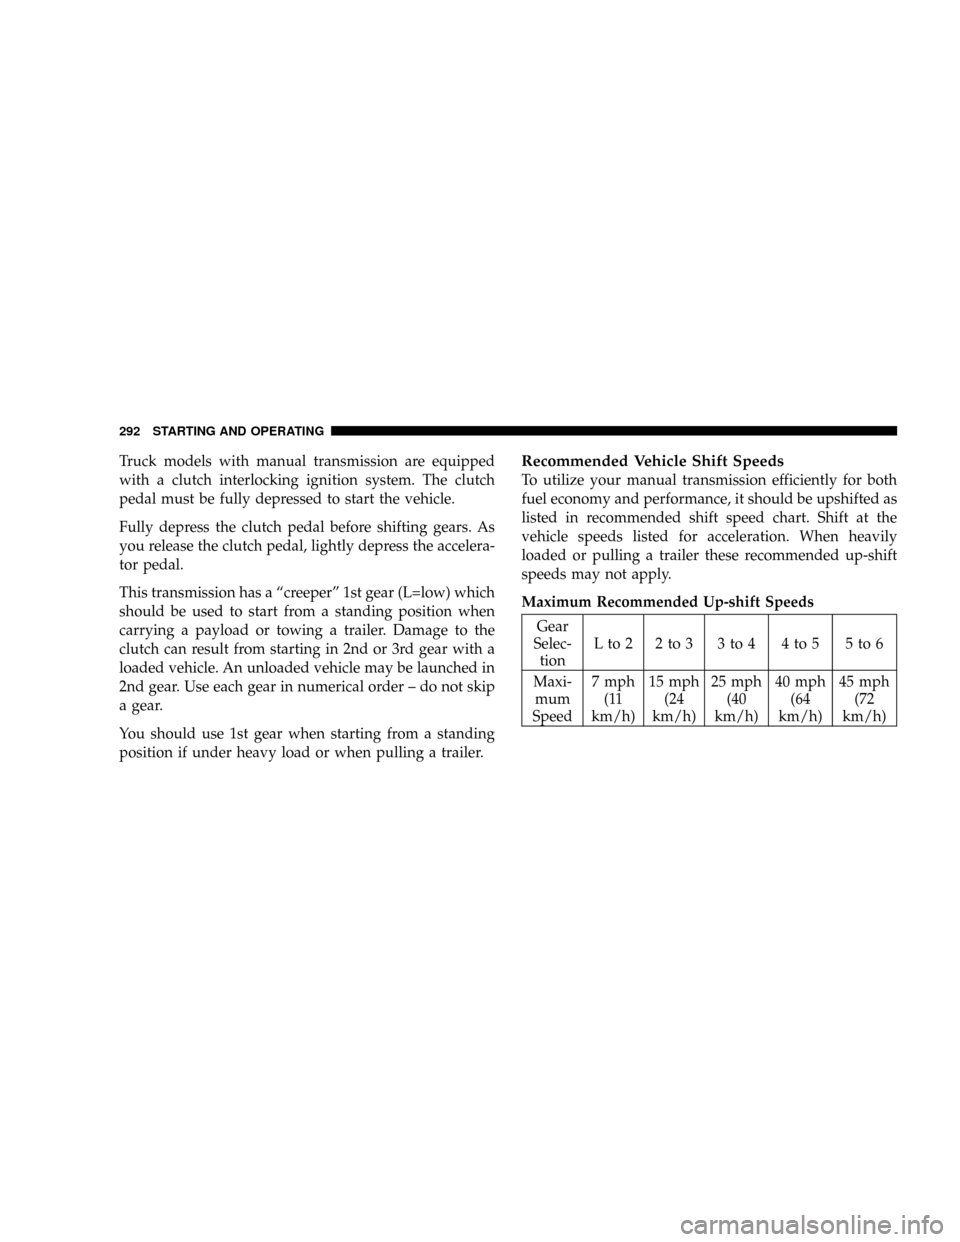
To utilize your manual transmission efficiently for both
fuel economy and performance, it should be upshifted as
listed in recommended shift speed chart. Shift at the
vehicle speeds listed for acceleration. When heavily
loaded or pulling a trailer these recommended up-shift
speeds may not apply.
Maximum Recommended Up-shift Speeds
Gear
Selec-
tionLto2 2to3 3to4 4to5 5to6
Maxi-
mum
Speed7 mph
(11
km/h)15 mph
(24
km/h)25 mph
(40
km/h)40 mph
(64
km/h)45 mph
(72
km/h)
292 STARTING AND OPERATING
Page 296 of 527
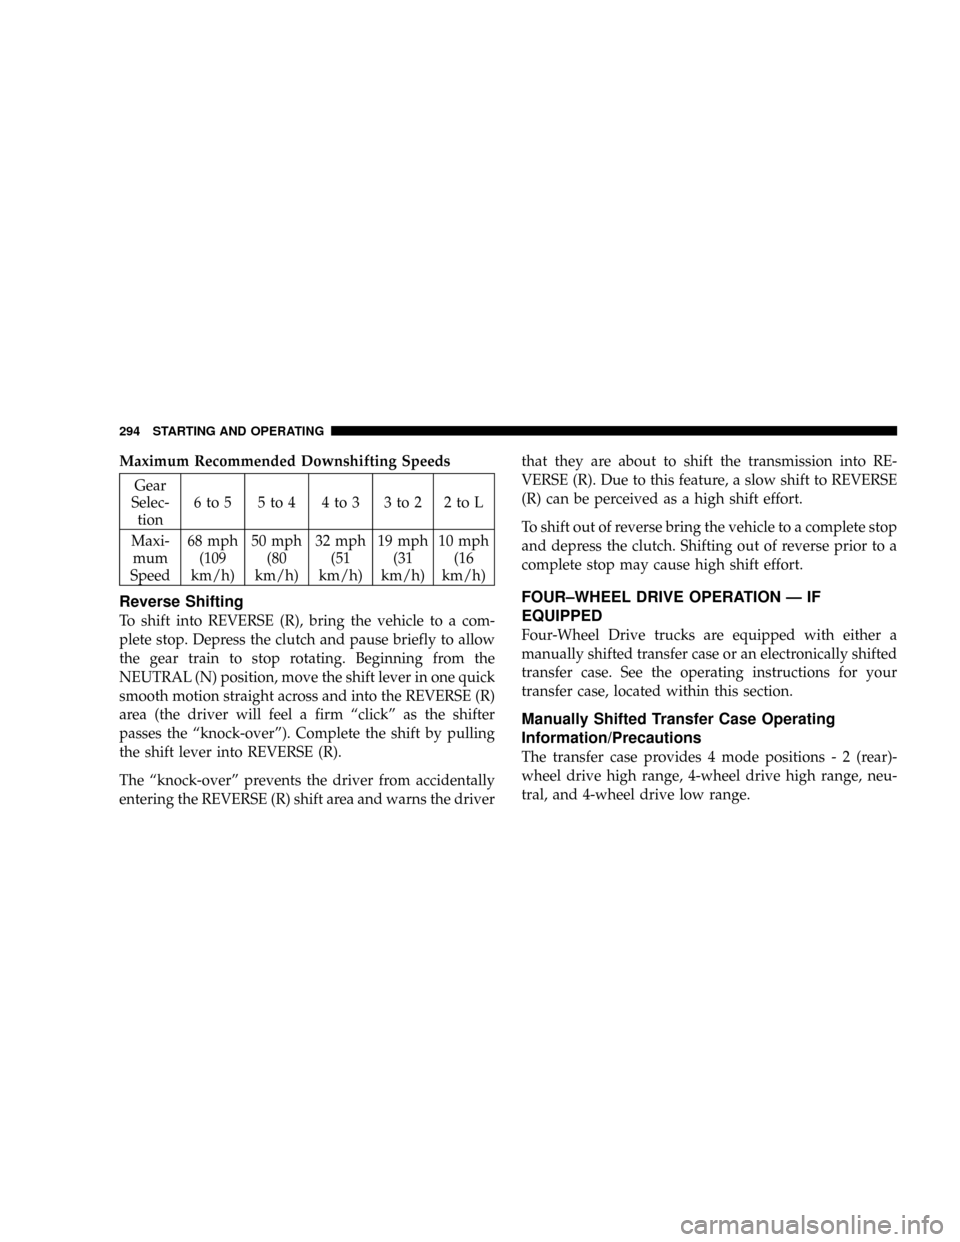
Maximum Recommended Downshifting Speeds
Gear
Selec-
tion6to5 5to4 4to3 3to2 2toL
Maxi-
mum
Speed68 mph
(109
km/h)50 mph
(80
km/h)32 mph
(51
km/h)19 mph
(31
km/h)10 mph
(16
km/h)
Reverse Shifting
To shift into REVERSE (R), bring the vehicle to a com-
plete stop. Depress the clutch and pause briefly to allow
the gear train to stop rotating. Beginning from the
NEUTRAL (N) position, move the shift lever in one quick
smooth motion straight across and into the REVERSE (R)
area (the driver will feel a firm ªclickº as the shifter
passes the ªknock-overº). Complete the shift by pulling
the shift lever into REVERSE (R).
The ªknock-overº prevents the driver from accidentally
entering the REVERSE (R) shift area and warns the driverthat they are about to shift the transmission into RE-
VERSE (R). Due to this feature, a slow shift to REVERSE
(R) can be perceived as a high shift effort.
To shift out of reverse bring the vehicle to a complete stop
and depress the clutch. Shifting out of reverse prior to a
complete stop may cause high shift effort.
FOUR±WHEEL DRIVE OPERATION Ð IF
EQUIPPED
Four-Wheel Drive trucks are equipped with either a
manually shifted transfer case or an electronically shifted
transfer case. See the operating instructions for your
transfer case, located within this section.
Manually Shifted Transfer Case Operating
Information/Precautions
The transfer case provides 4 mode positions-2(rear)-
wheel drive high range, 4-wheel drive high range, neu-
tral, and 4-wheel drive low range.
294 STARTING AND OPERATING