Page 155 of 527
WARNING!
Vehicle exhaust contains carbon monoxide, a danger-
ous gas. Do not run your vehicle in the garage while
training the transceiver. Exhaust gas can cause seri-
ous injury or death.
Programming HomeLinkT
Before You Begin
If you have not trained any of the HomeLinktbuttons,
erase all channels before you begin training.
To do this, press and hold the two outside buttons for 20
seconds. The EVIC will display ªCLEARING CHAN-
NELS.º Release the buttons when the EVIC message
states ªCHANNELS CLEARED.ºIt is recommended that a new battery be placed in the
hand-held transmitter of the device being programmed
to HomeLinktfor more efficient training and accurate
transmission of the radio-frequency signal.
Your vehicle should be parked outside of the garage
while training.
1. Turn the ignition switch to the ON/RUN position.
2. Place the hand-held transmitter 1 to 3 in (3 to 8 cm)
from the HomeLinktbuttons while keeping the EVIC
display in view.
For optimal training, point the battery end of the hand-
held transmitter away from the HomeLinkt.
3. Simultaneously, press and hold both the chosen
HomeLinktbutton and the hand-held transmitter button
until the EVIC display changes from ªCHANNEL #
TRAININGº to ªCHANNEL # TRAINED.º
UNDERSTANDING THE FEATURES OF YOUR VEHICLE 153
3
Page 157 of 527
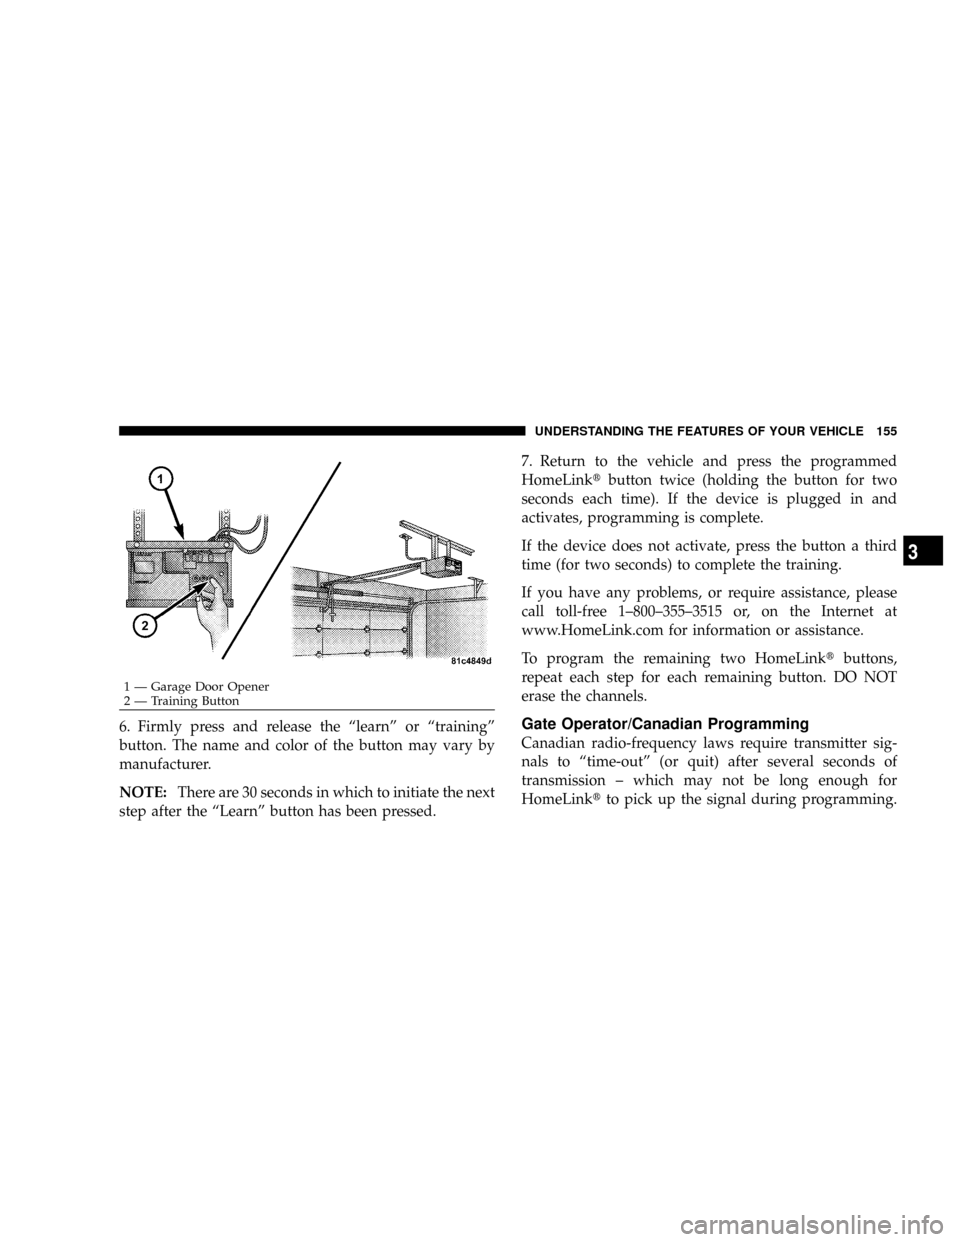
6. Firmly press and release the ªlearnº or ªtrainingº
button. The name and color of the button may vary by
manufacturer.
NOTE:There are 30 seconds in which to initiate the next
step after the ªLearnº button has been pressed.7. Return to the vehicle and press the programmed
HomeLinktbutton twice (holding the button for two
seconds each time). If the device is plugged in and
activates, programming is complete.
If the device does not activate, press the button a third
time (for two seconds) to complete the training.
If you have any problems, or require assistance, please
call toll-free 1±800±355±3515 or, on the Internet at
www.HomeLink.com for information or assistance.
To program the remaining two HomeLinktbuttons,
repeat each step for each remaining button. DO NOT
erase the channels.Gate Operator/Canadian Programming
Canadian radio-frequency laws require transmitter sig-
nals to ªtime-outº (or quit) after several seconds of
transmission ± which may not be long enough for
HomeLinktto pick up the signal during programming.
1 Ð Garage Door Opener
2 Ð Training ButtonUNDERSTANDING THE FEATURES OF YOUR VEHICLE 155
3
Page 158 of 527
Similar to this Canadian law, some U.S. gate operators are
designed to ªtime-outº in the same manner.
It may be helpful to unplug the device during the cycling
process to prevent possible overheating of the garage
door or gate motor.
If you are having difficulties programming a garage door
opener or a gate operator, replace ªProgramming
HomeLinkº Step 3 with the following:
3. Continue to press and hold the HomeLinktbutton
while you press and release - every two seconds
(ªcycleº) your hand-held transmitter until HomeLinkt
has successfully accepted the frequency signal. The
EVIC display will change from ªCHANNEL # TRAIN-
INGº to ªCHANNEL # TRAINED.º
If you unplugged the device for training, plug it back in
at this time.Then proceed with Step 4 under ªProgramming
HomeLinktº earlier in this section.
Using HomeLinkT
To operate, simply press and release the programmed
HomeLinktbutton. Activation will now occur for the
trained device (i.e., garage door opener, gate operator,
security system, entry door lock, home/office lighting,
etc.) The hand-held transmitter of the device may also be
used at any time.
Reprogramming A Single HomeLinkTButton
To reprogram a channel that has been previously trained,
follow these steps:
1. Turn the ignition switch to the ON/RUN position.
2. Press and hold the desired HomeLinktbutton for 20
seconds until the EVIC display states ªCHANNEL #
TRAINING.ºDo not release the button.
156 UNDERSTANDING THE FEATURES OF YOUR VEHICLE
Page 192 of 527
3. Turn Signal Indicators
Lights in instrument cluster flash when outside turn
signals are operating.
4. Tachometer
The tachometer indicates engine speed in revolutions per
minute.
CAUTION!
Do not operate the engine with the tachometer
pointer at high rpm for extended periods. Engine
damage may occur.
5. Airbag Indicator Light
The indicator lights and remains lit for 6 to 8 seconds
when the ignition is first turned on. If the light stays on,
flickers or comes on while driving, have the airbag
system checked by an authorized dealer.6. High Beam Indicator
This indicator shows that headlights are on high
beam.
7. Seat Belt Reminder Light
When the ignition switch is first turned ON, this
light will turn on for five to eight seconds as a bulb
check. During the bulb check, if the driver's seat
belt is unbuckled, a chime will sound. After the bulb
check or when driving, if the driver seat belt remains
unbuckled, the Seat Belt Warning Light will flash or
remain on continuously. Refer to9Enhanced Driver Seat
Belt Reminder System (BeltAlertt)9under ªOccupant
Restraintsº in section 2.
8. Speedometer
The speedometer shows the vehicle speed in miles per
hour and/or kilometers per hour.
190 UNDERSTANDING YOUR INSTRUMENT PANEL
Page 202 of 527
ELECTRONIC DIGITAL CLOCK
The clock and radio each use the display panel built into
the radio. A digital readout shows the frequency and/or
time in hours and minutes (depending on your radio
model) whenever the ignition switch is in the ON or ACC
position.
When the ignition switch is in the OFF position, or when
the radio frequency is being displayed, time keeping is
accurately maintained.
On the RAQ radio the time button alternates the location
of the time and frequency on the display. On the REF only
one of the two, time or frequency, is displayed at a time.
Clock Setting Procedure
1. Press and hold the time button until the hours blink.
2. Adjust the hours by turning the right side Tune/
Audio control.3. After the hours are adjusted, press the right side
Tune/Audio control to set the minutes.
4. Adjust the minutes using the right side Tune/Audio
control.
5. To exit, press any button/knob or wait approximately
five seconds.
RADIO GENERAL INFORMATION
Radio Broadcast Signals
The radio will provide excellent reception under most
operating conditions. Like any system, however, automo-
tive radios have performance limitations, due to mobile
operation and natural phenomena, which might lead you
to believe your sound system is malfunctioning. To help
you understand and save you concern about these ªap-
parentº malfunctions, you must understand a point or
two about the transmission and reception of radio sig-
nals.
200 UNDERSTANDING YOUR INSTRUMENT PANEL
Page 203 of 527
Two Types of Signals
There are two basic types of radio signals: AM or
Amplitude Modulation, in which the transmitted sound
causes the amplitude, or height, of the radio waves to
vary; and FM or Frequency Modulation, in which the
frequency of the wave is varied to carry the sound.
Electrical Disturbances
Radio waves may pick up electrical disturbances during
transmission. They mainly affect the wave amplitude,
and thus remain a part of the AM reception. They
interfere very little with the frequency variations that
carry the FM signal.
AM Reception
AM sound is based on wave amplitude, so AM reception
can be disrupted by such things as lightning, power lines
and neon signs.
FM Reception
Because FM transmission is based on frequency varia-
tions, interference that consists of amplitude variations
can be filtered out, leaving the reception relatively clear,
which is the major feature of FM radio.
NOTE:The radio, steering wheel radio controls (if
equipped), and 6-disc CD/DVD changer (if equipped)
will remain active for up to 10 minutes after the ignition
switch has been turned OFF. Opening a vehicle front
door will cancel this feature.
UNDERSTANDING YOUR INSTRUMENT PANEL 201
4
Page 348 of 527
the ignition key is cycled, this sequence will repeat,
providing the system fault still exists. A system fault can
occur by any of the following scenarios:
1. Signal interference due to electronic devices or driving
next to facilities emitting the same Radio Frequencies as
the TPM sensors.
2. Installing aftermarket window tinting that affects ra-
dio wave signals.
3. Accumulation of snow or ice around the wheels or
wheel housings.
4. Using tire chains on the vehicle.
5. Using wheels/tires not equipped with TPM sensors.
6. Loss of communication with the trigger modules or
tire pressure monitoring sensors.
NOTE: Your vehicle is equipped with a non-matching
full size spare wheel and tire assembly.1. This spare tire does not have a tire pressure monitor-
ing sensor. Therefore, the TPMS will not monitor the tire
pressure in the spare tire.
2. If you install the full size spare tire in place of a road
tire that has a pressure below the low-pressure warning
limit, upon the next ignition key cycle, a chime will
sound and the TPM Telltale Light will still turn ON due
to the low tire.
3. However, after driving the vehicle for up to 10 min-
utes above 15 mph (25 km/h), the TPM Telltale Light will
flash on and off for 75 seconds and then remain on solid.
4. For each subsequent ignition key cycle, a chime will
sound and the TPM Telltale Light will flash on and off for
75 seconds and then remain on solid.
5. Once you repair or replace the original road tire, and
reinstall it on the vehicle in place of the full size spare tire,
the TPMS will update automatically and the TPM Telltale
346 STARTING AND OPERATING
Page 367 of 527
þAn electronically actuated trailer brake controller is
required when towing a trailer with electronically
actuated brakes. When towing a trailer equipped with
a hydraulic surge actuated brake system, an electronic
brake controller is not required.
þTrailer brakes are recommended for trailers over 1,000
lbs (454 kg) and required for trailers in excess of 2,000
lbs (907 kg).
CAUTION!
If the trailer weighs more than 1,000 lbs (454 kg)
loaded, it should have its own brakes and they
should be of adequate capacity. Failure to do this
could lead to accelerated brake lining wear, higher
brake pedal effort, and longer stopping distances.
WARNING!
Do not connect trailer brakes to your vehicle's hy-
draulic brake lines. It can overload your brake sys-
tem and cause it to fail. You might not have brakes
when you need them and could have an accident.
Towing any trailer will increase your stopping dis-
tance. When towing you should allow for additional
space between your vehicle and the vehicle in front
of you. Failure to do so could result in an accident.
Towing Requirements Ð Trailer Lights & Wiring
Whenever you pull a trailer, regardless of the trailer size,
stop lights and turn signals on the trailer are required for
motoring safety.
STARTING AND OPERATING 365
5