2008 DODGE GRAND CARAVAN service
[x] Cancel search: servicePage 463 of 531
²Do not change the thermostat for summer or winter
operation. If replacement is ever necessary, install
ONLY the correct type thermostat. Other designs may
result in unsatisfactory coolant performance, poor gas
mileage, and increased emissions.
HOSES AND VACUUM/VAPOR HARNESSES
Inspect surfaces of hoses and nylon tubing for evidence
of heat and mechanical damage. Hard or soft spots,
brittle rubber, cracking, tears, cuts, abrasions, and exces-
sive swelling indicate deterioration of the rubber.
Pay particular attention to those hoses nearest to high
heat sources such as the exhaust manifold. Inspect hose
routing to be sure hoses do not come in contact with any
heat source or moving component which may cause heat
damage or mechanical wear.
Ensure nylon tubing in these areas has not melted or
collapsed.Inspect all hose connections such as clamps and cou-
plings to make sure they are secure and no leaks are
present.
Components should be replaced immediately if there is
any evidence of wear or damage that could cause failure.FUEL SYSTEM CONNECTIONS
The Electronic Fuel Injection high-pressure fuel system's
hoses and quick connect fittings have unique material
characteristics that provide adequate sealing and resist
attack by deteriorated gasoline.
You are urged to use only the manufacture specified
hoses with quick connect fittings, or their equivalent in
material and specification, in any fuel system servicing. It
is mandatory to replace any damaged hoses or quick
connect fittings that have been removed during service.
Care should be taken in installing quick connect fittings
to ensure they are properly installed and fully connected.
See your authorized dealer for service.
MAINTAINING YOUR VEHICLE 461
7
Page 464 of 531
BRAKES
In order to assure brake system performance, all brake
system components should be inspected periodically.
Suggested service intervals can be found in the Mainte-
nance Schedules.
WARNING!
Riding the brakes can lead to brake failure and
possibly an accident. Driving with your foot resting
or riding on the brake pedal can result in abnormally
high brake temperatures, excessive lining wear, and
possible brake damage. You wouldn't have your full
braking capacity in an emergency.
Brake And Power Steering Hoses
When the vehicle is serviced for scheduled maintenance,
inspect surface of hoses and nylon tubing for evidence of
heat and mechanical damage. Hard and brittle rubber,cracking, tears, cuts, abrasion, and excessive swelling
indicate deterioration of the rubber. Particular attention
should be made to examining those hose surfaces nearest
to high heat sources, such as the exhaust manifold.
Ensure nylon tubing in these areas has not melted or
collapsed.
Inspect all hose connections such as clamps and cou-
plings to make sure they are secure and no leaks are
present.
NOTE:Often, fluid such as oil, power steering fluid,
and brake fluid are used during assembly plant opera-
tions to facilitate the assembly of hoses to couplings.
Therefore, oil wetness at the hose-coupling area is not
necessarily an indication of leakage. Actual dripping of
hot fluid when systems are under pressure (during
vehicle operation), should be noted before hose is re-
placed based on leakage.
462 MAINTAINING YOUR VEHICLE
Page 465 of 531
NOTE:Inspection of brake hoses should be performed
whenever the brake system is serviced and every engine
oil change. Inspect hydraulic brake hoses for surface
cracking, scuffing, or worn spots. If there is any evidence
of cracking, scuffing, or worn spots, the hose should be
replaced immediately! Eventual deterioration of the hose
can take place resulting in a possibility of a burst failure.
WARNING!
Worn brake hoses can burst and cause brake failure.
You could have an accident. If you see any signs of
cracking, scuffing, or worn spots, have the brake
hoses replaced immediately.
Master Cylinder Ð Brake Fluid Level Check
The fluid level in the master cylinder should be checked
when performing underhood services, or immediately if
the brake system warning light indicates system failure.
Clean the top of the master cylinder area before removing
the cap. Add fluid to bring the level up to the top of the
ªFULLº mark on the side of the master cylinder reservoir.
Overfilling of fluid is not recommended because it may
cause leaking in the system.
Add enough fluid to bring the level up to the require-
ments described on the brake fluid reservoir. With disc
brakes, fluid level can be expected to fall as the brake
pads wear. However, low fluid level may be caused by a
leak and a checkup may be needed.
Use only manufacturer's recommended brake fluid, refer
to Fluids, Lubricants and Genuine Parts for correct fluid
type.
MAINTAINING YOUR VEHICLE 463
7
Page 466 of 531
WARNING!
²Overfilling the brake fluid reservoir can result in
spilling brake fluid on hot engine parts and the
brake fluid catching fire.
²Use of a brake fluid that has a lower initial boiling
point than the recommended MOPARtDOT 3
product or a brake fluid that is unidentified as to
FMVSS specification may result in sudden brake
failure during hard prolonged braking. You could
have an accident.
Use only brake fluid that has been in a tightly closed
container to avoid contamination from foreign matter or
moisture.
CAUTION!
Do not allow petroleum base fluid to contaminate the
brake fluid Ð all brake seal components could be
damaged causing partial or complete brake failure.
AUTOMATIC TRANSAXLE
The automatic transaxle and differential assembly are
contained within a single housing.
The fluid level in the automatic transaxle should be
checked whenever the vehicle is serviced. Operation with
an improper fluid level will greatly reduce the life of the
transaxle and the fluid.
All Four±Speed automatic transaxles are equipped with a
conventional filler tube and dipstick. If fluid is added, it
should be added through the filler tube.
464 MAINTAINING YOUR VEHICLE
Page 467 of 531
All six speed transaxles are equipped with a capped
dipstick tube, it is sealed and should not be tampered
with. Your authorized dealer has the necessary tools to
ensure that the fluid level is set properly.
Selection of Lubricant
It is important that the proper lubricant is used in the
transaxle to assure optimum transaxle performance. Use
only manufacturer 's recommended transaxle fluid; refer
to Fluids, Lubricants and Genuine Parts for correct fluid
type. It is important that the transaxle fluid be main-
tained at the prescribed level using the recommended
fluid. No chemical flushes should be used in any trans-
axle; only the approved lubricant may be used.
CAUTION!
Using a transaxle fluid other than the manufacturer's
recommended fluid may cause deterioration in trans-
axle shift quality and/or torque converter shudder.
Using a transaxle fluid other than the manufacturer's
recommended fluid will result in more frequent
fluid and filter changes. Refer to Fluids, Lubricants
and Genuine Parts for correct fluid type.
Fluid Level Check Ð 3.8L and 4.0L Engines with
Six-Speed Automatic Transaxle Ð If Equipped
The Six-Speed automatic transaxle is a sealed unit and
has no dipstick. See your authorized dealer to have the
transaxle fluid checked or serviced.
MAINTAINING YOUR VEHICLE 465
7
Page 483 of 531
The Heated Mirrors, Lower Instrument Panel Power
Outlet and Removable Floor Console, when in the front
position are fused with self-resetting fuses that are only
serviceable by an authorized dealer. The power seats are
fused by a 30 Amp circuit breaker located under the
driver's seat. The Power Windows are fused by a 25 Amp
circuit breaker located under the instrument panel near
the steering column. If you experience temporary or
permanent loss of these systems, see your authorized
dealer for service.
VEHICLE STORAGE
If you are leaving your vehicle dormant for more than 21
days you may want to take steps to protect your battery.
You may do the following:
²Remove the 20 Amp mini-fuse in the Integrated Power
Module labeled Ignition-Off Draw (IOD).
²Or, disconnect the negative cable from the battery.
²Anytime you store your vehicle, or keep it out of
service for two weeks or more, run the air conditioning
system at idle for about five minutes in the fresh air
and high blower setting. This will ensure adequate
system lubrication to minimize the possibility of com-
pressor damage when the system is started again.
REPLACEMENT LIGHT BULBS
LIGHT BULBS Ð Interior Bulb Number
Center & Rear Dome Light.................. 578
Center & Rear Reading Lights............... 578
Front Door Courtesy Light.................. 578
Front Header Reading Lights Ð If Equipped..... 578
Instrument Cluster Lights.................PC74
Liftgate Light(s).......................... 578
Overhead Console Reading Lights..........PC579
Removable Console Light Ð If Equipped....... 194
Visor Vanity Lights....................6501966
MAINTAINING YOUR VEHICLE 481
7
Page 484 of 531
NOTE:For lighted switches, see your dealer for replace-
ment.
All of the interior bulbs are glass wedge base or glass
cartridge types. Aluminum base bulbs are not approved
and should not be used for replacement.
LIGHT BULBS Ð Exterior Bulb Number
Backup, Tail, Stop Light...................3157
Center High-Mounted Stop Light. . . LED (See Note 1)
Fog Light Ð If Equipped..................9145
Front Side Marker,
Park/Turn Signal............... P27/7Wor3157
Headlight............................. H13
License................................ 168
Note 1: The Center High-Mounted Stop Light (CHMSL)
uses LED lights that are not serviceable separately. The
CHMSL must be replaced as an assembly, see your
authorized Dealer.BULB REPLACEMENT
Headlights
1.Raise the hood to access the rear of the headlight housing.
2. Slide the red lock tab rearward on the connector, then
depress the tab and remove the connector from the bulb.
3. Twist the headlight bulb and pull the bulb from
headlight housing.
4. Install the new headlight bulb and twist until locked
into the headlight housing.
CAUTION!
Do not touch the new bulb with your fingers. Oil
contamination will severely shorten bulb life. If the
bulb comes in contact with an oily surface, clean the
bulb with rubbing alcohol.
482 MAINTAINING YOUR VEHICLE
Page 487 of 531
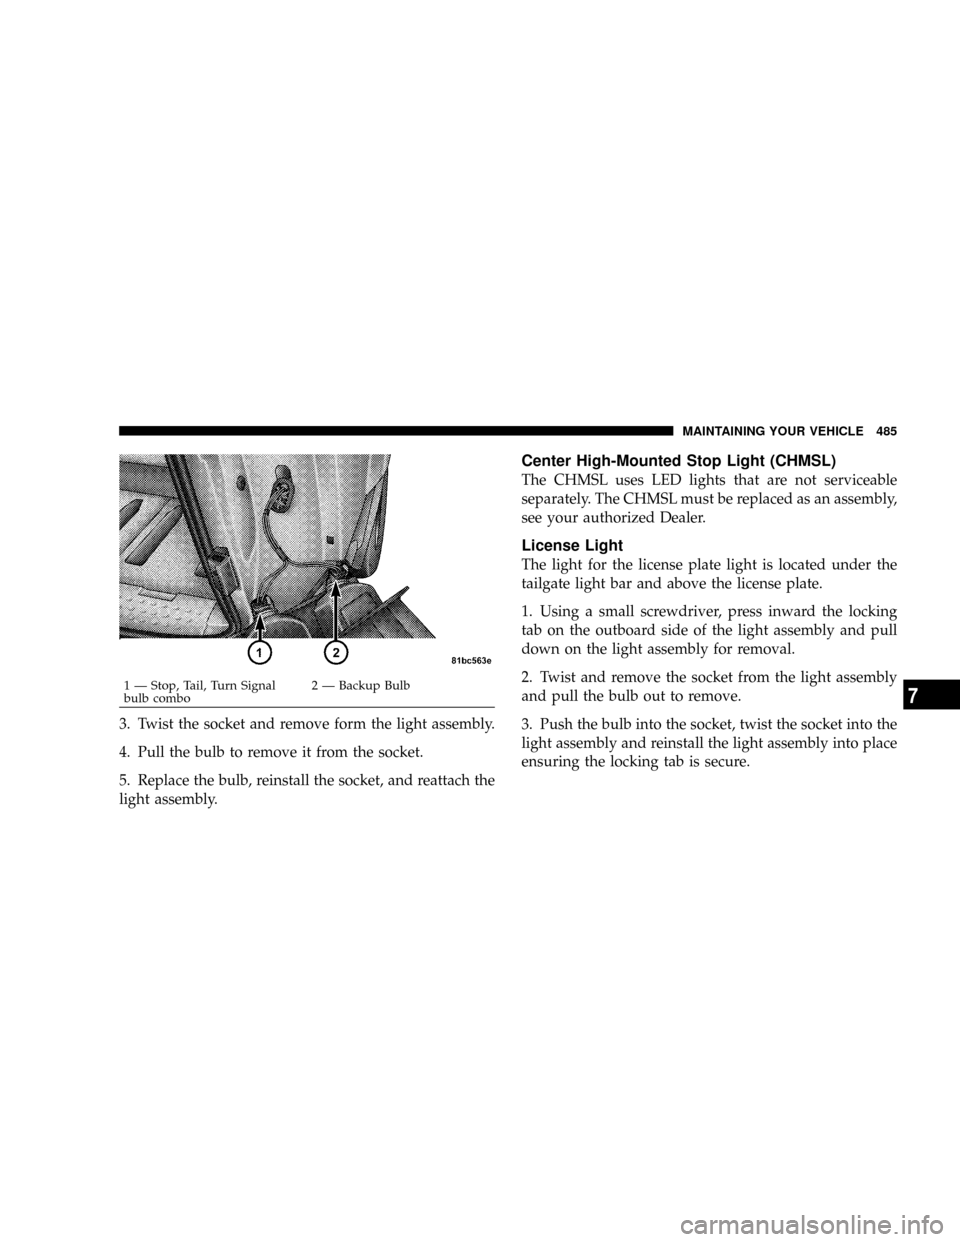
3. Twist the socket and remove form the light assembly.
4. Pull the bulb to remove it from the socket.
5. Replace the bulb, reinstall the socket, and reattach the
light assembly.
Center High-Mounted Stop Light (CHMSL)
The CHMSL uses LED lights that are not serviceable
separately. The CHMSL must be replaced as an assembly,
see your authorized Dealer.
License Light
The light for the license plate light is located under the
tailgate light bar and above the license plate.
1. Using a small screwdriver, press inward the locking
tab on the outboard side of the light assembly and pull
down on the light assembly for removal.
2. Twist and remove the socket from the light assembly
and pull the bulb out to remove.
3. Push the bulb into the socket, twist the socket into the
light assembly and reinstall the light assembly into place
ensuring the locking tab is secure.
1 Ð Stop, Tail, Turn Signal
bulb combo2 Ð Backup BulbMAINTAINING YOUR VEHICLE 4857