Page 344 of 466
HAZARD WARNING FLASHER
The hazard flasher switch is located in the center of the
instrument panel below the center air outlets.To engage the Hazard Warning Flashers, depress the
switch on the instrument panel. When the Hazard Warn-
ing Switch is activated, all directional turn signals will
flash on and off to warn oncoming traffic of an emer-
gency. Push the switch a second time to turn off the
flashers.
This is an emergency warning system and it should not
be used when the vehicle is in motion. Use it when your
vehicle is disabled and it is creating a safety hazard for
other motorists.
When you must leave the vehicle to seek assistance, the
Hazard Warning Flashers will continue to operate even
though the ignition switch is OFF.
NOTE:With extended use, the Hazard Warning Flash-
ers may wear down your battery.
Hazard Flasher Switch
344 WHAT TO DO IN EMERGENCIES
Page 356 of 466

correct tightness of each lug nut is 100 ft/lb. (135 N. m).
If in doubt about the correct tightness, have them
checked with a torque wrench by your dealer or at a
service station.
7. For vehicles equipped with center caps, install the
center cap by hand. Do not use a hammer or excessive
force to install the center cap.
8. Stow the jack, tools, and spare tire. Make sure the base
of the jack faces the rear of the vehicle before tightening
down the fastener.
WARNING!
A loose tire or jack thrown forward in a collision or
hard stop could endanger the occupants of the ve-
hicle. Always stow the jack parts and the spare tire in
the places provided.
JUMP-STARTING PROCEDURES
WARNING!
²Take care to avoid the radiator cooling fan whenever the hood is raised.
It can start anytime the ignition switch is on. You can be hurt by the fan.
²Do not attempt to push or tow your vehicle to get it started. Vehicles
equipped with an automatic transmission cannot be started this way.
Unburned fuel could enter the catalytic converter and once the engine
has started, ignite and damage the converter and vehicle. If the vehicle
has a discharged battery, booster cables may be used to obtain a start
from another vehicle. This type of start can be dangerous if done
improperly, so follow this procedure carefully.
²Battery fluid is a corrosive acid solution; do not allow battery fluid to
contact eyes, skin, or clothing. Don't lean over battery when attaching
clamps or allow the clamps to touch each other. If acid splashes in eyes
or on skin, flush contaminated area immediately with large quantities of
water.
²A battery generates hydrogen gas, which is flammable and explosive.
Keep flame or spark away from the vent holes.
²Do not use a booster battery or any other booster source with an output
that exceeds 12 volts.
²The battery in this vehicle has a vent hose that should not be discon-
nected and should only be replaced with a battery of the same type
(vented).
356 WHAT TO DO IN EMERGENCIES
Page 357 of 466

NOTE:The battery is stored under an access cover in
the trunk. Remote battery terminals are located in the
engine compartment for jump-starting.
1. Wear eye protection and remove any metal jewelry
such as watchbands or bracelets that might make an
inadvertent electrical contact.
2. When boost is provided by a battery in another
vehicle, park that vehicle within booster cable reach, but
do not allow the vehicles to touch one another.
WARNING!
Do not permit vehicles to touch each other as this
could establish a ground connection and personal
injury could result.3. Set the parking brake, place the automatic transmis-
sion in ªPº (Park), and turn the ignition switch to the
LOCK position on both vehicles.
4. Turn off the heater, radio, and all unnecessary electri-
cal loads.
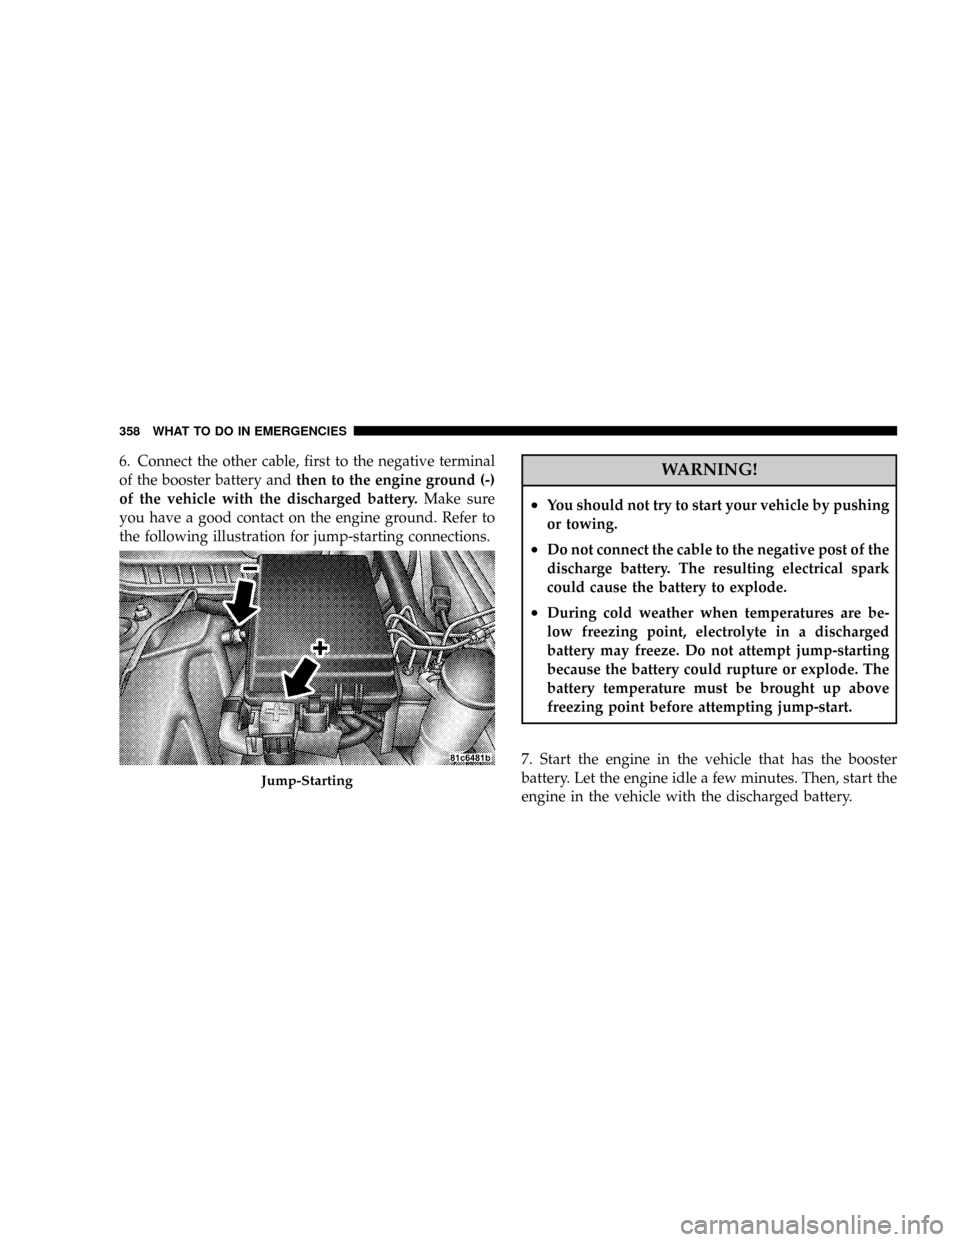
5. Connect one end of the jumper cable to the remote
jump-start positive battery post(+)in the engine com-
partment. Connect the other end of the same cable to the
positive terminal of the booster battery. Refer to the
following illustration for jump-starting connections.
WHAT TO DO IN EMERGENCIES 357
6
Page 358 of 466

6. Connect the other cable, first to the negative terminal
of the booster battery andthen to the engine ground (-)
of the vehicle with the discharged battery.Make sure
you have a good contact on the engine ground. Refer to
the following illustration for jump-starting connections.WARNING!
²You should not try to start your vehicle by pushing
or towing.
²Do not connect the cable to the negative post of the
discharge battery. The resulting electrical spark
could cause the battery to explode.
²During cold weather when temperatures are be-
low freezing point, electrolyte in a discharged
battery may freeze. Do not attempt jump-starting
because the battery could rupture or explode. The
battery temperature must be brought up above
freezing point before attempting jump-start.
7. Start the engine in the vehicle that has the booster
battery. Let the engine idle a few minutes. Then, start the
engine in the vehicle with the discharged battery.
Jump-Starting
358 WHAT TO DO IN EMERGENCIES
Page 359 of 466

NOTE:For vehicles equipped with ESP, refer to9Syn-
chronizing ESP9under9Electronic Stability Program9in
Section 5 of this manual if the ESP/BAS light (in the
instrument cluster) remains on continuously after start-
ing the engine of the vehicle with the discharged battery.
8. When removing the jumper cables, reverse the above
sequence exactly. Be careful of the moving belts and fan.
WARNING!
Any procedure other than above could result in:
1. Personal injury caused by electrolyte squirting out
the battery vent;
2. Personal injury or property damage due to battery
explosion;
3. Damage to charging system of booster vehicle or
of immobilized vehicle.
FREEING A STUCK VEHICLE
If your vehicle becomes stuck in mud, sand, or snow, it
can often be moved by a rocking motion. Turn your
steering wheel right and left to clear the area around the
front wheels. Then shift back and forth between Reverse
and Drive. Usually the least accelerator pedal pressure to
maintain the rocking motion without spinning the
wheels is most effective.
NOTE:Turn off the Electronic Stability Program (ESP)
Ð if equipped, or Traction Control System (TCS) Ð if
equipped before rocking the vehicle. For details, refer to
ªElectronic Stability Programº or ªTraction Control Sys-
temº in this manual.
WHAT TO DO IN EMERGENCIES 359
6
Page 364 of 466

NMaintenance-Free Battery................381
NAir Conditioner Maintenance.............383
NA/C Air Filter Ð If Equipped............384
NPower Steering Ð Fluid Check............384
NFront & Rear Suspension Ball Joints........385
NSteering Linkage......................385
NBody Lubrication.....................385
NWindshield Wiper Blades................386
NWindshield Washers...................386
NExhaust System......................387
NCooling System.......................388
NHoses And Vacuum/Vapor Harnesses.......393
NFuel System.........................393NBrake System........................394
NAutomatic Transmission................396
NAll Wheel Drive (AWD) Ð If Equipped.....398
NFront And Rear Wheel Bearings...........398
NAppearance Care And Protection From
Corrosion...........................398
NCleaning The Center Console Cup Holders . . . 403
mFuses (Power Distribution Centers)..........404
NFuses (Front Power Distribution Center).....404
NFuses (Rear Power Distribution Center)......406
mVehicle Storage........................411
mReplacement Light Bulbs.................412
mBulb Replacement......................413
364 MAINTAINING YOUR VEHICLE
Page 366 of 466
2.7L ENGINE COMPARTMENT
1 Ð Fuses (Front Power Distribution Center) 6 Ð Air Cleaner Filter
2 Ð Engine Oil Dipstick 7 Ð Coolant Pressure Cap
3 Ð Brake Fluid Reservoir Access Cover 8 Ð Engine Oil Fill
4 Ð Coolant Bottle 9 Ð Remote Jump-Start Positive Battery Post
5 Ð Power Steering Fluid 10 Ð Washer Fluid Bottle 366 MAINTAINING YOUR VEHICLE
Page 367 of 466
3.5L ENGINE COMPARTMENT
1 Ð Fuses (Front Power Distribution Center) 6 Ð Coolant Bottle
2 Ð Air Cleaner Filter 7 Ð Engine Oil Fill
3 Ð Brake Fluid Reservoir Access Cover 8 Ð Engine Oil Dipstick
4 Ð Coolant Pressure Cap 9 Ð Washer Fluid Bottle
5 Ð Power Steering Fluid 10 Ð Remote Jump-Start Positive Battery PostMAINTAINING YOUR VEHICLE 367
7