Page 325 of 466

WARNING!
²Never have any smoking materials lit in or near
the vehicle when the gas cap is removed or the
tank filled.
²Never add fuel to the vehicle when the engine is
running.
²A fire may result if gasoline is pumped into a
portable container that is inside of a vehicle. You
could be burned. Always place gas containers on
the ground while filling.
NOTE:
²Tighten the gas cap until you hear a ªclickingº sound.
This is an indication that the gas cap is tightened
properly. The Malfunction Indicator Light in the in-
strument cluster may turn on if the gas cap is not
secured properly. Make sure that the gas cap is tight-
ened each time the vehicle is refueled.
²When the fuel nozzle ªclicksº or shuts off, the fuel
tank is full.
Loose Fuel Filler Cap Message
If the vehicle diagnostic system determines that the fuel
filler cap is loose, improperly installed, or damaged, a
ªCheck Gascapº message will display in the Electronic
Vehicle Information Center (EVIC) Ð if equipped. If this
occurs, tighten the fuel filler cap properly and press the
odometer reset button to turn off the message. If the
problem continues, the message will appear the next time
the vehicle is started.
A loose, improperly installed, or damaged fuel filler cap
may also turn on the Malfunction Indicator Light (MIL).
Refer to ªOnboard Diagnostic Systemº in Section 7 of this
manual for more information.
STARTING AND OPERATING 325
5
Page 333 of 466

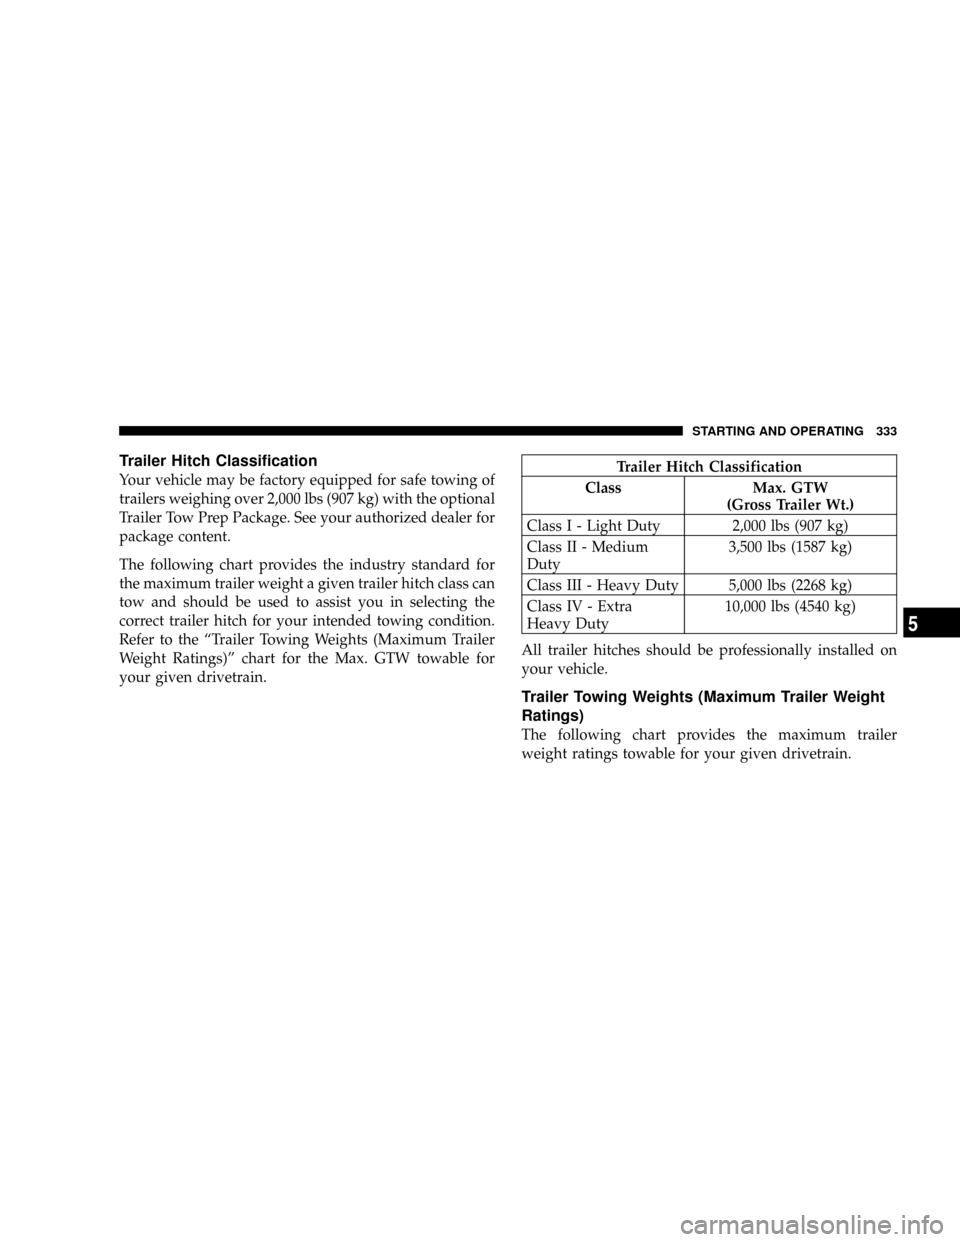
Trailer Hitch Classification
Your vehicle may be factory equipped for safe towing of
trailers weighing over 2,000 lbs (907 kg) with the optional
Trailer Tow Prep Package. See your authorized dealer for
package content.
The following chart provides the industry standard for
the maximum trailer weight a given trailer hitch class can
tow and should be used to assist you in selecting the
correct trailer hitch for your intended towing condition.
Refer to the ªTrailer Towing Weights (Maximum Trailer
Weight Ratings)º chart for the Max. GTW towable for
your given drivetrain.Trailer Hitch Classification
Class Max. GTW
(Gross Trailer Wt.)
Class I - Light Duty 2,000 lbs (907 kg)
Class II - Medium
Duty3,500 lbs (1587 kg)
Class III - Heavy Duty 5,000 lbs (2268 kg)
Class IV - Extra
Heavy Duty10,000 lbs (4540 kg)
All trailer hitches should be professionally installed on
your vehicle.
Trailer Towing Weights (Maximum Trailer Weight
Ratings)
The following chart provides the maximum trailer
weight ratings towable for your given drivetrain.
STARTING AND OPERATING 333
5
Page 339 of 466
WARNING!
Do not connect trailer brakes to your vehicle's hy-
draulic brake lines. It can overload your brake sys-
tem and cause it to fail. You might not have brakes
when you need them and could have an accident.
Towing any trailer will increase your stopping dis-
tance. When towing, you should allow for additional
space between your vehicle and the vehicle in front
of you. Failure to do so could result in an accident.
Towing Requirements Ð Trailer Lights & Wiring
Whenever you pull a trailer, regardless of the trailer size,
stoplights and turn signals on the trailer are required for
motoring safety.
The Trailer Tow Package may includea4and7pin
wiring harness. Use a factory approved trailer harness
and connector.
NOTE:Do not cut or splice wiring into the vehicles
wiring harness.
STARTING AND OPERATING 339
5
Page 341 of 466

Towing Tips
Before setting out on a trip, practice turning, stopping,
and backing the trailer in an area located away from
heavy traffic.
Towing Tips Ð Automatic Transmission
The ªDº range can be selected when towing. However, if
frequent shifting occurs while in this range, the ª3º range
should be selected.
NOTE:Using the ª3º range while operating the vehicle
under heavy operating conditions will improve perfor-
mance and extend transmission life by reducing exces-
sive shifting and heat build up. This action will also
provide better engine braking.
If you REGULARLY tow a trailer for more than 45
minutes of continuous operation, then change the auto-
matic transamission fluid and filter according to the
interval specified for ªpolice, taxi, fleet, or frequent trailer
towingº in the ªMaintenance Scheduleº in this manual.
Towing Tips Ð Electronic Speed Control (If
Equipped)
þ
Don't use in hilly terrain or with heavy loads.
þWhen using the speed control, if you experience speed
drops greater than 10 mph (16 km/h), disengage until
you can get back to cruising speed.
þUse speed control in flat terrain and with light loads to
maximize fuel efficiency.
Towing Tips Ð Autostickt(If Equipped)
þ
For vehicles equipped with Autostick.tBy using the
Autosticktmodes, and selecting a specific gear range,
frequent shifting can be avoided. The highest gear
range should be selected that allows for adequate
performance. For example, choose ª4º if the desired
speed can be maintained. Choose ª3º or ª2º if needed
to maintain the desired speed.
STARTING AND OPERATING 341
5
Page 353 of 466

6. Raise the vehicle just enough to remove the flat tire
and install the spare tire.
WARNING!
Raising the vehicle higher than necessary can make
the vehicle less stable. It could slip off the jack and
hurt someone near it. Raise the vehicle only enough
to remove the tire.
7. Remove the lug nuts, wheel cover (if equipped), and
tire. Remove the cover by hand. Do not pry it off.
8. Mount the spare tire.
NOTE:For vehicles so equipped, do not attempt to
install a center cap or wheel cover on the compact spare.
However, when reinstalling the road tire, follow the
procedure under ªWheel Cover or Center Cap Installa-
tionº in place of the remaining steps in this procedure.9. Install the lug nuts with the cone shaped end of the
nut toward the wheel. Lightly tighten the lug nuts. To
avoid the risk of forcing the vehicle off the jack, do not
tighten the lug nuts fully until the vehicle is lowered to
the ground.
10. Lower the vehicle to the ground by turning the jack
handle counter-clockwise.
11. Finish tightening the lug nuts. Push down on the
wrench while tightening for increased leverage. Alternate
lug nuts until each nut has been tightened twice. The
correct tightness of each lug nut is 100 ft/lb. (135 N. m).
If in doubt about the correct tightness, have them
checked with a torque wrench by your dealer or at a
service station.
12. Stow the jack, tools, and flat tire. Make sure the base
of the jack faces the rear of the vehicle before tightening
down the fastener.
WHAT TO DO IN EMERGENCIES 353
6
Page 355 of 466

1. Mount the road tire on the axle. For vehicles equipped
with wheel covers, perform Steps 2 and 3. For vehicles
equipped with center caps, proceed to Step 4.
2. Install two lug nuts on the mounting studs, which are
on each side of the stud that is in alignment with the
valve stem. Install the lug nuts with the cone shaped end
of the nut toward the wheel. Lightly tighten the lug nuts.To avoid the risk of forcing the vehicle off the jack, do not
tighten the lug nuts fully until the vehicle is lowered to
the ground.
3. Align the valve notch in the wheel cover with the
valve stem on the wheel. Install the cover by hand,
snapping the cover over the two lug nuts. Do not use a
hammer or excessive force to install the cover.
4. Install the remaining lug nuts with the cone shaped
end of the nut toward the wheel. Lightly tighten the lug
nuts. To avoid the risk of forcing the vehicle off the jack,
do not tighten the lug nuts fully until the vehicle is
lowered to the ground.
5. Lower the vehicle to the ground by turning the jack
handle counter-clockwise.
6. Finish tightening the lug nuts. Push down on the
wrench while tightening for increased leverage. Alternate
lug nuts until each nut has been tightened twice. The
WHAT TO DO IN EMERGENCIES 355
6
Page 359 of 466

NOTE:For vehicles equipped with ESP, refer to9Syn-
chronizing ESP9under9Electronic Stability Program9in
Section 5 of this manual if the ESP/BAS light (in the
instrument cluster) remains on continuously after start-
ing the engine of the vehicle with the discharged battery.
8. When removing the jumper cables, reverse the above
sequence exactly. Be careful of the moving belts and fan.
WARNING!
Any procedure other than above could result in:
1. Personal injury caused by electrolyte squirting out
the battery vent;
2. Personal injury or property damage due to battery
explosion;
3. Damage to charging system of booster vehicle or
of immobilized vehicle.
FREEING A STUCK VEHICLE
If your vehicle becomes stuck in mud, sand, or snow, it
can often be moved by a rocking motion. Turn your
steering wheel right and left to clear the area around the
front wheels. Then shift back and forth between Reverse
and Drive. Usually the least accelerator pedal pressure to
maintain the rocking motion without spinning the
wheels is most effective.
NOTE:Turn off the Electronic Stability Program (ESP)
Ð if equipped, or Traction Control System (TCS) Ð if
equipped before rocking the vehicle. For details, refer to
ªElectronic Stability Programº or ªTraction Control Sys-
temº in this manual.
WHAT TO DO IN EMERGENCIES 359
6
Page 364 of 466

NMaintenance-Free Battery................381
NAir Conditioner Maintenance.............383
NA/C Air Filter Ð If Equipped............384
NPower Steering Ð Fluid Check............384
NFront & Rear Suspension Ball Joints........385
NSteering Linkage......................385
NBody Lubrication.....................385
NWindshield Wiper Blades................386
NWindshield Washers...................386
NExhaust System......................387
NCooling System.......................388
NHoses And Vacuum/Vapor Harnesses.......393
NFuel System.........................393NBrake System........................394
NAutomatic Transmission................396
NAll Wheel Drive (AWD) Ð If Equipped.....398
NFront And Rear Wheel Bearings...........398
NAppearance Care And Protection From
Corrosion...........................398
NCleaning The Center Console Cup Holders . . . 403
mFuses (Power Distribution Centers)..........404
NFuses (Front Power Distribution Center).....404
NFuses (Rear Power Distribution Center)......406
mVehicle Storage........................411
mReplacement Light Bulbs.................412
mBulb Replacement......................413
364 MAINTAINING YOUR VEHICLE