Page 460 of 531
When additional coolant is needed to maintain the
proper level, it should be added to the coolant bottle. Do
not overfill.
Points To Remember
NOTE:When the vehicle is stopped after a few miles (a
few kilometers) of operation, you may observe vapor
coming from the front of the engine compartment. This is
normally a result of moisture from rain, snow, or high
humidity accumulating on the radiator and being vapor-
ized when the thermostat opens, allowing hot coolant to
enter the radiator.
If an examination of your engine compartment shows no
evidence of radiator or hose leaks, the vehicle may be
safely driven. The vapor will soon dissipate.
²Do not overfill the coolant recovery bottle.
²Check coolant freeze point in the radiator and in the
coolant recovery bottle. If antifreeze needs to be
added, contents of coolant recovery bottle must also be
protected against freezing.
²If frequent coolant additions are required, or if the
level in the coolant recovery bottle does not drop when
the engine cools, the cooling system should be pres-
sure tested for leaks.
²Maintain coolant concentration at 50% HOAT engine
coolant (minimum) and distilled water for proper
corrosion protection of your engine which contains
aluminum components.
²Make sure that the radiator and coolant recovery
bottle overflow hoses are not kinked or obstructed.
²Keep the front of the radiator clean. If your vehicle is
equipped with air conditioning, keep the front of the
condenser clean, also.
458 MAINTAINING YOUR VEHICLE
Page 463 of 531

NOTE:Inspection of brake hoses should be performed
whenever the brake system is serviced and every engine
oil change. Inspect hydraulic brake hoses for surface
cracking, scuffing, or worn spots. If there is any evidence
of cracking, scuffing, or worn spots, the hose should be
replaced immediately! Eventual deterioration of the hose
can take place resulting in a possibility of a burst failure.
WARNING!
Worn brake hoses can burst and cause brake failure.
You could have an accident. If you see any signs of
cracking, scuffing, or worn spots, have the brake
hoses replaced immediately.
Master Cylinder Ð Brake Fluid Level Check
The fluid level in the master cylinder should be checked
when performing underhood services, or immediately if
the brake system warning light indicates system failure.Clean the top of the master cylinder area before removing
the cap. Add fluid to bring the level up to the top of the
ªFULLº mark on the side of the master cylinder reservoir.
Overfilling of fluid is not recommended because it may
cause leaking in the system.
Add enough fluid to bring the level up to the require-
ments described on the brake fluid reservoir. With disc
brakes, fluid level can be expected to fall as the brake
pads wear. However, low fluid level may be caused by a
leak and a checkup may be needed.
Use only manufacturer's recommended brake fluid, refer
to Fluids, Lubricants and Genuine Parts for correct fluid
type.
MAINTAINING YOUR VEHICLE 461
7
Page 464 of 531
WARNING!
²Overfilling the brake fluid reservoir can result in
spilling brake fluid on hot engine parts and the
brake fluid catching fire.
²Use of a brake fluid that has a lower initial boiling
point than the recommended MOPARtDOT 3
product or a brake fluid that is unidentified as to
FMVSS specification may result in sudden brake
failure during hard prolonged braking. You could
have an accident.
Use only brake fluid that has been in a tightly closed
container to avoid contamination from foreign matter or
moisture.
CAUTION!
Do not allow petroleum base fluid to contaminate the
brake fluid Ð all brake seal components could be
damaged causing partial or complete brake failure.
AUTOMATIC TRANSAXLE
The automatic transaxle and differential assembly are
contained within a single housing.
The fluid level in the automatic transaxle should be
checked whenever the vehicle is serviced. Operation with
an improper fluid level will greatly reduce the life of the
transaxle and the fluid.
All Four±Speed automatic transaxles are equipped with a
conventional filler tube and dipstick. If fluid is added, it
should be added through the filler tube.
462 MAINTAINING YOUR VEHICLE
Page 465 of 531
All six speed transaxles are equipped with a capped
dipstick tube, it is sealed and should not be tampered
with. Your authorized dealer has the necessary tools to
ensure that the fluid level is set properly.
Selection of Lubricant
It is important that the proper lubricant is used in the
transaxle to assure optimum transaxle performance. Use
only manufacturer 's recommended transaxle fluid; refer
to Fluids, Lubricants and Genuine Parts for correct fluid
type. It is important that the transaxle fluid be main-
tained at the prescribed level using the recommended
fluid. No chemical flushes should be used in any trans-
axle; only the approved lubricant may be used.
CAUTION!
Using a transaxle fluid other than the manufacturer's
recommended fluid may cause deterioration in trans-
axle shift quality and/or torque converter shudder.
Using a transaxle fluid other than the manufacturer's
recommended fluid will result in more frequent
fluid and filter changes. Refer to Fluids, Lubricants
and Genuine Parts for correct fluid type.
Fluid Level Check Ð 3.8L and 4.0L Engines with
Six-Speed Automatic Transaxle Ð If Equipped
The Six-Speed automatic transaxle is a sealed unit and
has no dipstick. See your authorized dealer to have the
transaxle fluid checked or serviced.
MAINTAINING YOUR VEHICLE 463
7
Page 466 of 531
Fluid Level Check Ð 3.3L Engine with Four-Speed
Automatic Transaxle Ð If Equipped
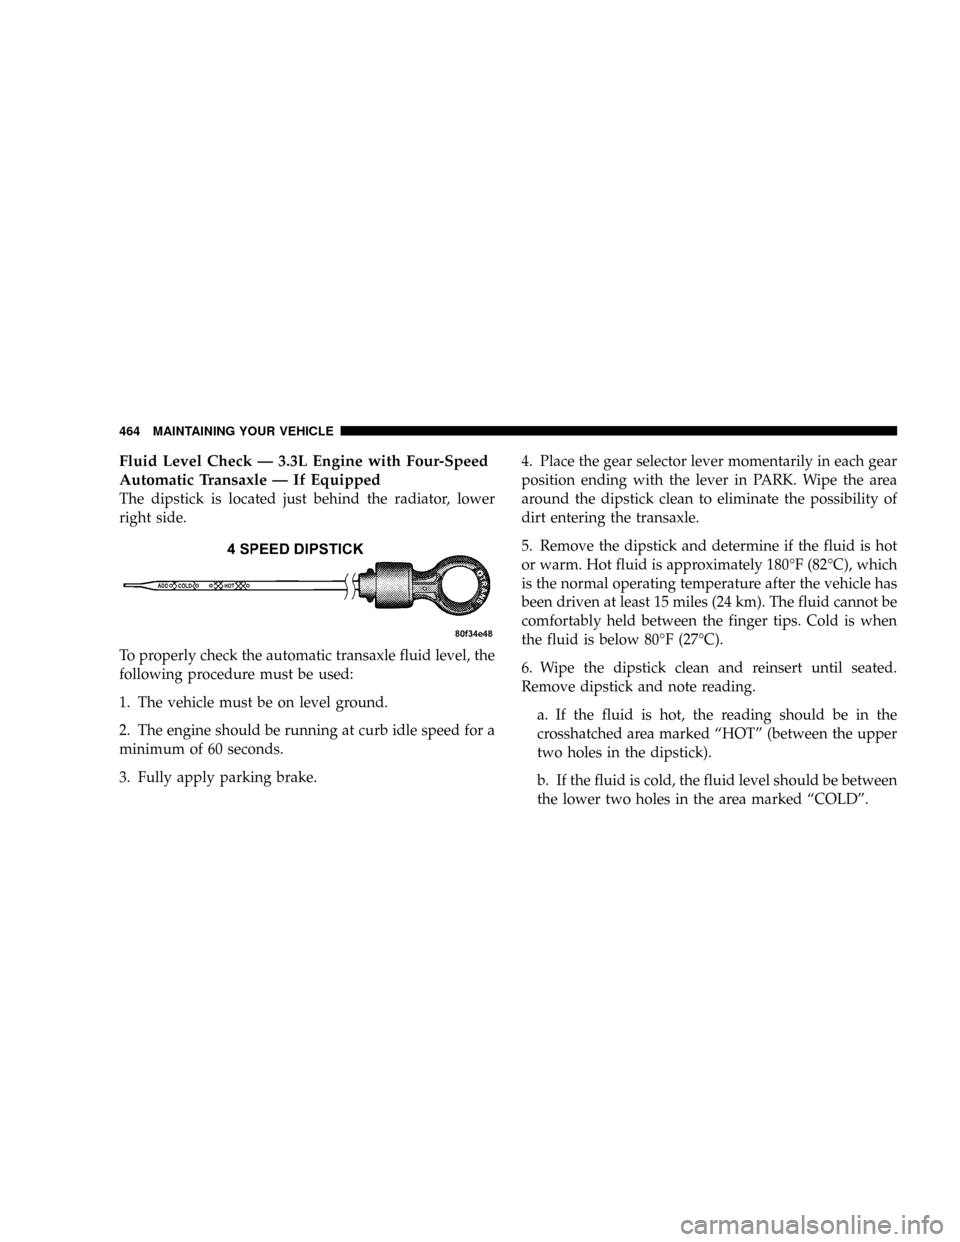
The dipstick is located just behind the radiator, lower
right side.
To properly check the automatic transaxle fluid level, the
following procedure must be used:
1. The vehicle must be on level ground.
2. The engine should be running at curb idle speed for a
minimum of 60 seconds.
3. Fully apply parking brake.4. Place the gear selector lever momentarily in each gear
position ending with the lever in PARK. Wipe the area
around the dipstick clean to eliminate the possibility of
dirt entering the transaxle.
5. Remove the dipstick and determine if the fluid is hot
or warm. Hot fluid is approximately 180ÉF (82ÉC), which
is the normal operating temperature after the vehicle has
been driven at least 15 miles (24 km). The fluid cannot be
comfortably held between the finger tips. Cold is when
the fluid is below 80ÉF (27ÉC).
6. Wipe the dipstick clean and reinsert until seated.
Remove dipstick and note reading.
a. If the fluid is hot, the reading should be in the
crosshatched area marked ªHOTº (between the upper
two holes in the dipstick).
b. If the fluid is cold, the fluid level should be between
the lower two holes in the area marked ªCOLDº.
464 MAINTAINING YOUR VEHICLE
Page 467 of 531
If the fluid level indicates low, add sufficient fluid to
bring to the proper level.
CAUTION!
Do not overfill. Dirt and water in the transaxle can
cause serious damage. To prevent dirt and water from
entering the transaxle after checking or replenishing
fluid, make certain that the dipstick cap is reseated
properly.
Fluid and Filter Changes
Refer to the ªMaintenance Scheduleº in Section 8 of this
manual for the recommended transaxle fluid and filter
change intervals.
If the transaxle is disassembled for any reason, the fluid
and filter should be changed.
Special Additives
Automatic Transmission Fluid (ATF) is an engineered
product and its performance may be impaired by supple-
mental additives. Therefore, do not add any fluid addi-
tives to the transaxle. The only exception to this policy is
the use of special dyes to aid in detecting fluid leaks. In
addition, avoid using transaxle sealers as they may
adversely affect seals.
FRONT AND REAR WHEEL BEARINGS
Front and rear wheel bearings are permanently sealed.
No regular maintenance is required for these compo-
nents.
APPEARANCE CARE AND PROTECTION FROM
CORROSION
Protection of Body and Paint from Corrosion
Vehicle body care requirements vary according to geo-
graphic locations and usage. Chemicals that make roads
passable in snow and ice, and those that are sprayed on
MAINTAINING YOUR VEHICLE 465
7
Page 474 of 531
Installation
Place the liner into the cupholder drawer and press the
liner into place so that the retention tabs seat into the
corresponding openings in the drawer.
FUSES/TOTALLY INTEGRATED POWER MODULE
(TIPM)
The Totally Integrated Power Module (TIPM) is located
in the engine compartment near the battery. This center
contains cartridge fuses and mini fuses. A label that
identifies each component may be printed or embossed
on the inside of the cover.
TIPM Location
472 MAINTAINING YOUR VEHICLE
Page 480 of 531
FUSES/TIPM
CavityCartridge
FuseMini
FuseDescription
M32 Ð 10 Amp
RedOccupant Restraint Con-
troller (ORC), TT EU-
ROPE
M33 Ð 10 Amp
RedNext Generation Control-
ler (NGC), Global Power-
train Engine Controller
(GPEC)
M34 Ð 10 Amp
RedPark Assist (PRK ASST),
Heater Ventilation, Air
Conditioning Module
(HVAC MOD), Headlamp
Wash (HDLP WASH),
Compass (COMPAS)
M35 Ð 10 Amp
RedHeated Mirrors
M36 Ð 20 Amp
YellowPower Outlet #3 (BATT)FUSES/TIPM
CavityCartridge
FuseMini
FuseDescription
M37 Ð 10 Amp
RedAnti-Lock Brake System
(ABS), Electronic Stability
Program (ESP), Stop
Lamp Switch (STP LP
SW), Fuel Pump Rly Hi
Control
M38 Ð 25 Amp
NaturalLock/Unlock Motors
(LOCK/UNLOCK MTRS)
478 MAINTAINING YOUR VEHICLE