2008 CHEVROLET UPLANDER center console
[x] Cancel search: center consolePage 10 of 476

Head Restraints
Adjust the head restraint so that the top of the restraint
is at the same height as the top of the occupant’s
head. This position reduces the chance of a neck injury
in a crash.
The height of the head restraints can be adjusted on
the �rst and second row seats. Pull the head restraint
up or push it down to adjust it.
The head restraints on the third row seat cannot be
adjusted.
Rear Seats
Rear Seat Operation
The rear seats in your vehicle have levers and straps
used to adjust, remove, and reinstall the seats. By using
the levers and straps in the correct order, you can
easily remove the seats from the vehicle. If your vehicle
has second row captain chairs with airbags, the seats
cannot be removed.
When reinstalling the seats, make sure the seats are in
the proper positions.
If your vehicle has a second row center console, it can
be removed. SeeSecond Row Center Console on
page 2-59. Do not put a seat in the center position
because the safety belt cannot be worn properly in this
position. SeeSafety Belts: They Are for Everyone
on page 1-23.
Bucket Seats
Your vehicle may have bucket seats in the second row.
These seats can be adjusted several different ways.
1-6
Page 98 of 476
Mirrors...........................................................2-43
Manual Rearview Mirror.................................2-43
Outside Power Mirrors...................................2-43
Outside Convex Mirror...................................2-44
Outside Heated Mirrors..................................2-44
Object Detection Systems...............................2-44
Ultrasonic Rear Parking Assist (URPA)..............2-44
OnStar
®System.............................................2-47
Universal Home Remote System......................2-51
Universal Home Remote System.....................2-51
Universal Home Remote System Operation
(With One Triangular LED).........................2-51Storage Areas................................................2-56
Glove Box...................................................2-56
Cupholder(s)................................................2-56
Overhead Console (Without Rail)....................2-56
Overhead Console (With Rail)........................2-57
Floor Console Storage Area...........................2-59
Folding Tray................................................2-59
Second Row Center Console..........................2-59
Luggage Carrier...........................................2-60
Convenience Net
(With Rear Convenience Center).................2-61
Convenience Net
(Without Rear Convenience Center).............2-61
Convenience Center......................................2-62
Section 2 Features and Controls
2-2
Page 115 of 476
If a power sliding door is locked, it cannot be unlocked
and opened using the overhead console PSD
switch(es) or the passenger PSD activation switch(es).
The power sliding door must either be manually
unlocked or unlocked using the power door unlock
switch located on the driver’s or front passenger’s
armrest, and then opened using the overhead or
passenger PSD activation switch(es).
The remote keyless entry transmitter can also be used to
open the power sliding door(s). If the vehicle is locked,
press the power sliding door button(s) and all doors will
unlock and the sliding door(s) will open. SeeRemote
Keyless Entry (RKE) System Operation on page 2-5.
If the power sliding door has been manually locked, you
must unlock the PSD before it can be opened.
Notice:If you leave the power sliding door on when
you go through an automatic car wash, the door may
accidentally open. Be sure the power sliding door is
turned off when going through a car wash.If the power sliding door(s) is open or in the process of
closing when you shift out of PARK (P), a chime will
sound. This is a warning that the sliding door(s) is not
completely closed. Also, the Driver Information
Center (DIC) will indicate if the door is open. SeeDIC
Warnings and Messages on page 3-58. Stop the vehicle
and close the door.
{CAUTION:
If you shift the transaxle out of PARK (P) and
accelerate before the power sliding door
latches closed, the door may reverse to the
open position. A child or others could fall out
of the vehicle and be injured. Always make
sure the power sliding door is closed and
latched before you drive away.
2-19
Page 122 of 476
Manual Rear Quarter Windows
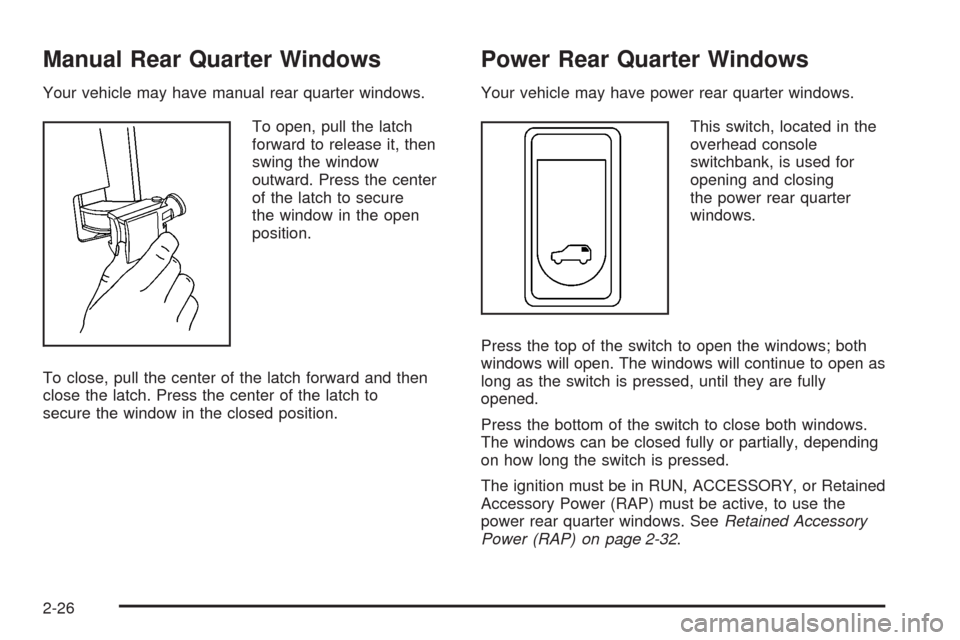
Your vehicle may have manual rear quarter windows.
To open, pull the latch
forward to release it, then
swing the window
outward. Press the center
of the latch to secure
the window in the open
position.
To close, pull the center of the latch forward and then
close the latch. Press the center of the latch to
secure the window in the closed position.
Power Rear Quarter Windows
Your vehicle may have power rear quarter windows.
This switch, located in the
overhead console
switchbank, is used for
opening and closing
the power rear quarter
windows.
Press the top of the switch to open the windows; both
windows will open. The windows will continue to open as
long as the switch is pressed, until they are fully
opened.
Press the bottom of the switch to close both windows.
The windows can be closed fully or partially, depending
on how long the switch is pressed.
The ignition must be in RUN, ACCESSORY, or Retained
Accessory Power (RAP) must be active, to use the
power rear quarter windows. SeeRetained Accessory
Power (RAP) on page 2-32.
2-26
Page 152 of 476

Reprogramming a Single Universal
Home Remote Button
To reprogram any of the three Universal Home Remote
buttons, repeat the programming instructions earlier
in this section, beginning with Step 2.
For help or information on the Universal Home Remote
System, call the customer assistance phone number
underCustomer Assistance Offices on page 7-5.
Storage Areas
Your vehicle’s large carrying capacity can store many
items. If the vehicle has an extended wheelbase, it can
carry even larger items. The �oor pins that are used
to attach the seats, can be used to secure larger loads.
Glove Box
To open, lift the handle up. Use the key to lock and
unlock.
Cupholder(s)
There are cupholders located below the center
instrument panel switchbank. The cupholders have a
rubber liner that can be removed, so that larger cups can
�t into the cupholders. You can also remove the liner
to clean it.
To use the cupholders, pull the tray out. Push the tray
back when not in use.
Your vehicle may be equipped with cupholders in the
second row.
Overhead Console (Without Rail)
If your vehicle has an overhead console without the rail
system, it has two reading lights, a courtesy light,
and a switchbank. SeeOverhead Console Switchbank
on page 3-21for more information.
2-56
Page 155 of 476
Floor Console Storage Area
Your vehicle may have a storage compartment located
on the front console below the front cupholders. Pull
up and then forward on the handle to open the storage
compartment.
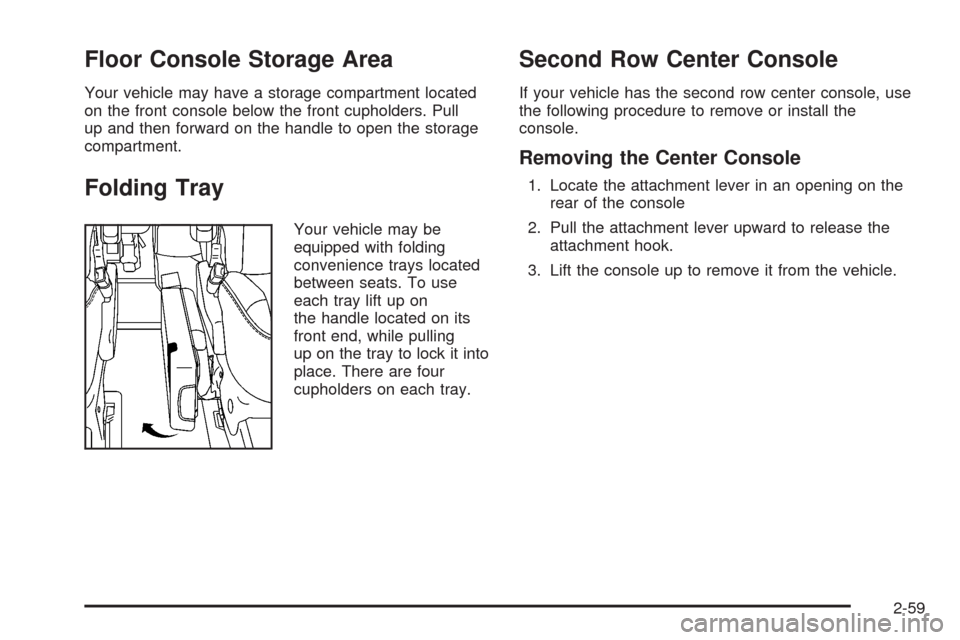
Folding Tray
Your vehicle may be
equipped with folding
convenience trays located
between seats. To use
each tray lift up on
the handle located on its
front end, while pulling
up on the tray to lock it into
place. There are four
cupholders on each tray.
Second Row Center Console
If your vehicle has the second row center console, use
the following procedure to remove or install the
console.
Removing the Center Console
1. Locate the attachment lever in an opening on the
rear of the console
2. Pull the attachment lever upward to release the
attachment hook.
3. Lift the console up to remove it from the vehicle.
2-59
Page 156 of 476
Replacing the Center Console
{CAUTION:
A second row center console that is not locked
into place properly can move around in a
crash or sudden stop. People in the vehicle
could be injured. Be sure to lock the console
into place properly when installing it.
1. Position the second row center console above the
forward �oor attachments between the second row
bucket seats.
For information on installing the seats, seeRear
Seat Operation on page 1-6.
2. Place the console’s front hooks onto the forward
�oor attachments.
3. Locate the attachment lever at the rear of the
console and pull up.
4. Rock the rear attachment bracket onto the �oor
attachment and release the lever.
5. Pull up on the console to ensure the rear
attachment hook is latched.
Luggage Carrier
{CAUTION:
If you try to carry something on top of your
vehicle that is longer or wider than the luggage
carrier — like paneling, plywood, a mattress and
so forth — the wind can catch it as you drive
along. This can cause you to lose control. What
you are carrying could be violently torn off, and
this could cause you or other drivers to have a
collision, and of course damage your vehicle.
You may be able to carry something like this
inside. But, never carry something longer or
wider than the luggage carrier on top of your
vehicle.
If you have the luggage carrier, you can load things on
top of your vehicle. Crossrails are not standard on this
vehicle and must be purchased at your dealer.
Notice:Loading cargo on the luggage carrier that
weighs more than 150 lbs (68 kg) or hangs over the
rear or sides of the vehicle may damage your vehicle.
Load cargo so that it rests on the slats as far forward
as possible and against the side rails, making sure to
fasten it securely.
2-60
Page 192 of 476

Rear Air Outlets
The outlet behind the driver side rear seat is for the cold
air return. Be sure to keep it free from obstructions.
Also, keep the area around the base of the center
instrument panel console, between and under the front
seats, free of objects that could also obstruct air�ow
to the rear seating area.
For more information on how to use the main climate
control system, seeDual Climate Control System
on page 3-27. For information on ventilation,
seeOutlet Adjustment on page 3-30.
Passenger Compartment Air Filter
Passenger compartment air, both outside and
recirculated air, is routed through a passenger
compartment �lter. The �lter removes most particles
from the air, including dust particles. Reductions in
air�ow, which may occur more quickly in dusty areas,
indicate that the �lter needs to be replaced early.
For how often to change the air �lter, seeScheduled
Maintenance on page 6-4.The access panel for the passenger compartment air
�lter is located in the back of the glove box. To replace
the �lter, do the following:
1. Pull the tab located on the outer access panel up
and out.
3-32