2008 CHEVROLET SUBURBAN spare
[x] Cancel search: sparePage 463 of 538

Storing a Flat or Spare Tire and
Tools
{CAUTION:
Storing a jack, a tire, or other equipment in the
passenger compartment of the vehicle could
cause injury. In a sudden stop or collision,
loose equipment could strike someone. Store
all these in the proper place.
Notice:Storing an aluminum wheel with a at tire
under your vehicle for an extended period of time or
with the valve stem pointing up can damage the
wheel. Always stow the wheel with the valve stem
pointing down and have the wheel/tire repaired
as soon as possible.
Store the tire under the rear of the vehicle in the spare
tire carrier. Refer to the following graphics and
instructions to help you:A. Hoist Assembly
B. Hoist Shaft
C. Hoist Shaft Access
Cover/Hole
D. Jack Handle
Extensions
E. Wheel Wrench
F. Hoist Cable
G. Tire/Wheel RetainerH. Spare Tire/Flat Tire
(Valve Stem
Pointed Down)
I. Hoist Shaft
Access Hole
J. Hoist End of
Extension Tool
K. Spare Tire Lock
1. Put the tire (H) on the ground at the rear of the
vehicle with the valve stem pointed down, and to
the rear.
5-105
Page 465 of 538
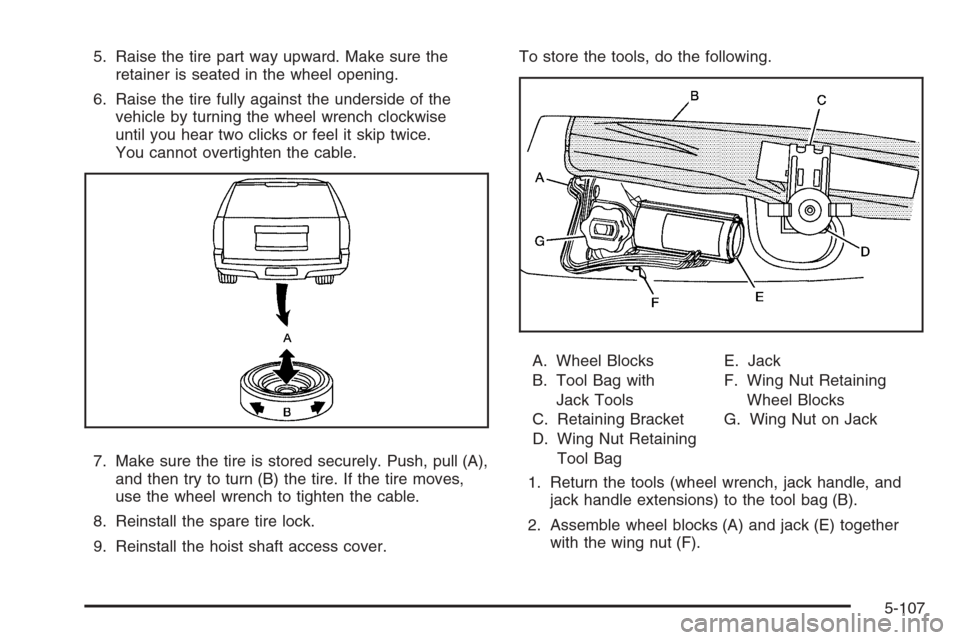
5. Raise the tire part way upward. Make sure the
retainer is seated in the wheel opening.
6. Raise the tire fully against the underside of the
vehicle by turning the wheel wrench clockwise
until you hear two clicks or feel it skip twice.
You cannot overtighten the cable.
7. Make sure the tire is stored securely. Push, pull (A),
and then try to turn (B) the tire. If the tire moves,
use the wheel wrench to tighten the cable.
8. Reinstall the spare tire lock.
9. Reinstall the hoist shaft access cover.To store the tools, do the following.
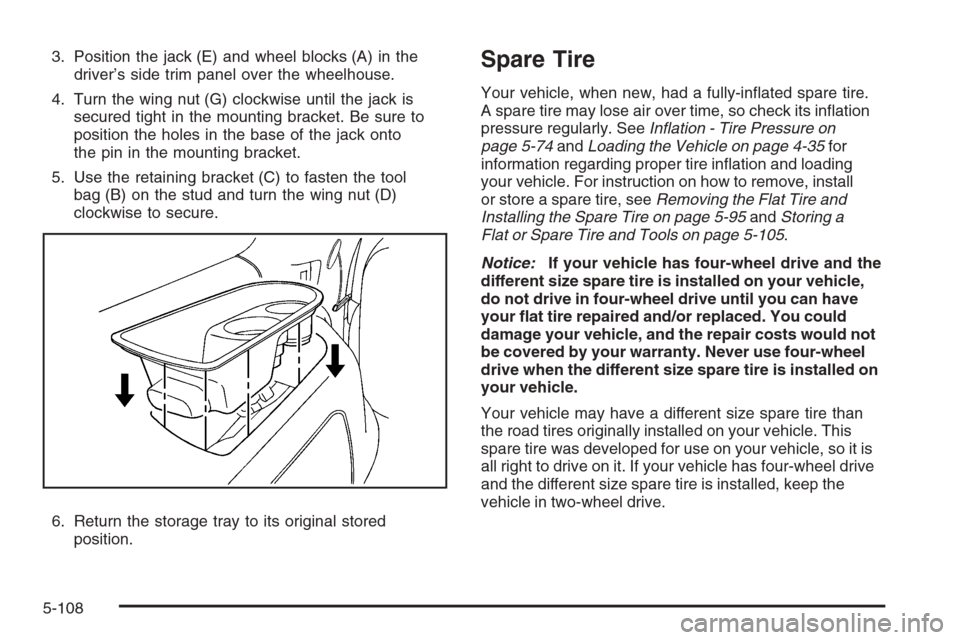
A. Wheel Blocks
B. Tool Bag with
Jack Tools
C. Retaining Bracket
D. Wing Nut Retaining
Tool BagE. Jack
F. Wing Nut Retaining
Wheel Blocks
G. Wing Nut on Jack
1. Return the tools (wheel wrench, jack handle, and
jack handle extensions) to the tool bag (B).
2. Assemble wheel blocks (A) and jack (E) together
with the wing nut (F).
5-107
Page 466 of 538
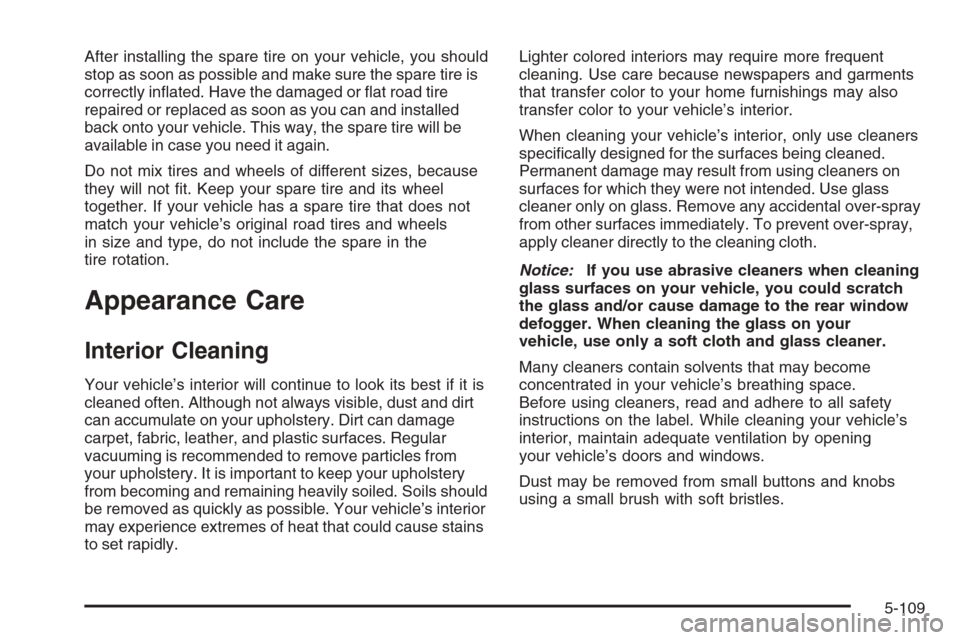
3. Position the jack (E) and wheel blocks (A) in the
driver’s side trim panel over the wheelhouse.
4. Turn the wing nut (G) clockwise until the jack is
secured tight in the mounting bracket. Be sure to
position the holes in the base of the jack onto
the pin in the mounting bracket.
5. Use the retaining bracket (C) to fasten the tool
bag (B) on the stud and turn the wing nut (D)
clockwise to secure.
6. Return the storage tray to its original stored
position.Spare Tire
Your vehicle, when new, had a fully-inated spare tire.
A spare tire may lose air over time, so check its ination
pressure regularly. SeeInflation - Tire Pressure on
page 5-74andLoading the Vehicle on page 4-35for
information regarding proper tire ination and loading
your vehicle. For instruction on how to remove, install
or store a spare tire, seeRemoving the Flat Tire and
Installing the Spare Tire on page 5-95andStoring a
Flat or Spare Tire and Tools on page 5-105.
Notice:If your vehicle has four-wheel drive and the
different size spare tire is installed on your vehicle,
do not drive in four-wheel drive until you can have
your at tire repaired and/or replaced. You could
damage your vehicle, and the repair costs would not
be covered by your warranty. Never use four-wheel
drive when the different size spare tire is installed on
your vehicle.
Your vehicle may have a different size spare tire than
the road tires originally installed on your vehicle. This
spare tire was developed for use on your vehicle, so it is
all right to drive on it. If your vehicle has four-wheel drive
and the different size spare tire is installed, keep the
vehicle in two-wheel drive.
5-108
Page 467 of 538
After installing the spare tire on your vehicle, you should
stop as soon as possible and make sure the spare tire is
correctly inated. Have the damaged or at road tire
repaired or replaced as soon as you can and installed
back onto your vehicle. This way, the spare tire will be
available in case you need it again.
Do not mix tires and wheels of different sizes, because
they will not t. Keep your spare tire and its wheel
together. If your vehicle has a spare tire that does not
match your vehicle’s original road tires and wheels
in size and type, do not include the spare in the
tire rotation.
Appearance Care
Interior Cleaning
Your vehicle’s interior will continue to look its best if it is
cleaned often. Although not always visible, dust and dirt
can accumulate on your upholstery. Dirt can damage
carpet, fabric, leather, and plastic surfaces. Regular
vacuuming is recommended to remove particles from
your upholstery. It is important to keep your upholstery
from becoming and remaining heavily soiled. Soils should
be removed as quickly as possible. Your vehicle’s interior
may experience extremes of heat that could cause stains
to set rapidly.Lighter colored interiors may require more frequent
cleaning. Use care because newspapers and garments
that transfer color to your home furnishings may also
transfer color to your vehicle’s interior.
When cleaning your vehicle’s interior, only use cleaners
specically designed for the surfaces being cleaned.
Permanent damage may result from using cleaners on
surfaces for which they were not intended. Use glass
cleaner only on glass. Remove any accidental over-spray
from other surfaces immediately. To prevent over-spray,
apply cleaner directly to the cleaning cloth.
Notice:If you use abrasive cleaners when cleaning
glass surfaces on your vehicle, you could scratch
the glass and/or cause damage to the rear window
defogger. When cleaning the glass on your
vehicle, use only a soft cloth and glass cleaner.
Many cleaners contain solvents that may become
concentrated in your vehicle’s breathing space.
Before using cleaners, read and adhere to all safety
instructions on the label. While cleaning your vehicle’s
interior, maintain adequate ventilation by opening
your vehicle’s doors and windows.
Dust may be removed from small buttons and knobs
using a small brush with soft bristles.
5-109
Page 477 of 538
Electrical System
Add-On Electrical Equipment
Notice:Do not add anything electrical to your
vehicle unless you check with your dealer/retailer
rst. Some electrical equipment can damage
your vehicle and the damage would not be covered
by your warranty. Some add-on electrical equipment
can keep other components from working as they
should.
Add-on equipment can drain your vehicle’s battery, even
if your vehicle is not operating.
Your vehicle has an airbag system. Before attempting to
add anything electrical to your vehicle, seeServicing
Your Airbag-Equipped Vehicle on page 1-90.
Windshield Wiper Fuses
The windshield wiper motor is protected by an internal
circuit breaker and a fuse. If the motor overheats due to
heavy snow, etc., the wiper will stop until the motor
cools. If the overload is caused by some electrical
problem and not snow, etc., be sure to get it xed.
Power Windows and Other Power
Options
Circuit breakers protect the power windows and other
power accessories. If the current load is too heavy,
the circuit breaker opens and then closes after a cool
down period, protecting the circuit until the problem
is xed or goes away.
Fuses and Circuit Breakers
If your vehicle is a Two-mode Hybrid, see the Two-mode
Hybrid manual for more information.
The wiring circuits in your vehicle are protected from
short circuits by a combination of fuses, circuit breakers
and fusible thermal links. This greatly reduces the
chance of res caused by electrical problems.
Look at the silver-colored band inside the fuse. If the
band is broken or melted, replace the fuse. Be sure
you replace a bad fuse with a new one of the identical
size and rating.
If you ever have a problem on the road and don’t have
a spare fuse, you can borrow one that has the same
amperage. Just pick some feature of your vehicle
that you can get along without – like the radio or
cigarette lighter – and use its fuse, if it is the correct
amperage. Replace it as soon as you can.
5-119
Page 496 of 538
Owner Checks and Services
These owner checks and services should be performed
at the intervals specied to help ensure the safety,
dependability, and emission control performance of your
vehicle. Your dealer/retailer can assist you with these
checks and services.
Be sure any necessary repairs are completed at once.
Whenever any uids or lubricants are added to your
vehicle, make sure they are the proper ones, as shown
inRecommended Fluids and Lubricants on page 6-13.
At Each Fuel Fill
It is important to perform these underhood checks at
each fuel fill.
Engine Oil Level Check
Notice:It is important to check the engine oil
regularly and keep it at the proper level. Failure to
keep the engine oil at the proper level can cause
damage to the engine not covered by your warranty.
Check the engine oil level and add the proper oil if
necessary. SeeEngine Oil on page 5-17.
Engine Coolant Level Check
Check the engine coolant level and add DEX-COOL®
coolant mixture if necessary. SeeEngine Coolant
on page 5-31.
Windshield Washer Fluid Level Check
Check the windshield washer uid level in the windshield
washer uid reservoir and add the proper uid if
necessary.
At Least Once a Month
Tire Ination Check
Inspect your vehicle’s tires and make sure they are
inated to the correct pressures. Do not forget to
check the spare tire. SeeInflation - Tire Pressure on
page 5-74. Check to make sure the spare tire is stored
securely. SeeChanging a Flat Tire on page 5-90.
Tire Wear Inspection
Tire rotation may be required for high mileage highway
drivers prior to the Engine Oil Life System service
notication. Check the tires for wear and, if necessary,
rotate the tires. SeeTire Inspection and Rotation on
page 5-80.
6-10
Page 514 of 538
Roadside Assistance Program
For vehicles purchased in the U.S., call
1-800-CHEV-USA (1-800-243-8872); (Text telephone
(TTY): 1-888-889-2438).
For vehicles purchased in Canada, call1-800-268-6800.
Service is available 24 hours a day, 365 days a year.
As the owner of a new Chevrolet vehicle, you are
automatically enrolled in the Chevrolet Roadside
Assistance program.
Who is Covered?
Roadside Assistance coverage is for the vehicle
operator, regardless of ownership. In Canada, a person
driving this vehicle without the consent of the owner
is not eligible for coverage.
Services Provided
The following services are provided in the U.S. and
Canada up to 5 years/100,000 miles (160 000 km),
whichever occurs rst, and, in Canada only, up
to a maximum coverage of $100.
Fuel Delivery:Delivery of enough fuel for the
vehicle to get to the nearest service station
(approximately $5 in Canada). In Canada, service
to provide diesel may be restricted. For safety
reasons, propane and other alternative fuels will not
be provided through this service.
Lock-out Service:Lock-out service will be covered
at no charge if you are unable to gain entry into
your vehicle. A remote unlock may be available if
you have an active OnStar
®subscription. To ensure
security, the driver must present personal
identication before lock-out service is provided. In
Canada, the vehicle registration is also required.
Emergency Tow From a Public Roadway or
Highway:Tow to the nearest dealership for warranty
service or in the event of a vehicle-disabling crash.
Winch-out assistance is provided when the vehicle is
mired in sand, mud, or snow.
Flat Tire Change:Installation of a spare tire in good
condition, when equipped and properly inated, is
covered at no charge. The customer is responsible
for the repair or replacement of the tire if not covered
by a warrantable failure.
Jump Start:A battery jump start is covered at no
charge if the vehicle does not start.
Trip Routing Service (Canada only):Upon request,
Roadside Assistance will send you detailed,
computer personalized maps, highlighting your
choice of either the most direct route or the most
scenic route to your destination, anywhere in North
America, along with helpful travel information
pertaining to your trip.
Please allow three weeks before your planned
departure date. Trip routing requests will be limited to
six per calendar year.
7-8
Page 534 of 538
R
Radio Frequency Identication (RFID), Privacy....7-18
Radio(s)........................................................3-78
Radios
Navigation/Radio System, see
Navigation Manual..................................3-105
Rear Seat Audio........................................3-114
Reception.................................................3-117
Setting the Clock.........................................3-76
Theft-Deterrent..........................................3-116
Rainsense™ II Wipers....................................... 3-9
Reading Lamps..............................................3-19
Rear Air Conditioning and Heating System.........3-31
Rear Air Conditioning and Heating System
and Electronic Climate Controls.....................3-32
Rear Axle......................................................5-54
Locking........................................................ 4-6
Rear Door Security Locks................................2-11
Rear Heated Seats.........................................1-12
Rear Seat Armrest..........................................2-72
Rear Seat Audio (RSA)..................................3-114
Rear Seat Entertainment System.....................3-105
Rear Side Window Antenna............................3-118
Rear Storage Area..........................................2-72
Rear Windshield Washer/Wiper.........................3-11
Rearview Mirror, Automatic Dimming with
Compass and Temperature Display................2-49Rearview Mirror, Automatic Dimming with OnStar
®,
Compass and Temperature Display..................2-47
Reclining Seatbacks.......................................... 1-8
Recommended Fluids and Lubricants.................6-13
Recovery Hooks.............................................4-34
Recreational Vehicle Towing.............................4-45
Remote Keyless Entry (RKE) System.................. 2-4
Remote Keyless Entry (RKE) System, Operation..... 2-5
Remote Vehicle Start........................................ 2-8
Removing the Flat Tire and Installing
the Spare Tire.............................................5-95
Removing the Spare Tire and Tools...................5-91
Replacement Bulbs.........................................5-63
Replacement Parts, Maintenance......................6-15
Reporting Safety Defects
Canadian Government..................................7-15
General Motors...........................................7-15
United States Government............................7-15
Restraint System Check
Checking the Restraint Systems....................1-92
Replacing Restraint System Parts
After a Crash..........................................1-93
Retained Accessory Power (RAP)......................2-26
Roadside
Assistance Program....................................... 7-8
Rocking Your Vehicle to Get it Out....................4-34
Routing, Engine Drive Belt...............................6-16
Running Boards, Power...................................2-17
Running Out of Fuel........................................2-46
10