2008 CHEVROLET SUBURBAN mirror
[x] Cancel search: mirrorPage 153 of 538

The vehicle may have outside heated mirrors which
help clear them of condensation, snow, and ice.
<(Rear Window Defogger):Press to turn the heated
mirrors on or off. Only the upper glass of the mirror is
heated. The lower convex part of the mirror is not
heated. Depending on the vehicle’s features, see “Rear
Window Defogger” under,Climate Control System
on page 3-22orDual Automatic Climate Control System
on page 3-24for more information.
The mirror may also have a turn signal arrow that
�ashes in the direction of the turn or lane change.
Outside Power Mirrors
Vehicles with outside
power mirrors have
the controls on the
driver door armrest.To adjust each mirror:
1. Press (A) to select the driver side mirror or (B)
to select the passenger side mirror.
2. Press one of the four arrows located on the control
pad to move the mirror to the desired direction.
3. Adjust each outside mirror so that you can see a
little of your vehicle, and the area behind your
vehicle.
4. Press either (A) or (B) again to deselect the mirror.
The mirrors may also include a memory function that
works with the memory seats. SeeMemory Seat,
Mirrors, and Pedals on page 1-6for more information.
Manually fold the mirrors inward to prevent damage
when going through an automatic car wash.
To fold, push the mirror toward the vehicle. Push
the mirror outward, to return to its original position.
2-53
Page 154 of 538
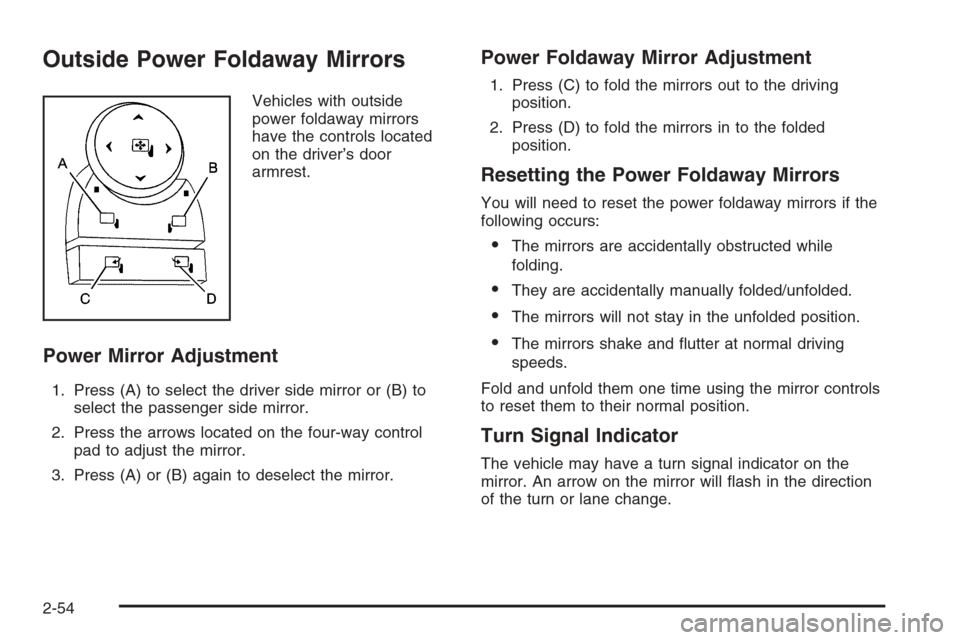
Outside Power Foldaway Mirrors
Vehicles with outside
power foldaway mirrors
have the controls located
on the driver’s door
armrest.
Power Mirror Adjustment
1. Press (A) to select the driver side mirror or (B) to
select the passenger side mirror.
2. Press the arrows located on the four-way control
pad to adjust the mirror.
3. Press (A) or (B) again to deselect the mirror.
Power Foldaway Mirror Adjustment
1. Press (C) to fold the mirrors out to the driving
position.
2. Press (D) to fold the mirrors in to the folded
position.
Resetting the Power Foldaway Mirrors
You will need to reset the power foldaway mirrors if the
following occurs:
The mirrors are accidentally obstructed while
folding.
They are accidentally manually folded/unfolded.
The mirrors will not stay in the unfolded position.
The mirrors shake and �utter at normal driving
speeds.
Fold and unfold them one time using the mirror controls
to reset them to their normal position.
Turn Signal Indicator
The vehicle may have a turn signal indicator on the
mirror. An arrow on the mirror will �ash in the direction
of the turn or lane change.
2-54
Page 155 of 538

Ground Illumination Lamps
The mirrors may also include ground illumination lamps
in the base of the mirror. These lamps help to see
the area near the base of the front doors when it is
dark out.
Outside Automatic Dimming Mirror
If your vehicle has this feature, the driver’s outside mirror
will adjust for the glare of headlamps behind you. This
feature is controlled by the on and off settings found
on the electrochromic inside mirror. SeeAutomatic
Dimming Rearview Mirror with OnStar
®, Compass and
Temperature Display on page 2-47orAutomatic
Dimming Rearview Mirror with Compass and
Temperature Display on page 2-49for more information.
Park Tilt Mirrors
Vehicles with the memory package have a passenger
and/or driver mirror that will tilt to a preselected position
when the vehicle is in REVERSE (R). This feature
lets the driver view the curb when parallel parking.
The mirror(s) return to the original position when the
vehicle is shifted out of REVERSE (R), or the ignition
is turned off.Turn this feature on or off through the Driver Information
Center (DIC). SeeDIC Vehicle Customization (With
DIC Buttons) on page 3-67for more information.
Outside Convex Mirror
{CAUTION:
A convex mirror can make things (like other
vehicles) look farther away than they really are.
If you cut too sharply into the right lane, you
could hit a vehicle on your right. Check your
inside mirror or glance over your shoulder
before changing lanes.
The passenger side mirror may have convex glass.
A convex mirror’s surface is curved so more can
be seen from the driver seat.
2-55
Page 156 of 538
Outside Heated Mirrors
The vehicle may have outside heated mirrors which
help clear them of condensation, snow, and ice.
<(Rear Window Defogger):Press to heat the
mirrors.
See “Rear Window Defogger” underDual Automatic
Climate Control System on page 3-24orClimate Control
System on page 3-22for more information.
Object Detection Systems
Ultrasonic Rear Parking
Assist (URPA)
For vehicles with the Ultrasonic Rear Parking
Assist (URPA) system, it operates at speeds less than
5 mph (8 km/h), and assists the driver with parking
and avoiding objects while in R (Reverse). The sensors
on the rear bumper are used to detect the distance
to an object up to 8 feet (2.5 m) behind the vehicle,
and at least 10 inches (25.4 cm) off the ground.
{CAUTION:
The Ultrasonic Rear Parking Assist (URPA)
system does not replace driver vision.
It cannot detect:
objects that are below the bumper,
underneath the vehicle, or if they are
too close or far from the vehicle
children, pedestrians, bicyclists, or pets.
If you do not use proper care before and while
backing; vehicle damage, injury, or death
could occur. Even with URPA, always check
behind your vehicle before backing up. While
backing, be sure to look for objects and check
your vehicle’s mirrors.
2-56
Page 183 of 538
The high-beam indicator on the instrument panel cluster
will come on. Release the lever to return to normal
operation.
Windshield Wipers
Clear ice and snow from the wiper blades before using
them. If they are frozen to the windshield, gently
loosen or thaw them. Damaged wiper blades may not
clear the windshield well, making it harder to see
and drive safely. If the blades do become damaged,
install new blades or blade inserts. For more information,
seeWindshield Wiper Blade Replacement on page 5-64.
Heavy snow or ice can overload the wiper motor. A
circuit breaker will stop the motor until it cools down.
Clear away snow or ice to prevent an overload.
Turn the band with the wiper symbol to control the
windshield wipers.
8(Mist):Turn the band to mist for a single wiping
cycle. Hold it there until the wipers start. Then let
go. The wipers stop after one wipe. Hold the band on
mist longer, for more wipe cycles.
9(Off):To stop the wipers, move the band to off.
6(Delay):Turn the band to adjust the delay time.
The delay between wiping cycles becomes shorter as
the band is moved to the top of the lever. This can
be very useful in light rain or snow.
6(Low Speed):Turn the band away from you to
the �rst solid band past the delay settings, for steady
wiping at low speed.
?(High Speed):Turn the band further, to the
second solid band past the delay settings, for
high-speed wiping.
Rainsense™ II Wipers
If your vehicle has Rainsense™ II windshield wipers,
the moisture sensor is located next to the inside
rearview mirror and is mounted on the windshield. When
active, these sensors are able to detect moisture on
the windshield and automatically turn on the wipers.
To turn on the Rainsense™ feature, the wipers must be
set to one of the �ve delay settings on the multifunction
lever. Each of the �ve settings adjusts the sensitivity
of the rainsensor.
Since different drivers have different setting preferences,
it is recommended that the mid-range setting (position 3)
be used initially. For more wipes, select the higher
settings; for fewer wipes, select the lower settings located
closer to the off position on the multifunction lever.
The rainsensor will automatically control the frequency of
the wipes from the off setting to the high speed setting
according to the weather conditions. The wipers can be
left in a rainsense mode even when it is not raining.
3-9
Page 198 of 538
Rear Window Defogger
The rear window defogger uses a warming grid to
remove fog from the rear window.
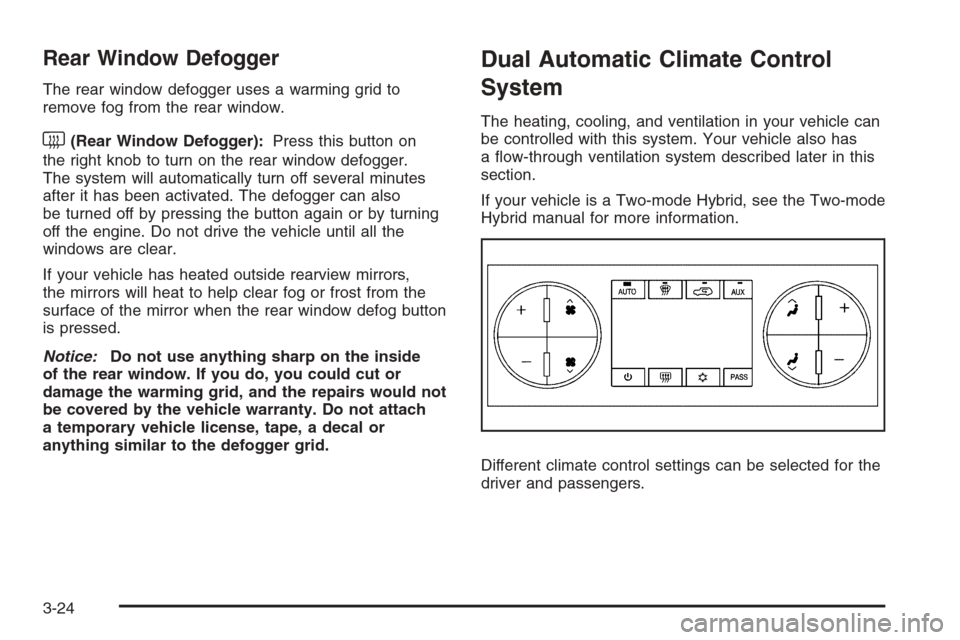
<(Rear Window Defogger):Press this button on
the right knob to turn on the rear window defogger.
The system will automatically turn off several minutes
after it has been activated. The defogger can also
be turned off by pressing the button again or by turning
off the engine. Do not drive the vehicle until all the
windows are clear.
If your vehicle has heated outside rearview mirrors,
the mirrors will heat to help clear fog or frost from the
surface of the mirror when the rear window defog button
is pressed.
Notice:Do not use anything sharp on the inside
of the rear window. If you do, you could cut or
damage the warming grid, and the repairs would not
be covered by the vehicle warranty. Do not attach
a temporary vehicle license, tape, a decal or
anything similar to the defogger grid.
Dual Automatic Climate Control
System
The heating, cooling, and ventilation in your vehicle can
be controlled with this system. Your vehicle also has
a �ow-through ventilation system described later in this
section.
If your vehicle is a Two-mode Hybrid, see the Two-mode
Hybrid manual for more information.
Different climate control settings can be selected for the
driver and passengers.
3-24
Page 204 of 538
Rear Window Defogger
The rear window defogger uses a warming grid to
remove fog from the rear window.
<(Rear Window Defogger):Press this button to
turn on the rear window defogger. It will automatically
turn off several minutes after it has been activated.
The defogger can also be turned off by pressing
the button again or by turning off the engine. Do not
drive the vehicle until all the windows are clear.
If your vehicle has heated outside rearview mirrors, the
mirrors will heat to help clear fog or frost from the
surface of the mirror when the rear window defog button
is pressed.
Notice:Do not use a razor blade or sharp object to
clear the inside rear window. Do not adhere
anything to the defogger grid lines in the rear glass.
These actions may damage the rear defogger.
Repairs would not be covered by your warranty.
Outlet Adjustment
Use the air outlets located in the center and on the side
of your instrument panel to direct the air�ow.
Operation Tips
Keep the hood and front air inlets free of ice, snow,
or any other obstruction (such as leaves). The
heater and defroster will work far better, reducing
the chance of fogging the inside of your windows.
When you enter a vehicle in cold weather, press the
fan up button to the maximum fan level before
driving. This helps clear the intake ducts of snow
and moisture, and reduces the chance of fogging
the inside of your window.
Keep the air path under the front seats clear of
objects. This helps air to circulate throughout
your vehicle.
Adding outside equipment to the front of your
vehicle, such as hood-air de�ectors, may affect the
performance of the heating and air conditioning
system. Check with your dealer before adding
equipment to the outside of your vehicle.
3-30
Page 246 of 538
CHIME VOLUME
This feature allows you to select the volume level of the
chime.
Press the customization button until CHIME VOLUME
appears on the DIC display. Press the set/reset
button once to access the settings for this feature. Then
press the customization button to scroll through the
following settings:
NORMAL:The chime volume will be set to a normal
level.
LOUD:The chime volume will be set to a loud level.
NO CHANGE:No change will be made to this feature.
The current setting will remain.
There is no default for chime volume. The volume will
stay at the last known setting.
To select a setting, press the set/reset button while the
desired setting is displayed on the DIC.
PARK TILT MIRRORS
If your vehicle has this feature, it allows you to select
whether or not the outside mirror(s) will automatically tilt
down when the vehicle is shifted into REVERSE (R).
SeePark Tilt Mirrors on page 2-55for more information.Press the customization button until PARK TILT
MIRRORS appears on the DIC display. Press the
set/reset button once to access the settings for
this feature. Then press the customization button to
scroll through the following settings:
OFF (default):Neither outside mirror will be tilted down
when the vehicle is shifted into REVERSE (R).
DRIVER MIRROR:The driver’s outside mirror will be
tilted down when the vehicle is shifted into
REVERSE (R).
PASSENGER MIRROR:The passenger’s outside
mirror will be tilted down when the vehicle is shifted into
REVERSE (R).
BOTH MIRRORS:The driver’s and passenger’s outside
mirrors will be tilted down when the vehicle is shifted
into REVERSE (R).
NO CHANGE:No change will be made to this feature.
The current setting will remain.
To select a setting, press the set/reset button while the
desired setting is displayed on the DIC.
3-72