2008 CHEVROLET SUBURBAN air condition
[x] Cancel search: air conditionPage 159 of 538
OnStar®System
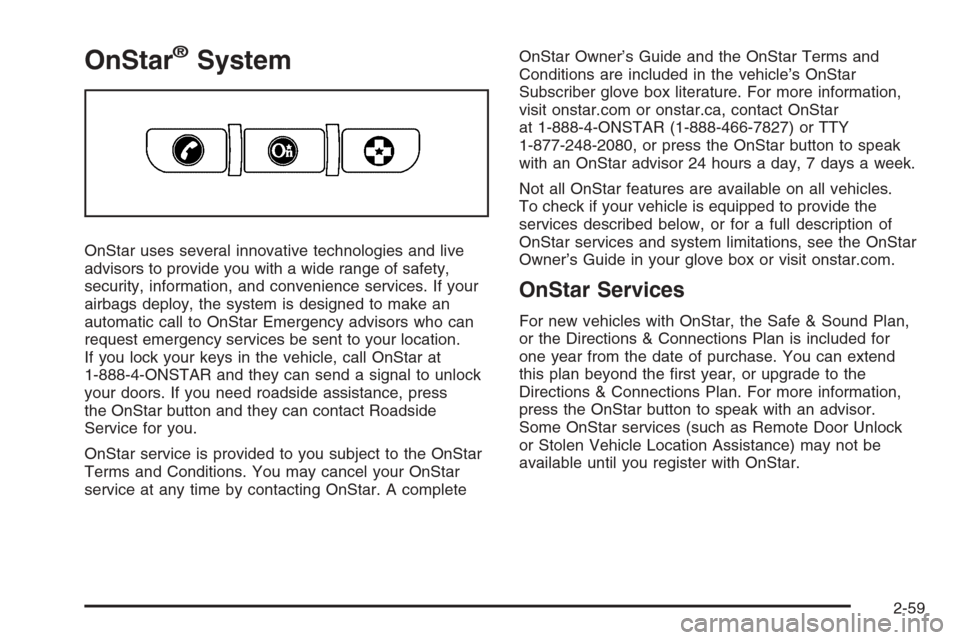
OnStar uses several innovative technologies and live
advisors to provide you with a wide range of safety,
security, information, and convenience services. If your
airbags deploy, the system is designed to make an
automatic call to OnStar Emergency advisors who can
request emergency services be sent to your location.
If you lock your keys in the vehicle, call OnStar at
1-888-4-ONSTAR and they can send a signal to unlock
your doors. If you need roadside assistance, press
the OnStar button and they can contact Roadside
Service for you.
OnStar service is provided to you subject to the OnStar
Terms and Conditions. You may cancel your OnStar
service at any time by contacting OnStar. A completeOnStar Owner’s Guide and the OnStar Terms and
Conditions are included in the vehicle’s OnStar
Subscriber glove box literature. For more information,
visit onstar.com or onstar.ca, contact OnStar
at 1-888-4-ONSTAR (1-888-466-7827) or TTY
1-877-248-2080, or press the OnStar button to speak
with an OnStar advisor 24 hours a day, 7 days a week.
Not all OnStar features are available on all vehicles.
To check if your vehicle is equipped to provide the
services described below, or for a full description of
OnStar services and system limitations, see the OnStar
Owner’s Guide in your glove box or visit onstar.com.
OnStar Services
For new vehicles with OnStar, the Safe & Sound Plan,
or the Directions & Connections Plan is included for
one year from the date of purchase. You can extend
this plan beyond the �rst year, or upgrade to the
Directions & Connections Plan. For more information,
press the OnStar button to speak with an advisor.
Some OnStar services (such as Remote Door Unlock
or Stolen Vehicle Location Assistance) may not be
available until you register with OnStar.
2-59
Page 175 of 538
Instrument Panel Overview...............................3-4
Hazard Warning Flashers................................3-6
Other Warning Devices...................................3-6
Horn .............................................................3-6
Tilt Wheel.....................................................3-6
Turn Signal/Multifunction Lever.........................3-7
Turn and Lane-Change Signals........................3-7
Headlamp High/Low-Beam Changer..................3-8
Flash-to-Pass.................................................3-8
Windshield Wipers..........................................3-9
Rainsense™ II Wipers.....................................3-9
Windshield Washer.......................................3-10
Rear Window Wiper/Washer...........................3-11
Cruise Control..............................................3-12
Exterior Lamps.............................................3-14
Headlamps on Reminder................................3-15
Daytime Running Lamps (DRL).......................3-16
Automatic Headlamp System..........................3-16
Fog Lamps ..................................................3-17
Auxiliary Roof Mounted Lamp.........................3-18
Instrument Panel Brightness...........................3-18
Dome Lamps ...............................................3-18
Dome Lamp Override....................................3-19
Entry Lighting...............................................3-19
Exit Lighting.................................................3-19
Reading Lamps............................................3-19
Electric Power Management...........................3-19Battery Run-Down Protection..........................3-20
Accessory Power Outlet(s).............................3-20
Ashtray(s) and Cigarette Lighter......................3-21
Climate Controls............................................3-22
Climate Control System.................................3-22
Dual Automatic Climate Control System...........3-24
Outlet Adjustment.........................................3-30
Rear Air Conditioning and Heating System.......3-31
Rear Air Conditioning and Heating System
and Electronic Climate Controls...................3-32
Warning Lights, Gages, and Indicators............3-34
Instrument Panel Cluster................................3-35
Speedometer and Odometer...........................3-36
Trip Odometer..............................................3-36
Tachometer.................................................3-36
Safety Belt Reminders...................................3-36
Airbag Readiness Light..................................3-37
Passenger Airbag Status Indicator...................3-38
Charging System Light..................................3-40
Voltmeter Gage............................................3-40
Brake System Warning Light..........................3-41
Antilock Brake System (ABS) Warning Light.....3-42
StabiliTrak
®Indicator Light.............................3-43
Engine Coolant Temperature Gage..................3-43
Tire Pressure Light.......................................3-44
Malfunction Indicator Lamp.............................3-44
Section 3 Instrument Panel
3-1
Page 196 of 538
Climate Controls
Climate Control System
The heating, cooling, defrost, defog and ventilation of
your vehicle can be controlled with this system.
Manual Operation
Turn the right knob clockwise or counterclockwise to
direct the air�ow inside of the vehicle.
To change the current mode, select one of the following:
H(Vent):This mode directs air to the instrument
panel outlets.
)(Bi-Level):This mode directs half of the air to the
instrument panel outlets and to the �oor outlets. The
�ow can be divided between vent and �oor outlets
depending upon where the knob is placed between the
settings. A little air is directed towards the windshield
and side window outlets. Cooler air is directed to
the upper outlets and warmer air to the �oor outlets.
6(Floor):This mode directs most of the air to the �oor
outlets, with some of the air directed to the windshield,
side window outlets, and second row �oor outlets. In this
mode, the system will automatically select outside air.
Recirculation cannot be selected when in Floor Mode.The right knob can also be used to select defog or
defrost mode. For more information, see “Defogging and
Defrosting” later in this section.
By positioning the right knob between two modes, a
combination of those two modes is selected.
The air conditioning compressor will be on unless the
outside temperature is close to freezing.
9(Fan):Turn the left knob clockwise or
counterclockwise to increase or decrease the fan speed.
Turn the knob all the way counterclockwise to turn the
front system off.
?(Recirculation):Press this button to turn the
recirculation mode on. When the button is pressed, an
indicator light will come on.
This mode keeps outside air from entering the vehicle.
It can be used to reduce outside air and prevent
odors from entering the vehicle. Recirculation may also
help cool the air inside the vehicle more quickly once
the temperature inside the vehicle is less than the
outside temperature.
The recirculation mode cannot be used with �oor,
defrost, or defogging modes. If you try to select
recirculation in one of those modes, the indicator will
�ash three times and turn off. The air conditioning
compressor will also come on when this mode is
activated. While in recirculation mode the windows may
3-22
Page 197 of 538
fog when the weather is cold and damp. To clear the
fog, select either the defog or defrost mode and increase
the fan speed. Recirculation mode can be turned off
by pressing the button again, or turning off the engine.
AUX (Auxiliary):Pressing this button will turn the
rear heating and air conditioning on. SeeRear Air
Conditioning and Heating System on page 3-31orRear
Air Conditioning and Heating System and Electronic
Climate Controls on page 3-32for more information.
Temperature Control:Rotate the thumbwheels up or
down to increase or decrease the temperature on
the driver’s side or the passenger side of the vehicle for
the dual zone system, if equipped. Otherwise, turn
the center knob clockwise or counterclockwise to
increase or decrease the temperature inside the vehicle.
#(Air Conditioning):Press this button on the left
knob to turn the air conditioning system on or off. When
A/C is pressed, an indicator light comes on to show
that the air conditioning has been activated.
On hot days, open the windows to let hot inside air
escape; then close them. This helps to reduce the time
it takes for your vehicle to cool down. It also helps
the system to operate more efficiently.
The air conditioning system removes moisture from the
air, so a small amount of water might drip underneath
the vehicle while idling or after turning off the engine.
This is normal.
Defogging and Defrosting
Fog on the inside of the windows is a result of high
humidity (moisture) condensing on the cool window
glass. This can be minimized if the climate control
system is used properly. There are two modes to clear
fog or frost from your windshield. Turn the right knob
clockwise to select the defog or defrost mode.
-(Defog):The defog mode is used to clear the
windows of fog or moisture and warm the passengers.
This mode directs air to the windshield, �oor outlets,
and side window vents. When this mode is selected,
the system turns off recirculation and runs the air
conditioning compressor unless the outside temperature
is close to freezing. The recirculation mode cannot be
selected while in the defog mode. Do not drive the
vehicle until all the windows are clear.
0(Defrost):The defrost mode is used to remove fog
or frost from the windshield more quickly. This mode
directs a portion of the air to the windshield and
side window vents and some to the �oor vents. In this
mode, the system will automatically force outside air into
the vehicle. The recirculation mode cannot be selected
while in the defrost mode. The air conditioning
compressor will run automatically in this setting, unless
the outside temperature is close to freezing. Do not
drive the vehicle until all the windows are clear.
3-23
Page 199 of 538
Driver’s Side Temperature Control
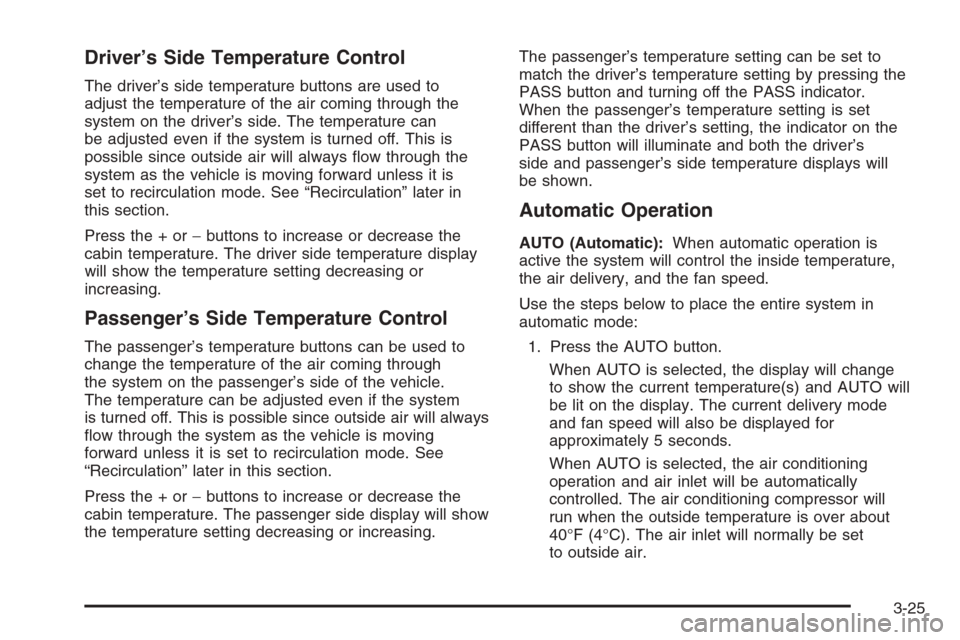
The driver’s side temperature buttons are used to
adjust the temperature of the air coming through the
system on the driver’s side. The temperature can
be adjusted even if the system is turned off. This is
possible since outside air will always �ow through the
system as the vehicle is moving forward unless it is
set to recirculation mode. See “Recirculation” later in
this section.
Press the + or−buttons to increase or decrease the
cabin temperature. The driver side temperature display
will show the temperature setting decreasing or
increasing.
Passenger’s Side Temperature Control
The passenger’s temperature buttons can be used to
change the temperature of the air coming through
the system on the passenger’s side of the vehicle.
The temperature can be adjusted even if the system
is turned off. This is possible since outside air will always
�ow through the system as the vehicle is moving
forward unless it is set to recirculation mode. See
“Recirculation” later in this section.
Press the + or−buttons to increase or decrease the
cabin temperature. The passenger side display will show
the temperature setting decreasing or increasing.The passenger’s temperature setting can be set to
match the driver’s temperature setting by pressing the
PASS button and turning off the PASS indicator.
When the passenger’s temperature setting is set
different than the driver’s setting, the indicator on the
PASS button will illuminate and both the driver’s
side and passenger’s side temperature displays will
be shown.
Automatic Operation
AUTO (Automatic):When automatic operation is
active the system will control the inside temperature,
the air delivery, and the fan speed.
Use the steps below to place the entire system in
automatic mode:
1. Press the AUTO button.
When AUTO is selected, the display will change
to show the current temperature(s) and AUTO will
be lit on the display. The current delivery mode
and fan speed will also be displayed for
approximately 5 seconds.
When AUTO is selected, the air conditioning
operation and air inlet will be automatically
controlled. The air conditioning compressor will
run when the outside temperature is over about
40°F (4°C). The air inlet will normally be set
to outside air.
3-25
Page 200 of 538
If it is hot outside, the air inlet may automatically
switch to recirculate inside air to help quickly
cool down the vehicle. The light on the button will
illuminate in recirculation.
2. Set the driver’s and passenger’s temperature.
To �nd your comfort setting, start with a 74°F (23°C)
temperature setting and allow about 20 minutes
for the system to regulate. Use the driver’s or
passenger’s temperature buttons to adjust the
temperature setting as necessary. If you choose the
temperature setting of 60°F (15°C), the system
will remain at the maximum cooling setting. If you
choose the temperature setting of 90°F (32°C),
the system will remain at the maximum heat setting.
Choosing either maximum setting will not cause
the vehicle to heat or cool any faster.
Be careful not to cover the solar sensor located on the
top of the instrument panel near the windshield. This
sensor regulates air temperature based on sun load and
also turns on the headlamps. For more information on
the solar sensor, see “Sensors” later in this section.
To avoid blowing cold air in cold weather, the system will
delay turning on the fan until warm air is available.
The length of delay depends on the engine coolant
temperature. Pressing the fan switch will override this
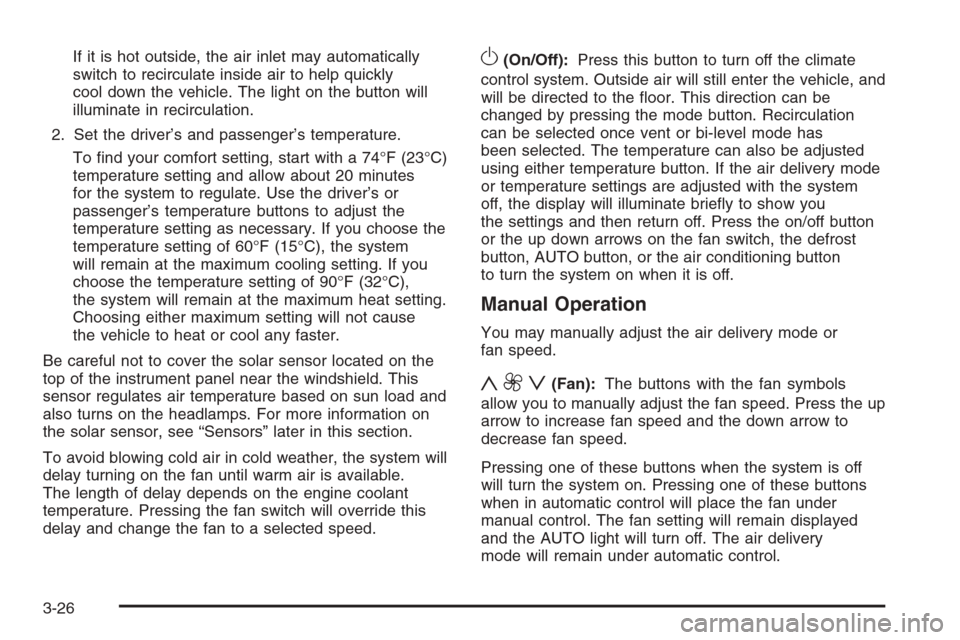
delay and change the fan to a selected speed.O(On/Off):Press this button to turn off the climate
control system. Outside air will still enter the vehicle, and
will be directed to the �oor. This direction can be
changed by pressing the mode button. Recirculation
can be selected once vent or bi-level mode has
been selected. The temperature can also be adjusted
using either temperature button. If the air delivery mode
or temperature settings are adjusted with the system
off, the display will illuminate brie�y to show you
the settings and then return off. Press the on/off button
or the up down arrows on the fan switch, the defrost
button, AUTO button, or the air conditioning button
to turn the system on when it is off.
Manual Operation
You may manually adjust the air delivery mode or
fan speed.
y9z(Fan):The buttons with the fan symbols
allow you to manually adjust the fan speed. Press the up
arrow to increase fan speed and the down arrow to
decrease fan speed.
Pressing one of these buttons when the system is off
will turn the system on. Pressing one of these buttons
when in automatic control will place the fan under
manual control. The fan setting will remain displayed
and the AUTO light will turn off. The air delivery
mode will remain under automatic control.
3-26
Page 201 of 538
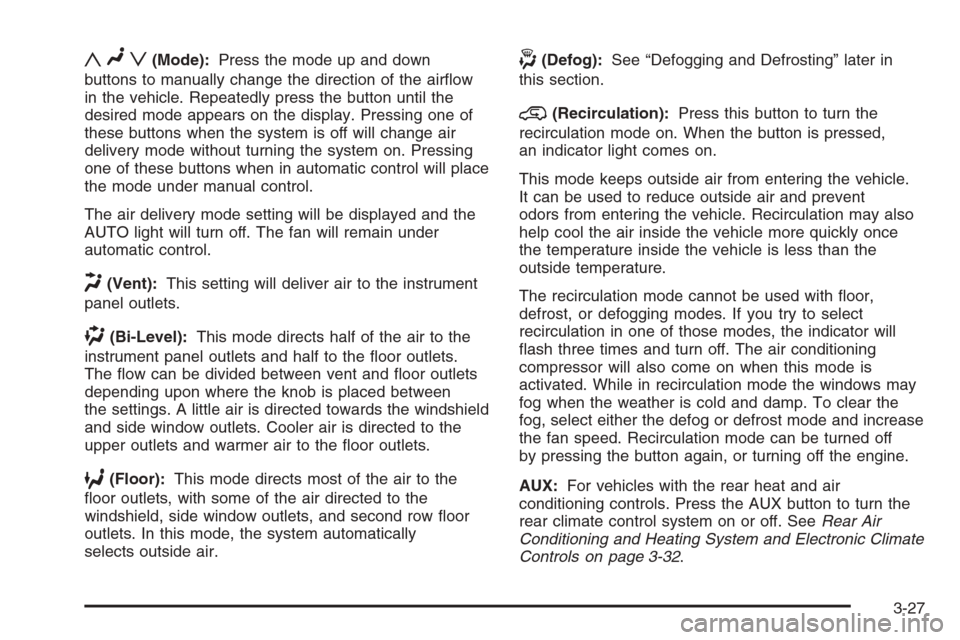
yNz(Mode):Press the mode up and down
buttons to manually change the direction of the air�ow
in the vehicle. Repeatedly press the button until the
desired mode appears on the display. Pressing one of
these buttons when the system is off will change air
delivery mode without turning the system on. Pressing
one of these buttons when in automatic control will place
the mode under manual control.
The air delivery mode setting will be displayed and the
AUTO light will turn off. The fan will remain under
automatic control.
H(Vent):This setting will deliver air to the instrument
panel outlets.
)(Bi-Level):This mode directs half of the air to the
instrument panel outlets and half to the �oor outlets.
The �ow can be divided between vent and �oor outlets
depending upon where the knob is placed between
the settings. A little air is directed towards the windshield
and side window outlets. Cooler air is directed to the
upper outlets and warmer air to the �oor outlets.
6(Floor):This mode directs most of the air to the
�oor outlets, with some of the air directed to the
windshield, side window outlets, and second row �oor
outlets. In this mode, the system automatically
selects outside air.
-(Defog):See “Defogging and Defrosting” later in
this section.
@(Recirculation):Press this button to turn the
recirculation mode on. When the button is pressed,
an indicator light comes on.
This mode keeps outside air from entering the vehicle.
It can be used to reduce outside air and prevent
odors from entering the vehicle. Recirculation may also
help cool the air inside the vehicle more quickly once
the temperature inside the vehicle is less than the
outside temperature.
The recirculation mode cannot be used with �oor,
defrost, or defogging modes. If you try to select
recirculation in one of those modes, the indicator will
�ash three times and turn off. The air conditioning
compressor will also come on when this mode is
activated. While in recirculation mode the windows may
fog when the weather is cold and damp. To clear the
fog, select either the defog or defrost mode and increase
the fan speed. Recirculation mode can be turned off
by pressing the button again, or turning off the engine.
AUX:For vehicles with the rear heat and air
conditioning controls. Press the AUX button to turn the
rear climate control system on or off. SeeRear Air
Conditioning and Heating System and Electronic Climate
Controls on page 3-32.
3-27
Page 202 of 538
Air Conditioning
#
(Air Conditioning):Press this button to turn the
air conditioning (A/C) compressor on and off. When
air conditioning is selected, an indicator light comes on
to show that the air conditioning has been activated.
Pressing this button when the outside temperature is too
cool for air conditioning will make the air conditioning
indicator �ash three times and then turn off to show that
the air conditioning mode is not available. If the air
conditioning is on and the outside temperature drops
below a temperature which is too cool for air
conditioning to be effective, the air conditioning light will
turn off to show that the air conditioning mode has
been canceled.
On hot days, open the windows long enough to let hot
inside air escape. This helps to reduce the time it
takes for your vehicle to cool down. It also helps the
system to operate more efficiently.
The air conditioning system removes moisture from the
air, so a small amount of water might drip underneath
the vehicle while idling or after turning off the engine.
This is normal.
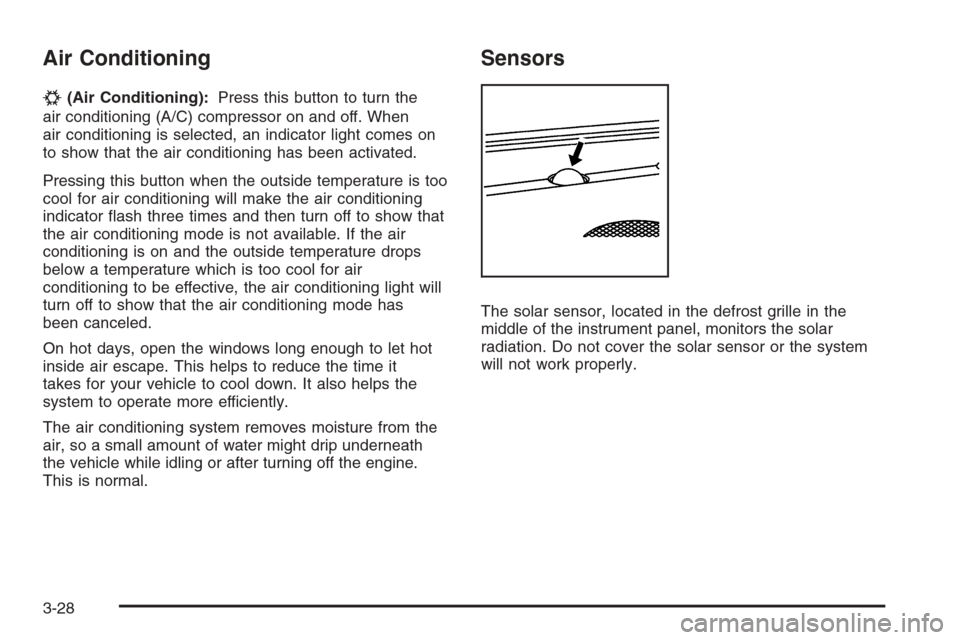
Sensors
The solar sensor, located in the defrost grille in the
middle of the instrument panel, monitors the solar
radiation. Do not cover the solar sensor or the system
will not work properly.
3-28