2008 CHEVROLET EXPRESS PASSANGER oil
[x] Cancel search: oilPage 270 of 414

How to Add Automatic
Transmission Fluid
Refer to the Maintenance Schedule to determine what
kind of transmission fluid to use. SeeRecommended
Fluids and Lubricants on page 6-13.
Using a funnel, add fluid down the transmission dipstick
tube only after checking the transmission fluid while it
is hot. A cold check is used only as a reference. If
the fluid level is low, add only enough of the proper
fluid to bring the level up to the HOT area for a
hot check. It does not take much fluid, generally less
than one pint (0.5 L). Do not overfill.
Notice:Use of the incorrect automatic transmission
�uid may damage your vehicle, and the damages
may not be covered by your warranty. Always
use the automatic transmission �uid listed in
Recommended Fluids and Lubricants on page 6-13.
•After adding fluid, recheck the fluid level as
described under “How to Check Automatic
Transmission Fluid,” earlier in this section.
•When the correct fluid level is obtained, push the
dipstick back in all the way; then flip the handle
down to lock the dipstick in place.
Engine Coolant
If your vehicle has the DURAMAX®Diesel engine, see
the DURAMAX®Diesel manual for more information.
The cooling system in your vehicle is filled with
DEX-COOL
®engine coolant. This coolant is designed
to remain in your vehicle for five years or 150,000 miles
(240 000 km), whichever occurs first, if you add only
DEX-COOL
®extended life coolant.
The following explains your cooling system and how to
add coolant when it is low. If you have a problem
with engine overheating, seeEngine Overheating on
page 5-27.
A 50/50 mixture of clean, drinkable water and
DEX-COOL
®coolant will:
•Give freezing protection down to−34°F (−37°C).
•Give boiling protection up to 265°F (129°C).
•Protect against rust and corrosion.
•Help keep the proper engine temperature.
•Let the warning lights and gages work as they
should.
5-24
Page 271 of 414

Notice:Using coolant other than DEX-COOL®may
cause premature engine, heater core, radiator
and fuel operated heater (FOH) corrosion. In
addition, the engine coolant may require changing
sooner, at 30,000 miles (50 000 km) or 24 months,
whichever occurs �rst. Any repairs would not
be covered by your warranty. Always use
DEX-COOL
®(silicate-free) coolant in your vehicle.
What to Use
Use a mixture of one-half clean, drinkable water and
one-half DEX-COOL®coolant which will not damage
aluminum parts. If you use this coolant mixture, you do
not need to add anything else.
{CAUTION:
Adding only plain water to your cooling system
can be dangerous. Plain water, or some other
liquid such as alcohol, can boil before the
proper coolant mixture will. Your vehicle’s
coolant warning system is set for the proper
coolant mixture.
CAUTION: (Continued)
CAUTION: (Continued)
With plain water or the wrong mixture, your
engine could get too hot but you would not get
the overheat warning. Your engine could catch
�re and you or others could be burned. Use a
50/50 mixture of clean, drinkable water and the
proper coolant.
Notice:If you use an improper coolant mixture, your
engine could overheat and be badly damaged. The
repair cost would not be covered by your warranty.
Too much water in the mixture can freeze and crack
the engine, radiator, heater core, and other parts.
If you have to add coolant more than four times a year,
have your dealer/retailer check your cooling system.
Notice:If you use extra inhibitors and/or additives
in your vehicle’s cooling system, you could
damage your vehicle. Use only the proper mixture
of the engine coolant listed in this manual for
the cooling system. SeeRecommended Fluids and
Lubricants on page 6-13for more information.
5-25
Page 275 of 414

If you no longer have the overheat warning, you can
drive. Just to be safe, drive slower for about 10 minutes.
If the warning does not come back on, you can drive
normally.
If the warning continues, and you have not stopped, pull
over, stop, and park your vehicle right away.
If there is still no sign of steam, push down the
accelerator until the engine speed is about twice as fast
as normal idle speed for at least three minutes while
you are parked. If you still have the warning, turn off the
engine and get everyone out of the vehicle until it
cools down.
You may decide not to lift the hood but to get service
help right away.
Cooling System
If your vehicle has a diesel engine, see “Van Models”
under “Cooling System” in the DURAMAX®Diesel
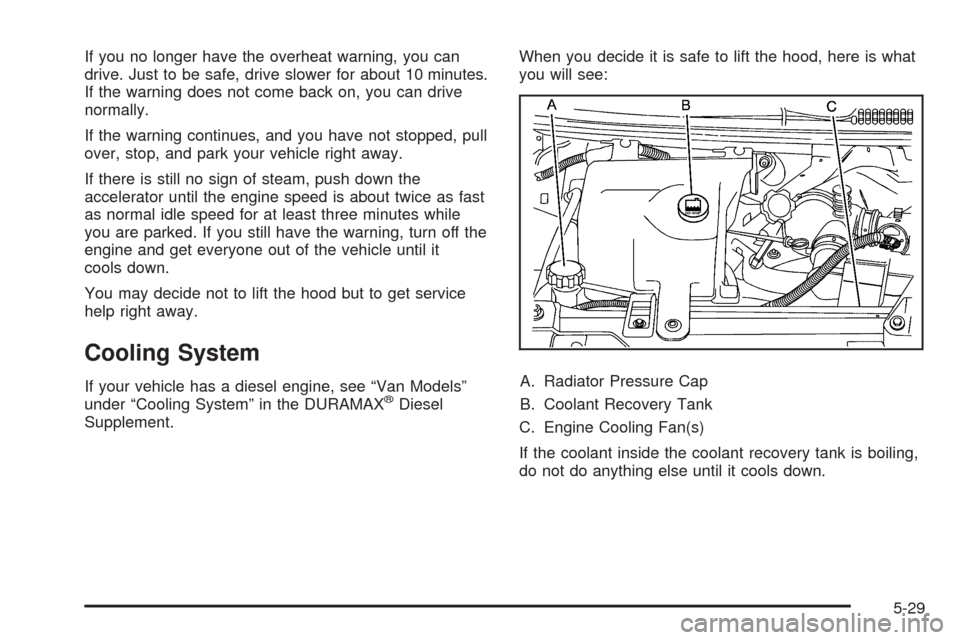
Supplement.When you decide it is safe to lift the hood, here is what
you will see:
A. Radiator Pressure Cap
B. Coolant Recovery Tank
C. Engine Cooling Fan(s)
If the coolant inside the coolant recovery tank is boiling,
do not do anything else until it cools down.
5-29
Page 277 of 414

{CAUTION:
Adding only plain water to the cooling system
can be dangerous. Plain water, or some other
liquid such as alcohol, can boil before the
proper coolant mixture will. The vehicle’s
coolant warning system is set for the proper
coolant mixture. With plain water or the wrong
mixture, the engine could get too hot but you
would not get the overheat warning. The
engine could catch �re and you or others
could be burned. Use a 50/50 mixture of clean,
drinkable water and DEX-COOL
®coolant.
Notice:
When using concentrated washer �uid, follow the
manufacturer’s instructions for adding water.
Do not mix water with ready-to-use washer �uid.
Water can cause the solution to freeze and
damage your washer �uid tank and other parts of
the washer system. Also, water does not clean as
well as washer �uid.
Fill the washer �uid tank only three-quarters full
when it is very cold. This allows for �uid
expansion if freezing occurs, which could
damage the tank if it is completely full.
Do not use engine coolant (antifreeze) in your
windshield washer. It can damage the vehicle’s
windshield washer system and paint.
Notice:In cold weather, water can freeze and crack
the engine, radiator, heater core and other parts.
Use the recommended coolant and the proper
coolant mixture.
{CAUTION:
You can be burned if you spill coolant on hot
components in the engine compartment.
Coolant contains ethylene glycol, and it will
burn if the engine parts are hot enough. Do not
spill coolant on a hot engine or components in
the engine compartment.
When the coolant in the coolant recovery tank is at the
COLD FILL mark, start your vehicle.
5-31
Page 284 of 414

Checking Brake Fluid
The brake fluid can be checked without taking off the
cap by looking at the brake fluid reservoir.
The fluid level should be
above MIN. If it is not,
have the brake hydraulic
system checked to
see if there is a leak.
After work is done on the brake hydraulic system,
make sure the level is above the MIN but not over the
MAX mark.
What to Add
When you do need brake fluid, use only DOT-3 brake
fluid. Use new brake fluid from a sealed container only.
SeeRecommended Fluids and Lubricants on page 6-13.Always clean the brake fluid reservoir cap and the area
around the cap before removing it. This helps keep
dirt from entering the reservoir.
{CAUTION:
With the wrong kind of �uid in the brake
hydraulic system, the brakes might not work
well. This could cause a crash. Always use the
proper brake �uid.
Notice:
Using the wrong �uid can badly damage brake
hydraulic system parts. For example, just a
few drops of mineral-based oil, such as engine
oil, in the brake hydraulic system can damage
brake hydraulic system parts so badly that they
will have to be replaced. Do not let someone
put in the wrong kind of �uid.
If you spill brake �uid on your vehicle’s painted
surfaces, the paint �nish can be damaged. Be
careful not to spill brake �uid on your vehicle. If
you do, wash it off immediately. SeeWashing
Your Vehicle on page 5-102.
5-38
Page 307 of 414

(D) Construction Code:A letter code is used to
indicate the type of ply construction in the tire.
The letter R means radial ply construction;
the letter D means diagonal or bias ply
construction; and the letter B means belted-bias
ply construction.
(E) Rim Diameter
:Diameter of the wheel in
inches.
(F) Service Description
:The service description
indicates the load range and speed rating of a
tire. The load index can range from 1 to 279.
Speed ratings range from A to Z.
Tire Terminology and De�nitions
Air Pressure:The amount of air inside the
tire pressing outward on each square inch of the
tire. Air pressure is expressed in pounds per
square inch (psi) or kilopascal (kPa).
Accessory Weight
:This means the combined
weight of optional accessories. Some examples of
optional accessories are, automatic transmission,
power steering, power brakes, power windows,
power seats, and air conditioning.Aspect Ratio
:The relationship of a tire’s height
to its width.
Belt
:A rubber coated layer of cords that is
located between the plies and the tread. Cords
may be made from steel or other reinforcing
materials.
Bead
:The tire bead contains steel wires wrapped
by steel cords that hold the tire onto the rim.
Bias Ply Tire
:A pneumatic tire in which the plies
are laid at alternate angles less than 90 degrees
to the centerline of the tread.
Cold Tire Pressure
:The amount of air pressure
in a tire, measured in pounds per square inch
(psi) or kilopascals (kPa) before a tire has built up
heat from driving. SeeInflation - Tire Pressure
on page 5-64.
Curb Weight
:The weight of a motor vehicle with
standard and optional equipment including the
maximum capacity of fuel, oil, and coolant,
but without passengers and cargo.
5-61
Page 337 of 414

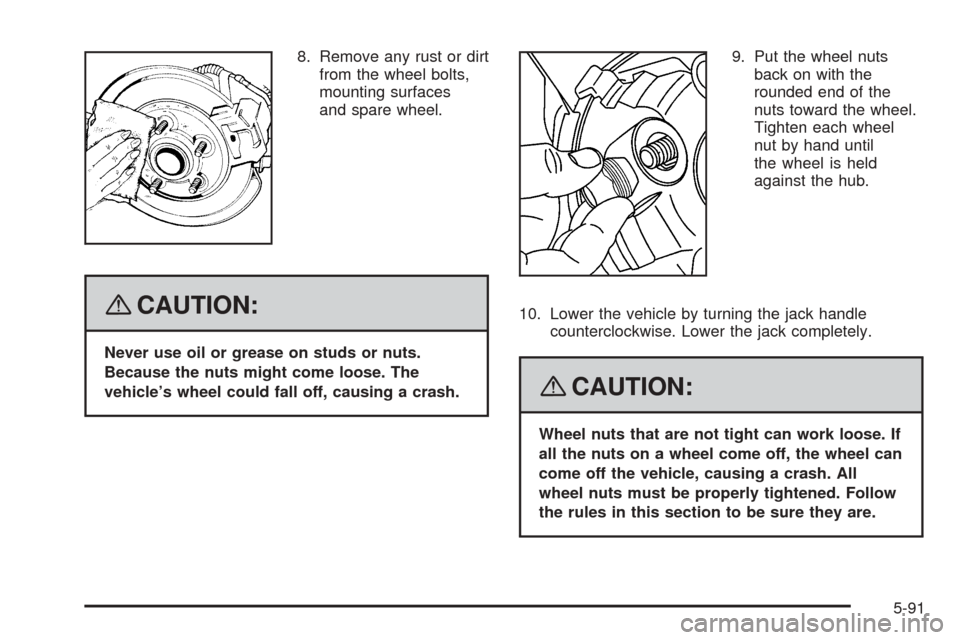
8. Remove any rust or dirt
from the wheel bolts,
mounting surfaces
and spare wheel.
{CAUTION:
Never use oil or grease on studs or nuts.
Because the nuts might come loose. The
vehicle’s wheel could fall off, causing a crash.9. Put the wheel nuts
back on with the
rounded end of the
nuts toward the wheel.
Tighten each wheel
nut by hand until
the wheel is held
against the hub.
10. Lower the vehicle by turning the jack handle
counterclockwise. Lower the jack completely.
{CAUTION:
Wheel nuts that are not tight can work loose. If
all the nuts on a wheel come off, the wheel can
come off the vehicle, causing a crash. All
wheel nuts must be properly tightened. Follow
the rules in this section to be sure they are.
5-91
Page 345 of 414

Spare Tire
Your vehicle, when new, had a fully-inflated spare tire.
A spare tire may lose air over time, so check its
inflation pressure regularly. SeeInflation - Tire Pressure
on page 5-64andLoading Your Vehicle on page 4-20
for information regarding proper tire inflation and loading
your vehicle. For instruction on how to remove, install
or store a spare tire, seeRemoving the Flat Tire
and Installing the Spare Tire on page 5-86andStoring
a Flat or Spare Tire and Tools on page 5-97.
After installing the spare tire on your vehicle, you should
stop as soon as possible and make sure the spare is
correctly inflated. The spare tire is made to perform well
at speeds up to 70 mph (112 km/h) at the recommended
inflation pressure, so you can finish your trip.
Have the damaged or flat road tire repaired or replaced
as soon as you can and installed back onto your
vehicle. This way, a spare tire will be available in case
you need it again. Do not mix tires and wheels of
different sizes, because they will not fit. Keep your spare
tire and its wheel together.
Appearance Care
Interior Cleaning
Your vehicle’s interior will continue to look its best if
it is cleaned often. Although not always visible, dust
and dirt can accumulate on your upholstery. Dirt
can damage carpet, fabric, leather, and plastic surfaces.
Regular vacuuming is recommended to remove
particles from your upholstery. It is important to
keep your upholstery from becoming and remaining
heavily soiled. Soils should be removed as quickly
as possible. Your vehicle’s interior may experience
extremes of heat that could cause stains to set rapidly.
Lighter colored interiors may require more frequent
cleaning. Use care because newspapers and garments
that transfer color to your home furnishings may also
transfer color to your vehicle’s interior.
5-99