Page 299 of 414
To replace a bulb:
1. Remove the two screws from the CHMSL assembly.
2. Remove the assembly.
3. Turn the bulb counterclockwise one quarter turn to
remove it from the socket.
4. Install a new bulb.
5. Reverse the steps to reinstall the assembly.
If items are loaded on the roof of the vehicle, as in a
luggage carrier, care should be taken not to block
or damage the CHMSL.Taillamps
To replace one of these bulbs:
1. Remove the
two inboard nuts
from the inside of the
taillamp assembly.
2. Pull the taillamp assembly rearward to clear
the studs.
3. Slide the taillamp assembly slightly upward to
release the lower clip.
4. Remove the three nuts on the taillamp assembly.
5. Remove the taillamp assembly from the vehicle.
5-53
Page 300 of 414
6. Remove the bulb socket by squeezing the tab on
the side of the socket while turning it
counterclockwise.
7. Turn the bulb counterclockwise to remove it.
8. Install a new bulb.
9. Reverse the steps to reinstall the taillamp assembly.
Replacement Bulbs
Exterior Lamp Bulb Number
Back-up, Rear Parking,
Stoplamp, and Turn Signal Lamp3157
Center High Mounted Stop
Lamp (CHMSL)912
Front Parking and Turn
Signal Lamp3157KX
Front Sidemarker Lamp 194
Headlamps
Composite High-Beam
Headlamp9005
Composite Low-Beam
Headlamp9006GS
Sealed Beam Headlamp H6054
For replacement bulbs not listed here, contact your
dealer/retailer.
Windshield Wiper Blade
Replacement
Windshield wiper blades should be inspected for wear
and cracking. SeeScheduled Maintenance on page 6-4
for more information on wiper blade inspection.
5-54
Page 301 of 414

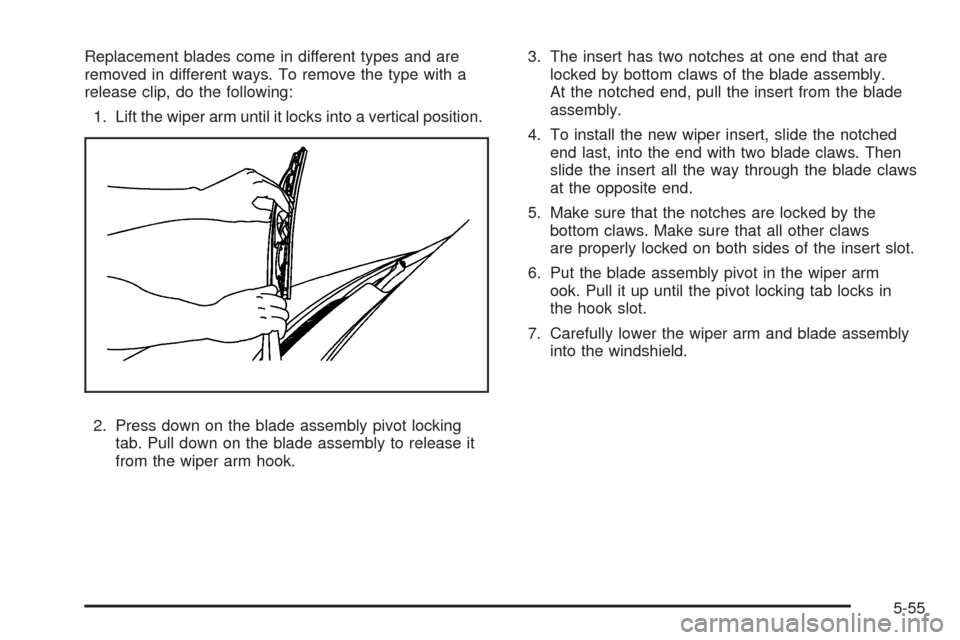
Replacement blades come in different types and are
removed in different ways. To remove the type with a
release clip, do the following:
1. Lift the wiper arm until it locks into a vertical position.
2. Press down on the blade assembly pivot locking
tab. Pull down on the blade assembly to release it
from the wiper arm hook.3. The insert has two notches at one end that are
locked by bottom claws of the blade assembly.
At the notched end, pull the insert from the blade
assembly.
4. To install the new wiper insert, slide the notched
end last, into the end with two blade claws. Then
slide the insert all the way through the blade claws
at the opposite end.
5. Make sure that the notches are locked by the
bottom claws. Make sure that all other claws
are properly locked on both sides of the insert slot.
6. Put the blade assembly pivot in the wiper arm
ook. Pull it up until the pivot locking tab locks in
the hook slot.
7. Carefully lower the wiper arm and blade assembly
into the windshield.
5-55
Page 316 of 414

The TPMS sensor matching process is outlined below:
1. Set the parking brake.
2. Turn the ignition switch to ON/RUN with the
engine off.
3. Press the Remote Keyless Entry (RKE) transmitter’s
LOCK and UNLOCK buttons at the same time for
approximately five seconds. The horn sounds twice
to signal the receiver is in relearn mode and
TIRE LEARNING ACTIVE message displays on the
DIC screen.
If your vehicle does not have RKE, press the Driver
Information Center (DIC) vehicle information
button until the PRESS
VTO RELEARN TIRE
POSITIONS message displays. The horn sounds
twice to signal the receiver is in relearn mode
and TIRE LEARNING ACTIVE message displays on
the DIC screen.
If your vehicle does not have RKE or DIC buttons,
press the trip odometer reset stem located on
the instrument panel cluster until the PRESS
VTO
RELEARN TIRE POSITIONS message displays.
The horn sounds twice to signal the receiver
is in relearn mode and TIRE LEARNING ACTIVE
message displays on the DIC screen.
4. Start with the driver side front tire.5. Remove the valve cap from the valve cap stem.
Activate the TPMS sensor by increasing or
decreasing the tire’s air pressure for five seconds,
or until a horn chirp sounds. The horn chirp,
which may take up to 30 seconds to sound,
confirms that the sensor identification code has
been matched to this tire and wheel position.
6. Proceed to the passenger side front tire, and repeat
the procedure in Step 5.
7. Proceed to the passenger side rear tire, and repeat
the procedure in Step 5.
8. Proceed to the driver side rear tire, and repeat the
procedure in Step 5. The horn sounds two times to
indicate the sensor identification code has been
matched to the driver side rear tire, and that
the TPMS sensor matching process is no longer
active. The TIRE LEARNING ACTIVE message on
the DIC display screen goes off.
9. Turn the ignition switch to LOCK/OFF.
10. Set all four tires to the recommended air pressure
level as indicated on the Tire and Loading
Information label.
11. Put the valve caps back on the valve stems.
5-70
Page 321 of 414

{CAUTION:
If you use bias-ply tires on your vehicle,
the wheel rim �anges could develop
cracks after many miles of driving. A tire
and/or wheel could fail suddenly, causing
a crash. Use only radial-ply tires with the
wheels on your vehicle.
If you must replace your vehicle’s tires with those that
do not have a TPC Spec number, make sure they
are the same size, load range, speed rating, and
construction type (radial and bias-belted tires) as your
vehicle’s original tires.
Vehicles that have a tire pressure monitoring system
could give an inaccurate low-pressure warning if
non-TPC Spec rated tires are installed on your vehicle.
Non-TPC Spec rated tires may give a low-pressure
warning that is higher or lower than the proper warning
level you would get with TPC Spec rated tires. See
Tire Pressure Monitor System on page 5-66.
Your vehicle’s original equipment tires are listed on the
Tire and Loading Information label. SeeLoading
Your Vehicle on page 4-20, for more information about
the Tire and Loading Information label and its location
on your vehicle.
Different Size Tires and Wheels
If you add wheels or tires that are a different size than
your original equipment wheels and tires, this could
affect the way your vehicle performs, including its
braking, ride and handling characteristics, stability, and
resistance to rollover. Additionally, if your vehicle
has electronic systems such as anti-lock brakes, rollover
airbags, traction control, and electronic stability control,
the performance of these systems can be affected.
{CAUTION:
If you add different sized wheels, your vehicle
may not provide an acceptable level of
performance and safety if tires not
recommended for those wheels are selected.
You may increase the chance that you will
crash and suffer serious injury. Only use
GM speci�c wheel and tire systems developed
for your vehicle, and have them properly
installed by a GM certi�ed technician.
SeeBuying New Tires on page 5-74andAccessories
and Modifications on page 5-3for additional information.
5-75
Page 328 of 414

Changing a Flat Tire
If a tire goes flat, avoid further tire and wheel damage
by driving slowly to a level place. Turn on your vehicle’s
hazard warning flashers. SeeHazard Warning Flashers
on page 3-6for more information.
{CAUTION:
Changing a tire can be dangerous. The vehicle
can slip off the jack and roll over or fall on you
or other people. You and they could be badly
injured or even killed. Find a level place to
change your tire.
CAUTION: (Continued)
CAUTION: (Continued)
To help prevent the vehicle from moving:
1. Set the parking brake �rmly.
2. Put the shift lever in PARK (P).
3. Turn off the engine and do not restart
while the vehicle is raised.
4. Do not allow passengers to remain in the
vehicle.
To be even more certain the vehicle will not
move, you should put blocks at the front and
rear of the tire farthest away from the one
being changed. That would be the tire, on the
other side, at the opposite end of the vehicle.
When your vehicle has a flat tire, use the following
example as a guide to assist you in the placement of
wheel blocks.
5-82
Page 331 of 414
To lower the spare tire from the vehicle:
1. Attach the wheel
wrench and ratchet,
with the DOWN
side facing you. The
wheel wrench has
a socket end and a flat
chisel end. Note that
there is an UP side and
a DOWN side on the
ratchet.
2. Put the flat chisel end of the wheel wrench on an
angle through the hole between the body and the
bumper. Be sure the flat end connects into the
hoist shaft.3. Turn the ratchet counterclockwise to lower the
spare tire to the ground. If the spare tire does
not lower to the ground, the secondary latch
is engaged causing the tire not to lower. See
Secondary Latch System on page 5-93.
5-85
Page 332 of 414
4. When the tire has been lowered, pull the tire toward
you so you can reach the tire retainer and pull it up
through the wheel opening.
If you have a vehicle which was completed from a cab
and chassis, refer to the information from the body
supplier/installer.
The spare tire is a full-size tire, like the other tires on
your vehicle.
Removing the Flat Tire and
Installing the Spare Tire
If your vehicle has plastic wheel nut caps, loosen them
by turning the wheel wrench counterclockwise. The
wheel nut caps are designed to remain with the center
cap. Remove the center cap.
If the wheel has a smooth center piece, place the chisel
end of the wheel wrench in the slot on the wheel and
gently pry it out.
1. Do a safety check before proceeding. SeeChanging
a Flat Tire on page 5-82for more information.
2. With the DOWN side facing you, use the ratchet
and wheel wrench to loosen all the wheel nuts.
Do not remove them yet.
5-86