Page 257 of 440

3. Firmly set the parking brake. SeeParking Brake on
page 3-36for more information.
4. Put the transmission in P (Park).
5. Secure the vehicle to the dolly following the
manufacturer’s instructions.
6. Use an adequate clamping device designed for
towing to ensure that the front wheels are locked
into the straight position.
7. Turn the ignition to LOCK/OFF.
If the tow vehicle will not be started or driven for six
weeks or more, remove the battery cable from
the negative terminal (post) of the battery to prevent
the battery from draining while towing.All-Wheel-Drive Vehicles
The vehicle was not designed to be towed with two
wheels on the ground. To properly tow these vehicles,
they should be placed on a platform trailer with all
four wheels off the ground.
Notice:Towing an all-wheel-drive vehicle with all
four wheels on the ground, or even with only two of
its wheels on the ground, will damage drivetrain
components. Do not tow an all-wheel-drive vehicle
with any of its wheels on the ground.
5-29
Page 261 of 440

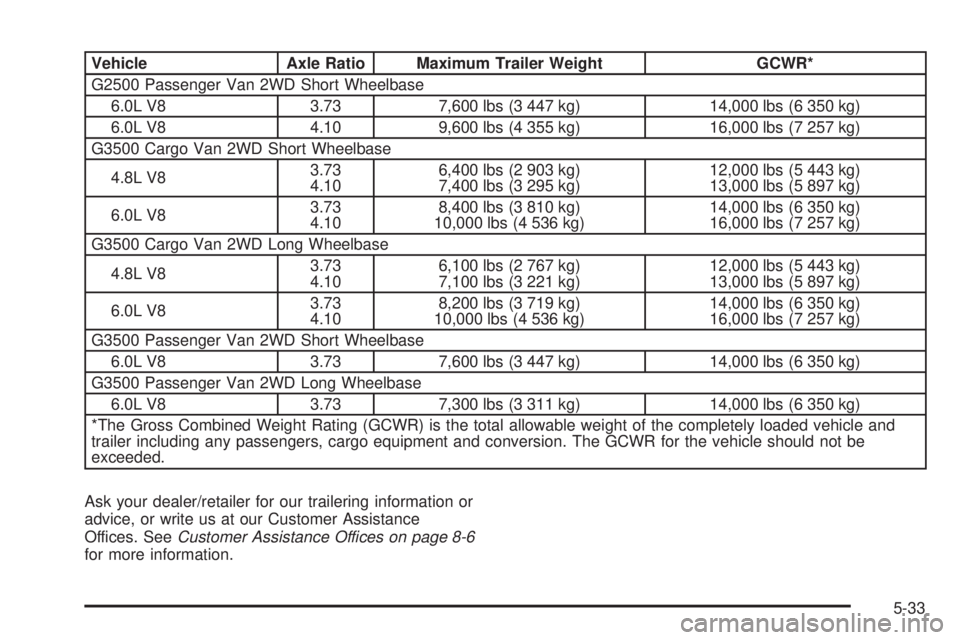
Vehicle Axle Ratio Maximum Trailer Weight GCWR*
G2500 Passenger Van 2WD Short Wheelbase
6.0L V8 3.73 7,600 lbs (3 447 kg) 14,000 lbs (6 350 kg)
6.0L V8 4.10 9,600 lbs (4 355 kg) 16,000 lbs (7 257 kg)
G3500 Cargo Van 2WD Short Wheelbase
4.8L V83.73
4.106,400 lbs (2 903 kg)
7,400 lbs (3 295 kg)12,000 lbs (5 443 kg)
13,000 lbs (5 897 kg)
6.0L V83.73
4.108,400 lbs (3 810 kg)
10,000 lbs (4 536 kg)14,000 lbs (6 350 kg)
16,000 lbs (7 257 kg)
G3500 Cargo Van 2WD Long Wheelbase
4.8L V83.73
4.106,100 lbs (2 767 kg)
7,100 lbs (3 221 kg)12,000 lbs (5 443 kg)
13,000 lbs (5 897 kg)
6.0L V83.73
4.108,200 lbs (3 719 kg)
10,000 lbs (4 536 kg)14,000 lbs (6 350 kg)
16,000 lbs (7 257 kg)
G3500 Passenger Van 2WD Short Wheelbase
6.0L V8 3.73 7,600 lbs (3 447 kg) 14,000 lbs (6 350 kg)
G3500 Passenger Van 2WD Long Wheelbase
6.0L V8 3.73 7,300 lbs (3 311 kg) 14,000 lbs (6 350 kg)
*The Gross Combined Weight Rating (GCWR) is the total allowable weight of the completely loaded vehicle and
trailer including any passengers, cargo equipment and conversion. The GCWR for the vehicle should not be
exceeded.
Ask your dealer/retailer for our trailering information or
advice, or write us at our Customer Assistance
Offices. SeeCustomer Assistance Offices on page 8-6
for more information.
5-33
Page 267 of 440

Driving with a Trailer
{WARNING:
When towing a trailer, exhaust gases may collect
at the rear of the vehicle and enter if the liftgate,
trunk/hatch, or rear-most window is open.
Engine exhaust contains carbon monoxide (CO)
which cannot be seen or smelled. It can cause
unconsciousness and even death.
To maximize safety when towing a trailer:
•Have the exhaust system inspected for leaks
and make necessary repairs before starting
a trip.
•Never drive with the liftgate, trunk/hatch, or
rear-most window open.
•Fully open the air outlets on or under the
instrument panel.
•Adjust the Climate Control system to a setting
that brings in only outside air and set the fan
speed to the highest setting. See Climate
Control System in the Index.
For more information about carbon monoxide, see
Engine Exhaust on page 3-40Towing a trailer requires a certain amount of experience.
Get to know the rig before setting out for the open
road. Get acquainted with the feel of handling and
braking with the added weight of the trailer. And always
keep in mind that the vehicle you are driving is now
longer and not as responsive as the vehicle is by itself.
Before starting, check all trailer hitch parts and
attachments, safety chains, electrical connectors, lamps,
tires and mirror adjustments. If the trailer has electric
brakes, start the vehicle and trailer moving and
then apply the trailer brake controller by hand to be sure
the brakes are working. This checks the electrical
connection at the same time.
During the trip, check occasionally to be sure that the
load is secure, and that the lamps and any trailer brakes
are still working.
Following Distance
Stay at least twice as far behind the vehicle ahead as
you would when driving the vehicle without a trailer. This
can help to avoid situations that require heavy braking
and sudden turns.
Passing
More passing distance is needed when towing a trailer.
Because the rig is longer, it is necessary to go much
farther beyond the passed vehicle before returning to
the lane.
5-39
Page 305 of 440

7. By this time, the coolant level inside the radiator
filler neck may be lower. If the level is lower, add
more of the proper DEX-COOL
®coolant mixture
through the filler neck until the level reaches
the base of the filler neck.
8. Then replace the pressure cap. At any time during
this procedure if coolant begins to flow out of the
filler neck, reinstall the pressure cap.
Notice:If the pressure cap is not tightly installed,
coolant loss and possible engine damage may
occur. Be sure the cap is properly and tightly
secured.
Engine Overheating
If your vehicle has the DURAMAX Diesel engine, see
the DURAMAX Diesel manual for more information.
The vehicle has an indicator to warn of engine
overheating.
You will find an engine coolant temperature gage on
your vehicle’s instrument panel. SeeEngine Coolant
Temperature Gage on page 4-29for more information.You may decide not to lift the hood when this warning
appears, but instead get service help right away.
SeeRoadside Assistance Program on page 8-8.
If you do decide to lift the hood, make sure the vehicle
is parked on a level surface.
Then check to see if the engine cooling fans are
running. If the engine is overheating, both fans should
be running. If they are not, do not continue to run
the engine and have the vehicle serviced.
See if the engine cooling fan speed increases when idle
speed is doubled by pushing the accelerator pedal down.
If it does not, your vehicle needs service. Turn off the
engine.
Notice:Engine damage from running the engine
without coolant is not covered by the warranty.
Notice:If the engine catches �re because of being
driven with no coolant, your vehicle can be badly
damaged. The costly repairs would not be covered
by the vehicle warranty.
6-35
Page 328 of 440
License Plate Lamp
To replace one of these bulbs:
A. Bulb Socket
B. License Plate Bulb Assembly
C. Screws
1. Remove the two screws (C) securing the license
plate bulb assembly (B).
2. Turn the bulb socket (A) counterclockwise and pull
the bulb straight out of the socket.3. Install the new bulb.
4. Reverse steps 1 and 2 to reinstall the license plate
bulb assembly.
Replacement Bulbs
Exterior Lamp Bulb Number
Back-up, Rear Parking,
Stoplamp, and Turn Signal Lamp3157
Center High Mounted
Stop Lamp (CHMSL)912
Front Parking and Turn
Signal Lamp3157KX
Front Sidemarker Lamp 194
License Plate Lamp 194
Headlamps
Composite High-Beam
Headlamp9005
Composite Low-Beam
Headlamp9006GS
Sealed Beam Headlamp H6054
For replacement bulbs not listed here, contact your
dealer/retailer.
6-58
Page 347 of 440

If the vehicle has dual rear wheels and the tread
design for the front tires is different from the dual
rear tires, always use the correct rotation pattern
shown here when rotating the tires. The dual tires
are rotated as a pair and the inside rear tires
become the outside rear tires.
When you install dual wheels, be sure that vent
holes in the inner and outer wheels on each
side are lined up.
Also seeDual Tire Operation on page 6-70for
additional information.
After the tires have been rotated, adjust the front
and rear inflation pressures as shown on the Tire
and Loading Information label. SeeIn�ation - TirePressure on page 6-68andLoading the Vehicle
on page 5-19. Make certain that all wheel nuts are
properly tightened. See “Wheel Nut Torque” under
Capacities and Speci�cations on page 6-116.
{WARNING:
Rust or dirt on a wheel, or on the parts to
which it is fastened, can make wheel nuts
become loose after time. The wheel could
come off and cause an accident. When you
change a wheel, remove any rust or dirt from
places where the wheel attaches to the
vehicle. In an emergency, you can use a cloth
or a paper towel to do this; but be sure to use a
scraper or wire brush later, if needed, to get all
the rust or dirt off. SeeChanging a Flat Tire on
page 6-86.
If your vehicle has a Tire Pressure Monitor
System (TPMS), reset the TPMS sensors after
rotating the tires. SeeTire Pressure Monitor
Operation on page 6-72.
Make sure the spare tire is stored securely. Push,
pull, and then try to rotate or turn the tire. If it
moves, tighten the cable. SeeStoring a Flat or
Spare Tire and Tools on page 6-100.
6-77
Page 354 of 440

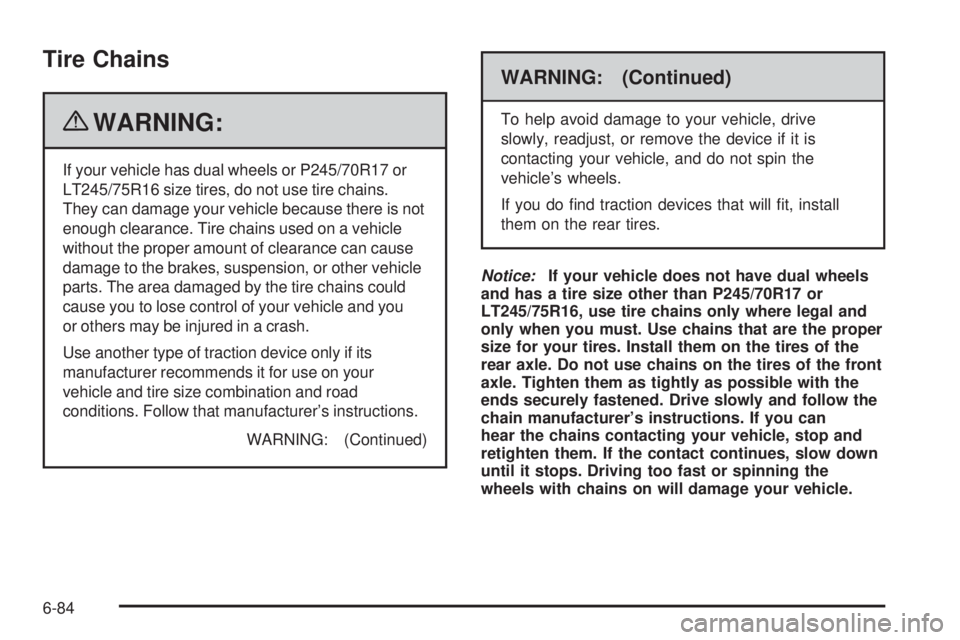
Tire Chains
{WARNING:
If your vehicle has dual wheels or P245/70R17 or
LT245/75R16 size tires, do not use tire chains.
They can damage your vehicle because there is not
enough clearance. Tire chains used on a vehicle
without the proper amount of clearance can cause
damage to the brakes, suspension, or other vehicle
parts. The area damaged by the tire chains could
cause you to lose control of your vehicle and you
or others may be injured in a crash.
Use another type of traction device only if its
manufacturer recommends it for use on your
vehicle and tire size combination and road
conditions. Follow that manufacturer’s instructions.
WARNING: (Continued)
WARNING: (Continued)
To help avoid damage to your vehicle, drive
slowly, readjust, or remove the device if it is
contacting your vehicle, and do not spin the
vehicle’s wheels.
If you do find traction devices that will fit, install
them on the rear tires.
Notice:If your vehicle does not have dual wheels
and has a tire size other than P245/70R17 or
LT245/75R16, use tire chains only where legal and
only when you must. Use chains that are the proper
size for your tires. Install them on the tires of the
rear axle. Do not use chains on the tires of the front
axle. Tighten them as tightly as possible with the
ends securely fastened. Drive slowly and follow the
chain manufacturer’s instructions. If you can
hear the chains contacting your vehicle, stop and
retighten them. If the contact continues, slow down
until it stops. Driving too fast or spinning the
wheels with chains on will damage your vehicle.
6-84
Page 357 of 440
Removing the Spare Tire and Tools
If you have a cargo van or a passenger van, the
equipment you will need is located in the passenger
side rear corner of the vehicle.
Remove the retaining wing bolt and lift it off of the
mounting bracket.
If you have a van with the 15-passenger seating
arrangement, the equipment you will need is secured
on the rear floor of the passenger side of the vehicle.To access the equipment, remove the retaining wing
bolt and lift it out of the mounting bracket.
6-87