Page 365 of 440

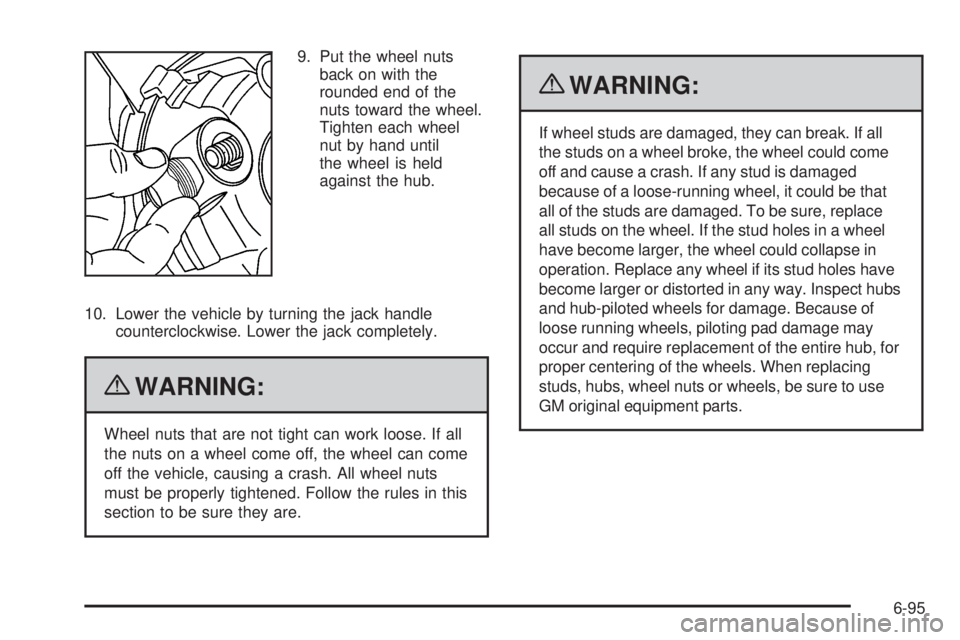
9. Put the wheel nuts
back on with the
rounded end of the
nuts toward the wheel.
Tighten each wheel
nut by hand until
the wheel is held
against the hub.
10. Lower the vehicle by turning the jack handle
counterclockwise. Lower the jack completely.
{WARNING:
Wheel nuts that are not tight can work loose. If all
the nuts on a wheel come off, the wheel can come
off the vehicle, causing a crash. All wheel nuts
must be properly tightened. Follow the rules in this
section to be sure they are.
{WARNING:
If wheel studs are damaged, they can break. If all
the studs on a wheel broke, the wheel could come
off and cause a crash. If any stud is damaged
because of a loose-running wheel, it could be that
all of the studs are damaged. To be sure, replace
all studs on the wheel. If the stud holes in a wheel
have become larger, the wheel could collapse in
operation. Replace any wheel if its stud holes have
become larger or distorted in any way. Inspect hubs
and hub-piloted wheels for damage. Because of
loose running wheels, piloting pad damage may
occur and require replacement of the entire hub, for
proper centering of the wheels. When replacing
studs, hubs, wheel nuts or wheels, be sure to use
GM original equipment parts.
6-95
Page 366 of 440

{WARNING:
Wheel nuts that are improperly or incorrectly
tightened can cause the wheels to become loose or
come off. The wheel nuts should be tightened with
a torque wrench to the proper torque specification
after replacing. Follow the torque specification
supplied by the aftermarket manufacturer when
using accessory locking wheel nuts. SeeCapacities
and Speci�cations on page 6-116for original
equipment wheel nut torque specifications.
Notice:Improperly tightened wheel nuts can lead
to brake pulsation and rotor damage. To avoid
expensive brake repairs, evenly tighten the wheel
nuts in the proper sequence and to the proper
torque speci�cation. SeeCapacities and
Specifications on page 6-116for the wheel nut
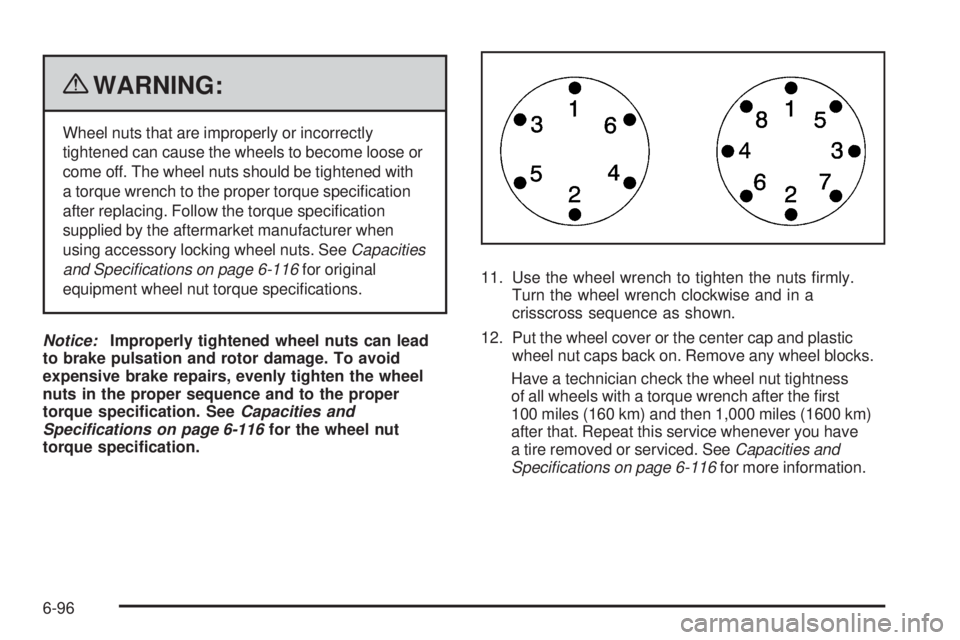
torque speci�cation.11. Use the wheel wrench to tighten the nuts firmly.
Turn the wheel wrench clockwise and in a
crisscross sequence as shown.
12. Put the wheel cover or the center cap and plastic
wheel nut caps back on. Remove any wheel blocks.
Have a technician check the wheel nut tightness
of all wheels with a torque wrench after the first
100 miles (160 km) and then 1,000 miles (1600 km)
after that. Repeat this service whenever you have
a tire removed or serviced. SeeCapacities and
Speci�cations on page 6-116for more information.
6-96
Page 367 of 440

Secondary Latch System
Your vehicle has an underbody-mounted tire hoist
assembly equipped with a secondary latch system.
It is designed to stop the spare tire from suddenly falling
off the vehicle if the cable holding the spare tire is
damaged. For the secondary latch to work, the tire
must be stowed with the valve stem pointing down.
SeeStoring a Flat or Spare Tire and Tools on
page 6-100for instructions on storing the spare tire
correctly.
{WARNING:
Before beginning this procedure read all the
instructions. Failure to read and follow the
instructions could damage the hoist assembly
and you and others could get hurt. Read and
follow the instructions listed next.To release the spare tire from the secondary latch:
{WARNING:
Someone standing too close during the procedure
could be injured by the jack. If the spare tire does
not slide off the jack completely, make sure no
one is behind you or on either side of you as you
pull the jack out from under the spare.
1. Check under the
vehicle to see if the
cable end is visible.
If the cable is not
visible, start this
procedure at Step 6.
2. Turn the hoist extension counterclockwise until
approximately 6 inches (15 cm) of cable is exposed.
6-97
Page 368 of 440
3. Attach the jack handle/jack handle extension and
wheel wrench to the jack.4. Place the jack under the vehicle, ahead of the rear
bumper. Position the center lift point of the jack
under the center of the spare tire and turn the
handle clockwise to raise the jack until it lifts the
secondary latch spring.
5. Keep raising the jack until the spare tire stops
moving upward and is held firmly in place.
This lets you know that the secondary latch
has released. The spare tire is now balancing
on the jack.
6-98
Page 369 of 440

6. Lower the jack by turning the wheel wrench
counterclockwise. Keep lowering the jack until
the spare tire slides off the jack or is hanging
by the cable.
7. Disconnect the jack handle from the jack and
carefully remove the jack. Use one hand to push
against the spare while firmly pulling the jack out
from under the spare tire with the other hand.
If the spare tire is hanging from the cable, assembly
the wheel wrench onto the hoist extension and insert
the chisel end of the hoist extension into the hoist
shaft hole above the bumper. Turn the wheel wrench
counterclockwise to lower the spare the rest of
the way.8. Tilt the retainer at the end of the cable and pull it
through the wheel opening. Pull the tire out from
under the vehicle.
Notice:If you drive away before the spare tire or
secondary latch system cable has been reinstalled,
you could damage your vehicle. Always reinstall
this cable before driving your vehicle.
9. If the cable is hanging under the vehicle, turn the
wheel wrench in the hoist shaft hole in the bumper
clockwise to raise the cable back up.
Have the hoist assembly inspected as soon as you can.
You will not be able to store a spare or flat tire using
the hoist assembly until it has been repaired or replaced.
To continue changing the flat tire, return to Step 4 of
Removing the Flat Tire and Installing the Spare Tire on
page 6-90.
6-99
Page 380 of 440

The vehicle has an airbag system. Before attempting
to add anything electrical to the vehicle, seeServicing
Your Airbag-Equipped Vehicle on page 2-78andAdding
Equipment to Your Airbag-Equipped Vehicle on
page 2-79.
Headlamp Wiring
The headlamp wiring is protected by fuses in the engine
compartment fuse block. An electrical overload will cause
the lamps to flicker on and off, or in some cases to remain
off. If this happens, have your headlamp wiring checked
right away.
Windshield Wiper Fuses
The windshield wiper motor is protected by a circuit
breaker and a fuse. If the motor overheats due to heavy
snow, etc., the wiper will stop until the motor cools.Although the circuit is protected from electrical overload,
overload due to heavy snow, etc., may cause wiper
linkage damage. Always clear ice and heavy snow from
the windshield before using the windshield wipers. If the
overload is caused by some electrical problem and not
snow, etc., be sure to get it fixed.
Fuses and Circuit Breakers
The wiring circuits in the vehicle are protected from
short circuits by a combination of fuses and circuit
breakers. This greatly reduces the chance of fires
caused by electrical problems.
Look at the silver-colored band inside the fuse. If the
band is broken or melted, replace the fuse. Be sure
you replace a bad fuse with a new one of the identical
size and rating.
6-110
Page 381 of 440
Floor Console Fuse Block
The floor console fuse block is located under the
driver seat.
Mini-Fuse Usage
F1 Empty
F2 Steering Wheel Sensor
F3 Auxiliary Parking Lamps (Cut-Away)
F4 Front Park Lamps
F5 Trailer Park Lamps
F6 Upfitter Park Lamps
F7 Right Rear Park Lamp
F8 Left Rear Park Lamp
F9 Outside Rear View Mirror Switch
F10 Airbag/AOS
F11 Empty
F12 Empty
F13Heating, Ventilation and
Air Conditioning 2
F14Heating, Ventilation and
Air Conditioning 1
F15 Empty
F17 Outside Rear View Mirror Heater
F18 Rear Window Defogger
F19 Compass
F20 Radio/Chime
F21Remote Function Actuator/
Tire Pressure Monitor
6-111
Page 382 of 440

Mini-Fuse Usage
F22Ignition Switch/Discrete Logic
Ignition Sensor (PK3)
F23 Instrument Panel Cluster
F25Heating, Ventilation and
Air Conditioning Control
F26 Auxiliary/Trailer Backup
F27 Tail Lamps Backup
F30 Upfitter Courtesy Lamps
F31 Front Door Lock
F32 Rear Door Lock
F33 Cargo Door Unlock
F34 Passenger Door Unlock
F35 Rear Passenger Door Unlock
F36 Driver Door Unlock
F37 Empty
F38 Empty
J-Case Fuse Usage
F16 Upfitter Auxiliary 1
F24 Empty
F28 Upfitter Auxiliary 2 Reading Lamps
F29 Rear Blower
Relays Usage
K1 Run (High Current Micro)
K2 Empty (High Current Micro)
K3 Park Lamps (High Current Micro)
K4Upfitter Auxiliary 2
(High Current Mini)
K5 Rear Defogger (High Current Micro)
K6Retained Accessory Power (RAP)
(High Current Micro)
Circuit Breaker Usage
CB1 Power Seats
CB2 Power Windows
Engine Compartment Fuse Block
The fuse block is located in the engine compartment on
the driver side of the vehicle.
Notice:Spilling liquid on any electrical components
on the vehicle may damage it. Always keep the
covers on any electrical component.
6-112