2008 CHEVROLET EXPRESS CARGO VAN wiper blades
[x] Cancel search: wiper bladesPage 126 of 414
d(Low Speed):For steady wiping at low speed,
turn the band away from you to the first solid band past
the delay settings position.
a(High Speed):For high-speed wiping, turn the
band further, to the second solid band past the
delay settings.
9(Off):To stop the wipers, move the band to off.
When driving during the day and the wipers are
activated, the head lamps will automatically turn on after
completing eight wipe cycles.
Be sure to clear ice and snow from the wiper blades
before using them. If they are frozen to the windshield,
carefully loosen or thaw them. If your blades do become
worn or damaged, get new blades or blade inserts.
Windshield Washer
L(Washer Fluid):There is a paddle marked
with the windshield washer symbol at the top of the
multifunction lever. To spray washer fluid on the
windshield, push the paddle. The wipers will clear
the window and then either stop or return to your
preset speed.
{CAUTION:
In freezing weather, do not use your washer
until the windshield is warmed. Otherwise the
washer �uid can form ice on the windshield,
blocking your vision.
3-10
Page 218 of 414
Before Leaving on a Long Trip
To prepare your vehicle for a long trip, consider having
it serviced by your dealer/retailer before departing.
Things to check on your own include:
•Windshield Washer Fluid:Reservoir full? Windows
clean — inside and outside?
•Wiper Blades:In good shape?
•Fuel, Engine Oil, Other Fluids:All levels checked?
•Lamps:Do they all work and are lenses clean?
•Tires:Are treads good? Are tires inflated to
recommended pressure?
•Weather and Maps:Safe to travel? Have
up-to-date maps?
Highway Hypnosis
Always be alert and pay attention to your surroundings
while driving. If you become tired or sleepy, find a
safe place to park your vehicle and rest.
Other driving tips include:
•Keep the vehicle well ventilated.
•Keep interior temperature cool.
•Keep your eyes moving — scan the road ahead
and to the sides.
•Check the rearview mirror and vehicle
instruments often.
4-14
Page 248 of 414
Tires..............................................................5-56
Tire Sidewall Labeling...................................5-56
Tire Terminology and Definitions.....................5-61
Inflation - Tire Pressure.................................5-64
Dual Tire Operation.......................................5-65
Tire Pressure Monitor System.........................5-66
Tire Pressure Monitor Operation.....................5-67
Tire Inspection and Rotation...........................5-71
When It Is Time for New Tires.......................5-73
Buying New Tires.........................................5-74
Different Size Tires and Wheels......................5-75
Uniform Tire Quality Grading..........................5-76
Wheel Alignment and Tire Balance..................5-78
Wheel Replacement......................................5-78
Tire Chains..................................................5-80
If a Tire Goes Flat........................................5-81
Changing a Flat Tire.....................................5-82
Removing the Spare Tire and Tools................5-83
Removing the Flat Tire and Installing the
Spare Tire................................................5-86
Secondary Latch System...............................5-93
Storing a Flat or Spare Tire and Tools............5-97
Spare Tire...................................................5-99
Appearance Care............................................5-99
Interior Cleaning...........................................5-99
Fabric/Carpet..............................................5-101Instrument Panel, Vinyl, and Other Plastic
Surfaces.................................................5-101
Care of Safety Belts....................................5-102
Weatherstrips.............................................5-102
Washing Your Vehicle..................................5-102
Cleaning Exterior Lamps/Lenses....................5-103
Finish Care................................................5-103
Windshield and Wiper Blades.......................5-104
Aluminum Wheels.......................................5-104
Tires.........................................................5-105
Sheet Metal Damage...................................5-105
Finish Damage...........................................5-106
Underbody Maintenance...............................5-106
Chemical Paint Spotting...............................5-106
Vehicle Care/Appearance Materials................5-107
Vehicle Identi�cation.....................................5-108
Vehicle Identification Number (VIN)................5-108
Service Parts Identification Label...................5-108
Electrical System..........................................5-109
Add-On Electrical Equipment.........................5-109
Headlamp Wiring........................................5-109
Windshield Wiper Fuses...............................5-109
Fuses and Circuit Breakers..........................5-109
Floor Console Fuse Block............................5-110
Engine Compartment Fuse Block...................5-112
Capacities and Speci�cations........................5-116
Section 5 Service and Appearance Care
5-2
Page 300 of 414
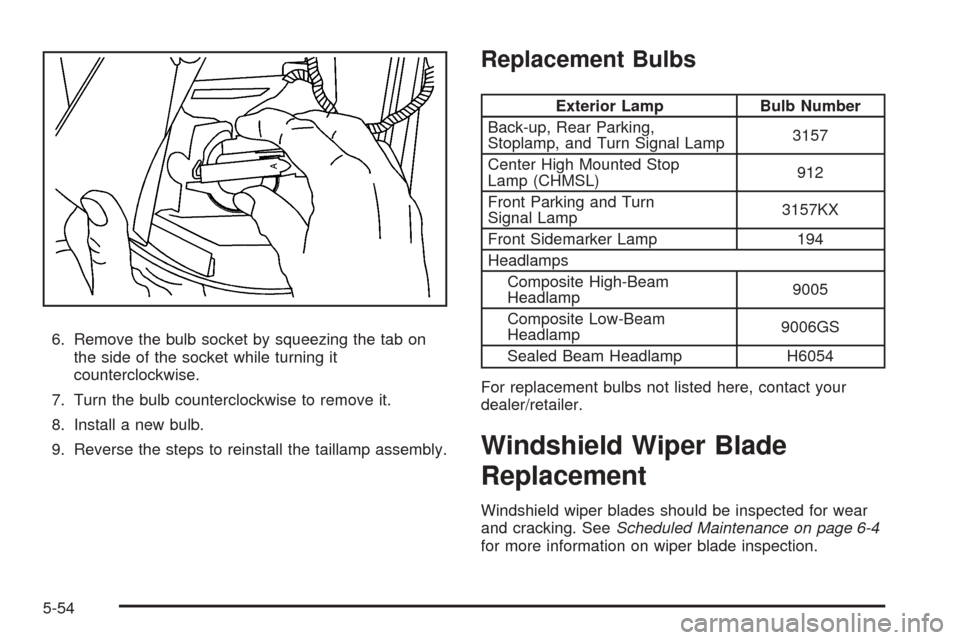
6. Remove the bulb socket by squeezing the tab on
the side of the socket while turning it
counterclockwise.
7. Turn the bulb counterclockwise to remove it.
8. Install a new bulb.
9. Reverse the steps to reinstall the taillamp assembly.
Replacement Bulbs
Exterior Lamp Bulb Number
Back-up, Rear Parking,
Stoplamp, and Turn Signal Lamp3157
Center High Mounted Stop
Lamp (CHMSL)912
Front Parking and Turn
Signal Lamp3157KX
Front Sidemarker Lamp 194
Headlamps
Composite High-Beam
Headlamp9005
Composite Low-Beam
Headlamp9006GS
Sealed Beam Headlamp H6054
For replacement bulbs not listed here, contact your
dealer/retailer.
Windshield Wiper Blade
Replacement
Windshield wiper blades should be inspected for wear
and cracking. SeeScheduled Maintenance on page 6-4
for more information on wiper blade inspection.
5-54
Page 301 of 414
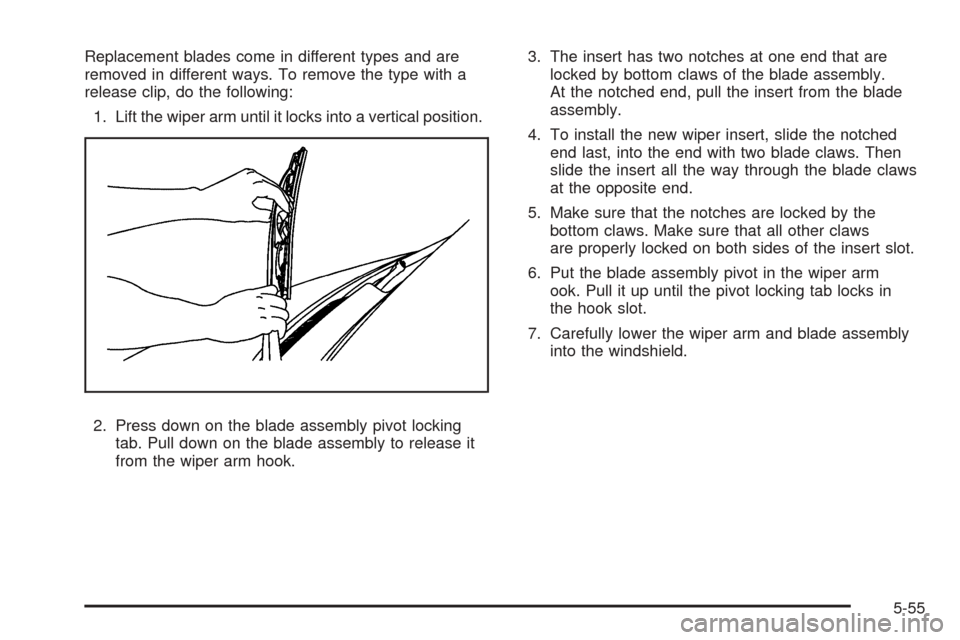
Replacement blades come in different types and are
removed in different ways. To remove the type with a
release clip, do the following:
1. Lift the wiper arm until it locks into a vertical position.
2. Press down on the blade assembly pivot locking
tab. Pull down on the blade assembly to release it
from the wiper arm hook.3. The insert has two notches at one end that are
locked by bottom claws of the blade assembly.
At the notched end, pull the insert from the blade
assembly.
4. To install the new wiper insert, slide the notched
end last, into the end with two blade claws. Then
slide the insert all the way through the blade claws
at the opposite end.
5. Make sure that the notches are locked by the
bottom claws. Make sure that all other claws
are properly locked on both sides of the insert slot.
6. Put the blade assembly pivot in the wiper arm
ook. Pull it up until the pivot locking tab locks in
the hook slot.
7. Carefully lower the wiper arm and blade assembly
into the windshield.
5-55
Page 350 of 414

Exterior painted surfaces are subject to aging, weather
and chemical fallout that can take their toll over a
period of years. You can help to keep the paint finish
looking new by keeping your vehicle garaged or covered
whenever possible.
Protecting Exterior Bright Metal Parts
Bright metal parts should be cleaned regularly to keep
their luster. Washing with water is all that is usually
needed. However, you may use chrome polish on
chrome or stainless steel trim, if necessary.
Use special care with aluminum trim. To avoid damaging
protective trim, never use auto or chrome polish,
steam or caustic soap to clean aluminum. A coating of
wax, rubbed to high polish, is recommended for all
bright metal parts.
Windshield and Wiper Blades
Clean the outside of the windshield with glass cleaner.
Clean the rubber blades using a lint free cloth or
paper towel soaked with windshield washer fluid or a
mild detergent. Wash the windshield thoroughly
when cleaning the blades. Bugs, road grime, sap, and a
buildup of vehicle wash/wax treatments may cause
wiper streaking. Replace the wiper blades if they are
worn or damaged.Wipers can be damaged by:
•Extreme dusty conditions
•Sand and salt
•Heat and sun
•Snow and ice, without proper removal
Aluminum Wheels
Notice:If you use strong soaps, chemicals,
abrasive polishes, cleaners, brushes, or cleaners
that contain acid on aluminum or chrome-plated
wheels, you could damage the surface of the
wheel(s). The repairs would not be covered by your
warranty. Use only approved cleaners on aluminum
or chrome-plated wheels.
Keep the wheels clean using a soft clean cloth with mild
soap and water. Rinse with clean water. After rinsing
thoroughly, dry with a soft clean towel. A wax may then
be applied.
5-104
Page 369 of 414

Scheduled Maintenance
Service MaintenanceIMaintenanceII
Change engine oil and filter. SeeEngine Oil (Gasoline Engine) on page 5-15.
Reset oil life system. SeeEngine Oil Life System on page 5-18.An Emission
Control Service.••
Lubricate chassis components.See footnote #.••
Visually check for any leaks or damage.See footnote (j).••
Inspect engine air cleaner filter. If necessary, replace filter. SeeEngine Air
Cleaner/Filter on page 5-20.See footnote (l).•
Rotate tires and check inflation pressures and wear. SeeTire Inspection and
Rotation on page 5-71and “Tire Wear Inspection” inAt Least Once a Month
on page 6-10.••
Inspect brake system.See footnote (a).••
Check engine coolant and windshield washer fluid levels and add fluid as
needed.••
Perform any needed additional services. See “Additional Required Services”
in this section.••
Inspect suspension and steering components.See footnote (b).•
Inspect engine cooling system.See footnote (c).•
Inspect wiper blades.See footnote (d).•
Inspect restraint system components.See footnote (e).•
6-5
Page 372 of 414

Maintenance Footnotes
(Gasoline Engine)
This maintenance section applies to vehicles with a
gasoline engine. If your vehicle has a diesel engine, see
the maintenance schedule section in the DURAMAX
®
Diesel manual.
†The U.S. Environmental Protection Agency or the
California Air Resources Board has determined that the
failure to perform this maintenance item will not nullify
the emission warranty or limit recall liability prior to the
completion of the vehicle’s useful life. We, however, urge
that all recommended maintenance services be
performed at the indicated intervals and the maintenance
be recorded.
#Lubricate the front suspension, kingpin bushings,
steering linkage, and rear driveline center splines.
(a)Visually inspect brake lines and hoses for proper
hook-up, binding, leaks, cracks, chafing, etc. Inspect
disc brake pads for wear and rotors for surface
condition. Inspect other brake parts, including calipers,
parking brake, etc.
(b)Visually inspect front and rear suspension and
steering system for damaged, loose, or missing parts,
signs of wear, or lack of lubrication. Inspect power
steering lines and hoses for proper hook-up, binding,
leaks, cracks, chafing, etc.(c)Visually inspect hoses and have them replaced if
they are cracked, swollen, or deteriorated. Inspect all
pipes, fittings, and clamps; replace with genuine parts as
needed. To help ensure proper operation, a pressure test
of the cooling system and pressure cap and cleaning the
outside of the radiator and air conditioning condenser is
recommended at least once a year.
(d)Inspect wiper blades for wear, cracking, or
contamination. Clean the windshield and wiper blades, if
contaminated. Replace wiper blades that are worn or
damaged. See Windshield Wiper Blade Replacement on
page 5-54andWindshield and Wiper Blades on
page 5-104for more information.
(e)Make sure the safety belt reminder light and safety
belt assemblies are working properly. Look for any
other loose or damaged safety belt system parts. If you
see anything that might keep a safety belt system from
doing its job, have it repaired. Have any torn or frayed
safety belts replaced. Also see Checking the Restraint
Systems on page 1-75.
(f)Lubricate all key lock cylinders, hood hinges, hood
prop rod pivot, hood latch assembly, secondary latch,
pivots, spring anchor, release pawl, rear compartment
hinges, latches, locks, fuel door hinge, and any moving
seat hardware. More frequent lubrication may be required
when exposed to a corrosive environment. Applying
silicone grease on weatherstrips with a clean cloth will
make them last longer, seal better, and not stick
or squeak.
6-8