2008 CHEVROLET EQUINOX remote control
[x] Cancel search: remote controlPage 147 of 436
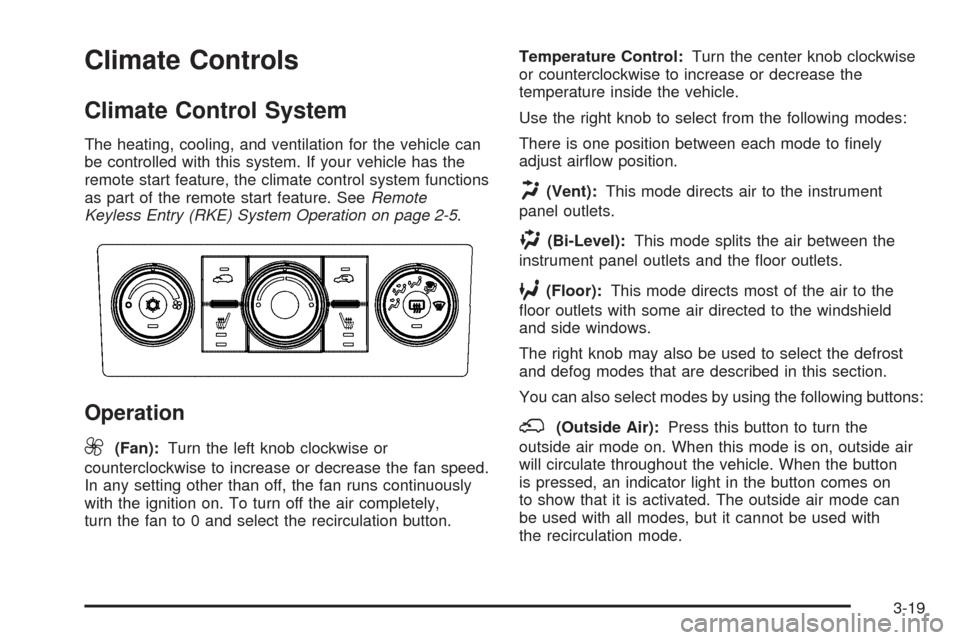
Climate Controls
Climate Control System
The heating, cooling, and ventilation for the vehicle can
be controlled with this system. If your vehicle has the
remote start feature, the climate control system functions
as part of the remote start feature. SeeRemote
Keyless Entry (RKE) System Operation on page 2-5.
Operation
9
(Fan):Turn the left knob clockwise or
counterclockwise to increase or decrease the fan speed.
In any setting other than off, the fan runs continuously
with the ignition on. To turn off the air completely,
turn the fan to 0 and select the recirculation button.Temperature Control:Turn the center knob clockwise
or counterclockwise to increase or decrease the
temperature inside the vehicle.
Use the right knob to select from the following modes:
There is one position between each mode to �nely
adjust air�ow position.
H(Vent):This mode directs air to the instrument
panel outlets.
)(Bi-Level):This mode splits the air between the
instrument panel outlets and the �oor outlets.
6(Floor):This mode directs most of the air to the
�oor outlets with some air directed to the windshield
and side windows.
The right knob may also be used to select the defrost
and defog modes that are described in this section.
You can also select modes by using the following buttons:
;(Outside Air):Press this button to turn the
outside air mode on. When this mode is on, outside air
will circulate throughout the vehicle. When the button
is pressed, an indicator light in the button comes on
to show that it is activated. The outside air mode can
be used with all modes, but it cannot be used with
the recirculation mode.
3-19
Page 150 of 436
If your vehicle has the remote start feature, the rear
defogger automatically turns on if it is cold outside.
When the vehicle transitions out of the remote start
mode, the rear defogger will turn off. SeeRemote
Keyless Entry (RKE) System Operation on page 2-5.
Notice:Do not use anything sharp on the inside
of the rear window. If you do, you could cut or
damage the warming grid, and the repairs would
not be covered by your warranty. Do not attach
a temporary vehicle license, tape, a decal or
anything similar to the defogger grid.
Remote Start Climate Control Operation
If your vehicle has the remote start feature and it
is activated, the climate control system heats and cools
the inside of the vehicle using the modes that were
set before the vehicle was turned off and the rear
defogger automatically turns on. If your vehicle has
heated seats, they may turn on if it is cold outside
and will shut off when the key is turned to ON/RUN.
SeeHeated Seats on page 1-4.
Outlet Adjustment
Use the louvers located on the air outlets to change
the direction of the air�ow.
Operation Tips
Clear away any ice, snow, or leaves from the air
inlets at the base of the vehicle that may block
the �ow of air into your vehicle.
Do not use any non-GM approved hood de�ectors
that could adversely affect the performance of the
system.
Keep the path under the front seats clear of objects
to help circulate the air inside of your vehicle more
effectively.
Passenger Compartment Air Filter
Outside air is routed through a passenger compartment
air �lter before entering the vehicle. This �lter removes
certain particles from the air, including pollen and
dust particles. Reductions in air�ow, which may occur
more quickly in dusty areas, indicate that the �lter needs
to be replaced early.
The �lter should be replaced as part of routine scheduled
maintenance. SeeScheduled Maintenance on page 6-4
for when to replace the �lter.
3-22
Page 207 of 436
sREV (Fast Reverse):Press and hold to reverse
playback quickly within a track. Sound is heard at
a reduced volume. Release to resume playing the track.
The elapsed time of the track displays.
\FWD (Fast Forward):Press and hold to advance
playback quickly within a track. Sound is heard at a
reduced volume. Release to resume playing the track.
The elapsed time of the track displays.
RDM (Random):With the random setting, tracks
can be listened to in random, rather than sequential
order. To play the tracks from the CD, press the
DVD/CD AUX button when not sourced to the CD,
or insert a disc partway into the slot. A RDM label
displays. Press the pushbutton positioned under the
RDM label until Random Current Disc displays.
Press the pushbutton again to turn off random play.
BAND:Press to listen to the radio when a CD or DVD
is playing. The CD or DVD remains inside the radio
for future listening or viewing entertainment.DVD/CD AUX (Auxiliary):Press to cycle through DVD,
CD, or Auxiliary when listening to the radio. The
DVD/CD text label and a message showing track or
chapter number displays when a disc is in either
slot. Press again and the system automatically searches
for an auxiliary input device, such as a portable audio
player. If a portable audio player is not connected,
“No Aux Input Device” displays. If a disc is in both the
DVD slot and the CD slot the DVD/CD AUX button
cycles between the two sources and does not indicate
“No Aux Input Device”. If a front auxiliary device is
connected, the DVD/CD AUX button cycles through all
available options, such as: DVD slot, CD slot, Front
AUX, and Rear AUX (if available). See “Using the
Auxiliary Input Jack(s)” later in this section, orRear
Seat Entertainment (RSE) System on page 3-99,
“Audio/Video (A/V) Jacks” for more information.
If a disc is inserted into top DVD slot, the rear seat
operator can turn on the video screen and use
the remote control to navigate the CD (tracks only)
through the remote control.
3-79
Page 209 of 436
CHECK DISC:If this error message displays, it could
be for one of the following reasons:
It is very hot. When the temperature returns to
normal, the CD should play.
You are driving on a very rough road. When the
road becomes smoother, the CD should play.
The CD is dirty, scratched, wet, or upside down.
The air is very humid. If so, wait about an hour
and try again.
There could have been a problem while burning
the CD.
The label could be caught in the CD player.
If any error occurs repeatedly or if an error cannot be
corrected, contact your dealer/retailer. If the radio
displays an error message, write it down and provide
it to your dealer/retailer when reporting the problem.
Using the DVD Player
The DVD player is controlled by the buttons on the
remote control, by the RSA system, or by the buttons
on the radio faceplate. See “Remote Control”, under
Rear Seat Entertainment (RSE) System on page 3-99
for more information.
The DVD player is only compatible with DVDs of the
appropriate region code that is printed on the jacket
of most DVDs.
The DVD slot of the radio is compatible with most
audio CDs, CD-R, CD-RW, DVD-Video, DVD-Audio,
DVD-R/RW, DVD+R/RW media along with MP3
and WMA formats.
If an error message appears on the video screen or
the radio, see “DVD Display Error Messages” under,
Rear Seat Entertainment (RSE) System on page 3-99
and “DVD Radio Error Messages” in this section
for more information.
3-81
Page 210 of 436
Playing a DVD
DVD/CD AUX (Auxiliary):Press to cycle through
DVD, CD, or Auxiliary when listening to the radio. The
DVD/CD text label and a message showing track or
chapter number displays when a disc is in either
slot. Press again and the system automatically searches
for an auxiliary input device, such as a portable audio
player. If a portable audio player is not connected,
“No Aux Input Device” displays. If a disc is in both the
DVD slot and the CD slot the DVD/CD AUX button
cycles between the two sources and does not indicate
“No Aux Input Device”. If a front auxiliary device is
connected, the DVD/CD AUX button cycles through all
available options, such as: DVD slot, CD slot, Front
AUX, and Rear AUX (if available). See “Using the
Auxiliary Input Jack(s)” later in this section, orRear
Seat Entertainment (RSE) System on page 3-99,
“Audio/Video (A/V) Jacks” for more information.
O(Power):Press to turn the radio on or off. Turn
clockwise or counterclockwise to increase or decrease
the volume. Press and hold for more than two seconds
turns off the entire radio and Rear Seat Entertainment
(RSE) system and starts the parental control feature
which prevents the rear seat occupant from operating
the Rear Seat Audio (RSA) system or remote control.A lock symbol appears next to the clock display. The
parental control feature remains on until a subsequent
press and hold of the power button is performed
(more than two seconds), or until the driver turns
the ignition off and exits the vehicle.
f(Tune):Turn to change tracks on a CD or DVD,
to manually tune a radio station, or to change clock
or date settings, while in the clock or date setting
mode. See the information given earlier in this section
speci�c to the radio, CD, and the DVD. Also, seeSetting
the Time on page 3-65, for setting the clock and date.
©SEEK (Previous Track/Chapter):Press to return
to the start of the current track or chapter. Press again
to go to the previous track or chapter. This button
might not work when the DVD is playing the copyright
information or the previews.
SEEK
¨(Next Track/Chapter):Press this button
to go to the next track or chapter. This button might not
work when the DVD is playing the copyright information
or the previews.
sREV (Fast Reverse):Press to fast reverse the
CD or DVD, �ve times the normal speed. The radio
displays the elapsed time while in fast reverse.
To stop fast reversing, press again. This button
might not work when the DVD is playing the copyright
information or the previews.
3-82
Page 211 of 436
\FWD (Fast Forward):Press to fast forward the
CD or DVD. The radio displays the elapsed time and
fast forwards �ve times the normal speed. To stop fast
forwarding, press again. This button might not work
when the DVD is playing the copyright information or
the previews.
Z(Eject):Press to eject a CD or DVD. If a CD
or DVD is ejected, but not removed, the player
automatically pulls it back in after 15 seconds.
If loading and reading of a CD cannot be completed,
such as unknown format, etc., and the disc fails to eject,
press and hold for more than �ve seconds to force
the disc to eject.
DVD-V (Video) Display Buttons
Once a DVD-V is inserted, the radio display menu
shows several tag options for DVD playing. Press the
pushbuttons located under any desired tag option during
DVD playback. See the tag options listed below for
more information.
The rear seat passenger navigates the DVD-V menus
and controls through the remote control. See “Remote
Control”, underRear Seat Entertainment (RSE)
System on page 3-99for more information. The Video
Screen automatically turns on when the DVD-V is
inserted into the DVD slot.
r/j(Play/Pause):Press either play or pause
displayed on the radio system, to toggle between
pausing or restarting playback of a DVD. If the forward
arrow is showing on the display, the system is in
pause mode. If the pause icon is showing on the display,
the system is in playback mode. If the DVD screen is
off, press this button to turn the screen on.
Some DVDs begin playing after the previews have
�nished, although there might be a delay of up to
30 seconds. If the DVD does not begin playing the
movie automatically, press the pushbutton located
under the play/pause symbol tag displayed on the radio.
If the DVD still does not play, refer to the on-screen
instructions, if available.
c(Stop):Press to stop playing, rewinding, or fast
forwarding a DVD.
r(Enter):Press to select the choices that are
highlighted in any menu.
y(Menu):Press to access the DVD menu. The DVD
menu is different on every DVD. Use the pushbuttons
located under the navigation arrows to navigate
the cursor through the DVD menu. After making a
selection press the enter button. This button only
operates when using a DVD.
3-83
Page 212 of 436
Nav (Navigate):Press to display directional arrows
for navigating through the menus.
q(Return):Press to exit the current active menu
and return to the previous menu. This button operates
only when a DVD is playing and a menu is active.
DVD-A (Audio) Display Buttons
Once a DVD-A is inserted, a radio display menu
shows several tag options for DVD playing. Press the
pushbuttons located under any desired tag option during
DVD playback. See the tag options listed below for
more information.
The rear seat operator navigates the DVD-A menus
and controls through the remote control. See “Remote
Control”, underRear Seat Entertainment (RSE)
System on page 3-99for more information. The Video
Screen does not automatically power on when the
DVD-A is inserted into the DVD slot. It must be manually
turned on by the rear seat occupant through the
remote control power button.
r/j(Play/Pause):Press either play or pause
displayed on the radio system, to toggle between
pausing or restarting playback of a DVD. If the
forward arrow is showing on the display, the system
is in pause mode. If the pause icon is showing on
the display, the system is in playback mode.
qGroupr:Press to cycle through musical
groupings on the DVD-A disc.
Nav (Navigate):Press to display directional arrows for
navigating through the menus.
e(Audio Stream):Press to cycle through audio
steam formats located on DVD-A disc. There is not any
type of noti�cation for the customer to see through
the radio display, but video screen has a text �eld that
shows audio stream changing.
Inserting a Disc
To play a disc, gently insert the disc, with the label side
up, into the loading slot. The DVD player might not
accept some paper labeled media. The player starts
loading the disc into the system and display “Loading
Disc” on the radio display. At the same time, the
radio displays a softkey menu of option(s). Some discs
automatically play the movie while others default to
the softkey menu display which requires the Play, Enter,
or Navigation softkeys to be pressed (either by softkey
or by the rear seat passenger using the remote control).
Loading a disc into the system, depending on media
type and format, ranges from 5 to 20 seconds for a CD,
and up to 30 seconds for a DVD.
3-84
Page 213 of 436
Stopping and Resuming Playback
To stop playing a DVD without turning off the system,
press the
cbutton on the remote control, or press the
pushbutton located under the stop or the play/pause
symbol tags displayed on the radio. If the radio head is
sourced to something other than DVD-V, press the
DVD/CD AUX button to make DVD-V the active source.
To resume DVD playback, press the play/pause button
on the remote control, or press the pushbutton located
under the play/pause symbol tag displayed on the radio.
The DVD should resume play from where it last stopped if
the disc has not been ejected and the stop button has not
been pressed twice on the remote control. If the disc has
been ejected or the stop button has been pressed twice
on the remote control, the disc resumes playing at the
beginning of the disc.
Ejecting a Disc
Press theZbutton on the radio to eject the disc. If a
disc is ejected from the radio, but not removed, the radio
reloads the disc after a short period of time. The disc is
stored in the radio. The radio does not resume play of the
disc automatically. If the RSA system is sourced to the
DVD, the movie when reloaded into the DVD player
begins to play again. In case loading and reading of a
DVD or CD cannot be completed (unknown format, etc.),
and the disc fails to eject, press and hold the
ZDVD
button more than 5 seconds to force the disc to eject.
DVD Radio Error Messages
Player Error:This message displays when there are
disc load or eject problems.
Disc Format Error:This message displays, if the disc
is inserted with the disc label wrong side up, or if
the disc is damaged.
Disc Region Error:This message displays, if the disc
is not from a correct region.
No Disc Inserted:This message displays, if no disc
is present when the
Zor DVD/CD AUX button
is pressed on the radio.
Using the Auxiliary Input Jack
The radio system has an auxiliary input jack located
on the lower right side of the faceplate. This is not an
audio output; do not plug the headphone set into
the front auxiliary input jack. An external audio device
such as an iPod, laptop computer, MP3 player, CD
changer, etc. can be connected to the auxiliary input
jack for use as another source for audio listening.
Drivers are encouraged to set up any auxiliary device
while the vehicle is in PARK (P). SeeDefensive Driving
on page 4-2for more information on driver distraction.
3-85