2008 CHEVROLET EQUINOX lock
[x] Cancel search: lockPage 314 of 436
Vehicle Storage
{CAUTION:
Batteries have acid that can burn you and gas
that can explode. You can be badly hurt if you
are not careful. SeeJump Starting on
page 5-36for tips on working around a battery
without getting hurt.
Infrequent Usage: If you drive your vehicle infrequently,
remove the black, negative (−) cable from the battery.
This will help keep the battery from running down.
Extended Storage: For extended storage of your vehicle,
remove the black, negative (−) cable from the battery
or use a battery trickle charger. This will help maintain
the charge of the battery over an extended period
of time.
You must close all doors and the liftgate before
reconnecting the battery. After reconnecting the battery,
you must press the unlock button on the keyless access
transmitter. Failure to follow this procedure could result in
the alarm sounding. Pressing unlock on the keyless
access transmitter will stop the alarm.
Jump Starting
If your battery has run down, you may want to use
another vehicle and some jumper cables to start your
vehicle. Be sure to use the following steps to do it safely.
{CAUTION:
Batteries can hurt you. They can be dangerous
because:
They contain acid that can burn you.
They contain gas that can explode or ignite.
They contain enough electricity to burn you.
If you do not follow these steps exactly, some
or all of these things can hurt you.
Notice:Ignoring these steps could result in costly
damage to your vehicle that would not be covered
by your warranty.
Trying to start your vehicle by pushing or pulling it
will not work, and it could damage your vehicle.
1. Check the other vehicle. It must have a 12-volt
battery with a negative ground system.
Notice:If the other vehicle’s system is not a 12-volt
system with a negative ground, both vehicles can
be damaged. Only use vehicles with 12-volt systems
with negative grounds to jump start your vehicle.
5-36
Page 315 of 436
2. Get the vehicles close enough so the jumper cables
can reach, but be sure the vehicles are not touching
each other. If they are, it could cause a ground
connection you do not want. You would not be able
to start your vehicle, and the bad grounding could
damage the electrical systems.
To avoid the possibility of the vehicles rolling, set
the parking brake �rmly on both vehicles involved
in the jump start procedure. Put an automatic
transmission in PARK (P) or a manual transmission
in NEUTRAL before setting the parking brake.
Notice:If you leave your radio or other accessories
on during the jump starting procedure, they could
be damaged. The repairs would not be covered
by your warranty. Always turn off your radio and
other accessories when jump starting your vehicle.
3. Turn off the ignition on both vehicles. Unplug
unnecessary accessories plugged into the cigarette
lighter or the accessory power outlet. Turn off the
radio and all lamps that are not needed. This will
avoid sparks and help save both batteries. And it
could save your radio!
4. Open the hoods and locate the positive (+) and
negative (−) terminal locations on each vehicle.
You will not need to access your battery for jump
starting. Your vehicle has a remote positive (+) and
a remote negative (−) jump starting terminal for that
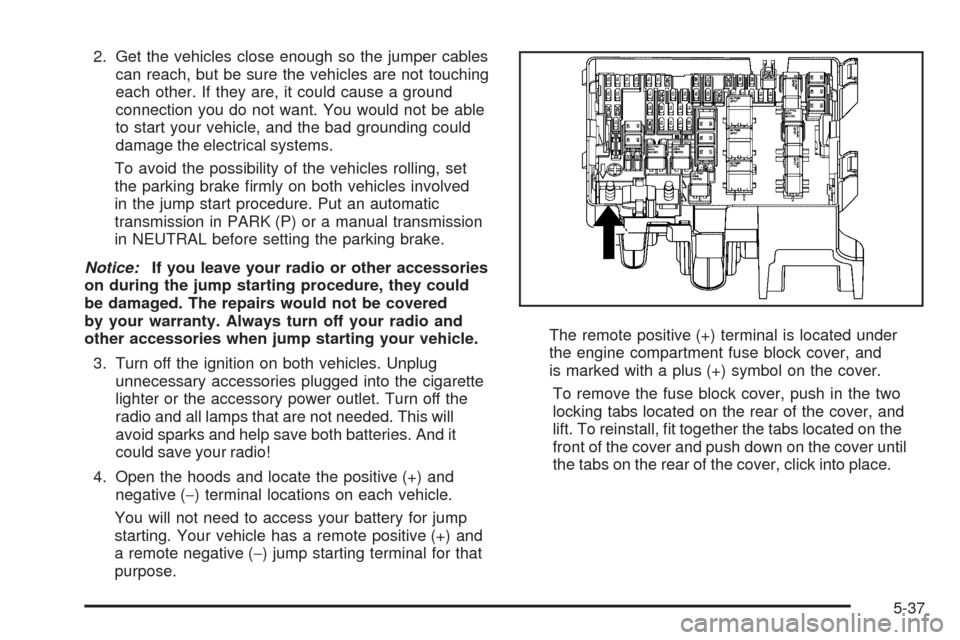
purpose.The remote positive (+) terminal is located under
the engine compartment fuse block cover, and
is marked with a plus (+) symbol on the cover.
To remove the fuse block cover, push in the two
locking tabs located on the rear of the cover, and
lift. To reinstall, �t together the tabs located on the
front of the cover and push down on the cover until
the tabs on the rear of the cover, click into place.
5-37
Page 318 of 436
5. Check that the jumper cables do not have loose or
missing insulation. If they do, you could get a
shock. The vehicles could be damaged, too.
Before you connect the cables, here are some
basic things you should know. Positive (+) will go to
positive (+) or to a remote positive (+) terminal if
the vehicle has one. Negative (−) will go to a heavy,
unpainted metal engine part or to a remote
negative (−) terminal if the vehicle has one.
Do not connect positive (+) to negative (−)oryou
will get a short that would damage the battery and
maybe other parts, too. And do not connect the
negative (−) cable to the negative (−) terminal on the
dead battery because this can cause sparks.
6. Connect the red positive (+) cable to the positive (+)
terminal of the dead battery. Use a remote
positive (+) terminal if the vehicle has one.
7. Do not let the other end touch metal. Connect it to
the positive (+) terminal of the good battery. Use a
remote positive (+) terminal if the vehicle has one.
8. Now connect the black negative (−) cable to the
negative (−) terminal of the good battery. Use a
remote negative (−) terminal if the vehicle has one.Do not let the other end touch anything until the
next step. The other end of the negative (−) cable
does not go to the dead battery. It goes to a heavy,
unpainted metal engine part or to a remote
negative (−) terminal on the vehicle with the dead
battery.
9. Connect the other end of the negative (−) cable at
least 18 inches (45 cm) away from the dead battery,
but not near engine parts that move. The electrical
connection is just as good there, and the chance
of sparks getting back to the battery is much less.
Your vehicle has a remote negative (−) terminal
for this purpose.
10. Now start the vehicle with the good battery and run
the engine for a while.
11. Press the unlock button on the remote keyless
entry transmitter to disarm your content
theft-deterrent system.
12. Try to start the vehicle that had the dead battery.
If it will not start after a few tries, it probably needs
service.
5-40
Page 319 of 436
Notice:If the jumper cables are connected or
removed in the wrong order, electrical shorting may
occur and damage the vehicle. The repairs would
not be covered by your warranty. Always connect
and remove the jumper cables in the correct order,
making sure that the cables do not touch each other
or other metal.
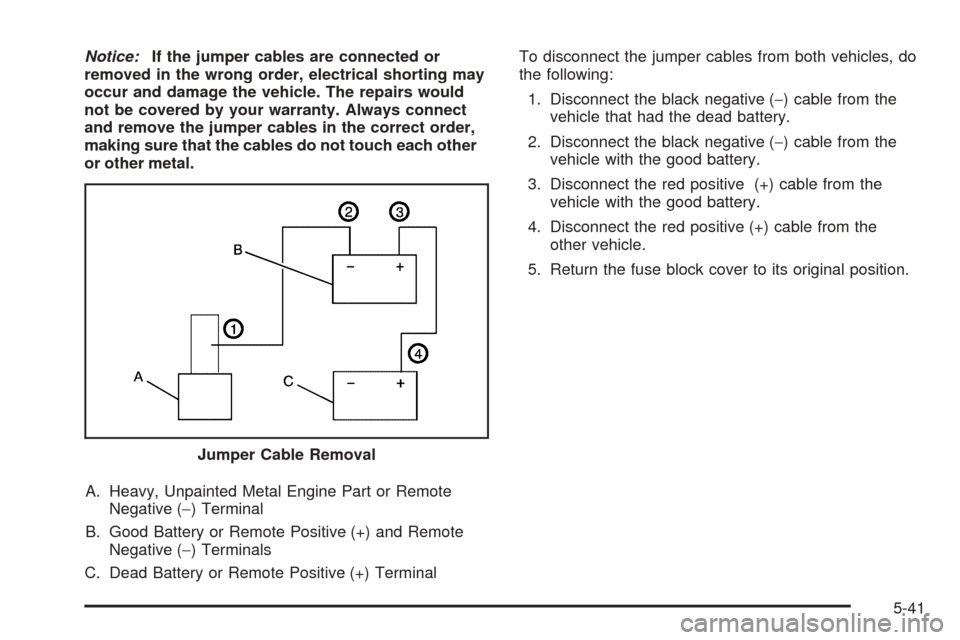
A. Heavy, Unpainted Metal Engine Part or Remote
Negative (−) Terminal
B. Good Battery or Remote Positive (+) and Remote
Negative (−) Terminals
C. Dead Battery or Remote Positive (+) TerminalTo disconnect the jumper cables from both vehicles, do
the following:
1. Disconnect the black negative (−) cable from the
vehicle that had the dead battery.
2. Disconnect the black negative (−) cable from the
vehicle with the good battery.
3. Disconnect the red positive (+) cable from the
vehicle with the good battery.
4. Disconnect the red positive (+) cable from the
other vehicle.
5. Return the fuse block cover to its original position.
Jumper Cable Removal
5-41
Page 325 of 436
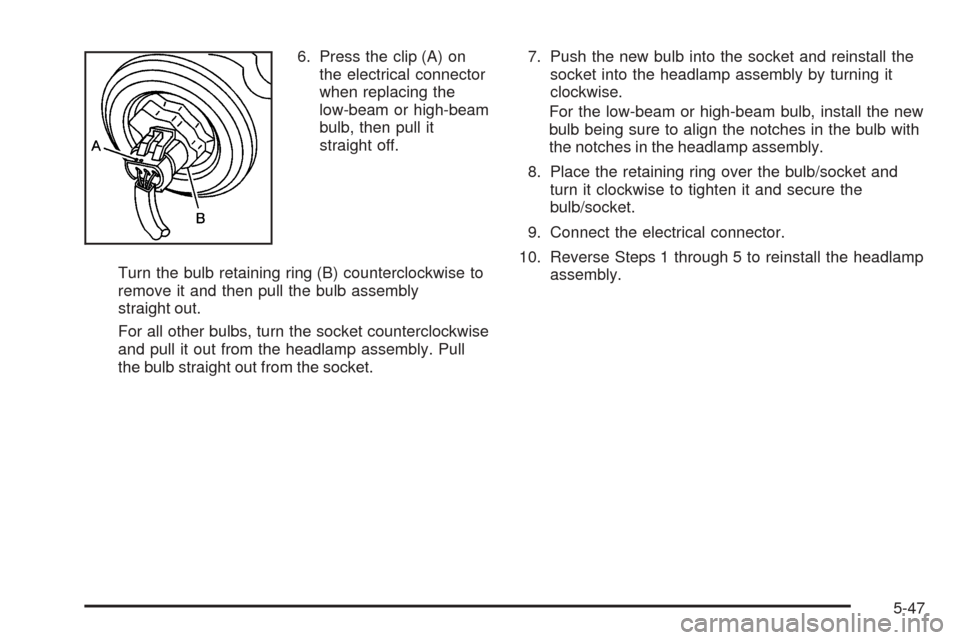
6. Press the clip (A) on
the electrical connector
when replacing the
low-beam or high-beam
bulb, then pull it
straight off.
Turn the bulb retaining ring (B) counterclockwise to
remove it and then pull the bulb assembly
straight out.
For all other bulbs, turn the socket counterclockwise
and pull it out from the headlamp assembly. Pull
the bulb straight out from the socket.7. Push the new bulb into the socket and reinstall the
socket into the headlamp assembly by turning it
clockwise.
For the low-beam or high-beam bulb, install the new
bulb being sure to align the notches in the bulb with
the notches in the headlamp assembly.
8. Place the retaining ring over the bulb/socket and
turn it clockwise to tighten it and secure the
bulb/socket.
9. Connect the electrical connector.
10. Reverse Steps 1 through 5 to reinstall the headlamp
assembly.
5-47
Page 327 of 436
4. Turn the bulb socket counterclockwise to disconnect
it from the taillamp assembly.
5. Pull the bulb out of the bulb socket.
6. Push the new bulb into the bulb socket.
7. Insert the bulb socket into the taillamp housing and
turn it clockwise to secure.
8. Reverse Steps 2 and 3 to reinstall the taillamp
assembly.
License Plate Lamp
To replace one of these bulbs:
1. Remove the two screws holding each of the license
plate lamps to the liftgate handle.
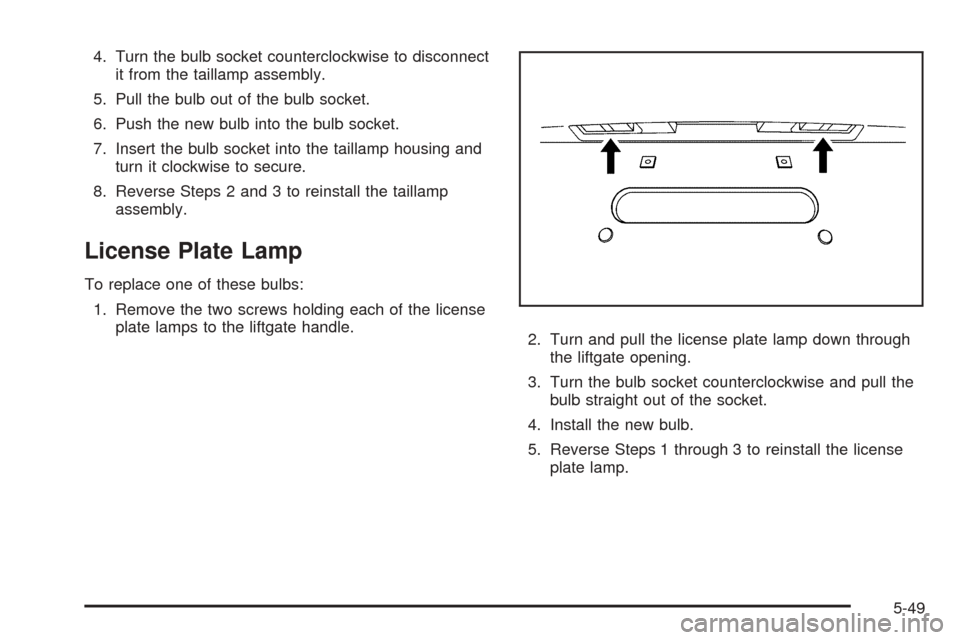
2. Turn and pull the license plate lamp down through
the liftgate opening.
3. Turn the bulb socket counterclockwise and pull the
bulb straight out of the socket.
4. Install the new bulb.
5. Reverse Steps 1 through 3 to reinstall the license
plate lamp.
5-49
Page 344 of 436
The TPMS sensor matching process is outlined below:
1. Set the parking brake.
2. Turn the ignition switch to ON/RUN with the
engine off.
3. Press the Remote Keyless Entry (RKE) transmitter’s
LOCK and UNLOCK buttons at the same time for
approximately �ve seconds. The horn sounds twice
to signal the receiver is in relearn mode and TIRE
LEARNING ACTIVE message displays on the DIC
screen.
4. Start with the driver side front tire.
5. Remove the valve cap from the valve cap stem.
Activate the TPMS sensor by increasing or
decreasing the tire’s air pressure for �ve seconds,
or until a horn chirp sounds. The horn chirp, which
may take up to 30 seconds to sound, con�rms that
the sensor identi�cation code has been matched to
this tire and wheel position.6. Proceed to the passenger side front tire, and repeat
the procedure in Step 5.
7. Proceed to the passenger side rear tire, and repeat
the procedure in Step 5.
8. Proceed to the driver side rear tire, and repeat the
procedure in Step 5. The horn sounds two times to
indicate the sensor identi�cation code has been
matched to the driver side rear tire, and the TPMS
sensor matching process is no longer active.
The TIRE LEARNING ACTIVE message on the DIC
display screen goes off.
9. Turn the ignition switch to LOCK/OFF.
10. Set all four tires to the recommended air pressure
level as indicated on the Tire and Loading
Information label.
11. Put the valve caps back on the valve stems.
5-66
Page 349 of 436
Different Size Tires and Wheels
If you add wheels or tires that are a different size than
your original equipment wheels and tires, this could
affect the way your vehicle performs, including its
braking, ride and handling characteristics, stability, and
resistance to rollover. Additionally, if your vehicle has
electronic systems such as anti-lock brakes, rollover
airbags, traction control, and electronic stability control,
the performance of these systems can be affected.
{CAUTION:
If you add different sized wheels, your vehicle
may not provide an acceptable level of
performance and safety if tires not
recommended for those wheels are selected.
You may increase the chance that you will
crash and suffer serious injury. Only use GM
speci�c wheel and tire systems developed for
your vehicle, and have them properly installed
by a GM certi�ed technician.
SeeBuying New Tires on page 5-69andAccessories
and Modifications on page 5-3for additional information.
Uniform Tire Quality Grading
Quality grades can be found where applicable on
the tire sidewall between tread shoulder and
maximum section width. For example:
Treadwear 200 Traction AA Temperature A
The following information relates to the system
developed by the United States National Highway
Traffic Safety Administration (NHTSA), which
grades tires by treadwear, traction, and
temperature performance. This applies only to
vehicles sold in the United States. The grades are
molded on the sidewalls of most passenger car
tires. The Uniform Tire Quality Grading (UTQG)
system does not apply to deep tread, winter-type
snow tires, space-saver, or temporary use
spare tires, tires with nominal rim diameters of
10 to 12 inches (25 to 30 cm), or to some
limited-production tires.
While the tires available on General Motors
passenger cars and light trucks may vary with
respect to these grades, they must also conform
to federal safety requirements and additional
General Motors Tire Performance Criteria (TPC)
standards.
5-71