Page 248 of 438

Dolly Towing
Front Towing (Front Wheels Off the
Ground)
Two-Wheel-Drive Vehicles
Notice:If you tow a two-wheel-drive vehicle with
the rear wheels on the ground, the transmission
could be damaged. The repairs would not be
covered by your warranty. Never tow your vehicle
with the rear wheels on the ground.
Two-wheel-drive vehicles should not be towed with
the rear wheels on the ground. Two-wheel-drive
transmissions have no provisions for internal lubrication
while being towed. To dolly tow a two-wheel-drive
vehicle, you must tow the vehicle with the rear wheels
on the dolly. See “Rear Towing (Rear Wheels Off
the Ground)” later in this section for more information.
Four-Wheel-Drive Vehicles
Use the following procedure to dolly tow your vehicle
from the front:
1. Drive the vehicle onto the dolly.
2. Firmly set the parking brake. SeeParking Brake on
page 2-32for more information.
3. Put an automatic transmission in PARK (P) or a
manual transmission in FIRST (1).
4. Follow the dolly manufacturer’s instructions to attach
and secure the vehicle being towed to the dolly and
then the loaded dolly to the tow vehicle.
4-44
Page 250 of 438

4. Follow the dolly manufacturer’s instructions to
attach and secure the vehicle being towed to
the dolly and then the loaded dolly to the tow
vehicle. Make sure the wheels are straight before
towing.
For manual transmission vehicles, make sure the
wheels are straight before proceeding to the
next steps. On automatic transmission vehicles,
use an adequate clamping device to ensure that the
front wheels are locked into the straight position.
5. Release the parking brake only after the vehicle
being towed is �rmly attached to the tow vehicle.
6. Turn the ignition to LOCK.
If the tow vehicle will not be started or driven for
six weeks or more, remove the battery cable
from the negative terminal (post) of the battery to
prevent your battery from draining while towing.Four-Wheel-Drive Vehicles
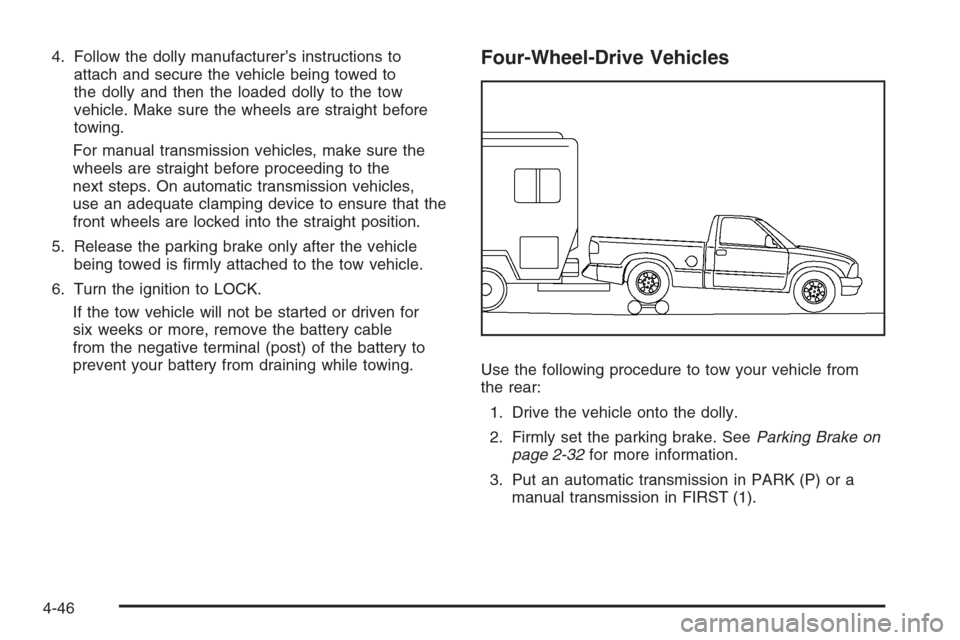
Use the following procedure to tow your vehicle from
the rear:
1. Drive the vehicle onto the dolly.
2. Firmly set the parking brake. SeeParking Brake on
page 2-32for more information.
3. Put an automatic transmission in PARK (P) or a
manual transmission in FIRST (1).
4-46
Page 251 of 438

4. Follow the dolly manufacturer’s instructions to attach
and secure the vehicle being towed to the dolly and
then the loaded dolly to the tow vehicle.
For manual transmission vehicles, make sure the
wheels are straight before proceeding to the
next steps. On automatic transmission vehicles,
use an adequate clamping device to ensure that the
front wheels are locked into the straight position.
{CAUTION:
Shifting a four-wheel-drive vehicle’s transfer
case into NEUTRAL can cause your vehicle to
roll even if the transmission is in PARK (P) for
an automatic transmission, or if your vehicle is
in gear, for a manual transmission. You or
others could be injured. Make sure the parking
brake is �rmly set before you shift the transfer
case to NEUTRAL.5. Shift the transfer case to NEUTRAL. See
Four-Wheel Drive on page 2-28for more
information.
6. Release the parking brake only after the vehicle
being towed is �rmly attached to the tow vehicle.
7. Turn the ignition to LOCK.
If the tow vehicle will not be started or driven for
six weeks or more, remove the battery cable
from the negative terminal (post) of the battery to
prevent your battery from draining while towing.
After towing, see “Shifting Out of NEUTRAL” under
Four-Wheel Drive on page 2-28.
4-47
Page 257 of 438

4WD Extended Cab Axle Ratio Maximum Trailer Weight GCWR*
Automatic Transmission,
5.3L Engine3.42 6,000 lbs (2 722 kg) 10,400 lbs (4 717 kg)
Manual Transmission,
2.9L Engine3.73 1,900 lbs (861 kg) 6,000 lbs (2 722 kg)
Manual Transmission,
2.9L Engine4.10 1,900 lbs (861 kg) 6,000 lbs (2 722 kg)
*The Gross Combination Weight Rating (GCWR) is the total allowable weight of the completely loaded vehicle and
trailer including any passengers, cargo, equipment and conversions. The GCWR for your vehicle should not be
exceeded.
4WD Crew Cab Axle Ratio Maximum Trailer Weight GCWR*
Automatic Transmission,
3.7L Engine3.73 5,500 lbs (2 495 kg) 9,800 lbs (4 445 kg)
Automatic Transmission,
5.3L Engine3.42 6,000 lbs (2 722 kg) 10,400 lbs (4 717 kg)
*The Gross Combination Weight Rating (GCWR) is the total allowable weight of the completely loaded vehicle and
trailer including any passengers, cargo, equipment and conversions. The GCWR for your vehicle should not be
exceeded.
Ask your dealer/retailer for our trailering information or
advice, or you can write us at our Customer Assistance
Offices. SeeCustomer Assistance Offices on page 7-6
for more information.
4-53
Page 261 of 438

Trailer Brakes
If your trailer weighs more than 1,000 lbs (450 kg)
loaded, then it needs its own brakes — and they must
be adequate. Be sure to read and follow the instructions
for the trailer brakes so you’ll be able to install, adjust
and maintain them properly.
Your trailer’s brake system can tap into the vehicle’s
hydraulic brake system only if:
The trailer parts can withstand 3,000 psi
(20 650 kPa) of pressure.
The trailer’s brake system will use less than
0.02 cubic inch (0.3 cc) of �uid from your vehicle’s
master cylinder. Otherwise, both braking systems
won’t work well. You could even lose your brakes.
If everything checks out this far, then make the brake
�uid tap at the port on the master cylinder that
sends �uid to the rear brakes. But don’t use copper
tubing for this. If you do, it will bend and �nally break off.
Use steel brake tubing.
Driving with a Trailer
Towing a trailer requires a certain amount of experience.
Before setting out for the open road, you’ll want to get
to know your rig. Acquaint yourself with the feel of
handling and braking with the added weight of the trailer.
And always keep in mind that the vehicle you are
driving is now a good deal longer and not nearly as
responsive as your vehicle is by itself.
Before you start, check all trailer hitch parts and
attachments, safety chains, electrical connector, lamps,
tires and mirror adjustment. If the trailer has electric
brakes, start your vehicle and trailer moving and then
apply the trailer brake controller by hand to be sure
the brakes are working. This lets you check your
electrical connection at the same time.
During your trip, check occasionally to be sure that the
load is secure, and that the lamps and any trailer
brakes are still working.
4-57
Page 296 of 438

Radiator Pressure Cap
Notice:If the pressure cap is not tightly installed,
coolant loss and possible engine damage may
occur. Be sure the cap is properly and tightly
secured.
SeeEngine Compartment Overview on page 5-12for
more information on location.
Engine Overheating
A coolant temperature gage is on the instrument panel.
SeeEngine Coolant Temperature Gage on page 3-32.
The air conditioning might stop working if the engine
is too hot. This is normal and helps cool the engine.
If Steam Is Coming From Your Engine
{CAUTION:
Steam from an overheated engine can burn you
badly, even if you just open the hood. Stay away
from the engine if you see or hear steam coming
from it. Just turn it off and get everyone away
from the vehicle until it cools down. Wait until
there is no sign of steam or coolant before you
open the hood.
If you keep driving when your engine is
overheated, the liquids in it can catch �re. You
or others could be badly burned. Stop your
engine if it overheats, and get out of the vehicle
until the engine is cool.
Notice:If the engine catches �re because of being
driven with no coolant, your vehicle can be badly
damaged. The costly repairs would not be covered
by the vehicle warranty.
5-30
Page 302 of 438
4. Fill the coolant recovery tank to the FULL
COLD mark.
5. Reinstall the cap on the coolant recovery tank, but
leave the radiator pressure cap off.6. Start the engine and let it run until you can feel the
upper radiator hose getting hot. Watch out for the
engine cooling fan.
7. By this time, the coolant level inside the radiator
�ller neck might be lower. If the level is lower, add
more of the proper DEX-COOL
®coolant mixture
through the �ller neck until the level reaches
the base of the �ller neck.
8. Then replace the pressure cap.
At any time during this procedure if coolant begins to
�ow out of the �ller neck, reinstall the pressure cap. Be
sure to secure it tightly.
5-36
Page 318 of 438
Headlamps
A. Low-Beam Headlamp/Daytime Running Lamps (DRL)
B. High-Beam Headlamp
To replace one of these bulbs:
1. Open the hood. SeeHood Release on page 5-11.
2. Reach in and access the bulb sockets from
inside the engine compartment.3. Turn the bulb socket counterclockwise to remove it
from the headlamp assembly and pull it straight out.
4. Unplug the electrical connector from the old bulb by
releasing the clips on the bulb socket.
5. Pull the old bulb straight out.
6. Push the new bulb straight in until it clicks to
secure it.
7. Plug in the electrical connector to the new bulb
socket.
8. Push the bulb socket straight in and turn it clockwise
to secure it in the headlamp assembly.
5-52