2008 CHEVROLET AVEO oil change
[x] Cancel search: oil changePage 115 of 384

Instrument Panel Overview...............................3-4
Hazard Warning Flashers................................3-8
Other Warning Devices...................................3-8
Horn.............................................................3-8
Tilt Wheel.....................................................3-9
Turn Signal/Multifunction Lever.........................3-9
Turn and Lane-Change Signals.......................3-10
Headlamp High/Low-Beam Changer.................3-10
Flash-to-Pass...............................................3-10
Windshield Wipers........................................3-11
Windshield Washer.......................................3-12
Rear Window Wiper/Washer (Hatchback).........3-12
Cruise Control..............................................3-13
Exterior Lamps.............................................3-15
Headlamps on Reminder................................3-16
Daytime Running Lamps (DRL).......................3-16
Fog Lamps..................................................3-17
Instrument Panel Brightness...........................3-17
Dome Lamp.................................................3-18
Inadvertent Power Battery Saver.....................3-18
Accessory Power Outlet(s).............................3-18
Ashtray(s) and Cigarette Lighter......................3-19
Clock..........................................................3-20Climate Controls............................................3-20
Climate Control System.................................3-20
Outlet Adjustment.........................................3-24
Passenger Compartment Air Filter...................3-24
Warning Lights, Gages, and Indicators............3-26
Instrument Panel Cluster................................3-27
Speedometer and Odometer...........................3-29
Trip Odometer..............................................3-29
Tachometer.................................................3-29
Safety Belt Reminders...................................3-30
Airbag Readiness Light.................................
.3-30
Passenger Airbag Status Indicator (Sedan).......3-31
Charging System Light..................................3-33
Brake System Warning Light..........................3-33
Antilock Brake System Warning Light...............3-34
Hold Mode Light...........................................3-35
Engine Coolant Temperature Gage..................3-35
Tire Pressure Light.......................................3-36
Malfunction Indicator Lamp.............................3-36
Oil Pressure Light.........................................3-39
Fog Lamp Light............................................3-40
Cruise Control Light......................................3-40
Section 3 Instrument Panel
3-1
Page 188 of 384
If playing a CD-R, the sound quality can be reduced due
to CD-R quality, the method of recording, the quality of
the music that has been recorded, and the way the CD-R
has been handled. There can be an increase in skipping,
difficulty in finding tracks, and/or difficulty in loading and
ejecting. If these problems occur, check the bottom
surface of the CD. If the surface of the CD is damaged,
such as cracked, broken, or scratched, the CD does not
play properly. If the surface of the CD is soiled, seeCare
of Your CDs on page 3-79for more information.
If there is no apparent damage, try a known good CD.
Do not add any label to a CD, it could get caught in the
CD player. If a CD is recorded on a personal computer
and a description label is needed, try labeling the top
of the recorded CD with a marking pen.
Notice:If a label is added to a CD, or more than
one CD is inserted into the slot at a time, or an
attempt is made to play scratched or damaged CDs,
the CD player could be damaged. While using the
CD player, use only CDs in good condition without
any label, load one CD at a time, and keep the
CD player and the loading slot free of foreign
materials, liquids, and debris.
If an error displays, see “CD Messages” later in this
section.
All of the CD functions work the same while playing an
MP3/WMA, except for those listed here. See “Playing
a CD” earlier for more information.SCROLL (MP3/WMA Mode Only):Press the SOUND
button for longer than two seconds. The song title or
other available information of a song scrolls on/off.
The offset is scroll on. The scroll mode can be changed
only when the SOUND button is pressed for longer
than two seconds.
DIR (Directory):Press this button to repeat the tracks
in the current directory. DIR displays.
Press this button again to repeat the tracks in all of the
directories. ALL displays.
Press this button again to turn off repeat play.
¦¥SEEK (Previous/Next Folder) (in MP3/WMA
Mode):Press the SEEK arrows to change the folder.
If CD-R does not have any folder, “ROOT” flashes on the
display for a short time.
()TUNE (Previous/Next Track):Press the up
TUNE arrow to go to the next track. The track number
displays. Press the down TUNE arrow to go to the
start of the current track. The player continues moving
forward or backward through the CD with each press of
the TUNE arrows.
INFO/DISP (Information/Display):Press this button to
display additional text information related to the current
MP3/WMA song. A choice of additional information such
as: Song Title, Album Title, and Artist. Bit rate might also
display.
3-74
Page 191 of 384

If playing a CD-R, the sound quality can be reduced due
to CD-R quality, the method of recording, the quality of
the music that has been recorded, and the way the CD-R
has been handled. There can be an increase in skipping,
difficulty in finding tracks, and/or difficulty in loading and
ejecting. If these problems occur, check the bottom
surface of the CD. If the surface of the CD is damaged,
such as cracked, broken, or scratched, the CD will not
play properly. If the surface of the CD is soiled, seeCare
of Your CDs on page 3-79for more information.
If there is no apparent damage, try a known good CD.
Do not add any label to a CD, it could get caught in the
CD player. If a CD is recorded on a personal computer
and a description label is needed, try labeling the top of
the recorded CD with a marking pen.
Notice:If a label is added to a CD, or more than
one CD is inserted into the slot at a time, or an
attempt is made to play scratched or damaged CDs,
the CD player could be damaged. While using the
CD player, use only CDs in good condition without
any label, load one CD at a time, and keep the
CD player and the loading slot free of foreign
materials, liquids, and debris.
If an error displays, see “CD Messages” later in this
section.
All of the CD functions work the same while playing an
MP3/WMA, except for those listed here. See “Playing
a CD” earlier for more information.SCROLL (MP3/WMA Mode Only):Press the SOUND
button for longer than two seconds. The song title and
other available information of the song scrolls on/off.
The offset is scroll on. The scroll mode can be changed
only when the SOUND button is pressed for longer than
two seconds.
1 DIR (Directory):Press this button to repeat the
tracks in the current directory. DIR displays.
Press this button again to repeat the tracks in all of the
directories. ALL displays.
Press this button again to turn off repeat play.
¦¥SEEK (Previous/Next Folder) (in MP3/WMA
Mode):Press the SEEK arrows to change the folder.
If CD-R does not have any folder, “ROOT” flashes
on the display for a short time.
()TUNE (Previous/Next Track):Press the up
TUNE arrow to go to the next track. The track number
displays. Press the down TUNE arrow to go to the
start of the current track. The player continues moving
forward or backward through the CD with each press of
the up or down arrows.
INFO/DISP (Information/Display):Press this button to
display additional text information related to the current
MP3/WMA song. A choice of additional information such
as: Song Title, Album Title, and Artist. Bit rate might also
display.
3-77
Page 238 of 384
If you are in an area of extreme cold, where the
temperature falls below−20°F (−29°C), it is
recommended that you use either an SAE 5W-30
synthetic oil or an SAE 0W-30 oil. Both provide easier
cold starting and better protection for the engine at
extremely low temperatures.
Engine Oil Additives
Do not add anything to the oil. The recommended oils
with the starburst symbol that meet GM Standard
GM6094M are all you need for good performance and
engine protection.
When to Change Engine Oil
If any one of these is true for you, use the short trip/city
maintenance schedule:
•Most trips are less than 5 miles (8 km). This is
particularly important when outside temperatures
are below freezing.
•Most trips include extensive idling, such as frequent
driving in stop-and-go traffic.
•You frequently use a carrier on top of your vehicle.
•The vehicle is used for delivery service, police,
taxi, or other commercial application.
Driving under these conditions causes engine oil to
break down sooner. If any one of these is true for your
vehicle, you need to change the oil and filter every
3,000 miles (5 000 km) or 3 months, whichever
occurs first.
If none of them is true, use the long trip/highway
maintenance schedule. Change the oil and filter every
7,500 miles (12 500 km) or 12 months, whichever occurs
first. Driving a vehicle with a fully warmed engine
under highway conditions will cause engine oil to break
down slower.
5-16
Page 239 of 384
What to Do with Used Oil
Used engine oil contains certain elements that can be
unhealthy for your skin and could even cause cancer.
Do not let used oil stay on your skin for very long. Clean
your skin and nails with soap and water, or a good
hand cleaner. Wash or properly dispose of clothing or
rags containing used engine oil. See the manufacturer’s
warnings about the use and disposal of oil products.
Used oil can be a threat to the environment. If you
change your own oil, be sure to drain all the oil from the
filter before disposal. Never dispose of oil by putting it
in the trash, pouring it on the ground, into sewers, or into
streams or bodies of water. Instead, recycle it by
taking it to a place that collects used oil. If you have a
problem properly disposing of used oil, ask your
dealer/retailer, a service station, or a local recycling
center for help.
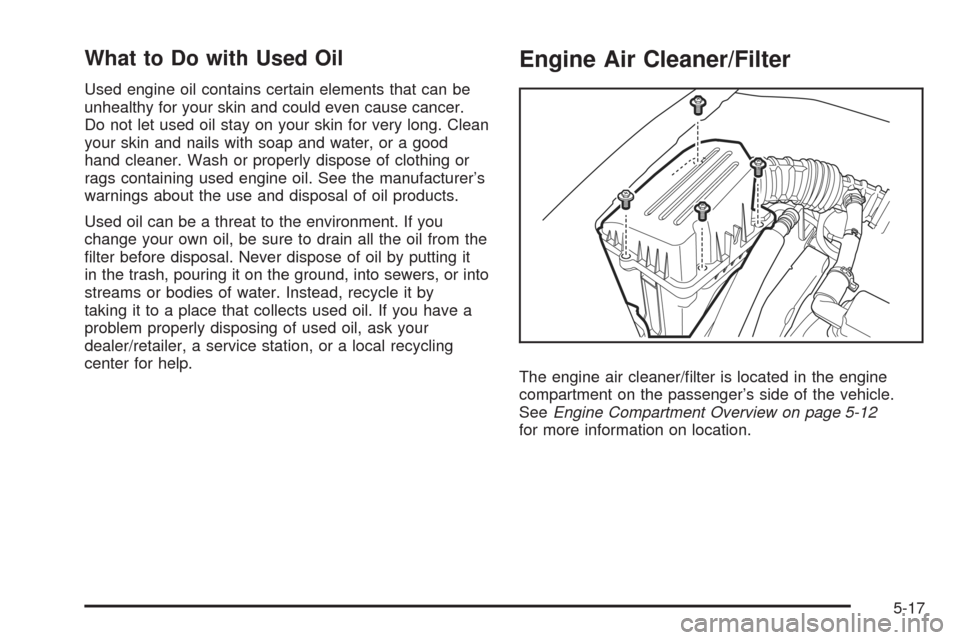
Engine Air Cleaner/Filter
The engine air cleaner/filter is located in the engine
compartment on the passenger’s side of the vehicle.
SeeEngine Compartment Overview on page 5-12
for more information on location.
5-17
Page 240 of 384
When to Inspect the Engine
Air Cleaner/Filter
Inspect the engine air cleaner/filter every
15,000 miles (25 000 km) and replace it every
30,000 miles (50 000 km). If you are driving in
dusty/dirty conditions, inspect the filter at each
engine oil change.
How to Inspect the Engine
Air Cleaner/Filter
To inspect the engine air cleaner/filter remove the filter
from the vehicle and lightly shake the filter to release
loose dust and dirt. If the filter remains caked with dirt,
a new filter is required.
To inspect or replace the filter, do the following:
1. Remove the screws and lift off the cover.
2. Inspect or replace the engine air cleaner/filter.
3. Put the cover back on tightly and tighten the screws.
SeePart A: Scheduled Maintenance Services on
page 6-4for replacement intervals.
{CAUTION:
Operating the engine with the air cleaner/�lter
off can cause you or others to be burned.
The air cleaner not only cleans the air; it helps
to stop �ames if the engine back�res. If it is
not there and the engine back�res, you could
be burned. Do not drive with it off, and be
careful working on the engine with the air
cleaner/�lter off.
Notice:If the air cleaner/�lter is off, a back�re
can cause a damaging engine �re. And, dirt
can easily get into your engine, which will damage
it. Always have the air cleaner/�lter in place
when you are driving.
5-18
Page 298 of 384
{CAUTION:
Rust or dirt on a wheel, or on the parts to
which it is fastened, can make wheel nuts
become loose after time. The wheel could
come off and cause an accident. When you
change a wheel, remove any rust or dirt from
places where the wheel attaches to the vehicle.
In an emergency, you can use a cloth or a
paper towel to do this; but be sure to use a
scraper or wire brush later, if needed, to get
all the rust or dirt off. SeeChanging a Flat Tire
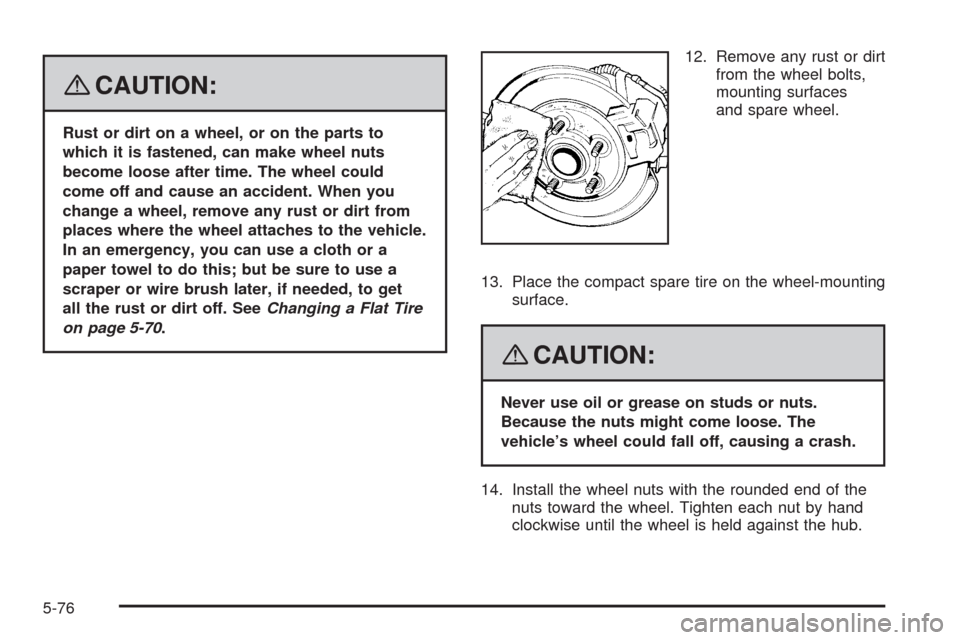
on page 5-70.12. Remove any rust or dirt
from the wheel bolts,
mounting surfaces
and spare wheel.
13. Place the compact spare tire on the wheel-mounting
surface.
{CAUTION:
Never use oil or grease on studs or nuts.
Because the nuts might come loose. The
vehicle’s wheel could fall off, causing a crash.
14. Install the wheel nuts with the rounded end of the
nuts toward the wheel. Tighten each nut by hand
clockwise until the wheel is held against the hub.
5-76
Page 303 of 384
To clean, use the following instructions:
1. Saturate a lint-free, clean white cloth with water
or club soda.
2. Wring the cloth to remove excess moisture.
3. Start on the outside edge of the soil and gently rub
toward the center. Continue cleaning, using a clean
area of the cloth each time it becomes soiled.
4. Continue to gently rub the soiled area until the
cleaning cloth remains clean.
5. If the soil is not completely removed, use a mild
soap solution and repeat the cleaning process
that was used with plain water.
If any of the soil remains, a commercial fabric cleaner
or spot lifter may be necessary. When a commercial
upholstery cleaner or spot lifter is to be used, test
a small hidden area for colorfastness first. If the locally
cleaned area gives any impression that a ring
formation may result, clean the entire surface.
After the cleaning process has been completed, a paper
towel can be used to blot excess moisture from the
fabric or carpet.Leather
A soft cloth dampened with water can be used to
remove dust. If a more thorough cleaning is necessary,
a soft cloth dampened with a mild soap solution can
be used. Allow the leather to dry naturally. Do not use
heat to dry. Never use steam to clean leather. Never
use spot lifters or spot removers on leather. Many
commercial leather cleaners and coatings that are sold
to preserve and protect leather may permanently
change the appearance and feel of your leather and are
not recommended. Do not use silicone or wax-based
products, or those containing organic solvents to clean
your vehicle’s interior because they can alter the
appearance by increasing the gloss in a non-uniform
manner. Never use shoe polish on leather.
5-81