2008 CHEVROLET AVALANCHE door lock
[x] Cancel search: door lockPage 248 of 528
AUTO DOOR LOCK
This feature allows you to select when the vehicle’s
doors will automatically lock. SeeProgrammable
Automatic Door Locks on page 2-11for more
information.
Press the customization button until AUTO DOOR
LOCK appears on the DIC display. Press the set/reset
button once to access the settings for this feature.
Then press the customization button to scroll through
the following settings:
SHIFT OUT OF PARK (default):The doors, including
the tailgate, will automatically lock when the vehicle
is shifted out of PARK (P).
AT VEHICLE SPEED:The doors, including the tailgate,
will automatically lock when the vehicle speed is above
8 mph (13 km/h) for three seconds.
NO CHANGE:No change will be made to this feature.
The current setting will remain.
To select a setting, press the set/reset button while the
desired setting is displayed on the DIC.
AUTO DOOR UNLOCK
This feature allows you to select whether or not to
turn off the automatic door unlocking feature. It also
allows you to select which doors and when the doors will
automatically unlock. SeeProgrammable Automatic
Door Locks on page 2-11for more information.
Press the customization button until AUTO DOOR
UNLOCK appears on the DIC display. Press the
set/reset button once to access the settings for this
feature. Then press the customization button to scroll
through the following settings:
OFF:None of the doors will automatically unlock.
DRIVER AT KEY OUT:Only the driver’s door will
unlock when the key is taken out of the ignition.
DRIVER IN PARK:Only the driver’s door will unlock
when the vehicle is shifted into PARK (P).
ALL AT KEY OUT:All of the doors, including the
tailgate, will unlock when the key is taken out of the
ignition.
ALL IN PARK (default):All of the doors, including the
tailgate, will unlock when the vehicle is shifted into
PARK (P).
NO CHANGE:No change will be made to this feature.
The current setting will remain.
To select a setting, press the set/reset button while the
desired setting is displayed on the DIC.
3-68
Page 249 of 528
REMOTE DOOR LOCK
This feature allows you to select the type of feedback
you will receive when locking the vehicle with the
Remote Keyless Entry (RKE) transmitter. You will not
receive feedback when locking the vehicle with the RKE
transmitter if the doors are open. SeeRemote Keyless
Entry (RKE) System Operation on page 2-5for more
information.
Press the customization button until REMOTE DOOR
LOCK appears on the DIC display. Press the set/reset
button once to access the settings for this feature.
Then press the customization button to scroll through
the following settings:
OFF:There will be no feedback when you press the
lock button on the RKE transmitter.
LIGHTS ONLY:The exterior lamps will �ash when you
press the lock button on the RKE transmitter.
HORN ONLY:The horn will sound on the second press
of the lock button on the RKE transmitter.
HORN & LIGHTS (default):The exterior lamps
will �ash when you press the lock button on the RKE
transmitter, and the horn will sound when the lock button
is pressed again within �ve seconds of the previous
command.
NO CHANGE:No change will be made to this feature.
The current setting will remain.To select a setting, press the set/reset button while the
desired setting is displayed on the DIC.
REMOTE DOOR UNLOCK
This feature allows you to select the type of feedback
you will receive when unlocking the vehicle with the
Remote Keyless Entry (RKE) transmitter. You will not
receive feedback when unlocking the vehicle with the
RKE transmitter if the doors are open. SeeRemote
Keyless Entry (RKE) System Operation on page 2-5
for more information.
Press the customization button until REMOTE DOOR
UNLOCK appears on the DIC display. Press the
set/reset button once to access the settings for this
feature. Then press the customization button to scroll
through the following settings:
LIGHTS OFF:The exterior lamps will not �ash when
you press the unlock button on the RKE transmitter.
LIGHTS ON (default):The exterior lamps will
�ash when you press the unlock button on the RKE
transmitter.
NO CHANGE:No change will be made to this feature.
The current setting will remain.
To select a setting, press the set/reset button while the
desired setting is displayed on the DIC.
3-69
Page 250 of 528
DELAY DOOR LOCK
This feature allows you to select whether or not the
locking of the vehicle’s doors and tailgate will be delayed.
When locking the doors and tailgate with the power door
lock switch and a door or the tailgate is open, this feature
will delay locking the doors and tailgate until �ve seconds
after the last door is closed. You will hear three chimes to
signal that the delayed locking feature is in use. The key
must be out of the ignition for this feature to work. You
can temporarily override delayed locking by pressing the
power door lock switch twice or the lock button on the
RKE transmitter twice. SeeDelayed Locking on
page 2-10for more information.
Press the customization button until DELAY DOOR
LOCK appears on the DIC display. Press the set/reset
button once to access the settings for this feature.
Then press the customization button to scroll through
the following settings:
OFF:There will be no delayed locking of the vehicle’s
doors.
ON (default):The doors will not lock until �ve seconds
after the last door or the tailgate is closed.
NO CHANGE:No change will be made to this feature.
The current setting will remain.
To select a setting, press the set/reset button while the
desired setting is displayed on the DIC.
EXIT LIGHTING
This feature allows you to select the amount of time you
want the exterior lamps to remain on when it is dark
enough outside. This happens after the key is turned
from ON/RUN to LOCK/OFF.
Press the customization button until EXIT LIGHTING
appears on the DIC display. Press the set/reset button
once to access the settings for this feature. Then
press the customization button to scroll through the
following settings:
OFF:The exterior lamps will not turn on.
30 SECONDS (default):The exterior lamps will stay on
for 30 seconds.
1 MINUTE:The exterior lamps will stay on for
one minute.
2 MINUTES:The exterior lamps will stay on for
two minutes.
NO CHANGE:No change will be made to this feature.
The current setting will remain.
To select a setting, press the set/reset button while the
desired setting is displayed on the DIC.
3-70
Page 336 of 528
Loading Your Vehicle
It is very important to know how much weight your
vehicle can carry. This weight is called the vehicle
capacity weight and includes the weight of all
occupants, cargo, and all nonfactory-installed
options. Two labels on your vehicle show how
much weight it was designed to carry, the Tire
and Loading Information label and the Certi�cation/
Tire label.
{CAUTION:
Do not load the vehicle any heavier than
the Gross Vehicle Weight Rating (GVWR),
or either the maximum front or rear Gross
Axle Weight Rating (GAWR). If you do,
parts on the vehicle can break, and it can
change the way your vehicle handles.
These could cause you to lose control
and crash. Also, overloading can shorten
the life of the vehicle.Tire and Loading Information Label
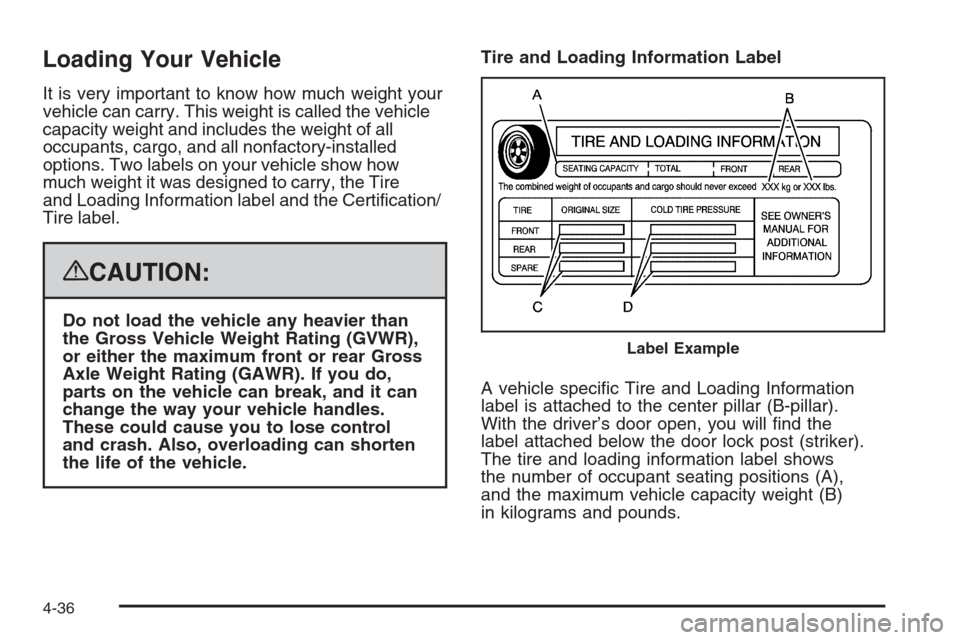
A vehicle speci�c Tire and Loading Information
label is attached to the center pillar (B-pillar).
With the driver’s door open, you will �nd the
label attached below the door lock post (striker).
The tire and loading information label shows
the number of occupant seating positions (A),
and the maximum vehicle capacity weight (B)
in kilograms and pounds.
Label Example
4-36
Page 442 of 528
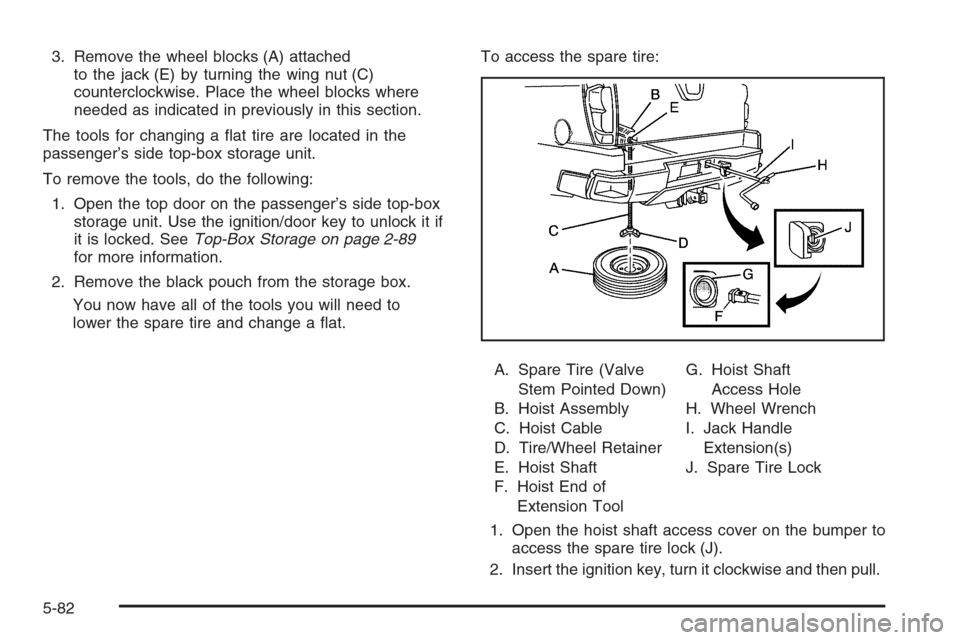
3. Remove the wheel blocks (A) attached
to the jack (E) by turning the wing nut (C)
counterclockwise. Place the wheel blocks where
needed as indicated in previously in this section.
The tools for changing a �at tire are located in the
passenger’s side top-box storage unit.
To remove the tools, do the following:
1. Open the top door on the passenger’s side top-box
storage unit. Use the ignition/door key to unlock it if
it is locked. SeeTop-Box Storage on page 2-89
for more information.
2. Remove the black pouch from the storage box.
You now have all of the tools you will need to
lower the spare tire and change a �at.To access the spare tire:
A. Spare Tire (Valve
Stem Pointed Down)
B. Hoist Assembly
C. Hoist Cable
D. Tire/Wheel Retainer
E. Hoist Shaft
F. Hoist End of
Extension ToolG. Hoist Shaft
Access Hole
H. Wheel Wrench
I. Jack Handle
Extension(s)
J. Spare Tire Lock
1. Open the hoist shaft access cover on the bumper to
access the spare tire lock (J).
2. Insert the ignition key, turn it clockwise and then pull.
5-82
Page 469 of 528
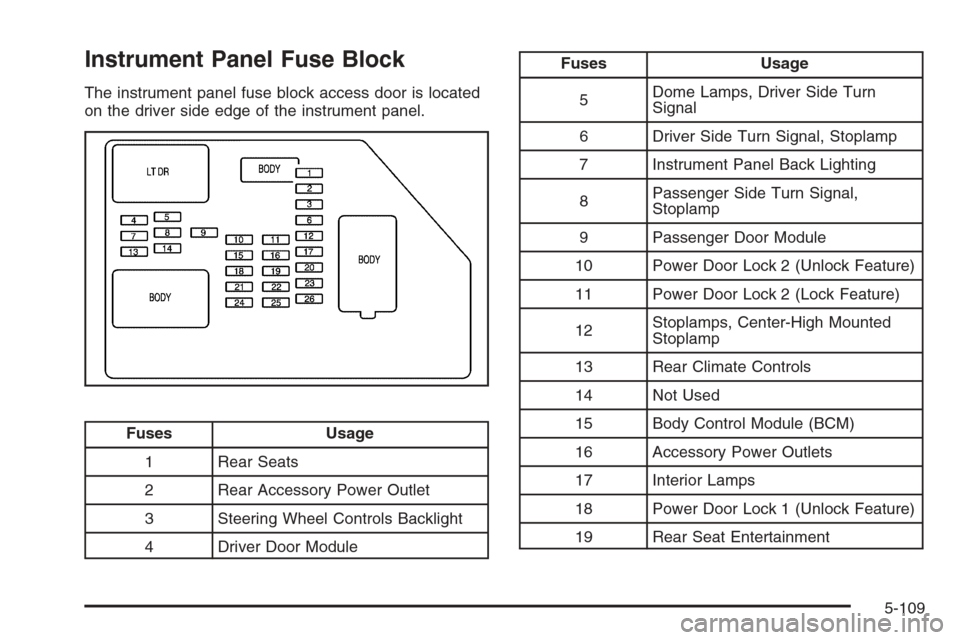
Instrument Panel Fuse Block
The instrument panel fuse block access door is located
on the driver side edge of the instrument panel.
Fuses Usage
1 Rear Seats
2 Rear Accessory Power Outlet
3 Steering Wheel Controls Backlight
4 Driver Door Module
Fuses Usage
5Dome Lamps, Driver Side Turn
Signal
6 Driver Side Turn Signal, Stoplamp
7 Instrument Panel Back Lighting
8Passenger Side Turn Signal,
Stoplamp
9 Passenger Door Module
10 Power Door Lock 2 (Unlock Feature)
11 Power Door Lock 2 (Lock Feature)
12Stoplamps, Center-High Mounted
Stoplamp
13 Rear Climate Controls
14 Not Used
15 Body Control Module (BCM)
16 Accessory Power Outlets
17 Interior Lamps
18 Power Door Lock 1 (Unlock Feature)
19 Rear Seat Entertainment
5-109
Page 470 of 528
Fuses Usage
20Ultrasonic Rear Parking Assist,
Power Liftgate
21 Power Door Lock 1 (Lock Feature)
22 Driver Information Center (DIC)
23 Rear Wiper
24 Not Used
25Driver Seat Module, Remote
Keyless Entry System
26 Not Used
Harness
ConnectorUsage
LT DR Driver Door Harness Connection
BODY Harness Connector
BODY Harness Connector
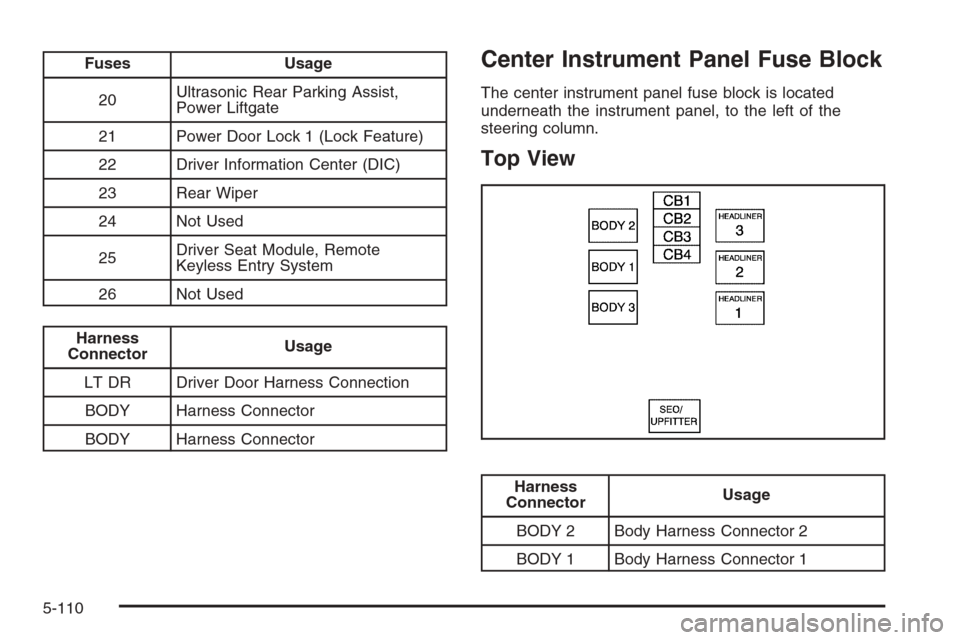
Center Instrument Panel Fuse Block
The center instrument panel fuse block is located
underneath the instrument panel, to the left of the
steering column.
Top View
Harness
ConnectorUsage
BODY 2 Body Harness Connector 2
BODY 1 Body Harness Connector 1
5-110
Page 484 of 528

(c)Visually inspect hoses and have them replaced if
they are cracked, swollen, or deteriorated. Inspect all
pipes, �ttings, and clamps; replace with genuine parts as
needed. To help ensure proper operation, a pressure test
of the cooling system and pressure cap and cleaning the
outside of the radiator and air conditioning condenser is
recommended at least once a year.
(d)Inspect wiper blades for wear, cracking, or
contamination. Clean the windshield and wiper blades,
if contaminated. Replace wiper blades that are worn
or damaged. See Windshield Wiper Blade Replacement
on page 5-55andWindshield and Wiper Blades on
page 5-104for more information.
(e)Make sure the safety belt reminder light and safety
belt assemblies are working properly. Look for any other
loose or damaged safety belt system parts. If you see
anything that might keep a safety belt system from doing
its job, have it repaired. Have any torn or frayed safety
belts replaced. Also see Checking the Restraint Systems
on page 1-76.
(f)Lubricate all key lock cylinders, hood latch assembly,
secondary latch, pivots, spring anchor, release pawl,
midgate hinges, side storage box door hinges, tailgate
hinges, tailgate linkage, outer tailgate handle pivot
points, latch bolt, fuel door hinge, locks, and folding
seat hardware. More frequent lubrication may be
required when exposed to a corrosive environment.Applying silicone grease on weatherstrips with a clean
cloth will make them last longer, seal better, and
not stick or squeak.
(g)Check vent hose at transfer case for kinks and
proper installation.
(h)Change automatic transmission �uid and �lter if the
vehicle is mainly driven under one or more of these
conditions:
�In heavy city traffic where the outside temperature
regularly reaches 90°F (32°C) or higher.
�In hilly or mountainous terrain.
�When doing frequent trailer towing.
�Uses such as found in taxi, police, or delivery
service.
(i)Drain, �ush, and re�ll cooling system. This service
can be complex; you should have your dealer/retailer
perform this service. See Engine Coolant on page 5-25
for what to use. Inspect hoses. Clean radiator,
condenser, pressure cap, and �ller neck. Pressure test
the cooling system and pressure cap.
(j)A �uid loss in any vehicle system could indicate a
problem. Have the system inspected and repaired and
the �uid level checked. Add �uid if needed.
6-8