2008 CHEVROLET AVALANCHE seats
[x] Cancel search: seatsPage 96 of 528
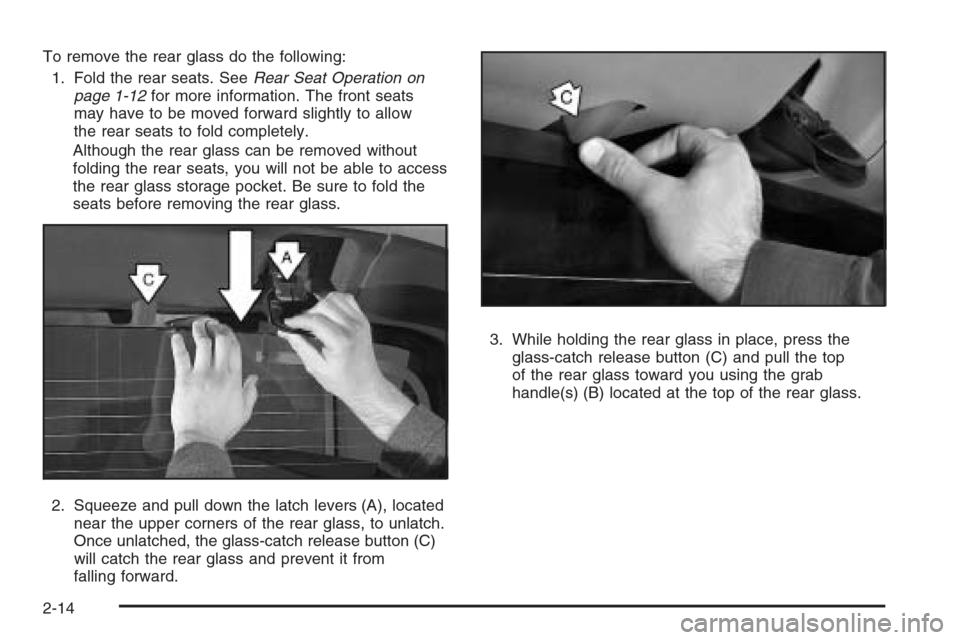
To remove the rear glass do the following:
1. Fold the rear seats. SeeRear Seat Operation on
page 1-12for more information. The front seats
may have to be moved forward slightly to allow
the rear seats to fold completely.
Although the rear glass can be removed without
folding the rear seats, you will not be able to access
the rear glass storage pocket. Be sure to fold the
seats before removing the rear glass.
2. Squeeze and pull down the latch levers (A), located
near the upper corners of the rear glass, to unlatch.
Once unlatched, the glass-catch release button (C)
will catch the rear glass and prevent it from
falling forward.3. While holding the rear glass in place, press the
glass-catch release button (C) and pull the top
of the rear glass toward you using the grab
handle(s) (B) located at the top of the rear glass.
2-14
Page 98 of 528
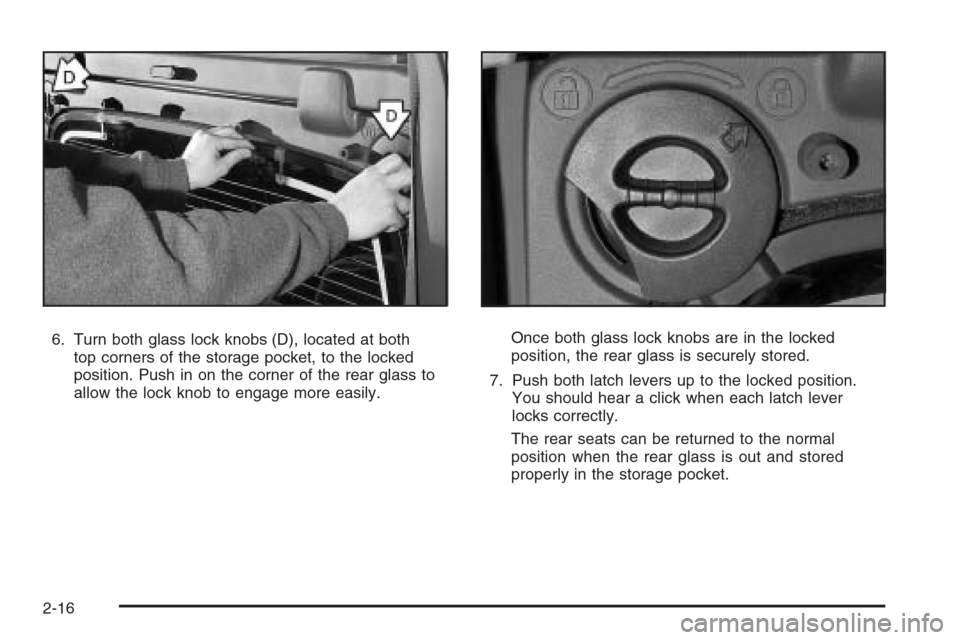
6. Turn both glass lock knobs (D), located at both
top corners of the storage pocket, to the locked
position. Push in on the corner of the rear glass to
allow the lock knob to engage more easily.Once both glass lock knobs are in the locked
position, the rear glass is securely stored.
7. Push both latch levers up to the locked position.
You should hear a click when each latch lever
locks correctly.
The rear seats can be returned to the normal
position when the rear glass is out and stored
properly in the storage pocket.
2-16
Page 101 of 528
Lowering the Midgate®with the Rear
Glass in Place
The Midgate®can be lowered to allow the cargo area of
your vehicle to extend into the cab. The rear glass
can be either installed in its normal position, or it can be
removed and stored in the rear glass storage pocket.
To lower the Midgate
®, do the following:
1. Fold the rear seats. The front seats might have to
be moved forward slightly to allow the rear seats to
fold. SeeRear Seat Operation on page 1-12for
more information.
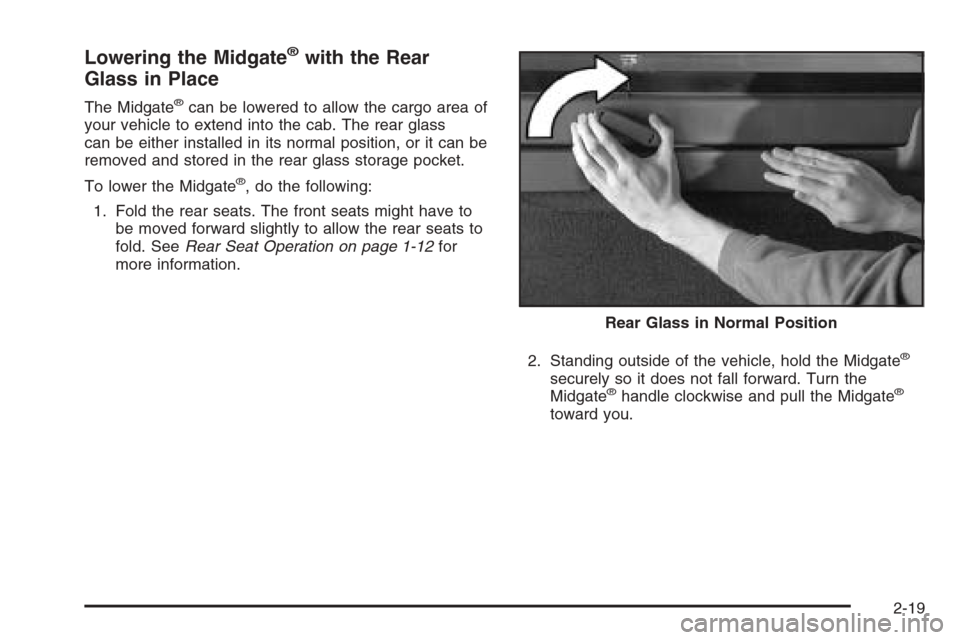
2. Standing outside of the vehicle, hold the Midgate
®
securely so it does not fall forward. Turn the
Midgate®handle clockwise and pull the Midgate®
toward you.Rear Glass in Normal Position
2-19
Page 153 of 528
Storage Areas
Glove Box
To open the glove box, lift up on the lever.
Cupholders
Your vehicle may have cupholders for the front and rear
passengers.
The cupholders are located in the center console for the
front passengers and on the rear of the center console
for the rear passengers.
The front cupholder may be removed for cleaning by
pushing down and then back on the cupholder.
To use the front cupholders, press down on the access
door and release. The door will then open. Push the
door back down to close it.
To use the rear cupholders, pull down on the door
located on the back of the console.
Center Overhead Console
Your vehicle may have an overhead console with
reading lights and a small storage area.
Press the button next to the light to turn it on and off.
Front Armrest Storage Area
Your vehicle may have a center armrest storage
compartment in the front bench seat.
To open it, fold down the armrest and press the latch
handle located at the front of the armrest. Then, let the
cover pop up and swing open.
Center Console Storage
Your vehicle may have a console compartment with
cupholders between the bucket seats.
To open it, press the button and lift the console
cover open.
The rear of the console has a cupholder that folds down
for the rear seat passenger to use.
2-71
Page 199 of 528
Electric Power Management
The vehicle has Electric Power Management (EPM) that
estimates the battery’s temperature and state of charge.
It then adjusts the voltage for best performance and
extended life of the battery.
When the battery’s state of charge is low, the voltage is
raised slightly to quickly put the charge back in. When
the state of charge is high, the voltage is lowered slightly
to prevent overcharging. If the vehicle has a voltmeter
gage or a voltage display on the Driver Information
Center (DIC), you may see the voltage move up
or down. This is normal. If there is a problem,
an alert will be displayed.
The battery can be discharged at idle if the electrical
loads are very high. This is true for all vehicles. This is
because the generator (alternator) may not be spinning
fast enough at idle to produce all the power that is
needed for very high electrical loads.
A high electrical load occurs when several of the
following loads are on: headlamps, high beams, fog
lamps, rear window defogger, climate control fan at
high speed, heated seats, engine cooling fans, trailer
loads, and loads plugged into accessory power outlets.EPM works to prevent excessive discharge of the
battery. It does this by balancing the generator’s output
and the vehicle’s electrical needs. It can increase
engine idle speed to generate more power, whenever
needed. It can temporarily reduce the power demands of
some accessories.
Normally, these actions occur in steps or levels, without
being noticeable. In rare cases at the highest levels of
corrective action, this action may be noticeable to the
driver. If so, a Driver Information Center (DIC) message
might be displayed, such as Battery Saver Active or
Service Battery Charging System. If this message is
displayed, it is recommended that the driver reduce the
electrical loads as much as possible. SeeDIC Warnings
and Messages on page 3-59.
Battery Run-Down Protection
This feature shuts off the dome lamps if they are left on
for more than 10 minutes when the ignition is in LOCK.
This will help prevent the battery from running down.
3-19
Page 211 of 528

Rear Window Defogger
The rear window defogger uses a warming grid to
remove fog from the rear window.
<(Rear Window Defogger):Press this button to
turn on the rear window defogger. It will automatically
turn off several minutes after it has been activated.
The defogger can also be turned off by pressing
the button again or by turning off the engine. Do not
drive the vehicle until all the windows are clear.
If your vehicle has heated outside rearview mirrors,
the mirrors will heat to help clear fog or frost from the
surface of the mirror when the rear window defog button
is pressed.
Notice:Do not use a razor blade or sharp object
to clear the inside rear window. Do not adhere
anything to the defogger grid lines in the rear glass.
These actions may damage the rear defogger.
Repairs would not be covered by your warranty.
Outlet Adjustment
Your vehicle has air outlets located in the center and on
the side of your instrument panel that allow you to adjust
the direction and amount of air�ow inside the vehicle.
Move the louvers up or down. Use the thumbwheel next
to or underneath the outlet to close the louvers. For the
most efficient air�ow and temperature control, keep the
outlet in the fully opened position.
Operation Tips
Keep the hood and front air inlets free of ice, snow,
or any other obstruction, such as leaves. The
heater and defroster will work far better, reducing
the chance of fogging the inside of your windows.
Keep the air path under the front seats clear
of objects. This helps air to circulate throughout
your vehicle.
Adding outside equipment to the front of your
vehicle, such as hood-air de�ectors, etc., may affect
the performance of the heating and air conditioning
system. Check with your dealer before adding
equipment to the outside of your vehicle.
3-31
Page 235 of 528

Units
Press the vehicle information button until UNITS
displays. This display allows you to select between
English or Metric units of measurement. Once in this
display, press the set/reset button to select between
ENGLISH or METRIC units. All of the vehicle information
will then be displayed in the unit of measurement
selected.
Tire Pressure
The pressure for each tire can be viewed in the DIC.
The tire pressure will be shown in either pounds per
square inch (psi) or kilopascals (kPa). Press the vehicle
information button until the DIC displays FRONT TIRES
PSI (kPa) LEFT ## RIGHT ##. Press the vehicle
information button again until the DIC displays REAR
TIRES PSI (kPa) LEFT ## RIGHT ##.
If a low or high tire pressure condition is detected by the
system while driving, a message advising you to check
the pressure in a speci�c tire will appear in the display.
SeeIn�ation - Tire Pressure on page 5-64andDIC
Warnings and Messages on page 3-59for more
information.
If the tire pressure display shows dashes instead of a
value, there may be a problem with your vehicle. If this
consistently occurs, see your dealer/retailer for service.
Engine Hours
Press the vehicle information button until ENGINE
HOURS displays. This display shows the total number
of hours the engine has run.
Relearn Remote Key
This display allows you to match Remote Keyless
Entry (RKE) transmitters to your vehicle. To match
an RKE transmitter to your vehicle:
1. Press the vehicle information button until
PRESS
VTO RELEARN REMOTE KEY displays.
2. Press the set/reset button until REMOTE KEY
LEARNING ACTIVE is displayed.
3. Press and hold the lock and unlock buttons on
the �rst transmitter at the same time for about
15 seconds.
On vehicles with memory recall seats, the �rst
transmitter learned will match driver 1 and
the second will match driver 2.
A chime will sound indicating that the transmitter is
matched.
4. To match additional transmitters at this time, repeat
Step 3.
Each vehicle can have a maximum of
eight transmitters matched to it.
5. To exit the programming mode, you must cycle the
key to LOCK/OFF.
3-55
Page 238 of 528
Relearn Remote Key
To access this display, the vehicle must be in PARK (P).
This display allows you to match Remote Keyless
Entry (RKE) transmitters to your vehicle. To match
an RKE transmitter to your vehicle:
1. Press the trip odometer reset stem until RELEARN
REMOTE KEY displays.
2. Press and hold the trip odometer reset stem for
three seconds.
The message REMOTE KEY LEARNING ACTIVE
will display.
3. Press and hold the lock and unlock buttons on
the �rst transmitter at the same time for about
15 seconds.
On vehicles with memory recall seats, the �rst
transmitter learned will match driver 1 and
the second will match driver 2.
A chime will sound indicating that the transmitter is
matched.
4. To match additional transmitters at this time, repeat
Step 3.
Each vehicle can have a maximum of
eight transmitters matched to it.
5. To exit the programming mode, you must cycle the
key to LOCK/OFF.
Language
This display allows you to select the language in which
the DIC messages will appear. To select a language:
1. Press the trip odometer reset stem until
ODOMETER displays.
2. While in the ODOMETER display, press and hold
the trip odometer reset stem for three seconds until
the currently set language displays.
3. Continue to press and hold the trip odometer reset
stem to scroll through all of the available languages.
The available languages are ENGLISH (default),
FRANCAIS (French), ESPANOL (Spanish), and
NO CHANGE.
4. Once the desired language is displayed, release
the trip odometer reset stem to set your choice.
3-58