Page 380 of 528

Engine Air Cleaner/Filter
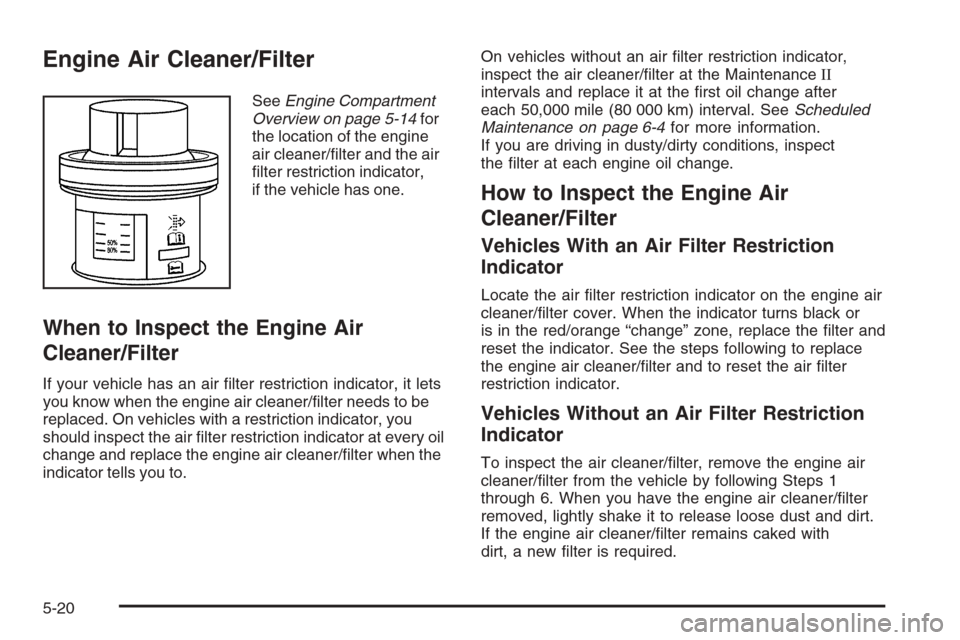
SeeEngine Compartment
Overview on page 5-14for
the location of the engine
air cleaner/�lter and the air
�lter restriction indicator,
if the vehicle has one.
When to Inspect the Engine Air
Cleaner/Filter
If your vehicle has an air �lter restriction indicator, it lets
you know when the engine air cleaner/�lter needs to be
replaced. On vehicles with a restriction indicator, you
should inspect the air �lter restriction indicator at every oil
change and replace the engine air cleaner/�lter when the
indicator tells you to.On vehicles without an air �lter restriction indicator,
inspect the air cleaner/�lter at the MaintenanceII
intervals and replace it at the �rst oil change after
each 50,000 mile (80 000 km) interval. SeeScheduled
Maintenance on page 6-4for more information.
If you are driving in dusty/dirty conditions, inspect
the �lter at each engine oil change.
How to Inspect the Engine Air
Cleaner/Filter
Vehicles With an Air Filter Restriction
Indicator
Locate the air �lter restriction indicator on the engine air
cleaner/�lter cover. When the indicator turns black or
is in the red/orange “change” zone, replace the �lter and
reset the indicator. See the steps following to replace
the engine air cleaner/�lter and to reset the air �lter
restriction indicator.
Vehicles Without an Air Filter Restriction
Indicator
To inspect the air cleaner/�lter, remove the engine air
cleaner/�lter from the vehicle by following Steps 1
through 6. When you have the engine air cleaner/�lter
removed, lightly shake it to release loose dust and dirt.
If the engine air cleaner/�lter remains caked with
dirt, a new �lter is required.
5-20
Page 385 of 528

How to Add Automatic Transmission
Fluid
Refer to the Maintenance Schedule to determine what
kind of transmission �uid to use. SeeRecommended
Fluids and Lubricants on page 6-13.
Using a funnel, add �uid down the transmission dipstick
tube only after checking the transmission �uid while it
is hot. A cold check is used only as a reference. If
the �uid level is low, add only enough of the proper �uid
to bring the level up to the HOT area for a hot check.
It does not take much �uid, generally less than
one pint (0.5 L). Do not over�ll.
Notice:Use of the incorrect automatic transmission
�uid may damage your vehicle, and the damages
may not be covered by your warranty. Always
use the automatic transmission �uid listed in
Recommended Fluids and Lubricants on page 6-13.
After adding �uid, recheck the �uid level as
described under “How to Check Automatic
Transmission Fluid,” earlier in this section.
When the correct �uid level is obtained, push the
dipstick back in all the way; then �ip the handle
down to lock the dipstick in place.
Engine Coolant
The cooling system in your vehicle is �lled with
DEX-COOL®engine coolant. This coolant is designed
to remain in your vehicle for �ve years or 150,000 miles
(240 000 km), whichever occurs �rst, if you add only
DEX-COOL
®extended life coolant.
The following explains your cooling system and how
to add coolant when it is low. If you have a problem
with engine overheating, seeEngine Overheating
on page 5-28.
A 50/50 mixture of clean, drinkable water and
DEX-COOL
®coolant will:
Give freezing protection down to−34°F (−37°C).
Give boiling protection up to 265°F (129°C).
Protect against rust and corrosion.
Help keep the proper engine temperature.
Let the warning lights and gages work as they
should.
Notice:Using coolant other than DEX-COOL
®may
cause premature engine, heater core, or radiator
corrosion. In addition, the engine coolant may
require changing sooner, at the �rst maintenance
service after each 30,000 miles (50 000 km) or
24 months, whichever occurs �rst. Any repairs
would not be covered by your warranty. Always
use DEX-COOL
®(silicate-free) coolant in your
vehicle.
5-25
Page 398 of 528

Brakes
Brake Fluid
The brake master cylinder
reservoir is �lled with
DOT-3 brake �uid. See
Engine Compartment
Overview on page 5-14for
the location of the reservoir.
There are only two reasons why the brake �uid level in
the reservoir might go down. The �rst is that the brake
�uid goes down to an acceptable level during normal
brake lining wear. When new linings are put in, the �uid
level goes back up. The other reason is that �uid is
leaking out of the brake hydraulic system. If it is, have
the brake hydraulic system �xed, since a leak means
that sooner or later the brakes will not work well.It is not a good idea to top off the brake �uid. Adding
brake �uid will not correct a leak. If �uid is added when
the linings are worn, there will be too much �uid when
new brake linings are installed. Add or remove brake
�uid, as necessary, only when work is done on the brake
hydraulic system.
{CAUTION:
If you have too much brake �uid, it can spill on
the engine. The �uid will burn if the engine is
hot enough. You or others could be burned,
and your vehicle could be damaged. Add brake
�uid only when work is done on the brake
hydraulic system. See “Checking Brake Fluid”
in this section.
When the brake �uid falls to a low level, the brake
warning light will come on. SeeBrake System Warning
Light on page 3-39.
Refer to the Maintenance Schedule to determine when
to check the brake �uid. SeeScheduled Maintenance
on page 6-4.
5-38
Page 401 of 528

Replacing Brake System Parts
The braking system on a vehicle is complex. Its many
parts have to be of top quality and work well together if
the vehicle is to have really good braking. Your vehicle
was designed and tested with top-quality brake parts.
When you replace parts of the braking system — for
example, when the brake linings wear down and you
need new ones put in — be sure you get new approved
replacement parts. If you do not, the brakes might not
work properly. For example, if someone puts in brake
linings that are wrong for your vehicle, the balance
between the front and rear brakes can change — for
the worse. The braking performance you have come to
expect can change in many other ways if someone puts
in the wrong replacement brake parts.
Battery
Your vehicle has a maintenance free battery. When
it is time for a new battery, see your dealer/retailer
for one that has the replacement number shown on
the original battery’s label. SeeEngine Compartment
Overview on page 5-14for battery location.
Warning:Battery posts, terminals, and related
accessories contain lead and lead compounds,
chemicals known to the State of California to cause
cancer and reproductive harm. Wash hands after
handling.
Vehicle Storage
{CAUTION:
Batteries have acid that can burn you and
gas that can explode. You can be badly hurt
if you are not careful. SeeJump Starting on
page 5-42for tips on working around a battery
without getting hurt.
Infrequent Usage: If you drive your vehicle infrequently,
remove the black, negative (−) cable from the battery.
This will help keep the battery from running down.
Extended Storage: For extended storage of your vehicle,
remove the black, negative (−) cable from the battery
or use a battery trickle charger. This will help maintain
the charge of the battery over an extended period
of time.
5-41
Page 408 of 528
What to Use
Refer to the Maintenance Schedule to determine what
kind of lubricant to use. SeeRecommended Fluids
and Lubricants on page 6-13.
Four-Wheel Drive
Lubricant checks in this section also apply to these
vehicles. There are two additional systems that need
lubrication.
Transfer Case
When to Check Lubricant
It is not necessary to regularly check transfer case �uid
unless you suspect there is a leak, or you hear an
unusual noise. A �uid loss could indicate a problem.
Have it inspected and repaired.
How to Check Lubricant
To get an accurate reading, the vehicle should be on a
level surface.
If the level is below the bottom of the �ller plug hole,
you will need to add some lubricant. Add enough
lubricant to raise the level to the bottom of the �ller
plug hole. Use care not to overtighten the plug.Automatic Transfer Case
5-48
Page 409 of 528

When to Change Lubricant
Refer to the Maintenance Schedule to determine
how often to change the lubricant. SeeScheduled
Maintenance on page 6-4.
What to Use
Refer to the Maintenance Schedule to determine what
kind of lubricant to use. SeeRecommended Fluids
and Lubricants on page 6-13.
Front Axle
When to Check and Change Lubricant
It is not necessary to regularly check front axle �uid
unless you suspect there is a leak or you hear an
unusual noise. A �uid loss could indicate a problem.
Have it inspected and repaired.
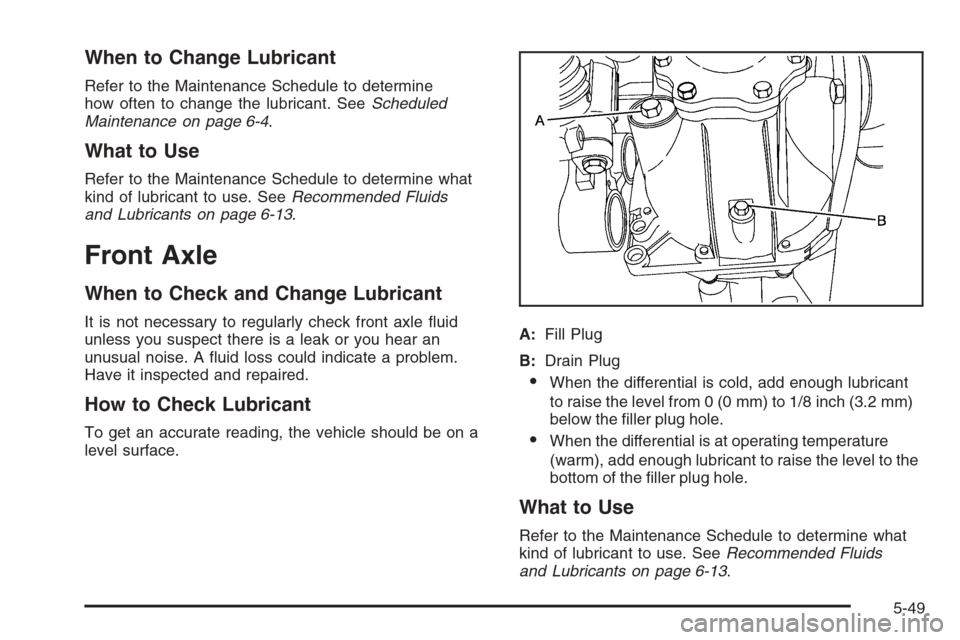
How to Check Lubricant
To get an accurate reading, the vehicle should be on a
level surface.A:Fill Plug
B:Drain Plug
When the differential is cold, add enough lubricant
to raise the level from 0 (0 mm) to 1/8 inch (3.2 mm)
below the �ller plug hole.
When the differential is at operating temperature
(warm), add enough lubricant to raise the level to the
bottom of the �ller plug hole.
What to Use
Refer to the Maintenance Schedule to determine what
kind of lubricant to use. SeeRecommended Fluids
and Lubricants on page 6-13.
5-49
Page 415 of 528
3. Pull the old bulb from the bulb socket, keeping the
bulb straight as you pull it out.
4. Install the new bulb.
5. Reverse Steps 1 through 3 to reinstall the bulb
socket.
Replacement Bulbs
Exterior Lamp Bulb Number
Back-up Lamp 7441
License Plate Lamp 168
Rear Turn Signal Lamp, Taillamp,
and Stoplamp3057
Sidemarker Lamp 194
For replacement bulbs not listed here, contact your
dealer/retailer.
Windshield Wiper Blade
Replacement
Windshield wiper blades should be inspected for wear
or cracking. SeeScheduled Maintenance on page 6-4.
Replacement blades come in different types and
are removed in different ways. To replace the wiper
blade assembly, do the following:
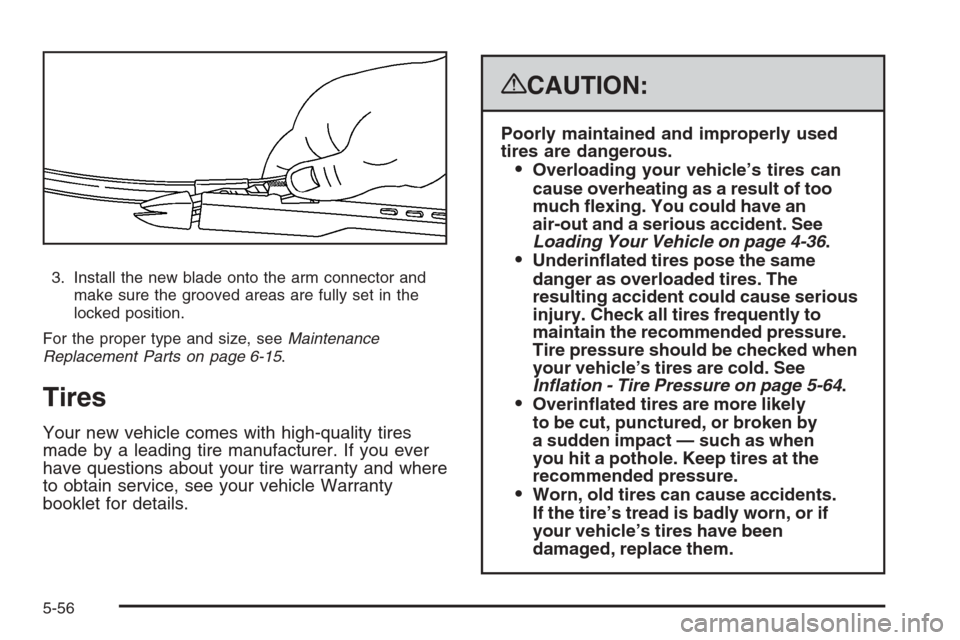
1. Pull the windshield wiper arm connector away from
the windshield.
2. Squeeze the grooved areas on each side of the
blade, and rotate the blade assembly away from
the arm connector.
5-55
Page 416 of 528

3. Install the new blade onto the arm connector and
make sure the grooved areas are fully set in the
locked position.
For the proper type and size, seeMaintenance
Replacement Parts on page 6-15.
Tires
Your new vehicle comes with high-quality tires
made by a leading tire manufacturer. If you ever
have questions about your tire warranty and where
to obtain service, see your vehicle Warranty
booklet for details.
{CAUTION:
Poorly maintained and improperly used
tires are dangerous.
Overloading your vehicle’s tires can
cause overheating as a result of too
much �exing. You could have an
air-out and a serious accident. See
Loading Your Vehicle on page 4-36.
Underin�ated tires pose the same
danger as overloaded tires. The
resulting accident could cause serious
injury. Check all tires frequently to
maintain the recommended pressure.
Tire pressure should be checked when
your vehicle’s tires are cold. See
Inflation - Tire Pressure on page 5-64.
Overin�ated tires are more likely
to be cut, punctured, or broken by
a sudden impact — such as when
you hit a pothole. Keep tires at the
recommended pressure.
Worn, old tires can cause accidents.
If the tire’s tread is badly worn, or if
your vehicle’s tires have been
damaged, replace them.
5-56