Page 320 of 528

Sound the horn as you approach the top of the hill
to let opposing traffic know you are there.
Use your headlamps even during the day. They
make your vehicle more visible to oncoming
traffic.
{CAUTION:
Driving to the top (crest) of a hill at full speed
can cause an accident. There could be a
drop-off, embankment, cliff, or even another
vehicle. You could be seriously injured or
killed. As you near the top of a hill, slow
down and stay alert.There are some things you should do if the vehicle
stalls, or is about to stall, and you cannot make it up
the hill:
Push the brake pedal to stop the vehicle and keep
it from rolling backwards. Also, apply the parking
brake.
If the engine is still running, shift the transmission to
REVERSE (R), release the parking brake, and slowly
back down the hill in REVERSE (R).
If the engine has stopped running, you will need
to restart it. With the brake pedal pressed and the
parking brake still applied, shift the transmission
to PARK (P) and restart the engine. Then, shift to
REVERSE (R), release the parking brake, and
slowly back down the hill as straight as possible
in REVERSE (R).
As you are backing down the hill, put your left hand
on the steering wheel at the 12 o’clock position. This
way, you will be able to tell if the wheels are straight
and maneuver as you back down. It is best that you
back down the hill with the wheels straight rather
than in the left or right direction. Turning the wheel
too far to the left or right will increase the possibility
of a rollover.
4-20
Page 370 of 528

To remove the fuel cap, turn it slowly counterclockwise.
It will require more effort to turn the fuel cap on the
last turn as you loosen it.
{CAUTION:
Fuel can spray out on you if you open the
fuel cap too quickly. If you spill fuel and then
something ignites it, you could be badly burned.
This spray can happen if your tank is nearly full,
and is more likely in hot weather. Open the fuel
cap slowly and wait for any hiss noise to stop.
Then unscrew the cap all the way.Be careful not to spill fuel. Do not top off or over�ll the
tank and wait a few seconds after you have �nished
pumping before removing the nozzle. Clean fuel
from painted surfaces as soon as possible.
SeeWashing Your Vehicle on page 5-102.
When replacing the fuel cap, insert the tether in its hole
before tightening the cap. Turn the fuel cap clockwise
until it clicks. It will require more effort to turn the fuel cap
on the last turn as you tighten it. Make sure the cap is
fully installed. The diagnostic system can determine if the
fuel cap has been left off or improperly installed. This
would allow fuel to evaporate into the atmosphere.
SeeMalfunction Indicator Lamp on page 3-43.
The TIGHTEN GAS CAP message will be displayed
on the Driver Information Center (DIC) if the fuel cap
is not properly installed. SeeDIC Warnings and
Messages on page 3-59for more information.
5-10
Page 394 of 528
{CAUTION:
You can be burned if you spill coolant on hot
engine parts. Coolant contains ethylene glycol
and it will burn if the engine parts are hot
enough. Do not spill coolant on a hot engine.
1. You can remove the
coolant surge tank
pressure cap when
the cooling system,
including the coolant
surge tank pressure
cap and upper radiator
hose, is no longer hot.
Turn the pressure cap slowly counterclockwise
about one full turn. If you hear a hiss, wait for
that to stop. A hiss means there is still some
pressure left.2. Then keep turning the pressure cap slowly, and
remove it.
3. Fill the coolant surge tank with the proper mixture,
to the FULL COLD mark.
5-34
Page 412 of 528
7. Locate the vertical headlamp aiming screws, which
are under the hood near each headlamp assembly.
The adjustment screw can be turned with a
E8 Torx
®socket.
8. Turn the vertical aiming screw until the headlamp
beam is aimed to the horizontal tape line. Turn it
clockwise or counterclockwise to raise or lower the
angle of the beam.9. Make sure that the light from the headlamp is
positioned at the bottom edge of the horizontal tape
line. The lamp on the left (A) shows the correct
headlamp aim. The lamp on the right (B) shows
the incorrect headlamp aim.
10. Repeat Steps 7 through 9 for the opposite
headlamp.
5-52
Page 414 of 528
To replace one of these bulbs, do the following:
1. Open the tailgate. SeeTailgate on page 2-22for
more information.
2. Remove the two
screws from the
taillamp assembly.
3. Pull the taillamp assembly rearward until you
disengage the outer pins on the taillamp assembly
from the vehicle.
4. Press the release tab, if the bulb socket has one,
and turn the bulb socket counterclockwise to
remove it from the taillamp assembly.
5. Pull the old bulb straight out from the bulb socket.6. Press a new bulb into the bulb socket and insert
the bulb socket into the taillamp assembly. Turn
the bulb socket clockwise into the taillamp assembly
until it clicks.
7. Reinstall the taillamp assembly making sure to line
up the pins with the vehicle.
License Plate Lamp
To replace one of these bulbs:
1. Reach under the rear bumper for the bulb socket.
2. Turn the bulb socket counterclockwise and pull the
bulb socket out of the connector.
5-54
Page 441 of 528
Removing the Spare Tire and Tools
The jack and the wheel blocks are located under a
cover near the passenger side rear seat.
1. Remove the jack cover by turning the two wing nuts
one-quarter turn counterclockwise and pulling the
jack cover off.A. Wheel Blocks
B. Knob
C. Wing Nut
D. Retaining HookE. Jack
F. Jack Head
G. Mounting Bracket
2. Release the jack (E) from the mounting bracket (G)
by turning the knob (B) on the jack counterclockwise
to lower the jack head (F) from the mounting bracket. Rear Seat (Passenger Side) Jack Cover
5-81
Page 442 of 528

3. Remove the wheel blocks (A) attached
to the jack (E) by turning the wing nut (C)
counterclockwise. Place the wheel blocks where
needed as indicated in previously in this section.
The tools for changing a �at tire are located in the
passenger’s side top-box storage unit.
To remove the tools, do the following:
1. Open the top door on the passenger’s side top-box
storage unit. Use the ignition/door key to unlock it if
it is locked. SeeTop-Box Storage on page 2-89
for more information.
2. Remove the black pouch from the storage box.
You now have all of the tools you will need to
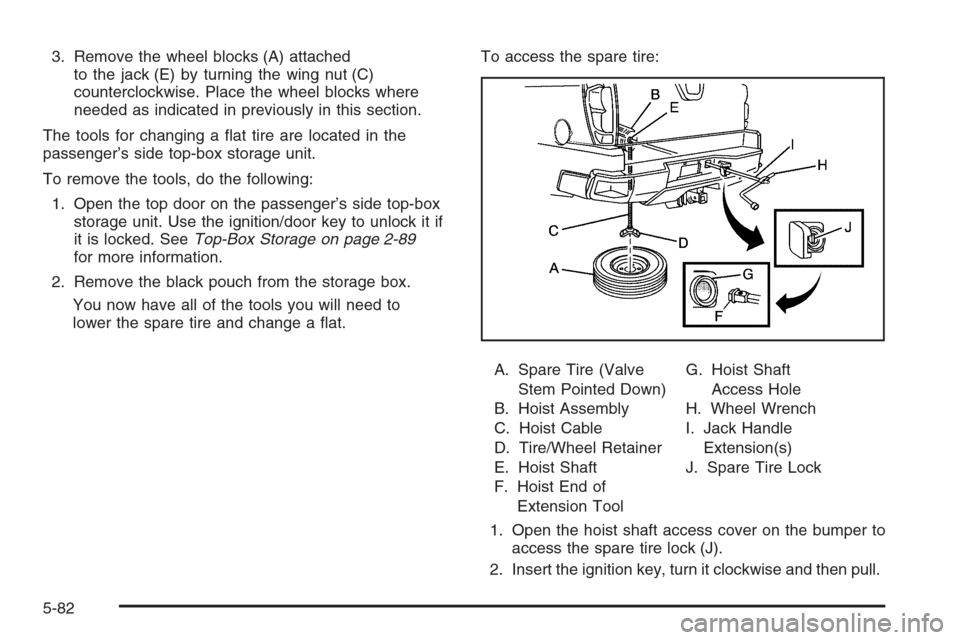
lower the spare tire and change a �at.To access the spare tire:
A. Spare Tire (Valve
Stem Pointed Down)
B. Hoist Assembly
C. Hoist Cable
D. Tire/Wheel Retainer
E. Hoist Shaft
F. Hoist End of
Extension ToolG. Hoist Shaft
Access Hole
H. Wheel Wrench
I. Jack Handle
Extension(s)
J. Spare Tire Lock
1. Open the hoist shaft access cover on the bumper to
access the spare tire lock (J).
2. Insert the ignition key, turn it clockwise and then pull.
5-82
Page 443 of 528
3. Assemble the two jack handle extensions (I) and
wheel wrench (H) as shown.4. Insert the open end
of the extension (F)
through the hole in the
rear bumper (G) (hoist
shaft access hole).
Be sure the hoist end (F) of the extension connects
to the hoist shaft (E). The ribbed square end of
the extension is used to lower the spare tire.
Do not use the chiseled end of the wheel wrench.
5. Turn the wheel wrench counterclockwise to lower
the spare tire to the ground. Continue to turn the
wheel wrench until the spare tire can be pulled out
from under the vehicle.
If the spare tire does not lower to the ground,
the secondary latch is engaged causing the tire
not to lower. SeeSecondary Latch System
on page 5-91for more information.
5-83