2008 CHEVROLET AVALANCHE tailgate
[x] Cancel search: tailgatePage 141 of 528
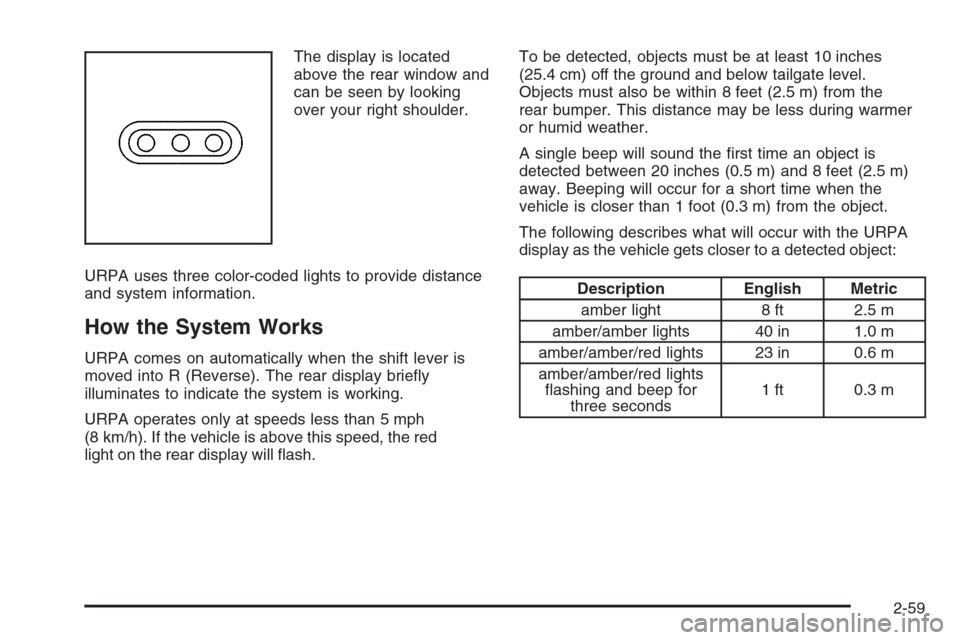
The display is located
above the rear window and
can be seen by looking
over your right shoulder.
URPA uses three color-coded lights to provide distance
and system information.
How the System Works
URPA comes on automatically when the shift lever is
moved into R (Reverse). The rear display brie�y
illuminates to indicate the system is working.
URPA operates only at speeds less than 5 mph
(8 km/h). If the vehicle is above this speed, the red
light on the rear display will �ash.To be detected, objects must be at least 10 inches
(25.4 cm) off the ground and below tailgate level.
Objects must also be within 8 feet (2.5 m) from the
rear bumper. This distance may be less during warmer
or humid weather.
A single beep will sound the �rst time an object is
detected between 20 inches (0.5 m) and 8 feet (2.5 m)
away. Beeping will occur for a short time when the
vehicle is closer than 1 foot (0.3 m) from the object.
The following describes what will occur with the URPA
display as the vehicle gets closer to a detected object:
Description English Metric
amber light 8 ft 2.5 m
amber/amber lights 40 in 1.0 m
amber/amber/red lights 23 in 0.6 m
amber/amber/red lights
�ashing and beep for
three seconds1 ft 0.3 m
2-59
Page 142 of 528

The system can be
disabled by pressing the
rear park aid disable button
located next to the radio.
The indicator light will
come on and PARKING
ASSIST OFF displays
on the
Driver Information Center (DIC) to indicate that URPA is
off, seeDIC Warnings and Messages on page 3-59
for information about clearing the message.
Notice:If you use URPA while the tailgate is
lowered, it may not detect an object behind your
vehicle, and you might back into the object and
damage your vehicle. Always verify the tailgate is
closed when using URPA or turn off URPA when
driving with the tailgate lowered.When the System Does Not Seem to
Work Properly
If the URPA system will not activate due to a temporary
condition, the message PARKING ASSIST OFF will be
displayed on the DIC and a red light will be shown on
the rear URPA display when the shift lever is moved into
R (Reverse). This occurs under the following conditions:
The driver disables the system.
The parking brake pedal is depressed.
The ultrasonic sensors are not clean. Keep the
vehicle’s rear bumper free of mud, dirt, snow, ice and
slush. For cleaning instructions, seeWashing Your
Vehicle on page 5-102.
A trailer was attached to the vehicle, or a bicycle or
an object was hanging out of the tailgate during the
last drive cycle, the red light may illuminate in the
rear display. Once the attached object is removed,
URPA will return to normal operation.
A tow bar is attached to the vehicle.
The vehicle’s bumper is damaged. Take the vehicle
to your dealer/retailer to repair the system.
Other conditions may affect system performance,
such as vibrations from a jackhammer or the
compression of air brakes on a very large truck.
If the system is still disabled, after driving forward at
least 15 mph (25 km/h), take the vehicle to your dealer/
retailer.
2-60
Page 155 of 528
Rear Storage Area
Your vehicle has a rear armrest/cupholder for the rear
seat passengers.
To open it, pull up and then out on the tab, located at
the top center of the armrest, and pull the armrest down.
Cargo Cover Panels
{CAUTION:
Improperly stored cargo cover panels could
be thrown about the vehicle during a collision
or sudden maneuver. You or others could be
injured. If you remove a panel, always store it
in the proper storage location. When you put
it back, always be sure that is securely
reattached.
Notice:Exceeding the weight limit of 250 lbs
(113 kg) can damage the cargo covers, and the
repairs would not be covered by your warranty.
Do not put anything on top of the cargo covers
over the weight limit.
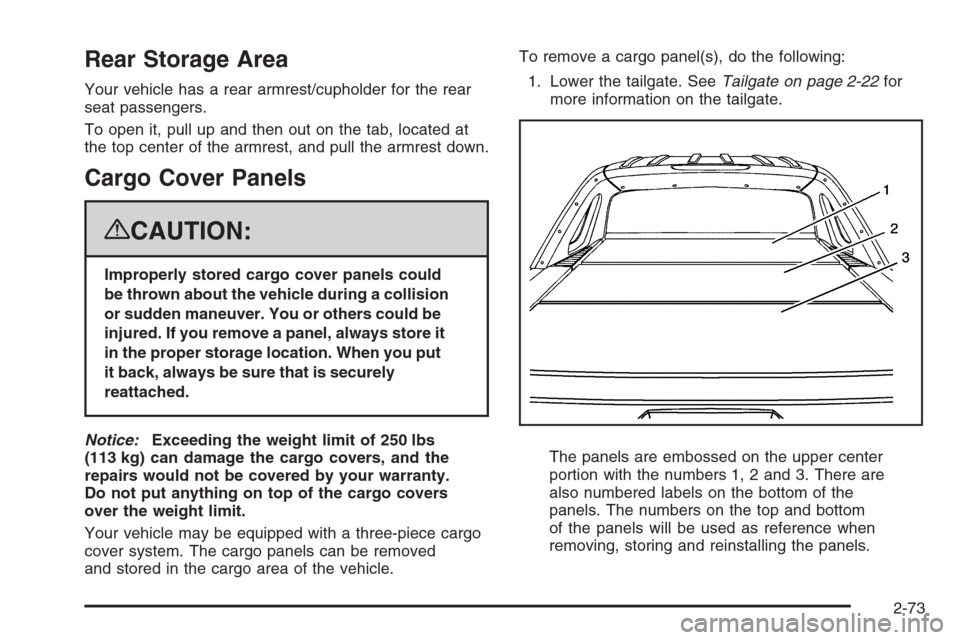
Your vehicle may be equipped with a three-piece cargo
cover system. The cargo panels can be removed
and stored in the cargo area of the vehicle.To remove a cargo panel(s), do the following:
1. Lower the tailgate. SeeTailgate on page 2-22for
more information on the tailgate.
The panels are embossed on the upper center
portion with the numbers 1, 2 and 3. There are
also numbered labels on the bottom of the
panels. The numbers on the top and bottom
of the panels will be used as reference when
removing, storing and reinstalling the panels.
2-73
Page 167 of 528
All-Weather Cargo Area
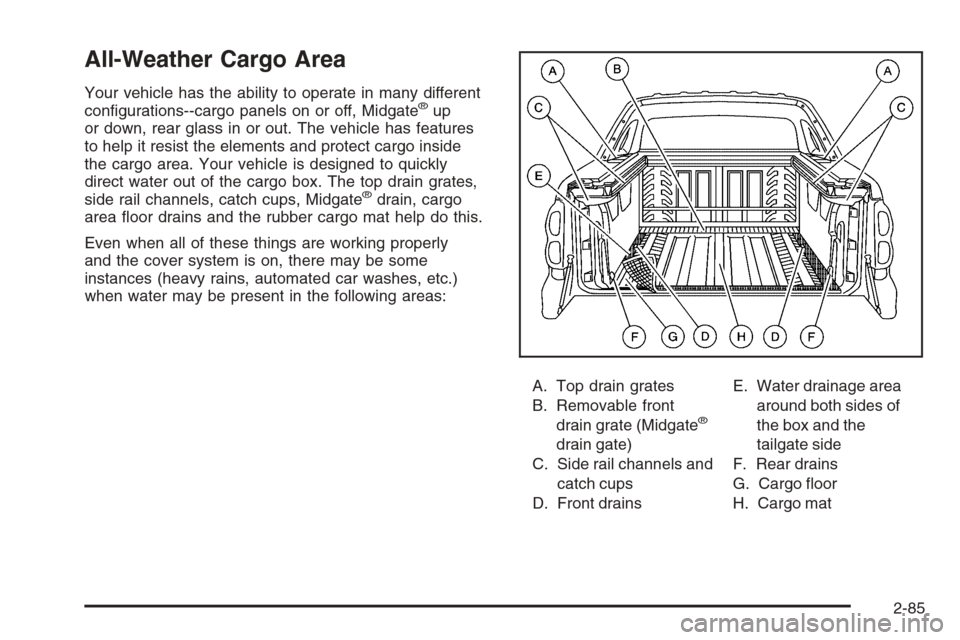
Your vehicle has the ability to operate in many different
con�gurations--cargo panels on or off, Midgate®up
or down, rear glass in or out. The vehicle has features
to help it resist the elements and protect cargo inside
the cargo area. Your vehicle is designed to quickly
direct water out of the cargo box. The top drain grates,
side rail channels, catch cups, Midgate
®drain, cargo
area �oor drains and the rubber cargo mat help do this.
Even when all of these things are working properly
and the cover system is on, there may be some
instances (heavy rains, automated car washes, etc.)
when water may be present in the following areas:
A. Top drain grates
B. Removable front
drain grate (Midgate
®
drain gate)
C. Side rail channels and
catch cups
D. Front drainsE. Water drainage area
around both sides of
the box and the
tailgate side
F. Rear drains
G. Cargo �oor
H. Cargo mat
2-85
Page 168 of 528
Maintenance and Cleaning
To ensure that the water management system performs
properly, be sure that the Midgate®, tailgate and cover
system are fully closed and that all parts are clean and
not blocked with debris. Follow the instructions given
next in this section for the proper procedures on cleaning
each item.
Top Drain Grates – Removal and
Cleaning
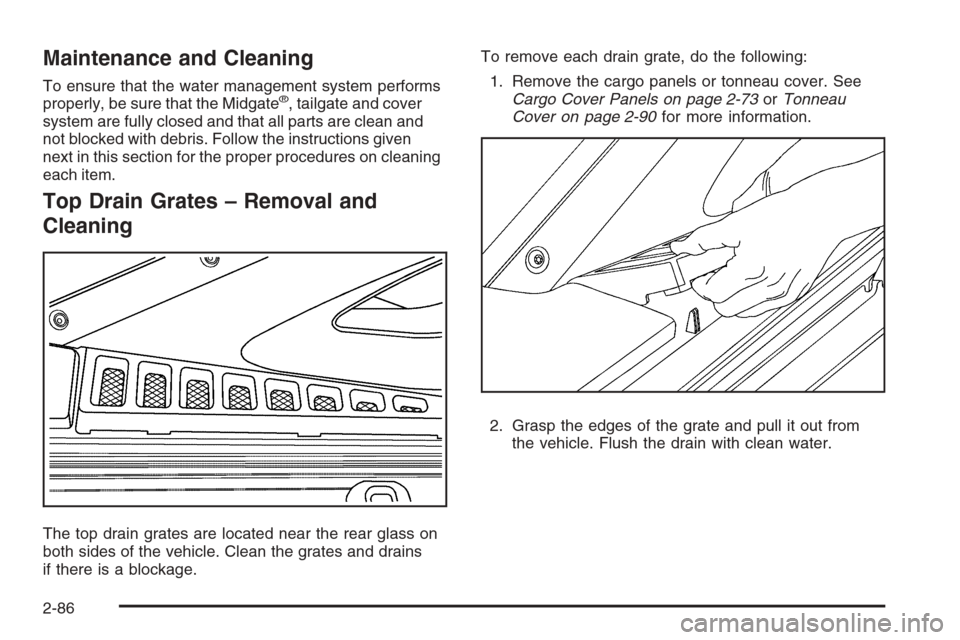
The top drain grates are located near the rear glass on
both sides of the vehicle. Clean the grates and drains
if there is a blockage.To remove each drain grate, do the following:
1. Remove the cargo panels or tonneau cover. See
Cargo Cover Panels on page 2-73orTonneau
Cover on page 2-90for more information.
2. Grasp the edges of the grate and pull it out from
the vehicle. Flush the drain with clean water.
2-86
Page 248 of 528
AUTO DOOR LOCK
This feature allows you to select when the vehicle’s
doors will automatically lock. SeeProgrammable
Automatic Door Locks on page 2-11for more
information.
Press the customization button until AUTO DOOR
LOCK appears on the DIC display. Press the set/reset
button once to access the settings for this feature.
Then press the customization button to scroll through
the following settings:
SHIFT OUT OF PARK (default):The doors, including
the tailgate, will automatically lock when the vehicle
is shifted out of PARK (P).
AT VEHICLE SPEED:The doors, including the tailgate,
will automatically lock when the vehicle speed is above
8 mph (13 km/h) for three seconds.
NO CHANGE:No change will be made to this feature.
The current setting will remain.
To select a setting, press the set/reset button while the
desired setting is displayed on the DIC.
AUTO DOOR UNLOCK
This feature allows you to select whether or not to
turn off the automatic door unlocking feature. It also
allows you to select which doors and when the doors will
automatically unlock. SeeProgrammable Automatic
Door Locks on page 2-11for more information.
Press the customization button until AUTO DOOR
UNLOCK appears on the DIC display. Press the
set/reset button once to access the settings for this
feature. Then press the customization button to scroll
through the following settings:
OFF:None of the doors will automatically unlock.
DRIVER AT KEY OUT:Only the driver’s door will
unlock when the key is taken out of the ignition.
DRIVER IN PARK:Only the driver’s door will unlock
when the vehicle is shifted into PARK (P).
ALL AT KEY OUT:All of the doors, including the
tailgate, will unlock when the key is taken out of the
ignition.
ALL IN PARK (default):All of the doors, including the
tailgate, will unlock when the vehicle is shifted into
PARK (P).
NO CHANGE:No change will be made to this feature.
The current setting will remain.
To select a setting, press the set/reset button while the
desired setting is displayed on the DIC.
3-68
Page 250 of 528
DELAY DOOR LOCK
This feature allows you to select whether or not the
locking of the vehicle’s doors and tailgate will be delayed.
When locking the doors and tailgate with the power door
lock switch and a door or the tailgate is open, this feature
will delay locking the doors and tailgate until �ve seconds
after the last door is closed. You will hear three chimes to
signal that the delayed locking feature is in use. The key
must be out of the ignition for this feature to work. You
can temporarily override delayed locking by pressing the
power door lock switch twice or the lock button on the
RKE transmitter twice. SeeDelayed Locking on
page 2-10for more information.
Press the customization button until DELAY DOOR
LOCK appears on the DIC display. Press the set/reset
button once to access the settings for this feature.
Then press the customization button to scroll through
the following settings:
OFF:There will be no delayed locking of the vehicle’s
doors.
ON (default):The doors will not lock until �ve seconds
after the last door or the tailgate is closed.
NO CHANGE:No change will be made to this feature.
The current setting will remain.
To select a setting, press the set/reset button while the
desired setting is displayed on the DIC.
EXIT LIGHTING
This feature allows you to select the amount of time you
want the exterior lamps to remain on when it is dark
enough outside. This happens after the key is turned
from ON/RUN to LOCK/OFF.
Press the customization button until EXIT LIGHTING
appears on the DIC display. Press the set/reset button
once to access the settings for this feature. Then
press the customization button to scroll through the
following settings:
OFF:The exterior lamps will not turn on.
30 SECONDS (default):The exterior lamps will stay on
for 30 seconds.
1 MINUTE:The exterior lamps will stay on for
one minute.
2 MINUTES:The exterior lamps will stay on for
two minutes.
NO CHANGE:No change will be made to this feature.
The current setting will remain.
To select a setting, press the set/reset button while the
desired setting is displayed on the DIC.
3-70
Page 414 of 528
To replace one of these bulbs, do the following:
1. Open the tailgate. SeeTailgate on page 2-22for
more information.
2. Remove the two
screws from the
taillamp assembly.
3. Pull the taillamp assembly rearward until you
disengage the outer pins on the taillamp assembly
from the vehicle.
4. Press the release tab, if the bulb socket has one,
and turn the bulb socket counterclockwise to
remove it from the taillamp assembly.
5. Pull the old bulb straight out from the bulb socket.6. Press a new bulb into the bulb socket and insert
the bulb socket into the taillamp assembly. Turn
the bulb socket clockwise into the taillamp assembly
until it clicks.
7. Reinstall the taillamp assembly making sure to line
up the pins with the vehicle.
License Plate Lamp
To replace one of these bulbs:
1. Reach under the rear bumper for the bulb socket.
2. Turn the bulb socket counterclockwise and pull the
bulb socket out of the connector.
5-54