2008 CADILLAC ESCALADE EXT AUX
[x] Cancel search: AUXPage 188 of 496

Accessory Power Outlet(s)
Accessory power outlets can be used to connect
auxiliary electrical equipment, such as a cellular
telephone or CB radio.
One accessory power outlet is located inside the center
�oor console. Lift up on the lower latch located at the
front of the console lid to access the accessory
power outlet.
There may also be an accessory power outlet located on
the rear of the center �oor console above the cupholder.
To use an accessory power outlet, remove the
protective cap. When not in use, always cover the
accessory power outlet with the protective cap.
Do not try to put the cigarette lighter in any of the
accessory power outlets.
Notice:If electrical devices are left plugged into a
power outlet, the battery may drain causing your
vehicle not to start or damage to the battery. This
would not be covered by the warranty. Always unplug
all electrical devices when turning off your vehicle.
Certain electrical accessories may not be compatible
with the accessory power outlet and could result
in blown vehicle or adapter fuses. If you experience
a problem see your dealer/retailer for additional
information on accessory power outlets.The accessory power outlets are powered, even
when the ignition is in LOCK/OFF. Continuing to use
power outlets while the ignition is in LOCK/OFF
may cause the vehicle’s battery to run down.
Notice:Adding any electrical equipment to your
vehicle may damage it or keep other components
from working as they should. The repairs would
not be covered by your warranty. Do not use
equipment exceeding maximum amperage rating
of 20 amperes. Check with your dealer/retailer
before adding electrical equipment.
When adding electrical equipment, be sure to follow
the proper installation instructions included with
the electrical equipment you install.
Notice:Improper use of the power outlet can
cause damage not covered by your warranty.
Do not hang any type of accessory or accessory
bracket from the plug because the power outlets
are designed for accessory power plugs only.
3-22
Page 235 of 496

SRCE (Source):Press to select a source, either radio,
CD, DVD, or auxiliary, if your vehicle has this feature.
The CD or DVD must be loaded to select the source and
to play. CD or DVD displays if a disc is loaded. If a
CD or DVD is not loaded, the display changes to the
auxiliary source, if your vehicle has this feature, or
continue to play the radio.
Vehicle Noise Compensation (VNC):Your vehicle has
a Bose
®audio system. It includes Bose AudioPilot®
noise compensation technology. When turned on,
AudioPilot®continuously adjusts the audio system
equalization, to compensate for background noise,
so that the audio always sounds the same at the set
volume level.
This feature is most effective at lower radio volume
settings where background noise can affect how well
the music is being heard through the audio system.
At higher volume settings, where the music is much
louder than the background noise, there might be little
or no adjustments by AudioPilot
®.
Turn the AudioPilot
®on by pressing thew(tune/
select) knob to enter the main menu. Then turn this
knob until VNC:AUDIOPILOT displays. Press this knob
to turn AudioPilot
®on and off. An X appears in the box
while it is on.To turn AudioPilot
®off, press thewknob to enter
the main menu, turn this knob until VNC:AUDIOPILOT
appears, and press this knob. The X in the box
disappears when it is turned off. For additional
information on AudioPilot
®, visit
www.bose.com/audiopilot.
Finding a Station
BAND:Press to select AM, FM1, FM2, or XM1
or XM2 (if equipped).
w(Tune/Select):Turn to select radio stations.
©¨(Seek):Press the left arrow to go to the previous
station and stay there. Press the right arrow to go to
the next station and stay there. The sound mutes while
seeking.
The radio only seeks stations with a strong signal that
are in the selected band.
©¨(Scan):Press the arrows to enter scan mode.
SCAN displays. Press the arrows to scan to the
next station. The radio goes to a station, plays for
�ve seconds, and then goes on to the next station.
Press the arrows again to stop scanning.
3-69
Page 245 of 496

RPT DISC (Repeat CD):Repeats the CD over
again. RPT DISC displays. Press the MODE
pushbutton again to turn off repeat play and
advance to the next mode.
RDM TRCK (Random Track):Plays the tracks on
the current CD in random, rather than sequential
order. RDM TRCK displays. Press the MODE
pushbutton again to turn off random play and
advance to the next mode.
RDM ALL (Random All CDs):Plays all of the CDs
loaded in random, rather than sequential order.
RDM ALL displays. Press the MODE pushbutton
again to turn off random play and advance to
the next mode.
F6 DISP (Display):Press to display the time of the
track. Press again to display CD PLAY MODE.
©¨(Seek):Press the left arrow to go to the start of
the current track. Press it again to go to the previous
track, or press the right arrow to go to the start of
the next track. Pressing either arrow for more than
two seconds searches the previous or next tracks at
two tracks per second. Release to stop searching and
to play the track.
©¨(Scan):Press the arrows to listen to each track
for 10 seconds. The CD goes to a track, plays for
10 seconds, and then goes to the next track. Press the
arrows again to stop scanning.
SRCE (Source):Press to select a source, either radio,
CD, DVD or AUX (auxiliary), if your vehicle has this
feature. The CD must be loaded to select the source and
to play. CD appears on the display if a CD is loaded.
If a CD is not loaded, the display changes to the
next available source, either DVD, AUX, if your vehicle
has this feature, or radio.
Z(Eject):Press to eject the CD that is currently
playing, or press and hold to eject all of the CDs
loaded. A beep sounds. Eject can be activated with the
ignition or radio off. If the CD is not removed after a
short time, the CD is pulled back into the CD player
for storage.
Playing an MP3 CD-R Disc
Radios with the MP3 feature are capable of playing
an MP3 CD-R disc. For more information on how to play
an MP3 CD-R disc, seeUsing an MP3 on page 3-86
later in this section.
3-79
Page 251 of 496

Using the AUX Display (If Equipped)
If your vehicle has Rear Seat Entertainment (RSE),
an AUX screen appears as the SRCE (source) key is
pressed. When AUX is selected in the front, the audio
from the device plugged into the auxiliary jacks in the
rear can be played over the vehicle speakers. Select
between AUX and DVD video on the video screen while
listening to AUX audio. SeeRear Seat Entertainment
(RSE) System on page 3-91for more information on
the auxiliary jacks.
SRCE (Source):Press to select the AUX display.
F2 (DVD):Press to select DVD video on the video
screen in the rear, with AUX audio on the vehicle
speakers.
F5 (AUX):Press to select AUX video on the video
screen in the rear, with AUX audio on the vehicle
speakers.
Con�gurable Radio Display Keys
This feature lets you customize the four keys that
are located on each side of the radio display to
make it easier to adjust the radio features.To program the con�gurable radio display keys,
perform the following steps:
1. Press the knob to enter the main menu.
2. Turn the
wknob until SETUP displays.
3. Press this knob to enter into SETUP.
4. Turn this knob until CONFIGURE DISPLAY KEYS
displays.
5. Press this knob again to enter into CONFIGURE
DISPLAY KEYS.
6. Turn this knob to select which of the four
con�gurable keys to be changed. The currently
assigned feature shows on the display.
7. Press this knob to select the con�gurable key to
change.
8. Turn this knob to �nd the feature that you would
like to store to the key.
9. Press this knob again when the feature to be stored
is found. The display updates and shows the symbol
of the selected feature next to the con�gurable key.
10. Repeat the previous steps for each con�gurable key.
Once a feature is programmed to a key, the feature
does not display when programming the remaining
con�gurable keys. The con�gurable keys can be
changed at any time.
3-85
Page 255 of 496

TUNE/SEL Knob:Turn to the left one notch to go to
the start of the current track. Turn it again to go to
the previous track, or turn to the right one notch to
go to the next track.
©¨(Scan):Press the scan arrows to listen to each
track for 10 seconds. The CD goes to a track, plays
for 10 seconds, and then goes to the next track.
Press the scan arrows again to stop scanning.
If your vehicle has rear seat entertainment, you can
view the menu and playlist from your CD on the video
screen. Turn on the video screen with the power
button on the remote control to view and navigate the
menu and playlists. SeeRear Seat Entertainment (RSE)
System on page 3-91for more information.
4(Information):Press this button, while an MP3 CD
is loaded, to view the Title, Artist, Album, or Folder
names. To view this information, perform the following:
1. Press the tune/select knob to enter the main menu.
2. Turn this knob until INFO displays.
3. Press this knob again to select INFO. The display
changes to show the additional MP3 information.4. Press one of the following pushbuttons to view that
speci�c information.
F1 TTLE (Title):Displays the title name.
F2 ATST (Artist):Displays the artist name.
F3 ALBM (Album):Displays the album name.
F4 FLDR (Folder):Displays the folder name.
5. Press the BACK (F6) button to exit the display. To
return to the original display, repeatedly press the
BACK (F6) button or wait for the display to time out.
SRCE (Source):Press this button to select a source,
either radio, CD, DVD, or AUX (auxiliary), if your
vehicle has this feature. The CD must be loaded to
select the source and to play. CD displays if a CD is
loaded. If a CD is not loaded, the display changes to the
next available source, either DVD, AUX, if your vehicle
has this feature, or radio.
Z(Eject):Press this button to eject a CD. Eject can
be activated with the ignition and the radio off. If the
CD is not removed after a short time, the CD pulls back
into the CD player for storage.
3-89
Page 258 of 496

Headphones
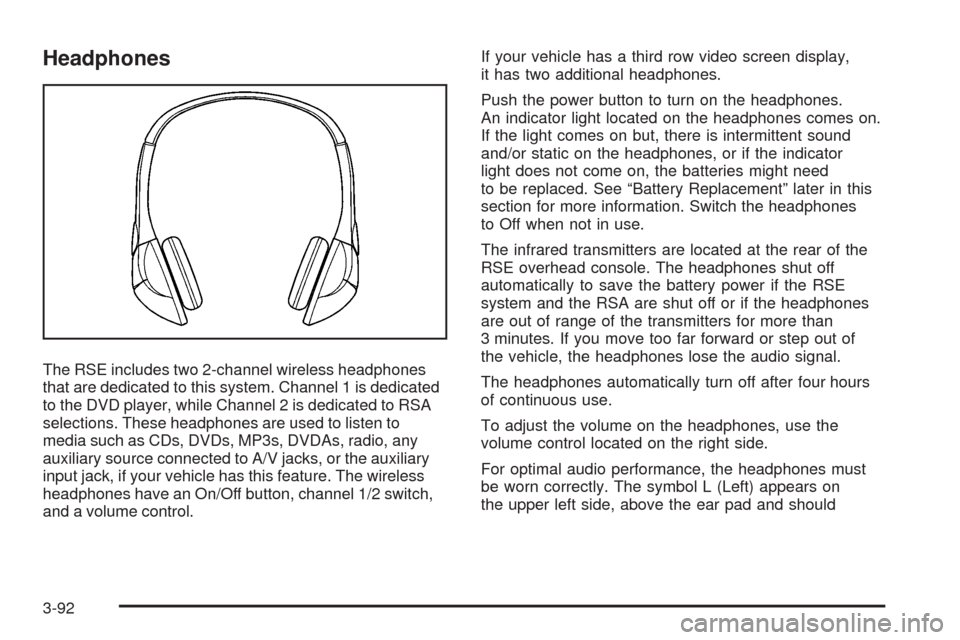
The RSE includes two 2-channel wireless headphones
that are dedicated to this system. Channel 1 is dedicated
to the DVD player, while Channel 2 is dedicated to RSA
selections. These headphones are used to listen to
media such as CDs, DVDs, MP3s, DVDAs, radio, any
auxiliary source connected to A/V jacks, or the auxiliary
input jack, if your vehicle has this feature. The wireless
headphones have an On/Off button, channel 1/2 switch,
and a volume control.If your vehicle has a third row video screen display,
it has two additional headphones.
Push the power button to turn on the headphones.
An indicator light located on the headphones comes on.
If the light comes on but, there is intermittent sound
and/or static on the headphones, or if the indicator
light does not come on, the batteries might need
to be replaced. See “Battery Replacement” later in this
section for more information. Switch the headphones
to Off when not in use.
The infrared transmitters are located at the rear of the
RSE overhead console. The headphones shut off
automatically to save the battery power if the RSE
system and the RSA are shut off or if the headphones
are out of range of the transmitters for more than
3 minutes. If you move too far forward or step out of
the vehicle, the headphones lose the audio signal.
The headphones automatically turn off after four hours
of continuous use.
To adjust the volume on the headphones, use the
volume control located on the right side.
For optimal audio performance, the headphones must
be worn correctly. The symbol L (Left) appears on
the upper left side, above the ear pad and should
3-92
Page 259 of 496

be positioned on the left ear. The symbol R (Right)
appears on the upper right side, above the ear pad
and should be positioned on the right ear.
Notice:Do not store the headphones in heat or
direct sunlight. This could damage the headphones
and repairs will not be covered by your warranty.
Storage in extreme cold can weaken the batteries.
Keep the headphones stored in a cool, dry place.
If the foam ear pads attached to the headphones
become worn or damaged, the pads can be replaced
separately from the headphone set. See your
dealer/retailer for more information.
Battery Replacement
To change the batteries on the headphones, do the
following:
1. Turn the screw to loosen the battery door located
on the left side of the headphones. Slide the
battery door open.
2. Replace the two batteries in the compartment.
Make sure that they are installed correctly,
using the diagram on the inside of the battery
compartment.
3. Replace the battery door and tighten the door screw.
If the headphones are to be stored for a long period of
time, remove the batteries and keep them in a cool,
dry place.
Audio/Video (A/V) Jacks
The A/V jacks are located on the rear of the �oor
console. The A/V jacks allow audio or video signals to
be connected from an auxiliary device such as a
camcorder or a video game unit to the RSE system.
Adapter connectors or cables (not included) may
be required to connect the auxiliary device to the
A/V jacks. Refer to the manufacturer’s instructions for
proper usage.
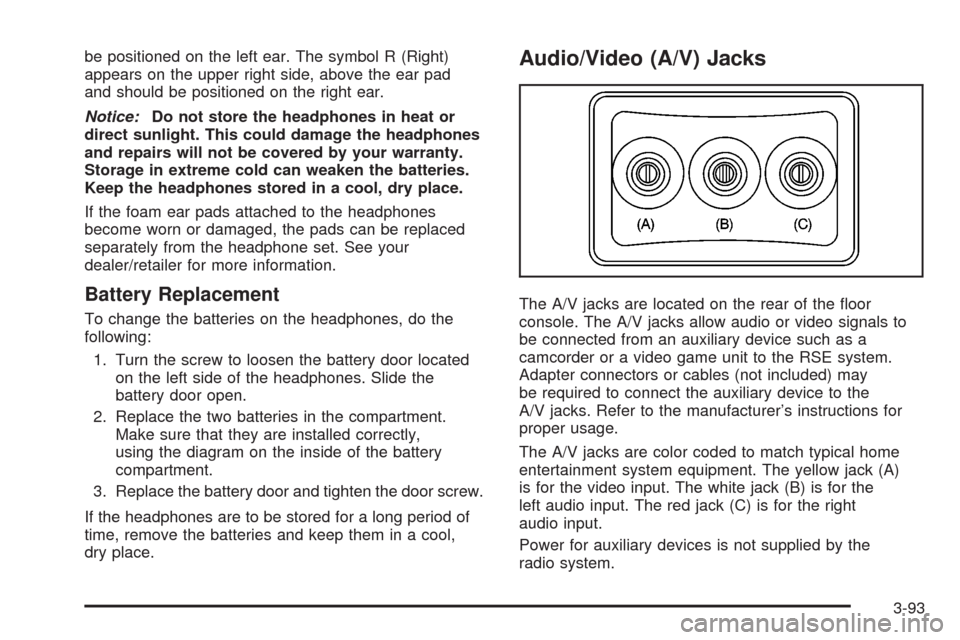
The A/V jacks are color coded to match typical home
entertainment system equipment. The yellow jack (A)
is for the video input. The white jack (B) is for the
left audio input. The red jack (C) is for the right
audio input.
Power for auxiliary devices is not supplied by the
radio system.
3-93
Page 260 of 496

To use the auxiliary inputs of the RSE system, connect
an external auxiliary device to the color-coded A/V jacks
and turn both the auxiliary device and the video screen
power on. If the video screen is in the DVD player mode,
pressing the AUX (auxiliary) button on the remote control
switches the video screen from the DVD player mode
to the auxiliary device. The radio plays the audio of the
connected auxiliary device by sourcing to auxiliary.
SeeRadio(s) on page 3-68for more information.
For optimal sound quality, increase the portable audio
device’s volume to the loudest level. Higher levels
of volume decreases audio distortion.
It is always best to power your portable audio device
through its own battery while playing.
How to Change the RSE Video Screen
Settings
The screen display mode (normal, full, and zoom),
screen brightness, and setup menu language can be
changed from the on screen setup menu. To change
any feature, perform the following:
1. Press the
z(display menu) button on the
remote control.
2. Use the remote control
Q,R,q,rnavigation
arrows and the
rbutton to use the setup menu.
3. Press the
zmenu button again to remove
the setup menu from the screen.
Audio Output
Audio from the DVD player or auxiliary inputs can be
heard through the following possible sources:
Wireless Headphones
Vehicle Speakers
Vehicle wired headphone jacks on the rear seat
audio system, if your vehicle has this feature.
The RSE system always transmits the audio signal to the
wireless headphones, if there is audio available. See
“Headphones” earlier in this section for more information.
The DVD player is capable of outputting audio to the
wired headphone jacks on the RSA system, if your
vehicle has this feature. The DVD player can be selected
as an audio source on the RSA system. SeeRear Seat
Audio (RSA) on page 3-101for more information.
When a device is connected to the radio’s auxiliary
input jack, if your vehicle has this feature, or A/V jacks,
the rear seat passengers are be able to hear audio
from the auxiliary device through the wireless or wired
headphones. The front seat passengers are able to
listen to playback from this device through the vehicle
speakers by selecting AUX as the source on the radio.
3-94