2008 CADILLAC ESCALADE ESV door lock
[x] Cancel search: door lockPage 158 of 500
Storage Areas Glove Box Open the glove box by pulling the bottom of the handle
upward. Use the key to lock and unlock.
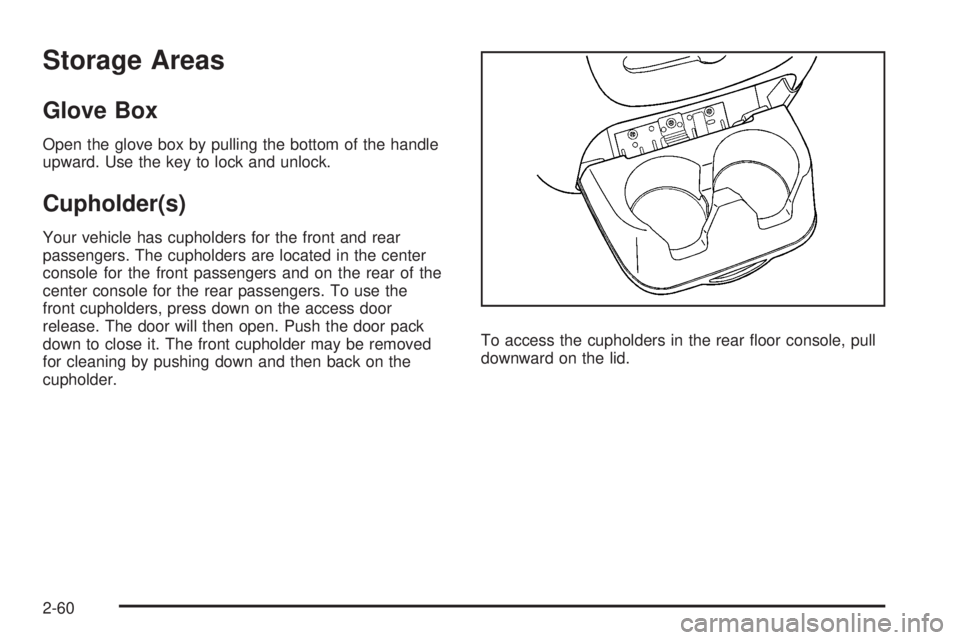
Cupholder(s) Your vehicle has cupholders for the front and rear
passengers. The cupholders are located in the center
console for the front passengers and on the rear of the
center console for the rear passengers. To use the
front cupholders, press down on the access door
release. The door will then open. Push the door pack
down to close it. The front cupholder may be removed
for cleaning by pushing down and then back on the
cupholder. To access the cupholders in the rear oor console, pull
downward on the lid.
2-60
Page 159 of 500

Center Console Storage Your vehicle has a console compartment between the
bucket seats.
The console has both an upper and lower storage bin
accessed by lifting up on the latches located at the front
of the console lid.
The console may have an accessory power outlet
inside. See Accessory Power Outlet(s) on page 3-24 .
The rear of the console also has a cupholder that swings
down for the rear seat passengers to use.
Assist Handles Your vehicle is equipped with assist handles to be used
when getting out of the vehicle. They are located
above the rear passenger doors. Pull down to use.
Garment Hooks There are garment hooks located on the assist handles. Luggage Carrier If your vehicle has a luggage carrier, you can load
things on top of your vehicle.
The luggage carrier has siderails attached to the roof
and crossrails, if equipped, which can be moved
back and forth to help secure cargo. To adjust, turn the
knob located at each end of the crossrail
counterclockwise until the crossrail can move freely. To
secure the crossrail, turn the knob located at each
end of the crossrail clockwise until tightened. Tie the
load to the siderails or siderail supports.
Notice: Loading cargo on the luggage carrier that
weighs more than 200 lbs (91 kg) or hangs over
the rear or sides of the vehicle may damage your
vehicle. Load cargo so that it rests as far forward as
possible and against the side rails, making sure
to fasten it securely.
Do not exceed the maximum vehicle capacity when
loading your vehicle. For more information on vehicle
capacity and loading, see Loading Your Vehicle on
page 4-35 .
2-61
Page 160 of 500

To prevent damage or loss of cargo as you are leaving,
check now and then to make sure the luggage and
cargo are still securely fastened.
Be sure the cargo is properly loaded.
If small heavy objects are placed on the roof, place
the load in the area over the rear wheels (behind
the rear side door on extended models). If you need
to, cut a piece of 3/8 inch plywood to t inside the
crossrails and siderails to spread the load. If
plywood is used, tie it to the siderail supports.
Tie the load to the crossrails or the siderail supports.
Use the crossrails only to keep the load from sliding.
To move the crossrails, pull out on the latch release
handle at each end. Slide the crossrail to the desired
position balancing the force side to side. Push the
release handle back into the latched position and
slide the crossrail back and forth slightly to be sure
the latch snaps securely into place.
If you need to carry long items, move the crossrails
as far apart as they will go. Tie the load to the
crossrails and the siderails or siderail supports. Also
tie the load to the bumpers. Do not tie the load so
tightly that the crossrails or siderails are damaged.
After moving a crossrail, be sure it is securely locked
into the siderail. Your vehicle has a Center High-Mounted Stoplamp
(CHMSL) located above the glass or above the rear
load doors.
If items are loaded on the roof of the vehicle, care
should be taken not to block or damage the CHMSL unit.
Rear Storage Area Your vehicle may have a storage compartment located
in the rear cargo area of the vehicle in the driver’s
side trim panel.
To open the utility compartment, turn the knobs and
swing the compartment door open. The compartment
door can be removed.
Rear Seat Armrest Your vehicle’s second row seat may have an
armrest/storage compartment.
Pull the loop at the top of the armrest out to lower the
armrest.
To open the compartment, push the button on the front
of the armrest and pull the top open.
2-62
Page 183 of 500

You may need to manually disable or cancel the
high-beam headlamps by turning the low-beam
headlamps on, if any of the above conditions exist.
Disabling and Resetting IntelliBeam ®
at the
Rearview Mirror IntelliBeam ®
can be disabled by using the controls on
the inside rearview mirror.
AUTO
3 (On/Off): To disable the system, press this
button on the inside rearview mirror. The IntelliBeam ®
indicator will turn off and will not come back on until the
IntelliBeam ®
button is pressed again.
(Stalk Disable): When IntelliBeam ®
has turned on the
high-beams, pull or push the high-beam stalk. This
will disable IntelliBeam ®
. The IntelliBeam ®
indicator on
the mirror will turn off. To re-enable IntelliBeam ®
,
press the IntelliBeam ®
button on the mirror.
A different sensitivity setting is available for dealer
diagnostics. This is done by pushing and holding this
button for 20 seconds until the IntelliBeam ®
indicator
light ashes three times. If you accidentally activate this,
the vehicle’s setting will automatically be reset each
time the ignition is turned off and then on again. Cleaning the IntelliBeam ®
Light Sensor The light sensor is located
on the inside of the vehicle
in front of the inside
rearview mirror.
Clean the light sensor window, periodically, using glass
cleaner on a soft cloth. Gently wipe the sensor
window. Do not spray glass cleaner directly on the
surface of the sensor window.
Headlamps on Reminder If a door is open, a reminder chime will sound when
your headlamps or parking lamps are manually turned
on and your key is out of the ignition. To turn off
the chime, turn the headlamp switch to off or AUTO and
then back on, or close and re-open the door. In the
AUTO mode, the headlamps turn off once the ignition is
in LOCK or may remain on until the headlamp delay
ends (if enabled in the DIC). See “Exit Lighting” under
DIC Vehicle Customization on page 3-61 .
3-19
Page 186 of 500

Dome Lamps The dome lamps come on when any door is opened.
They turn off after all the doors are closed.
The dome lamps can also be turned on by turning the
instrument panel brightness knob, located next to
the exterior lamps control, clockwise to the farthest
position. In this position, the dome lamps remain
on whether a door is opened or closed.
Dome Lamp Override The dome lamp override button is located next to the
exterior lamps control.
k (Dome Off): Press the button in and the dome
lamps remain off when a door is opened. Press
the button again to return it to the extended position so
that the dome lamps come on when a door is opened. Entry Lighting Your vehicle has an illuminated entry feature.
When the doors are opened, the dome lamps will come
on if the dome override button is in the extended
position. If the dome override button is pressed in, the
lamps will not come on.
Exit Lighting The interior lamps come on when the key is removed
from the ignition. They turn off automatically in
20 seconds. The lights do not come on if the dome
override button is pressed in.
Reading Lamps If your vehicle has reading lamps, press the button
located next to the lamp to turn it on or off.
Your vehicle may also have reading lamps in other
locations. To turn each one on or off, press the button
located next to the lamp. The lamps cannot be adjusted.
3-22
Page 189 of 500

Ashtray(s) and Cigarette Lighter The front ashtray and cigarette lighter are located in the
center console near the cupholders, if the vehicle has
them. Press on the access door to open it and use
the ashtray and lighter.
Notice: If you put papers, pins, or other ammable
items in the ashtray, hot cigarettes or other
smoking materials could ignite them and possibly
damage your vehicle. Never put ammable items in
the ashtray.
To remove the ashtray, pull it from the center console.
Slide it back in and push down to be sure it is secure.
To use the cigarette lighter, push it in all the way, and let
go. When it is ready, it will pop back out by itself.
Notice: Holding a cigarette lighter in while it is
heating does not let the lighter back away from the
heating element when it is hot. Damage from
overheating can occur to the lighter or heating
element, or a fuse could be blown. Do not hold a
cigarette lighter in while it is heating. Analog Clock The analog clock is not connected with any other
vehicle system and runs by itself.
To adjust the clock, do the following:
1. Locate the adjustment button, near the lower left
corner of the clock.
2. Push and hold the adjustment button to advance
the clock hands. Holding the button down will
cause the clock to advance faster. Release the
button before you get to the desired time.
3. Push and release the button to increase the time by
one minute increments until the desired time is
reached.
3-25
Page 226 of 500

DISPLAY LANGUAGE This feature allows you to select the language in which
the DIC messages will appear.
Press the customization button until the DISPLAY
LANGUAGE screen appears on the DIC display. Press
the set/reset button once to access the settings for
this feature. Then press the customization button
to scroll through the following settings:
ENGLISH (default): All messages will appear in
English.
DEUTSCH: All messages will appear in German.
ITALIANO: All messages will appear in Italian.
FRANCAIS: All messages will appear in French.
ESPANOL: All messages will appear in Spanish.
ARABIC: All messages will appear in Arabic.
CHINESE: All messages will appear in Chinese.
NO CHANGE: No change will be made to this feature.
The current setting will remain.
To select a setting, press the set/reset button while the
desired setting is displayed on the DIC. AUTO DOOR LOCK This feature allows you to select when the vehicle’s
doors will automatically lock. See Programmable
Automatic Door Locks on page 2-11 for more
information.
Press the customization button until AUTO DOOR
LOCK appears on the DIC display. Press the set/reset
button once to access the settings for this feature.
Then press the customization button to scroll through
the following settings:
SHIFT OUT OF PARK (default): The doors will
automatically lock when the vehicle is shifted out of
PARK (P).
AT VEHICLE SPEED: The doors will automatically lock
when the vehicle speed is above 8 mph (13 km/h) for
three seconds.
NO CHANGE: No change will be made to this feature.
The current setting will remain.
To select a setting, press the set/reset button while the
desired setting is displayed on the DIC.
3-62
Page 227 of 500

AUTO DOOR UNLOCK This feature allows you to select whether or not to turn
off the automatic door unlocking feature. It also
allows you to select which doors and when the doors
will automatically unlock. See Programmable Automatic
Door Locks on page 2-11 for more information.
Press the customization button until AUTO DOOR
UNLOCK appears on the DIC display. Press the
set/reset button once to access the settings for this
feature. Then press the customization button to scroll
through the following settings:
OFF: None of the doors will automatically unlock.
DRIVER AT KEY OUT: Only the driver’s door will
unlock when the key is taken out of the ignition.
DRIVER IN PARK: Only the driver’s door will unlock
when the vehicle is shifted into PARK (P).
ALL AT KEY OUT: All of the doors will unlock when
the key is taken out of the ignition.
ALL IN PARK (default): All of the doors will unlock
when the vehicle is shifted into PARK (P).
NO CHANGE: No change will be made to this feature.
The current setting will remain.
To select a setting, press the set/reset button while the
desired setting is displayed on the DIC. REMOTE DOOR LOCK This feature allows you to select the type of feedback
you will receive when locking the vehicle with the
Remote Keyless Entry (RKE) transmitter. You will not
receive feedback when locking the vehicle with the RKE
transmitter if the doors are open. See Remote Keyless
Entry (RKE) System Operation on page 2-4 for more
information.
Press the customization button until REMOTE DOOR
LOCK appears on the DIC display. Press the set/reset
button once to access the settings for this feature.
Then press the customization button to scroll through
the following settings:
OFF: There will be no feedback when you press the
lock button on the RKE transmitter.
LIGHTS ONLY: The exterior lamps will ash when you
press the lock button on the RKE transmitter.
HORN ONLY: The horn will sound on the second press
of the lock button on the RKE transmitter.
HORN & LIGHTS (default): The exterior lamps will ash
when you press the lock button on the RKE transmitter,
and the horn will sound when the lock button is pressed
again within ve seconds of the previous command.
NO CHANGE: No change will be made to this feature.
The current setting will remain.
To select a setting, press the set/reset button while the
desired setting is displayed on the DIC.
3-63