2008 BMW X6 low beam
[x] Cancel search: low beamPage 12 of 288

Cockpit
10
Cockpit
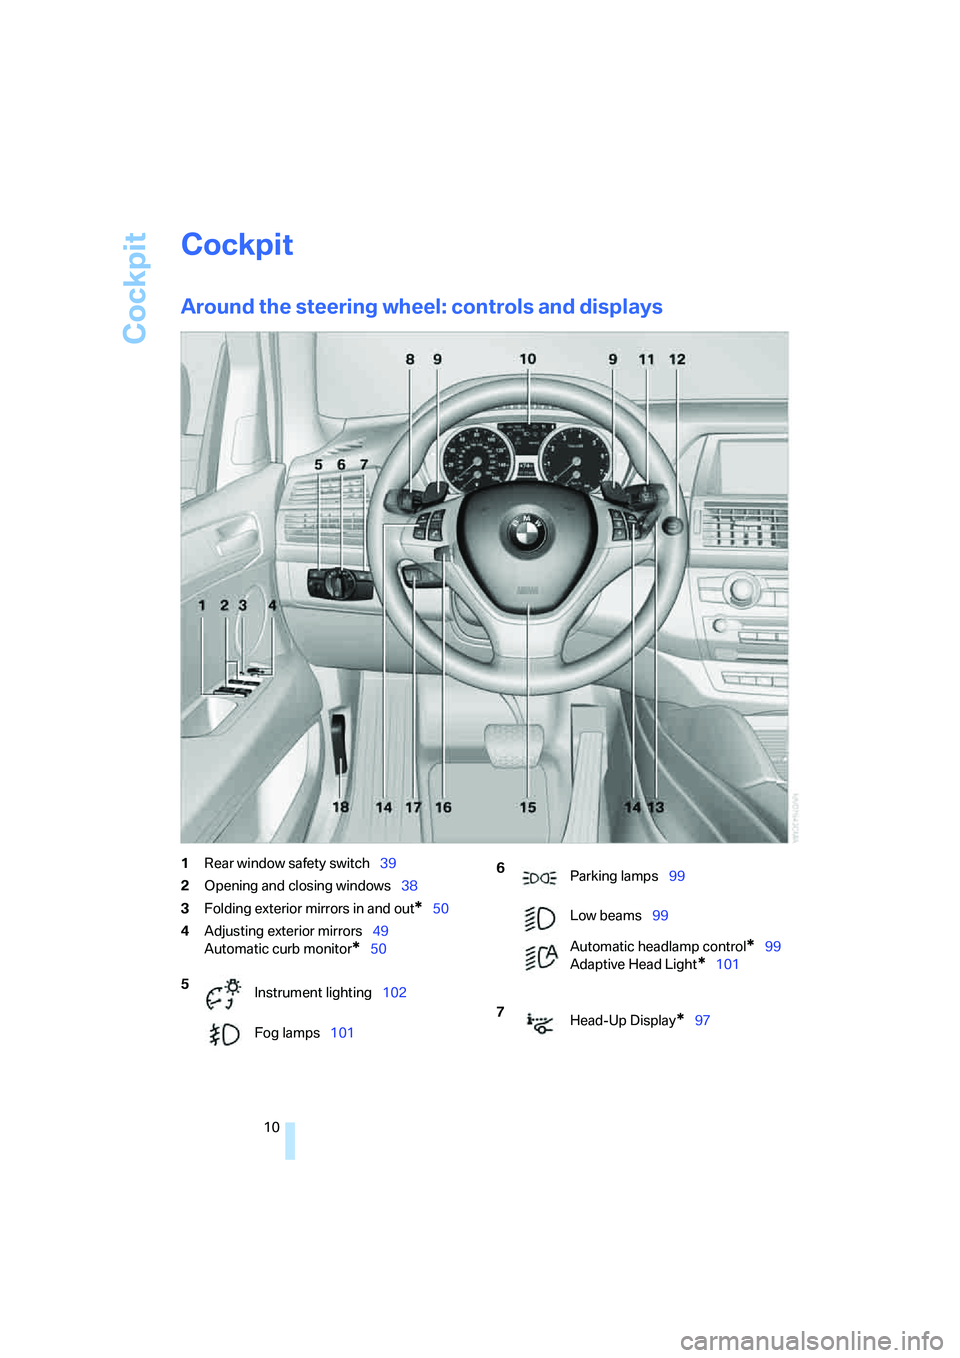
Around the steering wheel: controls and displays
1Rear window safety switch39
2Opening and closing windows38
3Folding exterior mirrors in and out
*50
4Adjusting exterior mirrors49
Automatic curb monitor
*50
5
Instrument lighting102
Fog lamps101
6
Parking lamps99
Low beams99
Automatic headlamp control
*99
Adaptive Head Light
*101
7
Head-Up Display
*97
Page 15 of 288

At a glance
13Reference
Controls
Driving tips
Communications
Navigation
Entertainment
Mobility
Indicator and warning lamps
The concept
The indicator and warning lamps can light up in
different combinations and colors.
Some lamps are tested for proper function by
briefly lighting up during starting of the engine
or when the ignition is switched on.
Explanatory text messages
Text messages at the bottom edge of the Con-
trol Display explain the meaning of the dis-
played indicator and warning lamps.
Additional information, e.g. on the cause of a
malfunction and on the corresponding need to
take action can be displayed via the Check Con-
trol, refer to page75.In the case of corresponding urgency, this infor-
mation is displayed immediately when the
related lamp lights up.
Indicator lamps without text messages
The following indicator lamps indicate that cer-
tain functions are activated:
With parking brake set58
With parking brake set for Canadian
models
Fog lamps101
High beams/headlamp flasher101
Lamp flashes:
DSC or DTC controls the drive and
braking forces for maintaining vehicle
stability86
Page 99 of 288

Controls
97Reference
At a glance
Driving tips
Communications
Navigation
Entertainment
Mobility
Head-Up Display*
The concept
With the Head-Up Display important informa-
tion is projected into the driver's field of view,
e.g. navigation instructions. This enables you to
take in this information without looking away
from the road.
Switching on/off
Press the button.
1Navigation information or Check Control
messages
2Cruise control
3Speed
Selecting displays
iDrive, for operating principle refer to page16.
1.Press the button.
This opens the start menu.
2.Press the controller to open the menu.
3.Select "Settings" and press the controller.
4.Select "Display settings" and press the
controller.
5.Change to upper field if necessary. Turn the
controller until "Head-Up Display" is
selected and press the controller.
6.Change into the second field from the top.
Turn the controller until "Head-Up Display"
is selected and press the controller.
7.Select desired information of Head-Up Dis-
play.
8.Press the controller.
The information is shown on the Head-
Up Display.
The settings are stored for the remote control
currently in use.
Adjusting brightness and height of
display
The brightness of the display is automatically
adapted to the ambient lighting conditions.
However, you can change the base setting.
With the low beams switched on, the brightness
can also be adjusted with the knurled wheel of
the instrument lighting.
Page 101 of 288

Controls
99Reference
At a glance
Driving tips
Communications
Navigation
Entertainment
Mobility
Lamps
Parking lamps/low beams
0Lights off and daytime running lamps
1Parking lamps and daytime running lamps
2Low beams and welcome lamps
3Automatic headlamp control
*, daytime run-
ning lamps, welcome lamps, and Adaptive
Head Light
*
If you open the driver's door with the ignition
switched off, the exterior lighting is automati-
cally switched off when the light switch is in
position0, 2 or 3.
If necessary, switch on the parking lamps,
switch position1.
Parking lamps
In switch position1, the front, rear and side
vehicle lighting is switched on. You can use the
parking lamps for parking.
The parking lamps drain the battery. Do
not leave them switched on for long peri-
ods of time, otherwise it may no longer be pos-
sible to start the engine. It is better to switch on
the roadside parking lamps on one side, refer to
page101.<
Low beams
The low beams light up when the light switch is
in position 2 and the ignition is on.
Automatic headlamp control*
In switch position3, the system activates the
low beams and switches them on or off in
response to changes in ambient light condi-
tions, for instance, in a tunnel, at dawn and dusk
and in case of precipitation. Adaptive Head
Light
* is active. The LED next to the symbol
lights up when the low beams are on. You can
activate the daytime running lamps, refer to
page100. In the situations named above, the
system then automatically switches over to the
low beams.
A blue sky with the sun low on the horizon can
cause the lights to be switched on.
The low beams remain switched on inde-
pendent of the ambient lighting condi-
tions when you switch on the fog lamps
*.<
The automatic headlamp control cannot
serve as a substitute for your personal
judgment in determining when the lamps
should be switched on in response to ambient
lighting conditions. For example, the sensors
cannot detect fog or hazy weather. To avoid
safety risks, you should always switch on the
low beams manually under these conditions.<
Welcome lamps
When parking the vehicle, if you leave the light
switch in position2 or3, the parking lamps and
the interior lamps light up briefly when the vehi-
cle is unlocked.
Activating/deactivating welcome
lamps
iDrive, for operating principle refer to page16.
1.Press the button.
This opens the start menu.
2.Press the controller to open the menu.
3.Select "Settings" and press the controller.
4.Select "Vehicle / Tires" and press the con-
troller.
Page 102 of 288

Lamps
100 5.Change to upper field if necessary. Turn the
controller until "Lighting" is selected and
press the controller.
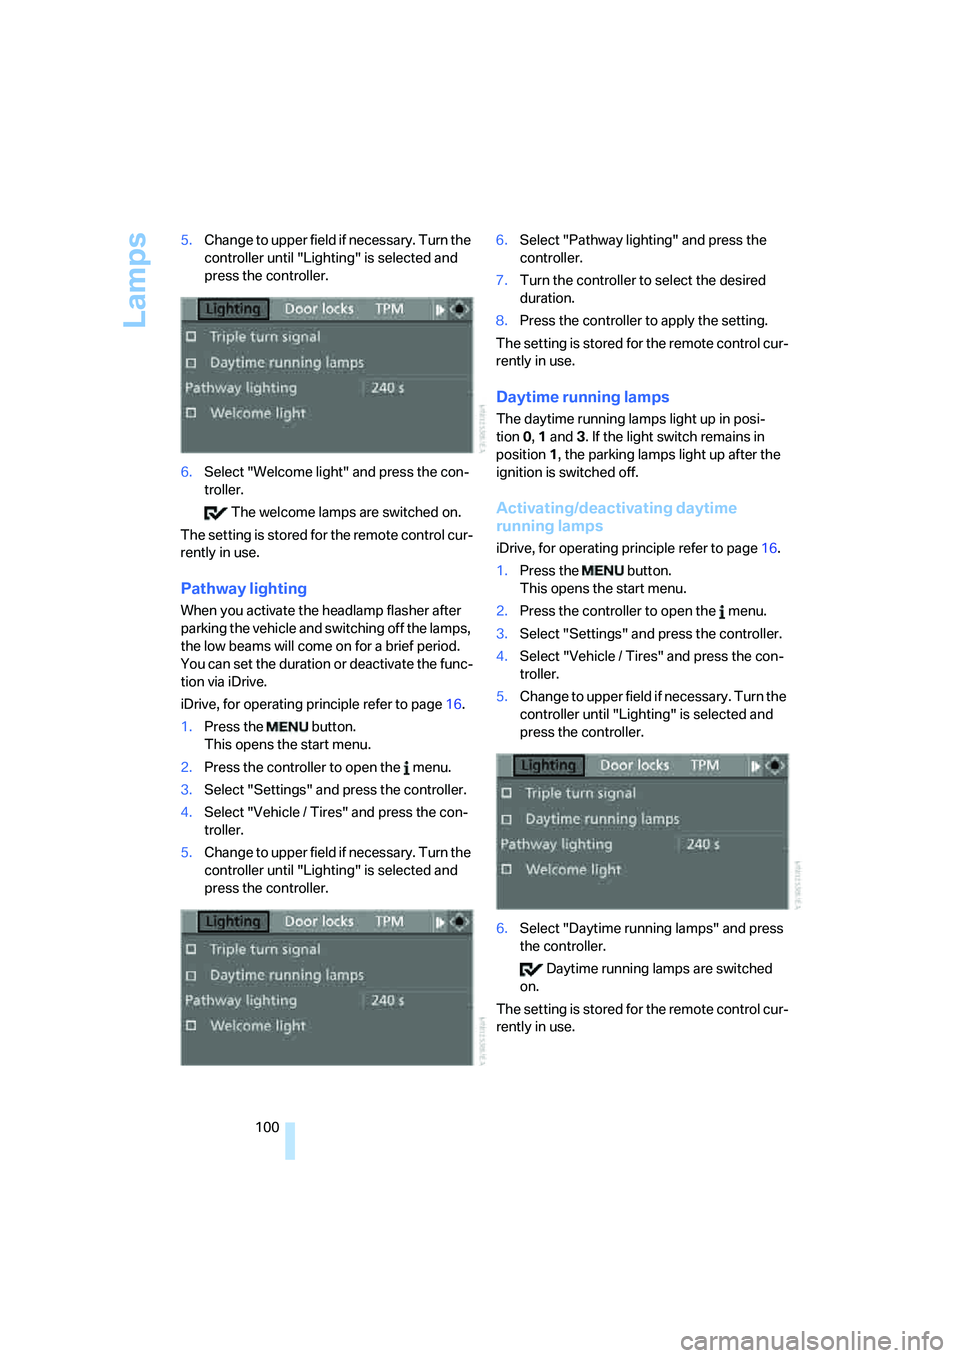
6.Select "Welcome light" and press the con-
troller.
The welcome lamps are switched on.
The setting is stored for the remote control cur-
rently in use.
Pathway lighting
When you activate the headlamp flasher after
parking the vehicle and switching off the lamps,
the low beams will come on for a brief period.
You can set the duration or deactivate the func-
tion via iDrive.
iDrive, for operating principle refer to page16.
1.Press the button.
This opens the start menu.
2.Press the controller to open the menu.
3.Select "Settings" and press the controller.
4.Select "Vehicle / Tires" and press the con-
troller.
5.Change to upper field if necessary. Turn the
controller until "Lighting" is selected and
press the controller.6.Select "Pathway lighting" and press the
controller.
7.Turn the controller to select the desired
duration.
8.Press the controller to apply the setting.
The setting is stored for the remote control cur-
rently in use.
Daytime running lamps
The daytime running lamps light up in posi-
tion0, 1 and 3. If the light switch remains in
position1, the parking lamps light up after the
ignition is switched off.
Activating/deactivating daytime
running lamps
iDrive, for operating principle refer to page16.
1.Press the button.
This opens the start menu.
2.Press the controller to open the menu.
3.Select "Settings" and press the controller.
4.Select "Vehicle / Tires" and press the con-
troller.
5.Change to upper field if necessary. Turn the
controller until "Lighting" is selected and
press the controller.
6.Select "Daytime running lamps" and press
the controller.
Daytime running lamps are switched
on.
The setting is stored for the remote control cur-
rently in use.
Page 103 of 288

Controls
101Reference
At a glance
Driving tips
Communications
Navigation
Entertainment
Mobility
Adaptive Head Light*
The concept
Adaptive Head Light is a variable headlamp
control system that enables better illumination
of the road surface. Depending on the steering
angle and other parameters, the light from the
headlamp follows the course of the road.
In tight curves, e.g. serpentines, or when turn-
ing, one of the two front fog lamps is also
switched on up to a speed of approx. 45 mph/
70 km/h. This provides improved illumination of
the area inside the curve.
Activating Adaptive Head Light
With the ignition switched on, turn the light
switch to position 3, refer to page99.
The turning lamps are automatically switched
on depending on the steering angle or the use
of turn signals.
To avoid blinding oncoming traffic, the Adaptive
Head Light directs light towards the front pas-
senger side when the vehicle is at a standstill.
When driving in reverse, both turning lamps are
active.
High beams/
roadside parking lamps
1High beams
2Headlamp flasher
3Roadside parking lamps
Roadside parking lamps, left or right*
You also enjoy the option of lighting up just one
side of your vehicle when parking.
Switching on
After parking the vehicle, press the lever up or
down beyond the resistance point for approx.
1 second, arrow3.
The roadside parking lamps drain the bat-
tery. Do not leave them switched on for
long periods of time, otherwise it may no longer
be possible to start the engine.<
Switching off
Briefly press the lever in the opposite direction
up to the resistance point, arrow 3.
Fog lamps*
First, switch on the parking lamps or the low
beams. The green indicator lamp in the instru-
ment panel lights up whenever the fog lamps
are on.
If the automatic headlamp control is acti-
vated, the low beams will come on auto-
matically when you switch on the fog lamps.<
Page 257 of 288

Mobility
255Reference
At a glance
Controls
Driving tips
Communications
Navigation
Entertainment
Rear
Being towed
Make sure that the ignition is switched on,
refer to page56, otherwise the low
beams, tail lamps, turn signals and windshield
wipers would not be available. When the engine
is stopped, there is no power assist. This then
requires increased effort for braking and steer-
ing. Active steering is deactivated and larger
steering wheel movements are required.<
Switch on the hazard warning flashers depend-
ing on the local regulations. If the electrical sys-
tem fails, mark the vehicle to be towed, e.g. with
a sign or warning triangle in the rear window.
Before towing, manually unlock the trans-
mission lock, refer to page63; failure to
do so can result in damage to the transmis-
sion.<
Do not exceed a towing speed of 45 mph/
70 km/h and a towing distance of
90 miles/150 km, otherwise the automatic
transmission may be damaged.<
Towing methods
Do not lift vehicle by tow fitting or body
and chassis parts, otherwise damage may
result.<
In some countries, towing with tow bars or
ropes in public traffic is not permitted. Familiar-
ize yourself with the regulations on towing in the
respective country.
With tow bar
The towing vehicle may not be lighter
than the vehicle to be towed, otherwise it
will not be possible to reliably control vehicle
response.
ble to avoid mounting the tow bar at an offset
angle, please observe the following:
>Clearance and maneuvering capability will
be sharply limited during cornering.
>When mounted at an angle, the tow bar will
exert lateral forces, tending to push the
vehicle sideways.
Only attach the tow bar to the tow fittings,
as attachment to other vehicle parts can
lead to damage.<
With tow rope
When starting off in the towing vehicle, make
sure that the tow rope is taut.
To avoid jerking and the associated
stresses on vehicle components when
towing, always use nylon ropes or nylon straps.
Only attach tow ropes to the tow fittings, as
attachment to other vehicle parts can lead to
damage.<
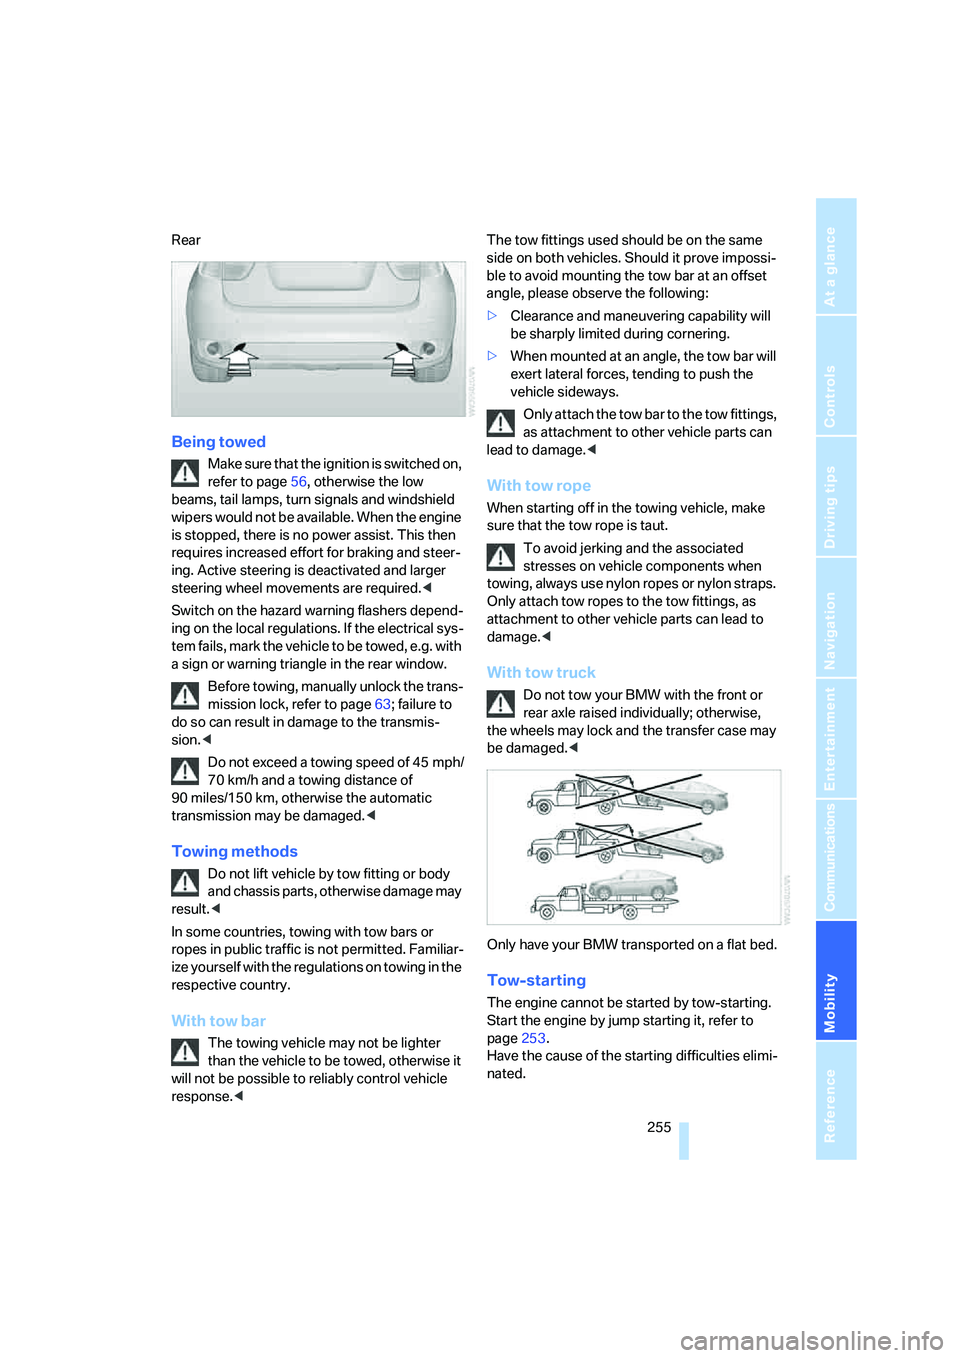
With tow truck
Do not tow your BMW with the front or
rear axle raised individually; otherwise,
the wheels may lock and the transfer case may
be damaged.<
Only have your BMW transported on a flat bed.
Tow-starting
The engine cannot be started by tow-starting.
Start the engine by jump starting it, refer to
page253.
Have the cause of the starting difficulties elimi-
nated.
Page 273 of 288

Reference 271
At a glance
Controls
Driving tips
Communications
Navigation
Entertainment
Mobility
"Distance to dest."71
Distance to destination, refer
to Computer70
Distance warning, refer to
PDC Park Distance
Control81
Door entry lighting102
Door key, refer to Keys/
remote control28
Door lock31
Door locking, confirmation
signals31
"Door locks"30,31,73
Doors
– manual operation32
– remote control29
DOT Quality Grades235
Downhill driving assistance,
refer to HDC87
Draft-free ventilation107
Drinks holder, refer to Cup
holders117
Drive for navigation DVDs160
"Driver's door only"30
Driver's seat, calibrating47
"Driver's seat climate"49
Driving lamps, refer to Parking
lamps/low beams99
Driving on poor roads130
Driving route, refer to
Displaying route149
Driving stability control
systems85
Driving through water127
Driving tips, refer to General
driving notes126
Dry air, refer to Cooling
function106
Drying the air, refer to Cooling
function106
DSC Dynamic Stability
Control86
– indicator lamp13,86
DTC Dynamic Traction
Control86
– activating86
– indicator lamp87"DVD"
– for DVD system in rear192
– in DVD changer180
DVD
– DVD changer179
– DVD system in rear190
– player for navigation
DVD160
DVD changer179
– adjusting brightness182
– adjusting contrast182
– adjusting tone182,185
– audio and video
playback180
– audio playback184
– chapter selection184
– controls179
– DVD audio content184
– DVD control181
– DVD country codes180
– DVD-specific menu183
– fast forward181
– filling179
– installation position179
– malfunctions180
– removing DVDs179
– reverse181
– selecting audio
language185
– selecting language182
– selecting subtitles183
– selecting track183
– selecting viewing angle183
– skip chapter181
– zoom182
"DVD format"
– for DVD system in rear195
– on DVD changer182
DVD for navigation134DVD system in rear190
– CD/DVD player191
– connecting headphones191
– controls190
– displaying images from CD/
DVD198
– DVD country codes192
– external device201
– information on CD/DVD
player200
– playing audio tracks from
CD/DVD196
– playing video from CD/
DVD192
– remote control191
– switching on/off192
Dynamic Performance
Control87
"Dynamic route" for
navigation147
Dynamic Stability Control
DSC86
Dynamic Traction Control
DTC86
E
Easy entry/exit51
Eject button, refer to Buttons
on the CD player160
Electrical malfunction
– automatic transmission with
Steptronic63
– door lock32
– driver's door32
– fuel filler door230
– glass sunroof, electric41
– parking brake60
Electric seat43
Electric steering wheel
adjustment51
Electronic brake-force
distribution85
Electronic oil level check240