Page 115 of 165
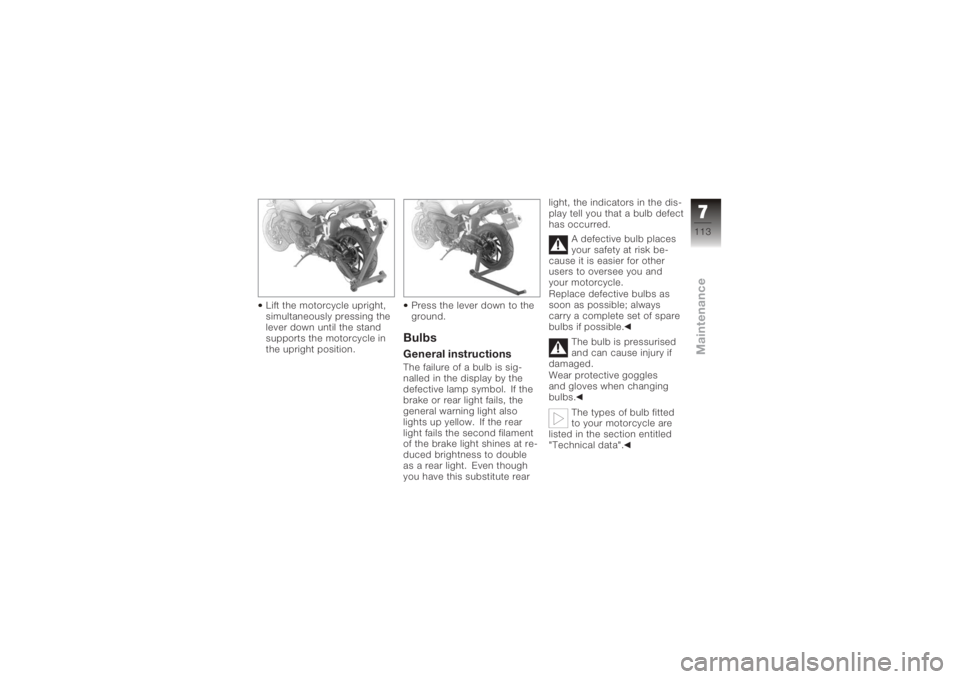
Lift the motorcycle upright,
simultaneously pressing the
lever down until the stand
supports the motorcycle in
the upright position.Press the lever down to the
ground.
BulbsGeneral instructionsThe failure of a bulb is sig-
nalled in the display by the
defective lamp symbol. If the
brake or rear light fails, the
general warning light also
lights up yellow. If the rear
light fails the second filament
of the brake light shines at re-
duced brightness to double
as a rear light. Even though
you have this substitute rearlight, the indicators in the dis-
play tell you that a bulb defect
has occurred.
A defective bulb places
your safety at risk be-
cause it is easier for other
users to oversee you and
your motorcycle.
Replace defective bulbs as
soon as possible; always
carry a complete set of spare
bulbs if possible.
The bulb is pressurised
and can cause injury if
damaged.
Wear protective goggles
and gloves when changing
bulbs.
The types of bulb fitted
to your motorcycle are
listed in the section entitled
"Technical data".
7113zMaintenance
Page 156 of 165
A
Abbreviations and symbols, 6
Anti-theft alarm, 18
B
BatteryBattery compartment, 13
Charging battery when
connected, 120
Charging the battery when
disconnected, 121
Installation, 123
Removal, 121
Warning, battery charge
current, 28
Brake fluid Checking level, front, 97
Checking level, rear, 99
Brake lever Adjusting the handbrake
lever, 48
Brake pads Checking front, 96
Checking rear, 96 Brakes
Checking operation, 95
Fluid reservoir, 13
Fluid reservoir, front, 13
Fluid reservoir, rear, 13
Technical data, 138
Bulbs General instructions, 113
Replacing brake-light
bulbs, 116
Replacing front turn
indicator bulb, 117
Replacing high-beam
headlight bulb, 114
Replacing low-beam
headlight bulb, 114
Replacing parking-light
bulb, 115
Replacing rear light
bulbs, 116
Replacing rear turn indicator
bulb, 117
Technical data, 140
Warning, bulb failure, 28, 29 C
Case
Adapting, 90
Adjusting, 88
Closing, 88
Installing, 90
Opening, 88
Removing, 89
Centre stand Placing motorcycle on
centre stand, 75
Removing motorcycle from
centre stand, 77
Clock, 22 Adjusting, 18, 46
Clutch Adjusting the clutch
lever, 48
Checking operation, 100
Fluid reservoir, 11
Technical data, 136
Confirmation of maintenance work, 147
11154zIndex
Page 157 of 165
CoolantTemperature gauge, 22, 23
Warning, coolant temperat-
ure, 26
D
Dimensions Technical data, 141
E
Electrics Technical data, 139
Emergency off switch (kill switch), 17, 47
Engine Starting, 64
Technical data, 134
Warning, engine electron-
ics, 27
Engine oil Checking level, 93
Draining , 94
Filler neck, 15
Indicator for engine oil
level, 13
Technical data, 135 Topping up, 94
Warning, engine oil pres-
sure, 27
ESA, 57 Adjusting spring preload, 58
Adjusting suspension
damping, 57
Calling up settings, 57
EWS Warning, 26
F
Final drive Technical data, 137
Frame Technical data, 141
Front-wheel stand Installing, 110
Fuel Filler neck, 13
Quantity reading, 22
Refuelling, 78
Technical data, 135
Warning, fuel down to
reserve, 26
Fuses, 139 G
Gear indicator, 22
Grip heating, 17, 47
H
Handlebar fittings
General view, left side , 16
General view, right side, 17
Hazard warning flashers, 16, 17
Switching off, 41
Switching on, 40
Headlight High-beam headlight, 19
Low-beam headlight, 19
Side lights, 19
Headlight flasher, 16
Helmet holder, 15, 53
High-beam headlight, 16
Horn, 16
I
Ignition Switching off, 38
Switching on, 38
11155zIndex
Page 158 of 165
ImmobiliserWarning, 26
Instrument cluster Overview, 18
Sensor for lighting, 18
J
Jump starting, 118
L
Laying up, 128
Lights Switching off the parking
lights, 50
Switching on the high-beam
headlight, 49
Switching on the low-beam
headlight, 49
Switching on the parking
lights, 50
Switching on the side
lights, 49 M
Mirrors
Adjusting, 54
Multifunction display, 18, 22
O
On-board computer Ambient temperature, 45
Average consumption, 45
Average speed, 44
Pushbutton, 16
Resetting average con-
sumption, 45
Resetting average
speed, 44
Residual range, 44
Selecting readings, 43
Tripmaster function, 43
P
Power socket, 11
Pre-ride check, 65 R
Rear wheel stand
Installing, 112
Refuelling, 78
Reserve Warning, 26
Residual range, 42, 44
Restoring to use, 129
Rev. counter, 18
Running gear Technical data, 137
S
Seat Installation, 52
Lock, 11
Removal, 51
Service, 144
Side stand Placing motorcycle on side
stand, 71
Removing motorcycle from
side stand, 73
Starting the engine, 64
Speedometer, 18
11156zIndex
Page 159 of 165
Spring preload, rearAdjusting, 11, 55
Starter, 17
Steering lock, 39
Suspension damping, rear Adjusting, 11, 56
T
Technical data Brakes, 138
Bulbs, 140
Clutch, 136
Dimensions, 141
Electrics, 139
Engine, 134
Engine oil, 135
Final drive, 137
Frame, 141
Fuel, 135
Running gear, 137
Transmission, 136
Weights, 142
Wheels and tyres, 138
Telltale lights, 18 Toolkit
Anti-theft alarm, 15
Overview, basic kit, 92
Overview, supplementary
kit, 92
Torques, 133
Transmission Starting the engine, 64
Technical data, 136
Tripmaster, 22 Operation, 41
Resetting the tripmeter, 42
Residual range, 42
Selecting readings, 41
Troubleshooting chart, 132
Turn indicators Left, 16, 50
Right, 17, 51
Switching off, 17, 51
Tyres Checking tread depth, 101
Checking tyre pressures, 58
Technical data, 138 V
Vehicle
General view, left side, 11
General view, right side, 13
Laying up, 128
restoring to use, 129
Vehicle identification num- ber, 13
W
Warning lights, 18
Warnings, 22 Mode of presentation, 23
Warnings, overview, 24, 31
Weights Technical data, 142
Wheels Installing front wheel, 105
Installing rear wheel, 108
Removing front wheel, 102
Removing rear wheel, 107
Technical data, 138
11157zIndex
Page 163 of 165
BMW Motorrad Integral ABSE2
If the motorcycle is not to be
ridden for several weeks, a
trickle charger, which can be
obtained from your BMW
Motorrad dealer, should be
connected or the battery
disconnected and then
recharged before starting
riding again.
During rider safety training,
an unusual number of ABS-
controlled braking operations
take place in rapid succession
interspersed with periods of
waiting and assessment in
which the motorcycle is not
being ridden. The battery is
put under heavy load by the
ABS control actions, but at
the same time it is not being
recharged as practically no
riding is being done.
In isolated cases, in this
artificially created situation, braking operations in which
the brake lever is operated
with maximum force and
extreme speed, in combina-
tion with declining on-board
supply voltage, can bring the
ABS up to its technical limits in
which its control function is no
longer fulfilled.
Field observations carried out
by BMW Motorrad indicate
that a comparable situation
has not arisen in traffic or even
during training rides.
The following notes must
be observed during safety
training:
• check the warning and
indicator lamps before any
braking exercise
• ride the motorcycle over
sufficient distance to charge
the battery after a maximum
of five braking exercises• switch off consumers such
as seat and grip heating,
radio, navigation system and
accessories connected to
the power sockets
• in pauses and discussions,
switch off the ignition; if the
engine is switched off with
the emergency off switch,
the lights and all electronic
systems remain switched on
and drain the battery
How can I achieve the
shortest braking distance?
Dynamic load distribution
between the front and rear
wheels changes under
braking. The heavier the
brakes are applied, the more
load is transferred to the front
brake. The greater the load on
the wheel, the more braking
force can be transferred.Info_I_ABS_en_xx.fm Seite 2 Dienstag, 19. Juli 2005 2:48 14