2008 BMW M5 SEDAN radio controls
[x] Cancel search: radio controlsPage 33 of 260

Controls
31Reference
At a glance
Driving tips
Communications
Navigation
Entertainment
Mobility
inside is not possible without special knowl-
edge.<
Switching on interior lamps
With vehicle locked:
Press the button.
You can also use this function to locate your
vehicle in parking garages etc.
Panic mode*
You can trigger the alarm system in case of dan-
ger:
Press the button for at least 3 seconds.
Switching off alarm: press any button.
Opening luggage compartment lid
Press the button for approx. 1 second.
The luggage compartment lid opens, regard-
less of whether it was previously locked or
unlocked.
During opening, the luggage compart-
ment lid pivots back and up. Make sure
that adequate clearance is available before
opening.
To prevent accidentally locking yourself out,
never lay the remote control in the cargo bay. A
previously locked luggage compartment lid is
also locked again after closing.<
Confirmation signals
You can activate or deactivate the confirmation
signals.
1.Open the start menu.
2.Press the controller to open the menu.
3.Select "Settings" and press the controller.
4.Select "Vehicle / Tires" and press the con-
troller.
5.Change to upper field if necessary. Turn the
controller until "Door locks" is selected and
press the controller.
6.Select "Confirmation" and press the con-
troller.7.Select the desired signal.
8.Press the controller.
The signal is activated.
Malfunction
The remote control may malfunction due to
local radio waves. Should the remote control fail
to operate due to interference of this kind,
unlock and lock the vehicle via the door lock
using a key.
If it is no longer possible to lock the vehicle
using the remote control, then the battery is
discharged. Use this remote control during an
extended drive; this will recharge the battery,
refer to page28.
For US owners only
The transmitter and receiver units comply with
part 15 of the FCC/Federal Communication
Commission regulations. Operation is gov-
erned by the following:
FCC ID:
LX8766S
LX8766E
LX8CAS
LX8CAS2
Compliance statement:
This device complies with part 15 of the FCC
Rules. Operation is subject to the following two
conditions:
>This device must not cause harmful inter-
ference, and
>this device must accept any interference
received, including interference that may
cause undesired operation.
Page 39 of 260

Controls
37Reference
At a glance
Driving tips
Communications
Navigation
Entertainment
Mobility
Please make sure that the ignition and all
electronic systems/consumers are
switched off before locking to save the bat-
tery.<
Comfort closing
Hold a finger or the back of your hand against
the surface, arrow2 or 3, but do not grasp the
door handle while doing so.
The windows and the glass sunroof
* are
closed.
Watch during the closing process to be
sure that no one is injured. Removing the
hand from the door handle stops the closing
process immediately.<
Opening luggage compartment lid
separately
Press the button on the luggage compartment
lid. This corresponds to pressing the button.
If the vehicle detects that a remote con-
trol has been accidentally left inside the
locked vehicle's cargo bay after the luggage
compartment lid is closed, the lid will reopen.
The hazard warning flashers flash and a signal
*
sounds.<
Switching on radio readiness
By pressing the Start/Stop button, you switch
on the radio readiness, refer to page56.
When doing so, do not depress the brake
or clutch pedal, otherwise the engine will
start immediately.<
Starting engine
You can start the engine or switch on the igni-
tion if a remote control is located in the interior
of the vehicle. It need not be inserted in the igni-
tion lock, refer to page56.
If you take the remote control with you when
leaving the vehicle with the engine running, a
warning lamp lights up. In addition, a message
appears on the Control Display. As long as no
remote control is detected, it is only possible to
restart the engine within approx. 10 seconds
after it is switched off.
Malfunction
The comfort access function may malfunction
due to local radio waves. Then open or close the
vehicle with the buttons on the remote control
or with a key. To start the engine following this,
insert the remote control in the ignition lock.
When unlocking or locking/comfort closing do
not simultaneously grasp the door handle and
touch the surfaces, arrow2 or 3. Otherwise, you
may limit the function.
Replacing battery
If the battery of the remote control is dead, a
message will appear in the Control Display.
1.Remove integrated key from remote con-
trol, refer to page28.
2.Remove cover.
3.Lay in new battery with positive side facing
upward.
4.Press cover closed.
Return used battery to a recycling collec-
tion point or to your BMW center.<
Windows
To prevent injuries, exercise care when
closing the windows and keep them in
your field of vision until they are shut.
Always take along the remote control when you
leave the vehicle, otherwise children could, for
example, operate the windows and injure them-
selves.<
Page 45 of 260

Controls
43Reference
At a glance
Driving tips
Communications
Navigation
Entertainment
Mobility
Adjusting active backrest width*
First set a comfortable backrest width, see
above. Based on the backrest width set, the lat-
eral support is automatically adapted to the cur-
rent driving situation.
The adaptation of the backrest width and the
speed of the adjustment vary depending on the
program. You can select from among three pro-
grams from comfort to sport. The "Sport" pro-
gram provides increased lateral support on both
sides when driving through a quick succession
of curves.
Press the button repeatedly until the desired
program is shown on the Control Display.
The LED in the button lights up.
To deactivate: press button longer.
You can also activate your preferred program
for the active backrest width adjustment of the
driver's seat with the button on the steering
wheel, refer to MDrive on page50.
Easy entry/exit*
To facilitate entry and exit, the backrest width
temporarily opens all the way.
Seat, mirror and steering
wheel memory
You can store and request two different posi-
tions for the driver's seat and passenger seat
*,
exterior rearview mirrors, and steering wheel.
The adjustment of the lumbar support is not
stored in the memory.
Storing
1.Switch on radio readiness or ignition, refer
to page56.
2.Set the desired seat, exterior mirror and
steering wheel positions.
3.Press the button:
The LED in the button lights up.
4.Press the desired memory button1 or2:
The LED goes out.
Requesting
Do not request a position from the mem-
ory while the vehicle is moving. There is a
risk of accident from unexpected movement of
the seat or steering wheel.<
Comfort mode
1.Open the driver's door after unlocking or
switch on radio readiness.
2.Briefly press the desired memory button1
or2.
The system cancels the adjustment procedure
when you briefly press one of the seat adjust-
ment switches or one of the memory buttons.
Page 59 of 260

Controls
57Reference
At a glance
Driving tips
Communications
Navigation
Entertainment
Mobility
Radio readiness and ignition
switched off
All indicator and warning lamps in the instru-
ment cluster go out.
Starting engine
Do not run the engine in closed rooms,
otherwise the inhalation of toxic exhaust
gases can cause unconsciousness and death.
The exhaust gases contain carbon monoxide,
an odorless and colorless, but highly toxic gas.
Never leave an unattended vehicle with the
engine running, as such a vehicle represents a
potential safety hazard.
Before leaving the vehicle with the engine run-
ning, shift into neutral
* or move the selector
lever into position N and firmly apply the hand-
brake, otherwise the vehicle can begin to roll.<
Avoid frequent starting in quick succes-
sion or repeated starting attempts in
which the engine does not start. Otherwise, the
fuel is not burned or inadequately burned and
there is a danger of overheating and damaging
the catalytic converter.<
Do not allow the engine to warm up by leaving it
running while the vehicle remains stationary.
Instead, begin to drive at a moderate engine
speed.
Manual transmission*
Remote control in ignition lock or with comfort
access in vehicle, refer to page36.
1.Depress brake pedal.
2.Depress the clutch pedal and shift into
idling position.
3.Press the Start/Stop button.
Sequential Manual Transmission with
Drivelogic
Remote control in ignition lock or with comfort
access in vehicle, refer to page36.
1.Firmly apply the handbrake.
2.Depress brake pedal.
3.Place selector lever in position N.
4.Press the Start/Stop button.
If the engine does not start, shift back to
the last selector lever position selected,
refer to the instrument cluster display or the
selector lever. Then select position N.
You cannot start off with the hood open.
When the engine is cold, the exhaust system
has a slightly metallic undertone due to the sys-
tem design.<
Switching off engine
When leaving the vehicle, always take the
remote control with you.
When parking, firmly apply the handbrake, as
otherwise the vehicle could roll.<
Manual transmission*
1.Press the Start/Stop button with the vehicle
stopped.
2.Shift into first gear or reverse.
3.Firmly apply the handbrake.
4.Remove the remote control from the igni-
tion lock, refer to page56.
Sequential Manual Transmission with
Drivelogic
1.Firmly apply the handbrake.
2.Shift into a driving position.
3.Press the Start/Stop button.
If N is engaged when switching off the
engine, this will be pointed out to you opti-
cally and acoustically.
4.Remove the remote control from the igni-
tion lock, refer to page56.
Page 87 of 260

Controls
85Reference
At a glance
Driving tips
Communications
Navigation
Entertainment
Mobility
System limits
TPM cannot announce sudden serious tire
damage caused by external influences.
The system does not function properly if it has
not been reset, e.g. a flat tire is reported despite
correct tire inflation pressures.
The system is inactive and cannot display a flat
tire if a wheel has been mounted without TPM
electronics, or if TPM is temporarily interfered
with by other systems or devices which use the
same radio frequency.
Status display on Control Display
The tire and system status is indicated by the
color of the tires.
TPM takes the fact that the tire pressure
changes during driving into account. A correc-
tion is only required if requested by TPM with
the color.
Green
The tire pressure matches the learned set state.
"TPM active" is displayed on the Control Dis-
play.
One wheel is yellow
Flat tire or a major drop in inflation pressure in
the indicated tire. A message appears on the
Control Display.
All wheels are yellow
Flat tire or a major drop in inflation pressure in
several tires. A message appears on the Control
Display.
Gray
The system cannot detect a flat tire.
Reasons for this can be:
>TPM is being reset
>Temporary interference due to systems
or devices which use the same radio fre-
quency
>Malfunction
Resetting system
Reset the system again after each correc-
tion of the tire inflation pressure and after
every tire or wheel change.<
Resetting finishes during driving, which can be
interrupted at any time. When driving resumes,
resetting is continued automatically.
iDrive, for operating principle refer to page16.
1.Press the button.
This opens the start menu.
2.Press the controller to open the menu.
3.Select "Settings" and press the controller.
4.Select "Vehicle / Tires" and press the con-
troller.
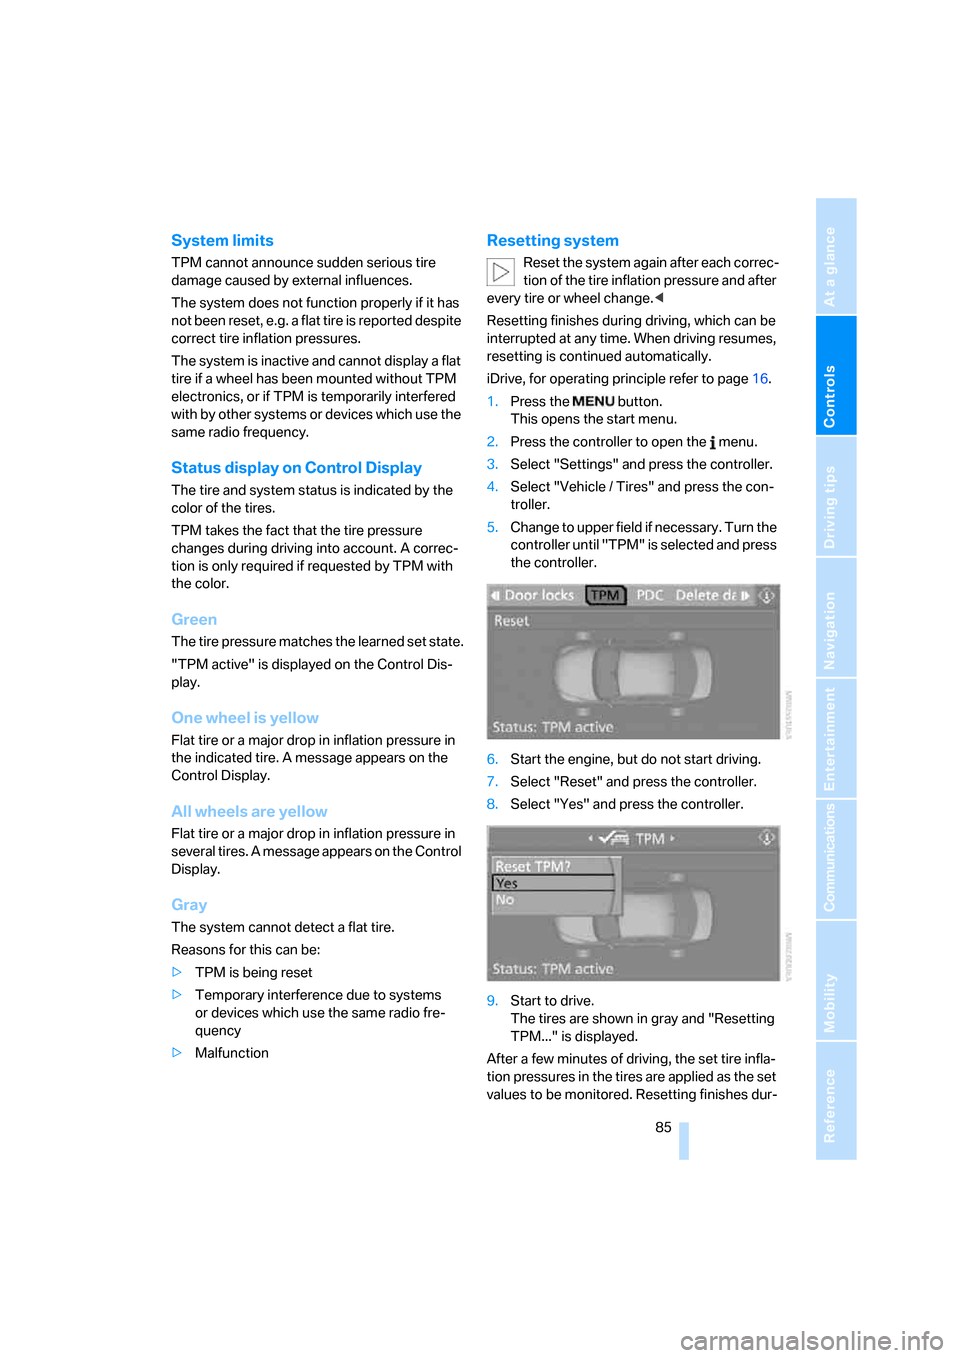
5.Change to upper field if necessary. Turn the
controller until "TPM" is selected and press
the controller.
6.Start the engine, but do not start driving.
7.Select "Reset" and press the controller.
8.Select "Yes" and press the controller.
9.Start to drive.
The tires are shown in gray and "Resetting
TPM..." is displayed.
After a few minutes of driving, the set tire infla-
tion pressures in the tires are applied as the set
values to be monitored. Resetting finishes dur-
Page 91 of 260

Controls
89Reference
At a glance
Driving tips
Communications
Navigation
Entertainment
Mobility
Operational readiness of airbag system
From radio readiness, refer to page56, the
warning lamp lights up briefly, indicating the
operational readiness of the entire airbag sys-
tem and the safety belt tensioners.
Airbag system malfunction
>Warning lamp does not light up from radio
readiness.
>Warning lamp lights up continuously.
Have the airbag system checked immedi-
ately in case of a malfunction, otherwise
there is a danger that the airbag system may not
respond in the expected manner in an accident
despite an impact of corresponding intensity.<
Head-Up Display*
The concept
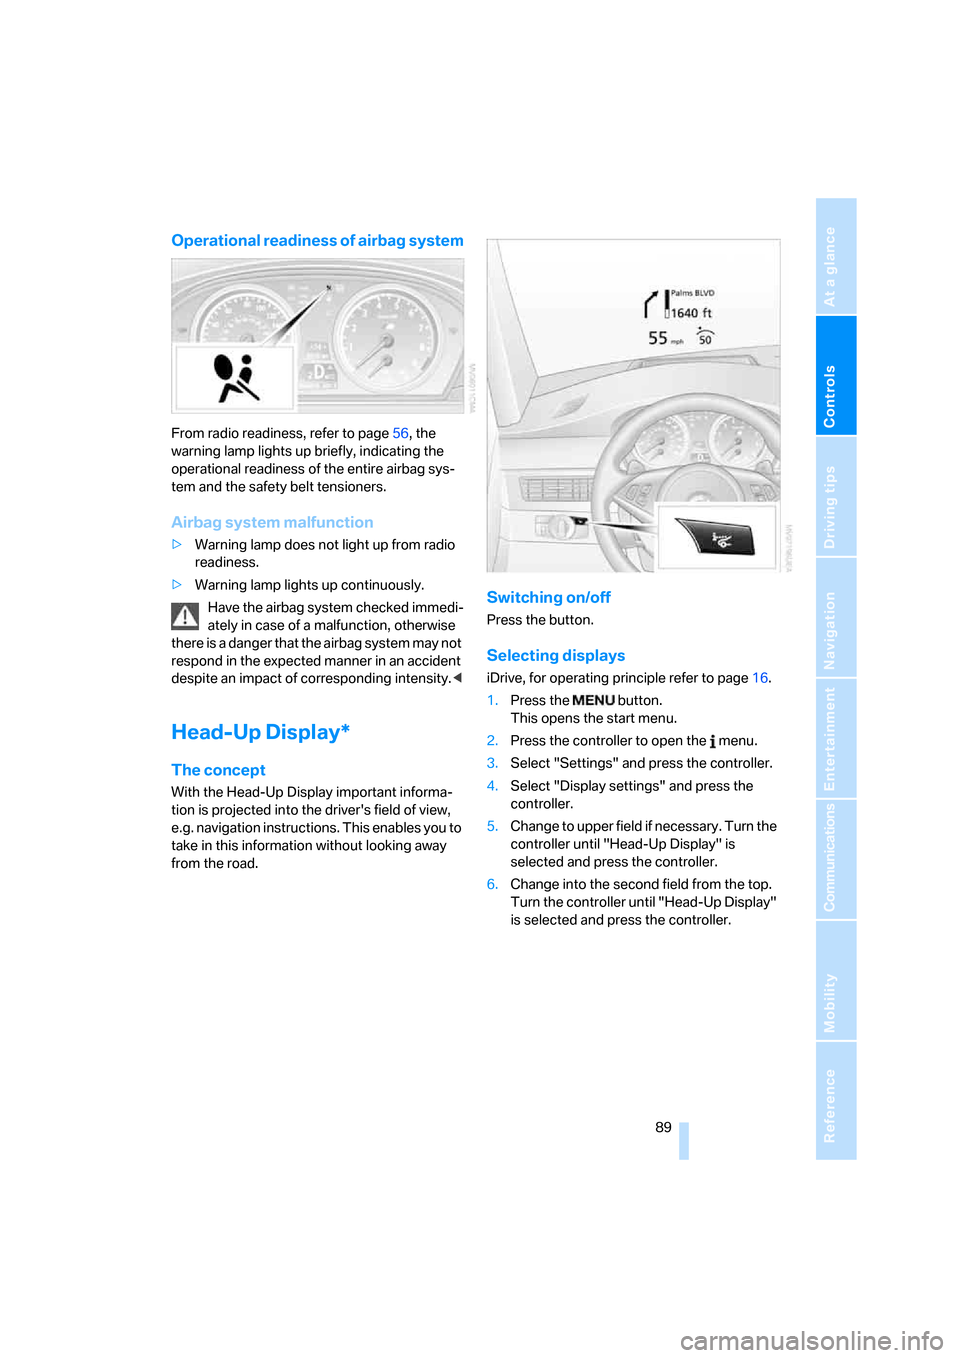
With the Head-Up Display important informa-
tion is projected into the driver's field of view,
e.g. navigation instructions. This enables you to
take in this information without looking away
from the road.
Switching on/off
Press the button.
Selecting displays
iDrive, for operating principle refer to page16.
1.Press the button.
This opens the start menu.
2.Press the controller to open the menu.
3.Select "Settings" and press the controller.
4.Select "Display settings" and press the
controller.
5.Change to upper field if necessary. Turn the
controller until "Head-Up Display" is
selected and press the controller.
6.Change into the second field from the top.
Turn the controller until "Head-Up Display"
is selected and press the controller.
Page 103 of 260

Controls
101Reference
At a glance
Driving tips
Communications
Navigation
Entertainment
Mobility
>with sufficient battery voltage
>at an outside temperature below 777/
256
From radio readiness the interior temperature,
the air volume and the air distribution can be
set.
Switching automatic climate control
on and off
1.Turn to the left to minimum air volume.
2.After approx. 1 second, turn to the left
again.
You switch on the system again by pressing any
button of the automatic climate control.
Front ventilation
1Knurled wheels to smoothly open and close
vent outlets
2Levers to change the vent outlet direction
Do not drop any foreign objects into the
vent outlets, otherwise these could be
catapulted outwards and lead to injuries.<
Ventilation for cooling
Adjust the vent outlets to direct the flow of cool
air in your direction, for instance, if the interior
has become too warm, etc.
Draft-free ventilation
Set the vent outlets so that the air flows past
you and is not directed straight at you.
Rear ventilation
1Knurled wheel to smoothly open and close
vent outlets
2Knurled wheel to adjust the temperature:
>Turn toward blue: colder
>Turn toward red: warmer
3Levers to change the vent outlet direction
Microfilter/activated-charcoal filter
The microfilter removes dust and pollen from
the incoming air. The activated-charcoal filter
provides additional protection by filtering gas-
eous pollutants from the outside air. Your BMW
center replaces this combined filter as a stan-
dard part of your scheduled maintenance.
Parked car ventilation
The concept
The parked car ventilation blows air into the
passenger compartment to lower interior tem-
peratures.
It is ready to use in the parked car mode at any
outside temperature.
You can set two different times for the system
to start. The parked car ventilation can also be
switched on and off directly. It remains
switched on for 30 minutes.
Since the system uses a substantial amount of
electrical current, you should refrain from acti-
vating it twice in succession without allowing
the battery to be recharged in normal operation
between use.
Page 150 of 260

On/off and tone
148
On/off and tone
The following audio sources have shared
controls and setting options:
>Professional
* radio or
Business radio
>CD player
>CD changer
*
Controls
The audio sources can be operated using:
>Buttons in the area of the CD player
>iDrive
>Buttons on steering wheel, refer to page11
>Programmable memory/direct selection
buttons, refer to page21
Buttons in area of CD player
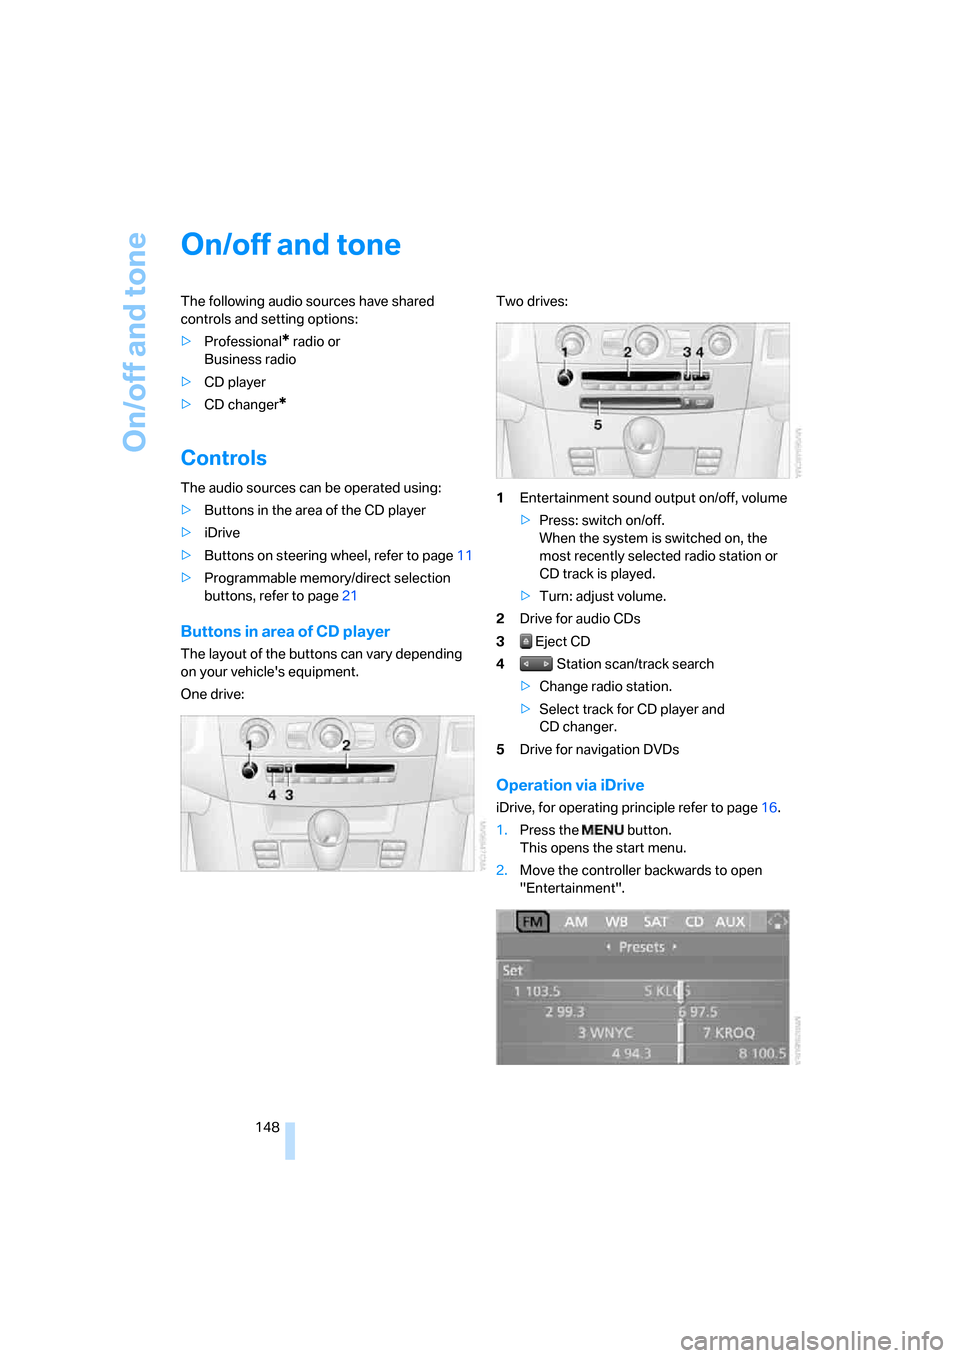
The layout of the buttons can vary depending
on your vehicle's equipment.
One drive:Two drives:
1Entertainment sound output on/off, volume
>Press: switch on/off.
When the system is switched on, the
most recently selected radio station or
CD track is played.
>Turn: adjust volume.
2Drive for audio CDs
3 Eject CD
4 Station scan/track search
>Change radio station.
>Select track for CD player and
CD changer.
5Drive for navigation DVDs
Operation via iDrive
iDrive, for operating principle refer to page16.
1.Press the button.
This opens the start menu.
2.Move the controller backwards to open
"Entertainment".