2008 BMW M3 CONVERTIBLE window
[x] Cancel search: windowPage 34 of 172

Opening and closing
32 from the cargo bay beforehand to avoid
water stains or soiling.
Do not place any objects on the retract-
able hardtop or on the luggage compart-
ment lid, otherwise they could fall during move-
ments of the retractable hardtop and cause
damage or injury.
Never move the retractable hardtop when the
rollover protection system is in the activated
position.
Driving when the hardtop is not fully opened or
closed may result in damage or injury.
Do not reach into the mechanism while the
hardtop is opening or closing. Keep children
away from the swiveling area of the retractable
hardtop.<
The retractable hardtop cannot be moved
at temperatures below + 147/–106. <
The retractable hardtop can only be
opened and closed when the vehicle is
stationary. To avoid causing damage, do not
drive off until the hardtop has stopped mov-
ing.<
Before opening and closing
>Comply with the safety precautions
described above.
>Ensure that the cargo bay partition is folded
down and engaged on both sides, refer to
page91, otherwise it will not be possible to
open the retractable hardtop.
>Do not place any objects next to or on the
cargo bay partition and close the storage
compartment on the left side of the cargo
bay.
>Do not exceed the maximum loading height
under the cargo bay partition; refer to the
label in the cargo bay showing a line indicat-
ing the maximum height.
>Ensure that the luggage compartment lid is
closed.
>The vehicle should be parked on fairly level
ground. Excessive angle is indicated by a
lamp.
Opening and closing
When the vehicle is stationary and at radio
readiness or beyond, refer to page46:
If possible, conserve the battery by only
operating the retractable hardtop when
the engine is running.
Before closing the retractable hardtop, remove
all foreign objects from the windshield frame as
these could prevent the hardtop from closing
properly.<
1Pull button: open the retractable hardtop.
Push button: close the retractable hardtop.
2LEDs
The side windows move down slightly
when the switch for hardtop operation is
pulled or pushed.<
If you push or pull the switch for a longer period
after the LED2 goes out, the windows move up
again.
LEDs
>While the hardtop is being operated, the left
LED lights up green. It goes out as soon as
the top is fully opened or closed.
>If the right-hand LED flashes red when you
release the switch, the opening or closing
action has not yet finished.
>If the right LED lights up red when the
switch is pressed, the cargo bay partition is
folded up, the luggage compartment lid is
not closed, the vehicle is standing on a
strong incline or there is a malfunction. The
retractable hardtop cannot be moved.
Page 35 of 172
Reference
At a glance
Controls
Driving tips
Mobility
33
Interruption
The automatic sequence of movements is
interrupted if the switch for hardtop operation is
released. The sequence can be continued in
the desired direction by pushing or pulling the
switch.
A hardtop that is not fully opened or
closed is a safety hazard.
Do not interrupt and resume the closing proce-
dure several times in close succession as this
could damage the mechanism.<
If the hardtop is not fully opened or
closed, the luggage compartment lid can-
not be opened and the windows cannot be
moved.<
Convenient operation with remote
control or via door lock
Refer to pages20 and22.
Wind deflector*
The wind deflector keeps air movements in the
passenger compartment to a minimum when
the hardtop is open and provides an even more
comfortable ride, particularly at high speeds.
Installation
The wind deflector is stored in a protective
cover in the cargo bay. Brief instructions for
operation can be found on the protective cover.
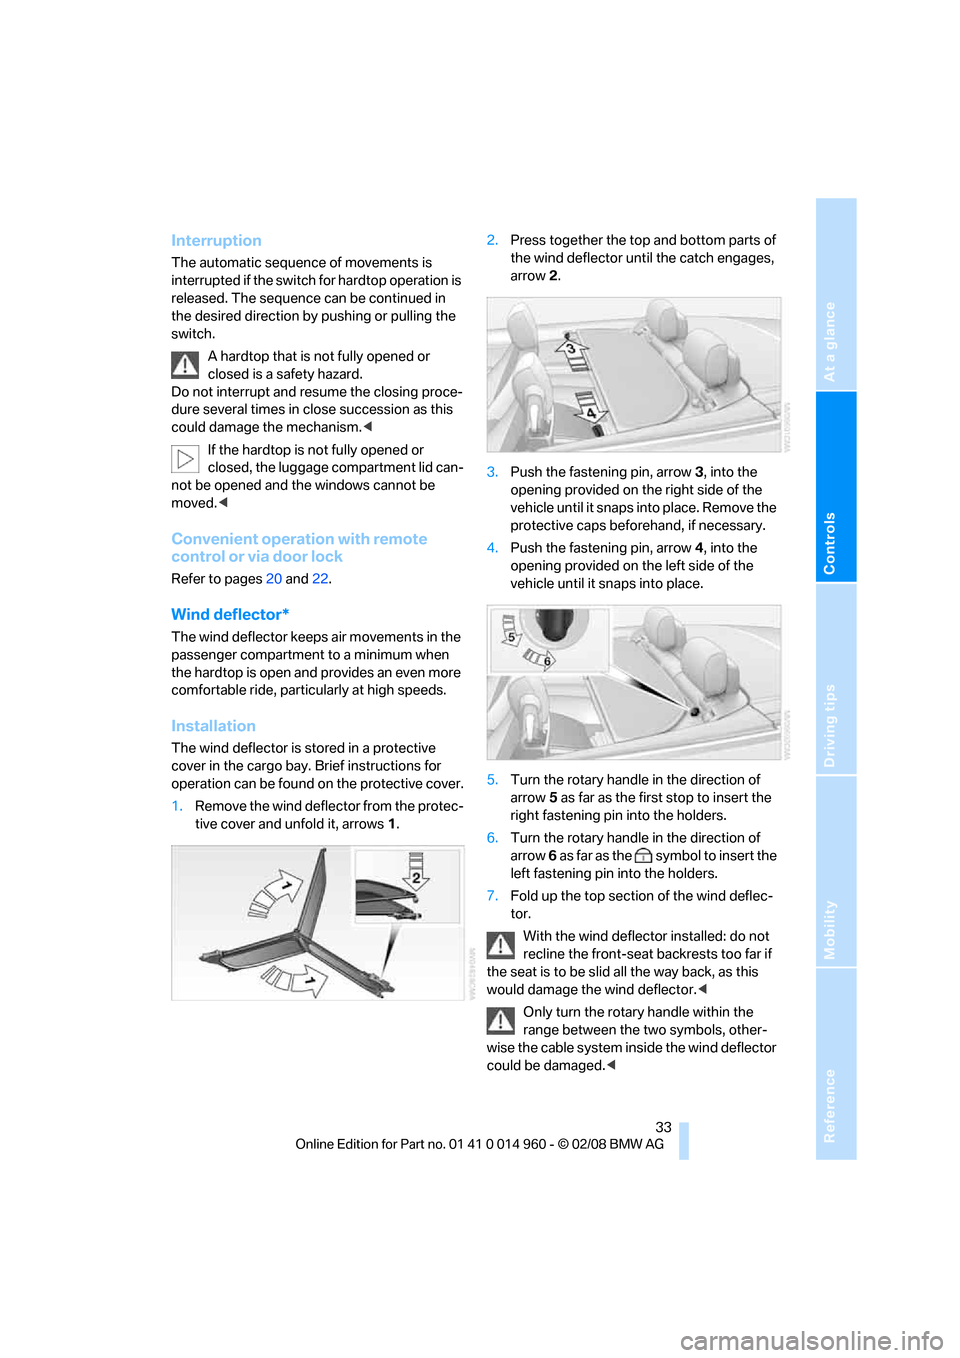
1.Remove the wind deflector from the protec-
tive cover and unfold it, arrows 1.2.Press together the top and bottom parts of
the wind deflector until the catch engages,
arrow 2.
3.Push the fastening pin, arrow 3, into the
opening provided on the right side of the
vehicle until it snaps into place. Remove the
protective caps beforehand, if necessary.
4.Push the fastening pin, arrow 4, into the
opening provided on the left side of the
vehicle until it snaps into place.
5.Turn the rotary handle in the direction of
arrow 5 as far as the first stop to insert the
right fastening pin into the holders.
6.Turn the rotary handle in the direction of
arrow 6 a s f a r a s t h e s y m b o l t o in s e r t t h e
left fastening pin into the holders.
7.Fold up the top section of the wind deflec-
tor.
With the wind deflector installed: do not
recline the front-seat backrests too far if
the seat is to be slid all the way back, as this
would damage the wind deflector.<
Only turn the rotary handle within the
range between the two symbols, other-
wise the cable system inside the wind deflector
could be damaged.<
Page 36 of 172

Opening and closing
34
Removing the wind deflector
Proceed in the reverse order as used for instal-
lation.
Protective caps are provided in the vehicle for
the holders of the wind deflector.
Folding
Slide the red release lever towards the middle of
the wind deflector and push the two halves
apart.
Loading function
Cargo can still be loaded on the rear seat of the
vehicle even if the wind deflector has been
installed.
1.Lower all windows.
2.Fold down the top section of the wind
deflector, arrow1.3.Turn the rotary handle to position ,
arrow2.
Fold both sections of the wind deflector forward
and rest them against the front seats, arrow3.
To protect the seat cushions or to use the bag
holders, you can fold the rear backrest down,
refer to page92.
Page 47 of 172

Reference
At a glance
Controls
Driving tips
Mobility
45
3.Allow the belt strap to retract and pull it taut
against the child-restraint system.
The safety belt is locked.
To unlock the safety belt
1.Open the belt buckle.
2.Remove the child-restraint system.
3.Allow the safety belt strap to retract all the
way.
LATCH child-restraint fixing
system
LATCH: Lower Anchors and Tethers for CHil-
dren.
To install and use the LATCH child
restraint system, follow the operating and
safety instructions provided by the manufac-
turer of the system, otherwise the protective
function of the seat may be compromised.<
Before installing the child seat, pull the belt out
of the area for the child-restraint fixing system.
Ensure that both lower LATCH anchors
are correctly engaged and that the child
restraint system is resting firmly against the
backrest, otherwise the protective function of
the seat may be compromised.<
The anchor points for the lower LATCH
anchors are located behind the labeled protec-
tive caps.
Coupe: child-restraint system with
tether strap
Use the top tether anchors to secure
child-restraint systems only, otherwise
the anchors could be damaged.
Coupe: placement of the tether strap
Make sure the upper retaining strap does
not run over sharp edges and is not
twisted as it passes to the top anchor. Other-
wise the strap will not properly secure the child-
restraint system in the event of an accident.<
1Direction of travel
2Head restraint
3Hook for upper retaining strap
4Anchor
5Rear window shelf
6Seat backrest
7Upper retaining strap of child-restraint sys-
tem
1.Push the head restraint upward.
2.Guide the upper retaining strap between
the head restraint holders.
3.Use the hook to clip the retaining strap to
the anchor.
4.Push the head restraint into its lowermost
position.
5.Pull the retaining strap taut.
Page 82 of 172

Climate
80
Climate
1Airflow directed toward the windshield and
side windows
2Air to the upper body area
Draft-free ventilation83
3Air to the footwell
4Air distribution, manual
5Temperature adjustment, left-hand side of
passenger compartment
6Maximum cooling
7AUTO program
8Air flow rate, manual
9Automatic recirculated-air control AUC/
Recirculated-air mode10Temperature adjustment, right-hand side
of passenger compartment
11Residual heat
12Defrosting windows and removing conden-
sation
13Switching cooling function on/off manually
14Rear window defroster
15Air grill for interior temperature sensor –
please keep clear and unobstructed
Page 83 of 172

Reference
At a glance
Controls
Driving tips
Mobility
81
Automatic climate control
Comfortable interior climate
AUTO program7 offers the ideal air distribution
and air flow rate for almost all conditions, refer
to AUTO program below. All you need to do is
select an interior temperature which is comfort-
able for you.
The following sections inform you in detail
about how to adjust the settings.
Most settings are stored for the remote control
currently in use, refer also to Personal Profile
settings on page18.
Adjusting air distribution manually
The air distribution can be
switched on and off manually. The
air is directed to the windshield, to
the upper body area and to the
footwell. Automatic air distribution adjustment
is deactivated.
You can switch the automatic air distribution
back on by pressing the AUTO button. This
automatically switches on the cooling function
as well.
Temperature
Set the desired temperatures indi-
vidually for the driver's and front
passenger's sides.
The automatic climate control
achieves this temperature as quickly as possi-
ble regardless of the season, using maximum
cooling or heating power if necessary, and then
maintains it.
When you switch between different tem-
perature settings in quick succession, the
automatic climate control does not have
enough time to achieve the set temperature.<
You can achieve maximum heating power with
the highest setting, regardless of the outside
temperature.
The lowest setting effects continuous cooling.
Maximum cooling
At outside temperatures above
327/06 and when the engine is
running, you obtain a maximum
cooling effect as soon as possible.
The automatic climate control goes into recir-
culated-air mode at the lowest temperature. Air
flows at maximum rate from the vents for the
upper body area. You should therefore open
them for maximum cooling.
AUTO program
The AUTO program adjusts the air
distribution to the windshield and
side windows, towards the upper
body area and into the footwell for you. The air
flow rate and your temperature specifications
will be adapted to outside influences as a result
of seasonal changes, e.g. sunlight or window
condensation.
The cooling is switched on automatically with
the AUTO program.
Adjusting air flow rate manually
Press the left side of the button to
reduce airflow. Press the right side
of the button to increase it.
You can reactivate the automatic mode for the
air flow rate with the AUTO button.
The air flow rate may be reduced or the blower
may be switched off entirely to save on battery
power. The display remains the same.
Switching the system on/off
With the blower at its lowest setting, press the
left side of the button to switch off the auto-
matic climate control. All displays are cleared
except for the rear window defroster if it is
switched on.
Press any button except REST or rear window
defroster to reactivate the automatic climate
control.
Page 84 of 172

Climate
82
Automatic recirculated-air control
AUC/Recirculated-air mode
Switch on the desired operating
mode by pressing this button
repeatedly:
>LED off: outside air flows in continuously.
>Left-hand LED on, AUC mode: a sensor
detects pollutants in the outside air. If nec-
essary, the system blocks the supply of out-
side air and recirculates the inside air. As
soon as the concentration of pollutants in
the outside air has decreased sufficiently,
the system automatically switches back to
outside air supply.
>Right-hand LED on, recirculated-air mode:
the supply of outside air is permanently
shut off. The system then recirculates the
air currently within the vehicle.
If condensation starts to form on the
inside window surfaces during operation
in the recirculated-air mode, you should switch
it off while also increasing the air flow rate as
required.
The recirculated-air mode should not be used
continuously for lengthy periods, otherwise the
quality of the air inside the car will gradually
deteriorate.<
Via the button on the steering wheel
You can switch quickly between the recircu-
lated-air mode and the previous mode using a
button
on the steering wheel, refer to page11.
Residual heat
The heat stored in the engine is
used to heat the passenger com-
partment, e.g. while stopped at a
school to pick up a child.
The function can be switched on when the fol-
lowing conditions are met:
>Up to 15 minutes after the engine has been
switched off
>While the engine is at operating tempera-
ture
>As long as battery voltage is sufficient>At an outside temperature below 777/
256
The LED is lit when the function is on.
As of radio readiness, you can set the interior
temperature, the air flow rate and the air distri-
bution.
Defrosting windows and removing
condensation
Quickly removes ice and conden-
sation from the windshield and
front side windows.
Switch on the cooling function as well.
Switching cooling function on/off
The cooling function cools and
dehumidifies the incoming air
before reheating it as required,
according to the temperature setting. This
function is only available while the engine is
running.
The cooling function helps prevent condensa-
tion on the windows or removes it quickly.
Depending on the weather, the windshield may
fog over briefly when the engine is started.
The cooling function is automatically switched
on along with the AUTO program.
Rear window defroster
The defroster is switched off auto-
matically after a certain time.
Depending on your vehicle's
equipment, the upper wires serve as an antenna
and are not part of the rear window defroster.
Page 100 of 172

Things to remember when driving
98
Things to remember when driving
Break-in period
Moving parts need breaking-in time to adjust to
each other. Please follow the instructions below
in order to achieve the optimal service life and
economy of operation for your vehicle.
Engine and differential
Always obey all official speed limits.
Up to 1,200 miles/2,000 km
Drive at varying engine and road speeds, but do
not exceed an engine speed of 5,500 rpm or a
road speed of 105 mph/170 km/h.
Do not depress the accelerator all the way.
From 1,200 miles/2,000 km to
3,000 miles/5,000 km
Engine and road speeds can be increased grad-
ually up to a traveling speed of 135 mph/
220 km/h. Use the maximum speed only for
brief intervals, e. g. when passing.
Transmission
The transmission begins functioning at an opti-
mal level only after a distance of approx.
300 miles/500 km. Do not exceed engine
speeds of 5,500 rpm during this period.
Tires
Due to technical factors associated with their
manufacture, tires do not achieve their full trac-
tion potential until after an initial break-in
period. Therefore, drive cautiously during the
first 200 miles/300 km.
Brake system
Brakes require an initial break-in period of
approx. 300 miles/500 km to achieve optimized
contact and wear patterns between brake pads
and rotors. Drive cautiously during this break-in
period.
Clutch
The function of the clutch reaches its optimal
level only after a distance driven of approx.
300 miles/500 km. During this break-in period,
engage the clutch gently.
Following part replacement
The same break-in procedures should be
observed if any of the components mentioned
above have to be renewed in the course of the
vehicle's operating life.
General driving notes
Clearance
Mind the limited clearance of the BMW
M3, e. g. when driving into underground
parking garages or over obstacles. If equipped
with EDC
*, select the "Sport" program, refer to
page68, when driving off curbs to keep clear-
ance as even as possible. Otherwise the vehicle
may be damaged.<
Close the luggage compartment lid
Operate the vehicle only when the lug-
gage compartment lid is closed. Other-
wise, exhaust fumes could enter the interior of
the vehicle.<
If the vehicle must be driven with the luggage
compartment lid open:
1.Close all windows and the glass roof.
2.Greatly increase the air volume of the auto-
matic climate control system, refer to
page81.
Hot exhaust system
In all vehicles, extremely high tempera-
tures are generated in the exhaust sys-
tem. Do not remove the heat shields installed
adjacent to various sections of the exhaust sys-
tem, and never apply undercoating to them.
When driving, standing at idle and while park-