2008 BMW 760LI service
[x] Cancel search: servicePage 80 of 254

Everything under control
78
Resetting values
You can reset values for the average speed and
average fuel consumption:
1.Activate the relevant menu item and press
the controller.
2.Press the controller again to confirm your
selection.
This also resets the information currently
shown on the Info Display.
Entering a distance manually
1.Select "To dest." and press the controller.
2.Turn the controller to set the distance to the
destination.
3.Press the controller to save the setting.
The distance to the destination is automatically
predetermined when using the navigation sys-
tem route guidance, refer to page144.
Using voice command system
Trip computer
The trip computer can be used, e.g. for a vaca-
tion trip.
iDrive, for principle details, refer to page16.
1.Press the button to open the start
menu.
2.Move the controller toward "Car Data".3.Select "BC " and press the controller.
>Departure time
>Driving time
>Distance traveled
>Average fuel consumption
>Average speed
To switch trip computer on/off and reset all val-
ues:
Select "START / RESET" and press the con-
troller.
To deactivate trip computer:
Select "STOP" and press the controller.
Service required
The distance or time period remaining until your
next service briefly appears when you switch on
the ignition.
Your Service Advisor will determine your
vehicle's current service requirements by
reading out the data stored in the remote con-
trol.<
With BMW Assist enabled, information about
maintenance status of your vehicle or informa-
tion about legally mandated inspections is
automatically transmitted before the relevant {On-board computer}.
Page 81 of 254

Controls
79Reference
At a glance
Driving tips
Communications
Navigation
Entertainment
Mobility
deadline, refer to Automatic service notification
on page190.
Additional information
You can view additional information on service
and maintenance procedures on the Control
Display.
iDrive, for principle details, refer to page16.
1.Press the button to open the start
menu.
2.Move the controller toward "Car Data".
3.Select and press the controller.
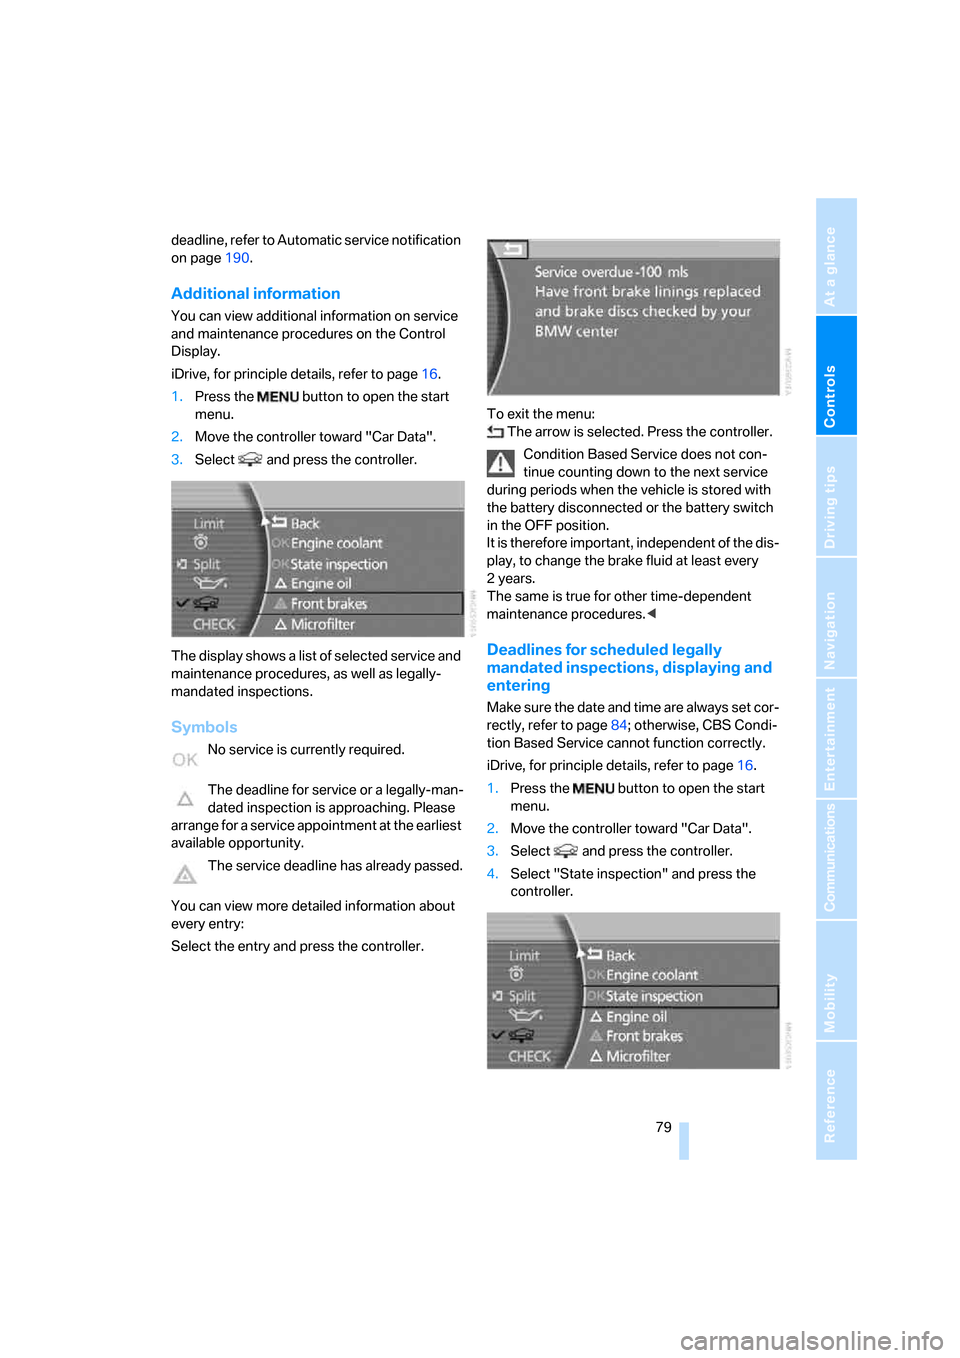
The display shows a list of selected service and
maintenance procedures, as well as legally-
mandated inspections.
Symbols
No service is currently required.
The deadline for service or a legally-man-
dated inspection is approaching. Please
arrange for a service appointment at the earliest
available opportunity.
The service deadline has already passed.
You can view more detailed information about
every entry:
Select the entry and press the controller.To exit the menu:
The arrow is selected. Press the controller.
Condition Based Service does not con-
tinue counting down to the next service
during periods when the vehicle is stored with
the battery disconnected or the battery switch
in the OFF position.
It is therefore important, independent of the dis-
play, to change the brake fluid at least every
2years.
The same is true for other time-dependent
maintenance procedures.<
Deadlines for scheduled legally
mandated inspections, displaying and
entering
Make sure the date and time are always set cor-
rectly, refer to page84; otherwise, CBS Condi-
tion Based Service cannot function correctly.
iDrive, for principle details, refer to page16.
1.Press the button to open the start
menu.
2.Move the controller toward "Car Data".
3.Select and press the controller.
4.Select "State inspection" and press the
controller.
Page 82 of 254

Everything under control
80 5.Turn the controller to select appointment
input.
6.Press the controller.
The month is selected.
7.Turn the controller to adjust the setting.
8.Press the controller to save the setting.
The year is selected.
9.Turn the controller to adjust the setting.
10.Press the controller to save the setting.
11."STORE DATE" is selected. Press the con-
troller to save the setting.
The date entry is saved.
The list of entries is resorted by date.
Display on Info Display
If the deadline for your next state vehicle
inspection is approaching, the remaining dis-
tance and time will appear briefly when you
switch on the ignition.
Your Service Advisor will determine your
vehicle's current service requirements by
reading out the data stored in the remote con-
trol.<
Check Control
The concept
Check Control monitors functions in the vehicle
and generates a message if a malfunction
occurs in the monitored systems. A Check Con-
trol message of this kind includes indicator or
warning lamps on the Info Display and possibly
an acoustic signal and text messages on the
Info Display.
Indicator and warning lamps
Control and warning lamps can light up in vari-
ous combinations and colors.
Explanatory text messages
Text messages on the Info Display explain the
meaning of the indicator and warning lamps
shown.
Page 97 of 254

Controls
95Reference
At a glance
Driving tips
Communications
Navigation
Entertainment
Mobility
Airbags
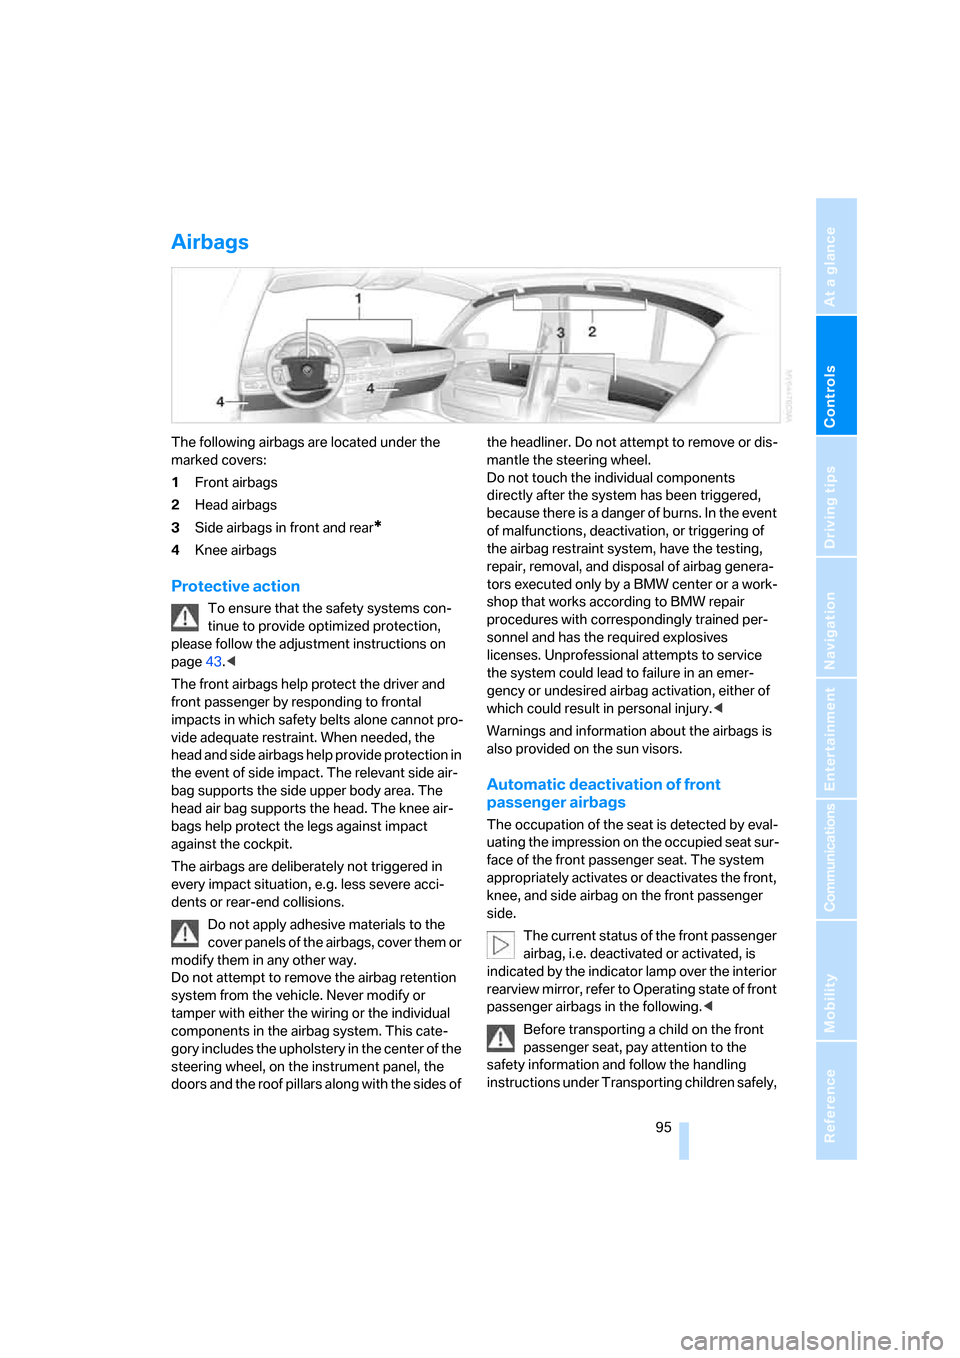
The following airbags are located under the
marked covers:
1Front airbags
2Head airbags
3Side airbags in front and rear
*
4Knee airbags
Protective action
To ensure that the safety systems con-
tinue to provide optimized protection,
please follow the adjustment instructions on
page43.<
The front airbags help protect the driver and
front passenger by responding to frontal
impacts in which safety belts alone cannot pro-
vide adequate restraint. When needed, the
head and side airbags help provide protection in
the event of side impact. The relevant side air-
bag supports the side upper body area. The
head air bag supports the head. The knee air-
bags help protect the legs against impact
against the cockpit.
The airbags are deliberately not triggered in
every impact situation, e.g. less severe acci-
dents or rear-end collisions.
Do not apply adhesive materials to the
cover panels of the airbags, cover them or
modify them in any other way.
Do not attempt to remove the airbag retention
system from the vehicle. Never modify or
tamper with either the wiring or the individual
components in the airbag system. This cate-
gory includes the upholstery in the center of the
steering wheel, on the instrument panel, the
doors and the roof pillars along with the sides of the headliner. Do not attempt to remove or dis-
mantle the steering wheel.
Do not touch the individual components
directly after the system has been triggered,
because there is a danger of burns. In the event
of malfunctions, deactivation, or triggering of
the airbag restraint system, have the testing,
repair, removal, and disposal of airbag genera-
tors executed only by a BMW center or a work-
shop that works according to BMW repair
procedures with correspondingly trained per-
sonnel and has the required explosives
licenses. Unprofessional attempts to service
the system could lead to failure in an emer-
gency or undesired airbag activation, either of
which could result in personal injury.<
Warnings and information about the airbags is
also provided on the sun visors.
Automatic deactivation of front
passenger airbags
The occupation of the seat is detected by eval-
uating the impression on the occupied seat sur-
face of the front passenger seat. The system
appropriately activates or deactivates the front,
knee, and side airbag on the front passenger
side.
The current status of the front passenger
airbag, i.e. deactivated or activated, is
indicated by the indicator lamp over the interior
rearview mirror, refer to Operating state of front
passenger airbags in the following.<
Before transporting a child on the front
passenger seat, pay attention to the
safety information and follow the handling
instructions under Transporting children safely,
Page 109 of 254

Controls
107Reference
At a glance
Driving tips
Communications
Navigation
Entertainment
Mobility
The interior temperature, air volume, and air
distribution can be set starting from the radio
ready state.
Switching cooling function on and off
manually
When activated, the air conditioner
mode cools and dehumidifies the
incoming air, reheating it as
required, depending on the temperature set-
ting. Depending on the weather, the windshield
may fog over briefly when the engine is started.
The cooling function is switched on automati-
cally with the AUTO program. The passenger
compartment can only be cooled with the
engine running.
Rear window defroster
The rear window defroster
switches off automatically after a
while. Depending on your equip-
ment package, the upper wires are used as an
antenna and are not part of the rear window
defroster.
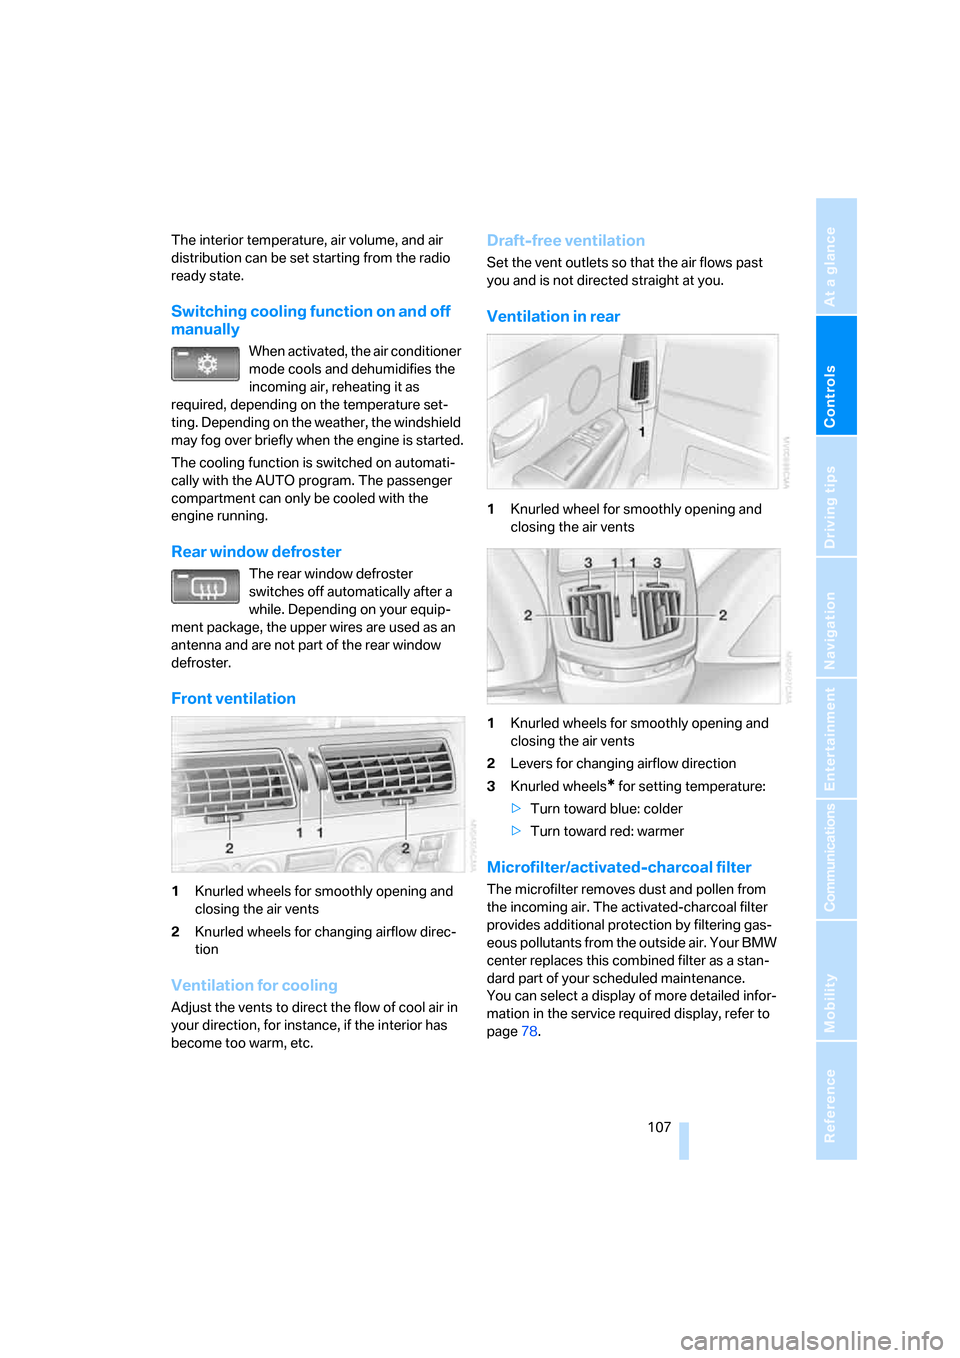
Front ventilation
1Knurled wheels for smoothly opening and
closing the air vents
2Knurled wheels for changing airflow direc-
tion
Ventilation for cooling
Adjust the vents to direct the flow of cool air in
your direction, for instance, if the interior has
become too warm, etc.
Draft-free ventilation
Set the vent outlets so that the air flows past
you and is not directed straight at you.
Ventilation in rear
1Knurled wheel for smoothly opening and
closing the air vents
1Knurled wheels for smoothly opening and
closing the air vents
2Levers for changing airflow direction
3Knurled wheels
* for setting temperature:
>Turn toward blue: colder
>Turn toward red: warmer
Microfilter/activated-charcoal filter
The microfilter removes dust and pollen from
the incoming air. The activated-charcoal filter
provides additional protection by filtering gas-
eous pollutants from the outside air. Your BMW
center replaces this combined filter as a stan-
dard part of your scheduled maintenance.
You can select a display of more detailed infor-
mation in the service required display, refer to
page78.
Page 124 of 254

Things to remember when driving
122
Things to remember when driving
Breaking-in
Moving parts need time to adjust to one
another. To ensure that your vehicle continues
to furnish optimized economy of operation
throughout an extended service life, we request
that you devote careful attention to the follow-
ing information.
Engine and differential
Always obey all official speed limits.
Up to 1,200 miles/2,000 km
Drive with changing engine and vehicle speeds,
but do not exceed:
4500 rpm or 100 mph/160 km/h
Avoid full-throttle operation and use of the
transmission's kick-down mode during these
initial miles.
After 1,200 miles/2,000 km
The engine and vehicle speed can gradually be
increased.
Tires
Due to technical factors associated with their
manufacture, tires do not achieve their full trac-
tion potential until after an initial break-in
period. Therefore, drive reservedly during the
first 200 miles/300 km.
Brake system
Brakes require an initial break-in period of
approx. 300 miles/500 km to achieve optimized
contact and wear patterns between brake pads
and rotors.
Following component replacements
Follow the break-in sequence again if compo-
nents addressed above must be replaced again
during subsequent driving.
General driving notes
Closing luggage compartment lid
Operate the vehicle only when the lug-
gage compartment lid is completely
closed. Otherwise, exhaust fumes could pene-
trate into the passenger compartment.<
If special circumstances should make it abso-
lutely necessary to operate the vehicle with the
luggage compartment lid open:
1.Close all windows and the glass sunroof.
2.Adjust the automatic climate control's
blower to supply a high rate of airflow, refer
to page106.
Hot exhaust system
As in all vehicles, extremely high temper-
atures are generated in the exhaust sys-
tem. Do not remove the heat shields installed
adjacent to it, and never apply undercoating to
them. When driving, standing at idle, and park-
ing, take care to avoid possible contact
between the hot exhaust system and any highly
flammable materials such as hay, leaves, grass,
etc. Such contact could lead to a fire, accompa-
nied by the risk of serious property damage and
personal injury.<
Mobile communications devices in
vehicle
BMW does not recommend using mobile
communications devices, e.g. mobile
phones, inside the vehicle without a direct con-
nection to an outside antenna. Otherwise, the
vehicle electronics and mobile communications
device can interfere with each other. In addition,
there is no assurance that the radiation which
results during transmission will be discharged
from the vehicle interior.<
Page 161 of 254

Navigation
Entertainment
Driving tips
159Reference
At a glance
Controls
Communications
Mobility
7.Turn the controller until you reach the
desired memory position.
8.Press the controller.
The stations are stored for the remote control
currently in use.
Using the voice command system:
Changing memory position
1.Select the desired station and press the
controller.
2.Turn the controller until you reach the
desired memory position.
3.Press the controller.
The station is now stored.
RDS Radio Data System*
RDS also broadcasts information on the VHF/
FM waveband. RDS stations have the following
properties for this purpose:
>In broadcasting companies that broadcast
over several frequencies, the system auto-
matically switches to the frequency with the
best reception quality.
>If the reception conditions are good, the
station names are shown on the Control
Display. With weaker reception or when
there is interference, it can take a while for
the station names to appear.
Switching RDS on/off
1.Select "FM" and press the controller.
2.Choose the selection criterion and press
the controller.
3.Select "MANUAL" and press the controller.
4.Select "RDS" and press the controller.
RDS is available in the FM waveband.<
Weather reports*
Weather Radio is a service of the National Oce-
anic and Atmospheric Administration (NOAA)
of the US Department of Trade. Weather
reports are repeated every 4 to 6 minutes and
are routinely updated at intervals of 1 to
3 hours, more often when necessary. Most sta-
tions operate 24 hours a day. In case of a storm,
the National Weather Service interrupts the
routine weather news and transmits special
warning messages instead. Should you have
questions regarding NOAA Weather Radio, 1.{Radio}.
2.{Station 1...12}.
Page 162 of 254

Radio
160 please contact the nearest office of the National
Weather Service or write to the National
Weather Service at: W/OM1, National Oceanic
and Atmospheric Administration, 1325 East-
West Highway, Silver Spring, MD 20910.
Calling up weather reports
iDrive, for principle details, refer to page16.
1.Press the button to open the start
menu.
2.Move the controller toward "Entertain-
ment".
3.Select "WB" and press the controller.
A list of the available channels is displayed.
4.Turn the controller until the desired channel
is selected and press the controller.
The display shows a list of weather band sta-
tions
In some regions, only one or two channels
can be received or Weather Band chan-
nels are unavailable.<
Using the voice command system
Satellite radio*
You can receive approx. 100 different channels
with high sound quality.
The channels are offered to you in predefined
packages. To listen to the channels of your
choice, you must have these channels enabled.
With this new technology the signal may fail,
causing interruptions in reception.Using the voice command system:
Enabling or disabling channels
iDrive, for principle details, refer to page16.
1.Press the button to open the start
menu.
2.Move the controller toward "Entertain-
ment".
3.Select "SAT" and press the controller.
4.Select "Channels" and press the controller.
The channels that can be received are
shown in the list.
5.Select channel and press the controller.
A phone number and the electronic serial
number, ESN, are displayed.
The electronic serial number is
required to enable or disable.<
6.Dial the displayed telephone number to
have the channel enabled or disabled.
During the enabling or disabling process,
leave the ignition switched on.
These channels are enabled.
Channel selection
Using buttons in center console
Press the button for the corresponding
direction until you reach the next station.
Using the voice command system: 1.{Weatherband}.
2.{Channel 1...7}.
1.{Satellite Radio} or {SDARS}.
2.{Turn on}.
1.{Satellite Radio} or {SDARS}.
2.{Previous station} or {Next station}