2008 BMW 760LI rear entertainment
[x] Cancel search: rear entertainmentPage 53 of 254
Controls
51Reference
At a glance
Driving tips
Communications
Navigation
Entertainment
Mobility
Adjusting manually
You can also adjust the mirrors manually by
pressing against the outer edges of their mirror
glass.
Folding mirrors in and out*
At driving speeds up to approx. 15 mph/
20 km/h, you can fold the mirrors in and out by
pressing button3. This is an advantage, e.g. in
car washes and narrow streets, or for moving
mirrors that were manually folded in back into
the correct position.
Before entering an automatic car wash,
fold in the exterior mirrors by hand or with
button3, to prevent them from being damaged
due to the width of the vehicle.<
Automatic heating
Both exterior mirrors are automatically heated
whenever the ignition is switched on.
Tilting down passenger-side exterior
mirror – automatic curb monitor
Activating
1.Push the mirror selector switch into the
driver's mirror position, arrow1.
2.Engage transmission position R.
The mirror glass tilts downward somewhat
on the passenger's side. This allows the
driver to see the area immediately adjacent
to the vehicle – such as a curb – when park-
ing, etc.
Deactivating
Push the mirror selector switch into the passen-
ger's mirror position, arrow2.
Interior and exterior mirrors,
automatic dimming feature*
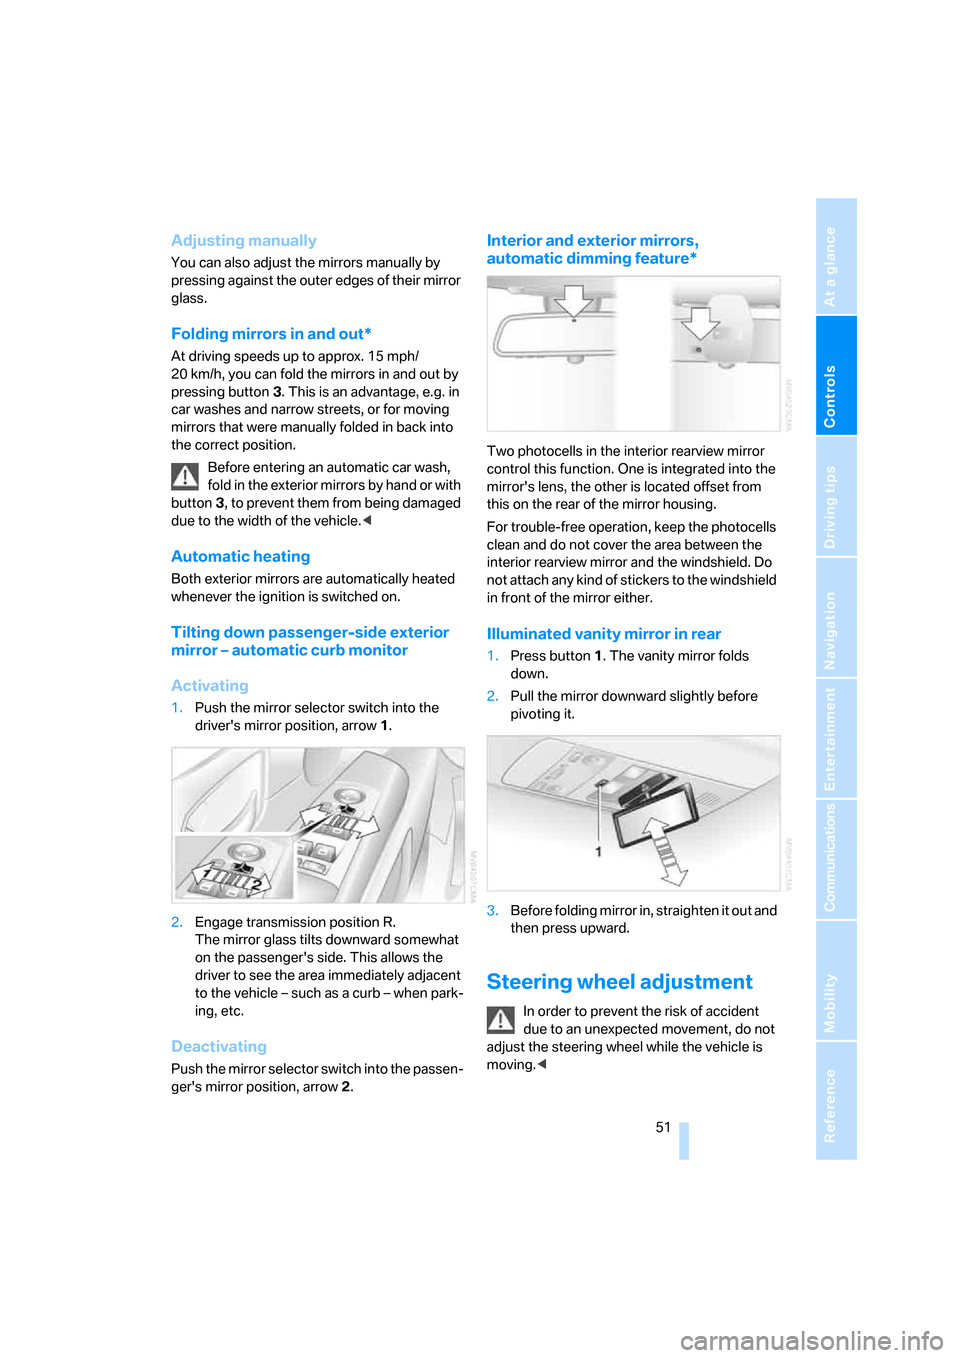
Two photocells in the interior rearview mirror
control this function. One is integrated into the
mirror's lens, the other is located offset from
this on the rear of the mirror housing.
For trouble-free operation, keep the photocells
clean and do not cover the area between the
interior rearview mirror and the windshield. Do
not attach any kind of stickers to the windshield
in front of the mirror either.
Illuminated vanity mirror in rear
1.Press button1. The vanity mirror folds
down.
2.Pull the mirror downward slightly before
pivoting it.
3.Before folding mirror in, straighten it out and
then press upward.
Steering wheel adjustment
In order to prevent the risk of accident
due to an unexpected movement, do not
adjust the steering wheel while the vehicle is
moving.<
Page 57 of 254
Controls
55Reference
At a glance
Driving tips
Communications
Navigation
Entertainment
Mobility
Unlocking safety belt
1.Open the belt buckle.
2.Remove the child restraint system.
3.Allow the belt webbing to be pulled in com-
pletely.
LATCH child restraint fixing
system*
LATCH: Lower Anchor and Tethers for CHil-
dren.
For installation and use of LATCH child
restraint systems, follow the operating
and safety instructions of the system manufac-
turer.<
If the vehicle is equipped with power seats in
the rear, return these to their standard positions
before using LATCH child restraint systems,
refer to page45.
Before installing the LATCH child's seat, pull
the belt away from the region of the child
restraint fixing system.
Make sure that the LATCH anchors have
properly engaged and that the child
restraint system is resting snugly against the
backrest.<
Rear seats
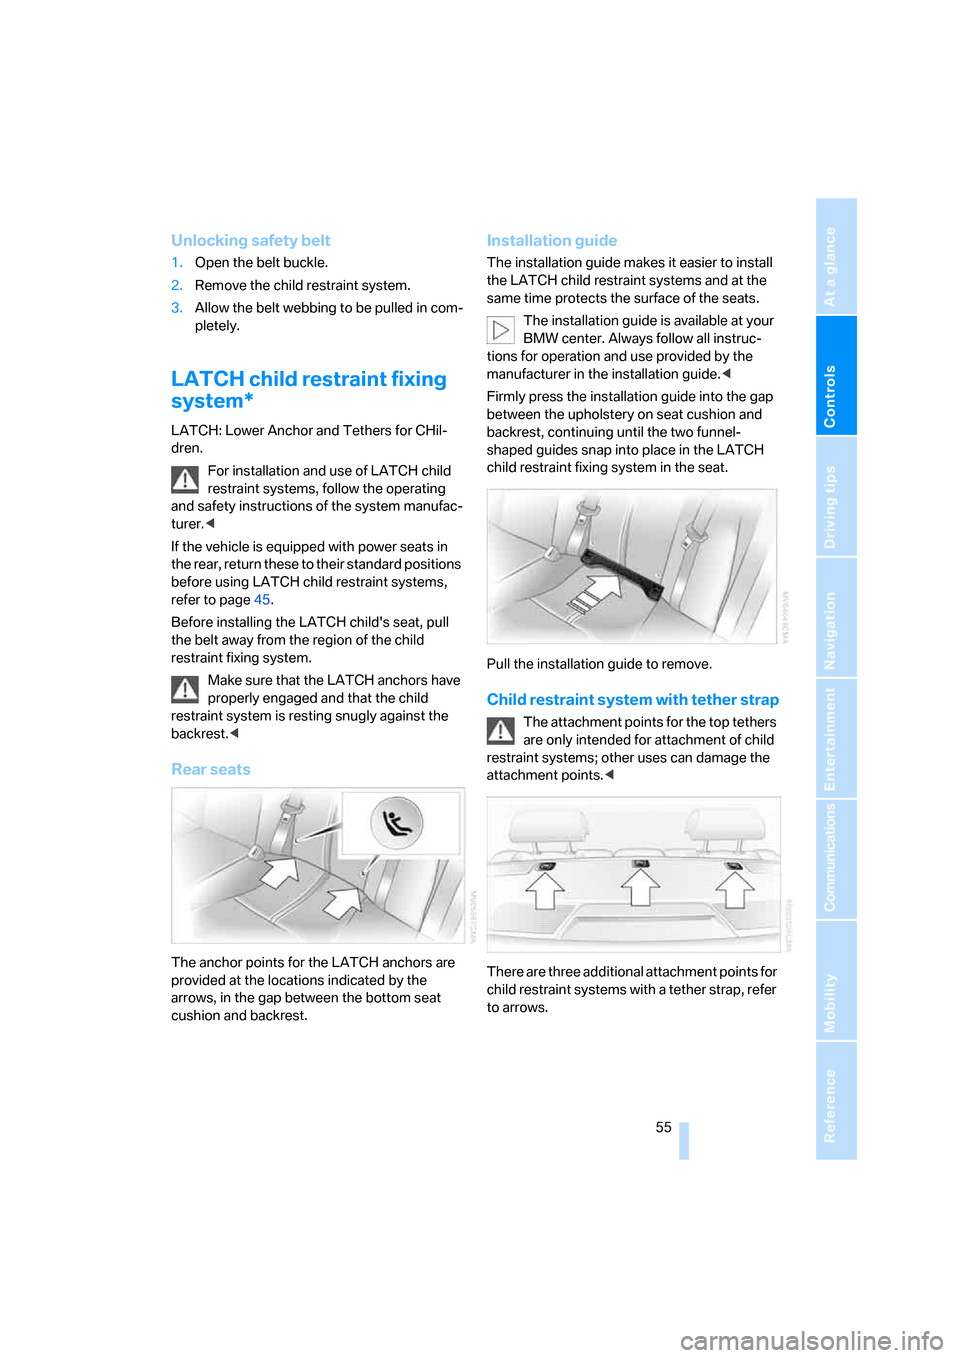
The anchor points for the LATCH anchors are
provided at the locations indicated by the
arrows, in the gap between the bottom seat
cushion and backrest.
Installation guide
The installation guide makes it easier to install
the LATCH child restraint systems and at the
same time protects the surface of the seats.
The installation guide is available at your
BMW center. Always follow all instruc-
tions for operation and use provided by the
manufacturer in the installation guide.<
Firmly press the installation guide into the gap
between the upholstery on seat cushion and
backrest, continuing until the two funnel-
shaped guides snap into place in the LATCH
child restraint fixing system in the seat.
Pull the installation guide to remove.
Child restraint system with tether strap
The attachment points for the top tethers
are only intended for attachment of child
restraint systems; other uses can damage the
attachment points.<
There are three additional attachment points for
child restraint systems with a tether strap, refer
to arrows.
Page 63 of 254
Controls
61Reference
At a glance
Driving tips
Communications
Navigation
Entertainment
Mobility
What you will need
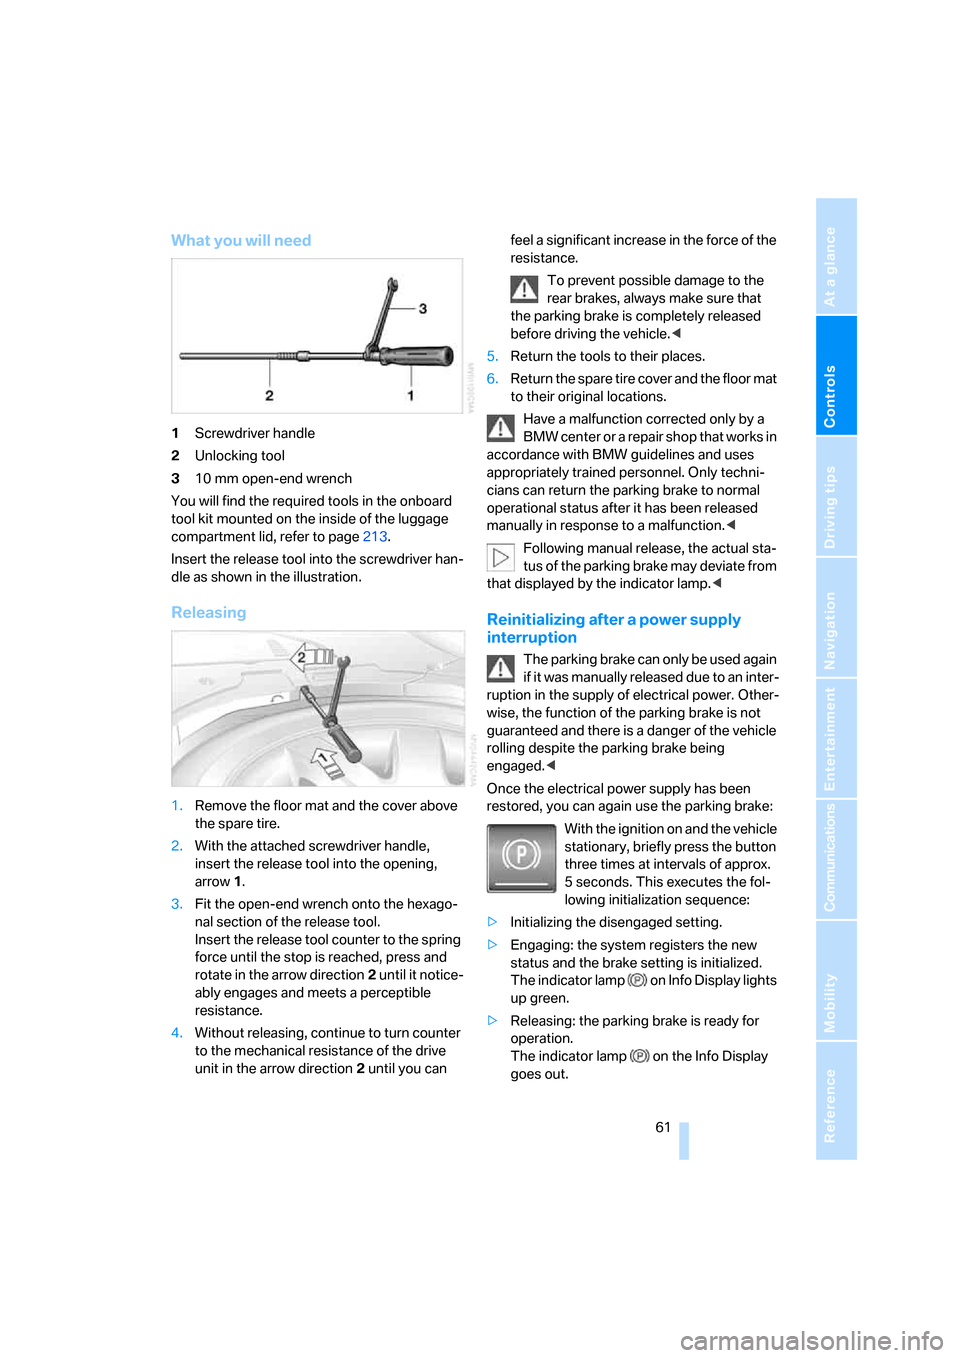
1Screwdriver handle
2Unlocking tool
310 mm open-end wrench
You will find the required tools in the onboard
tool kit mounted on the inside of the luggage
compartment lid, refer to page213.
Insert the release tool into the screwdriver han-
dle as shown in the illustration.
Releasing
1.Remove the floor mat and the cover above
the spare tire.
2.With the attached screwdriver handle,
insert the release tool into the opening,
arrow1.
3.Fit the open-end wrench onto the hexago-
nal section of the release tool.
Insert the release tool counter to the spring
force until the stop is reached, press and
rotate in the arrow direction2 until it notice-
ably engages and meets a perceptible
resistance.
4.Without releasing, continue to turn counter
to the mechanical resistance of the drive
unit in the arrow direction 2 until you can feel a significant increase in the force of the
resistance.
To prevent possible damage to the
rear brakes, always make sure that
the parking brake is completely released
before driving the vehicle.<
5.Return the tools to their places.
6.Return the spare tire cover and the floor mat
to their original locations.
Have a malfunction corrected only by a
BMW center or a repair shop that works in
accordance with BMW guidelines and uses
appropriately trained personnel. Only techni-
cians can return the parking brake to normal
operational status after it has been released
manually in response to a malfunction.<
Following manual release, the actual sta-
tus of the parking brake may deviate from
that displayed by the indicator lamp.<
Reinitializing after a power supply
interruption
The parking brake can only be used again
if it was manually released due to an inter-
ruption in the supply of electrical power. Other-
wise, the function of the parking brake is not
guaranteed and there is a danger of the vehicle
rolling despite the parking brake being
engaged.<
Once the electrical power supply has been
restored, you can again use the parking brake:
With the ignition on and the vehicle
stationary, briefly press the button
three times at intervals of approx.
5 seconds. This executes the fol-
lowing initialization sequence:
>Initializing the disengaged setting.
>Engaging: the system registers the new
status and the brake setting is initialized.
The indicator lamp on Info Display lights
up green.
>Releasing: the parking brake is ready for
operation.
The indicator lamp on the Info Display
goes out.
Page 67 of 254

Controls
65Reference
At a glance
Driving tips
Communications
Navigation
Entertainment
Mobility
Turn signals/
headlamp flasher
1High beams
2Headlamp flasher
3Turn signals
Using turn signals
Move the lever beyond the resistance point.
If you wish to manually control the shut-off of
the turn signal, then only push the lever to the
resistance point.
Atypically rapid flashing of the indicator
lamps signals the failure of a turn signal
lamp, possibly in the trailer when towing.<
Temporarily signaling
Push the lever to the resistance point and hold it
there for as long as you wish to signal.
Triple turn signal activation
Press the lever to the resistance point and
release; the turn signal flashes three times.
Wiper system
1Switching on wipers
2Switching off wipers or for brief wipe
3Activating/deactivating rain sensor
4Cleaning windshield, headlamps and
BMW Night Vision camera
*
5Adjusting rain sensor sensitivity level
Switching on wipers
The lever automatically returns to its initial posi-
tion when released.
Normal wiper speed
Press once.
The system reverts to operation in the intermit-
tent mode when the vehicle is stationary.
Fast wiper speed
Press twice or press beyond the resistance
point.
The system reverts to normal speed when the
vehicle is stationary.
Rain sensor
The rain sensor controls the wiper operation as
a function of the rain intensity. It is located on
the windshield, directly in front of the inside
rearview mirror.
Page 89 of 254

Controls
87Reference
At a glance
Driving tips
Communications
Navigation
Entertainment
Mobility
1.Press the button to open the start
menu.
2.Move the controller toward "Settings".
3.Select "Vehicle" and press the controller.
4.Select "PDC pic." and press the controller.
This activates the PDC display.
The display appears as soon as PDC is acti-
vated.
The setting is stored for the remote control cur-
rently in use.
To exit the menu:
Select the arrow and press the controller.
System limits
Even with PDC, final responsibility for
estimating the distance between the
vehicle and any objects always remains with the
driver. Even when sensors are involved, there is
a blind spot in which objects cannot be
detected. The system's detection of objects is
also subject to the physical limits that apply to
all forms of ultrasonic measurement, such as
those encountered with tow bars and trailer
couplings, as well as thin or wedge-shaped
objects. Low objects already indicated, such as
curb edges, may enter the blind spot of the sen-
sors before or after a continuous audible signal is given. Higher, protruding objects, such as
wall ledges, may not be detectable.
Loud noises from outside and inside the vehicle
may also prevent you from hearing the PDC's
signal tone.<
Driving stability control
systems
Your BMW is equipped with an extended array
of systems designed to enhance and maintain
vehicle stability under extreme conditions.
ABS Antilock Brake System
ABS prevents the wheels from locking during
braking. Safe steering response is maintained
even during hard braking. This increases active
driving safety.
ABS is operational every time you start the
engine. For information on safe braking, refer to
page123.
CBC Cornering Brake Control
This system provides further enhancements to
vehicle stability and steering response when
braking while cornering or when braking during
a lane change.
Electronic brake-force distribution
The system controls the brake pressure in the
rear wheels to ensure a stable braking behavior.
Brake assistant
When you apply the brakes rapidly, this system
automatically produces the maximum braking
force boost and thus helps to achieve the short-
est possible braking distance during full brak-
ing. This system exploits all of the benefits pro-
vided by ABS.
Do not reduce the pressure on the brake pedal
for the duration of the full braking.
DSC Dynamic Stability Control
DSC prevents traction loss in the driving wheels
when starting off and accelerating. The system
also detects unstable driving conditions such
Page 91 of 254

Controls
89Reference
At a glance
Driving tips
Communications
Navigation
Entertainment
Mobility
Deactivating DTC
Select "DTC" and press the controller.
The LED on the Control Display and the DTC
indicator lamp on the Info Display go out.
Dynamic Drive
The concept
Dynamic Drive minimizes body roll and opti-
mizes vehicle stability during cornering and
evasive maneuvers.
Active stabilizers at the front and rear axles form
the basis for Dynamic Drive. Suspension com-
pliance adapts to suit driving conditions, vary-
ing from performance-oriented during corner-
ing to smooth and comfort-oriented when the
vehicle is traveling in a straight line. During vehi-
cle operation, the system continuously runs
through closed-loop control cycles lasting only
fractions of a second.
The system assumes operational status each
time you start the engine.
Malfunction
The warning lamp lights up yellow and
a message appears on the Info Display.
A malfunction has occurred in the
Dynamic Drive system. Have the system
checked as soon as possible.
If a malfunction occurs, please remember
to adapt your speed accordingly, espe-
cially in curves.
The suspension will be noticeably softer and
the vehicle will display a greater tendency to tilt
during cornering and in crosswinds.<
If a Check Control message indicates an oil loss,
stop as soon as possible at a suitable location
and switch off the engine. Do not continue driv-
ing, contact your BMW center.
Self-leveling suspension*
Malfunction
The warning lamp for self-leveling sus-
pension lights up yellow and a message
appears on the Info Display.
A malfunction has occurred in the level control
system.
Stop driving and check the vehicle:
>The vehicle is considerably lower at the rear
than at the front, possibly also on one side,
at the rear left compared to the rear right.
>The ground clearance is reduced or the
driving comfort is noticeably reduced.
>The position of the vehicle is normal, but a
malfunction is indicated.
Drive to the nearest BMW center or a workshop
that works in accordance with BMW guidelines
and uses appropriately trained personnel. Drive
with appropriate caution in the meantime.
EDC Electronic Damping
Control*
If the influencing variables such as road surface
quality or operating conditions such as steer-
ing, braking etc. change, the damping automat-
ically adjusts to the new conditions.
iDrive, for principle details, refer to page16.
1.Press the button to open the start
menu.
2.Move the controller toward "Settings".
3.Select "Vehicle" and press the controller.
4.Select "EDC" and press the controller.
Page 97 of 254
Controls
95Reference
At a glance
Driving tips
Communications
Navigation
Entertainment
Mobility
Airbags
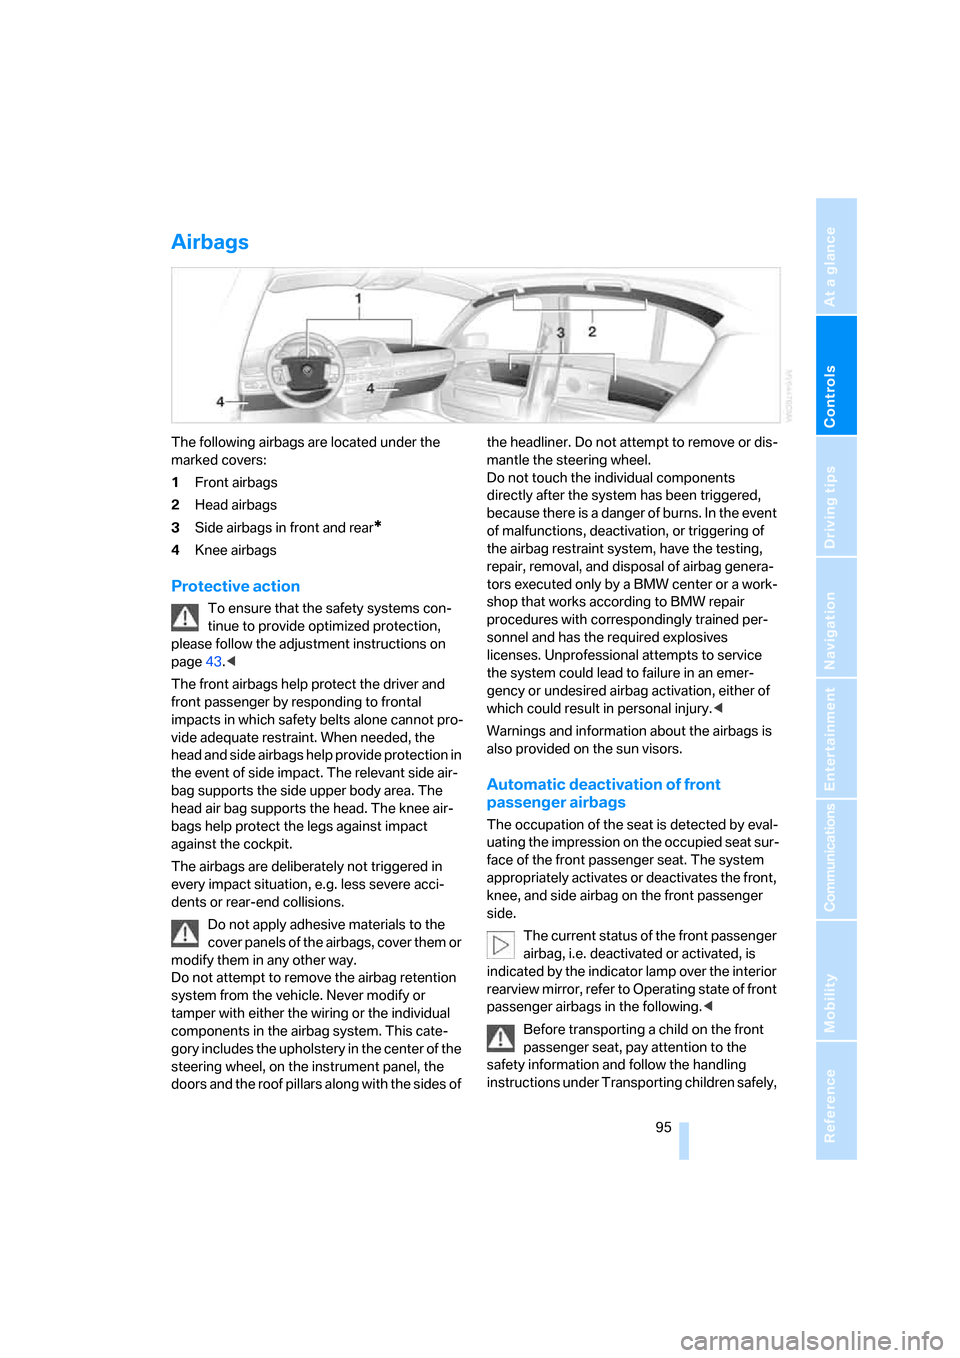
The following airbags are located under the
marked covers:
1Front airbags
2Head airbags
3Side airbags in front and rear
*
4Knee airbags
Protective action
To ensure that the safety systems con-
tinue to provide optimized protection,
please follow the adjustment instructions on
page43.<
The front airbags help protect the driver and
front passenger by responding to frontal
impacts in which safety belts alone cannot pro-
vide adequate restraint. When needed, the
head and side airbags help provide protection in
the event of side impact. The relevant side air-
bag supports the side upper body area. The
head air bag supports the head. The knee air-
bags help protect the legs against impact
against the cockpit.
The airbags are deliberately not triggered in
every impact situation, e.g. less severe acci-
dents or rear-end collisions.
Do not apply adhesive materials to the
cover panels of the airbags, cover them or
modify them in any other way.
Do not attempt to remove the airbag retention
system from the vehicle. Never modify or
tamper with either the wiring or the individual
components in the airbag system. This cate-
gory includes the upholstery in the center of the
steering wheel, on the instrument panel, the
doors and the roof pillars along with the sides of the headliner. Do not attempt to remove or dis-
mantle the steering wheel.
Do not touch the individual components
directly after the system has been triggered,
because there is a danger of burns. In the event
of malfunctions, deactivation, or triggering of
the airbag restraint system, have the testing,
repair, removal, and disposal of airbag genera-
tors executed only by a BMW center or a work-
shop that works according to BMW repair
procedures with correspondingly trained per-
sonnel and has the required explosives
licenses. Unprofessional attempts to service
the system could lead to failure in an emer-
gency or undesired airbag activation, either of
which could result in personal injury.<
Warnings and information about the airbags is
also provided on the sun visors.
Automatic deactivation of front
passenger airbags
The occupation of the seat is detected by eval-
uating the impression on the occupied seat sur-
face of the front passenger seat. The system
appropriately activates or deactivates the front,
knee, and side airbag on the front passenger
side.
The current status of the front passenger
airbag, i.e. deactivated or activated, is
indicated by the indicator lamp over the interior
rearview mirror, refer to Operating state of front
passenger airbags in the following.<
Before transporting a child on the front
passenger seat, pay attention to the
safety information and follow the handling
instructions under Transporting children safely,
Page 99 of 254
Controls
97Reference
At a glance
Driving tips
Communications
Navigation
Entertainment
Mobility
BMW Night Vision*
The concept
BMW Night Vision is a driver assistance system
that is designed to provide enhanced vision for
certain objects at night. This can be especially
helpful for detecting people and larger animals.
When objects are detected, the driver may be
able to take appropriate action sooner. For
example, the driver may identify and detect the
presence of persons or animals in the road
ahead or off to the sides and can be more alert,
slow down or stop, blow the horn, etc. The
driver can decide which actions are appropriate
and then react accordingly.
A certain area in front of the vehicle is viewed by
an infrared camera and a generated image is
shown on the Control Display. The resulting
thermal image shows the relative heat radiation
of the objects present in the camera's field of
view. Warmer objects appear brighter and
cooler objects appear darker. Contrast is
dependent on the temperature difference
between the objects and the background and
on the amount of heat radiation of the object
itself. As a result, it is quite possible that a per-
son is not continually recognizable as a person
in shape, since the thermal radiation can be
affected by different clothing which blocks heat
loss. Objects with little temperature difference
to the surrounding area, or little heat radiation
are less noticeable, for example in cold weather.
Any improvement in detection depends on
many factors such as the object size and tem-
perature compared to the surroundings, or
other nearby objects, the visual recognition
skills of the driver, weather conditions, and
other factors.
Driving hints
With the system active, periodically but briefly,
glance at the thermal image on the Control Dis-
play to notice objects that could be people or
larger animals. The glance should be similar to
glancing at the rear view mirror. Do not stare at
the image for long periods while driving, as this
will take your attention away from the road. If you notice an object of interest ahead, be pre-
pared to slow down or stop, blow the horn, or
take other appropriate action.
System limits
The system is designed to supplement but not
replace forward vision through the windshield.
The driver is responsible for safe driving at
night. BMW Night Vision is not designed to be
used as a continuous viewing window for driv-
ing at night.
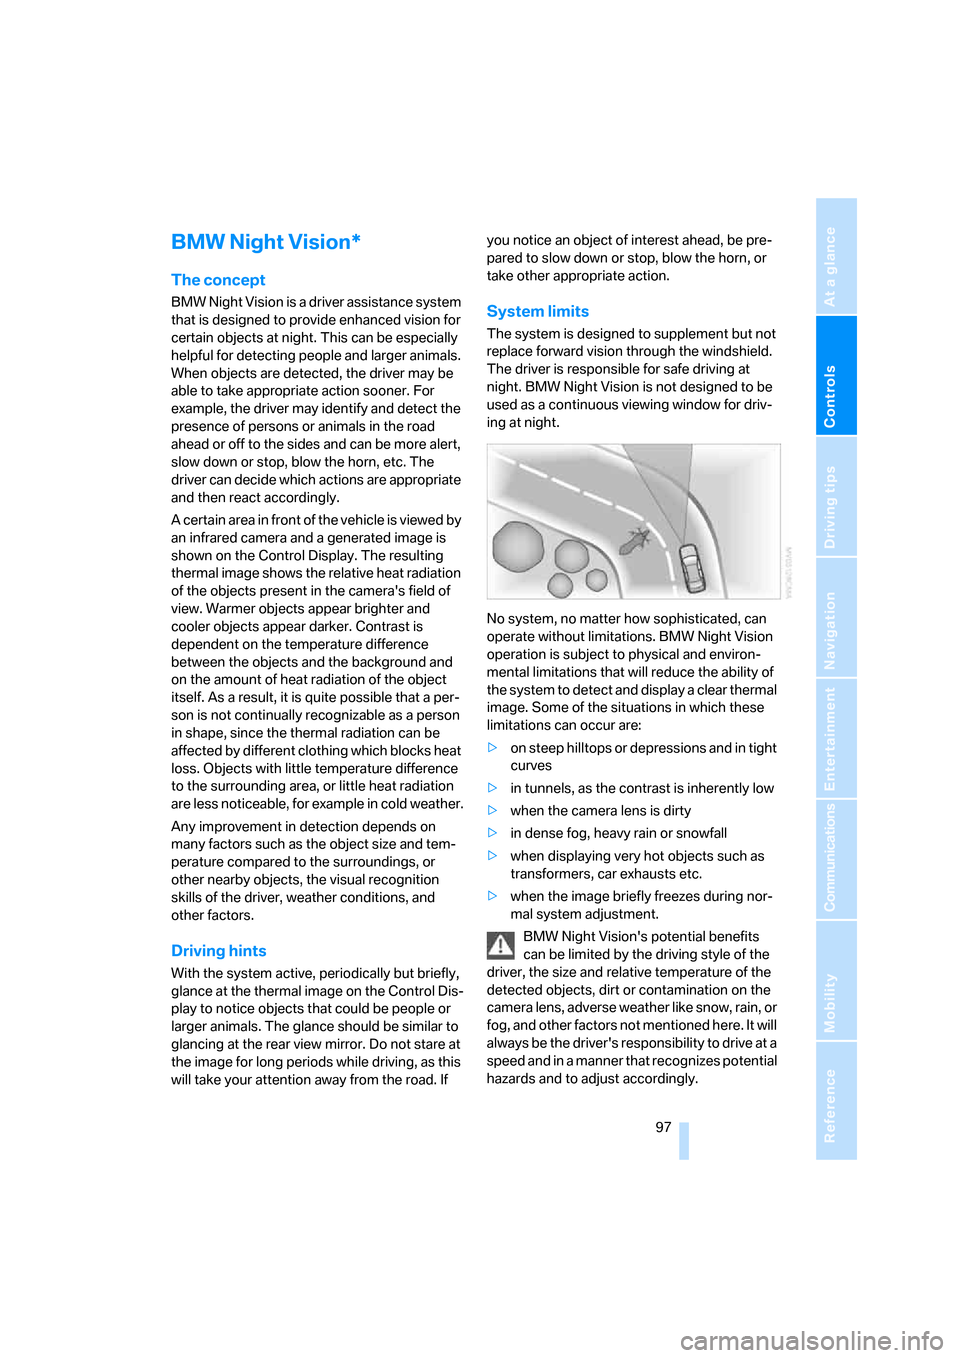
No system, no matter how sophisticated, can
operate without limitations. BMW Night Vision
operation is subject to physical and environ-
mental limitations that will reduce the ability of
the system to detect and display a clear thermal
image. Some of the situations in which these
limitations can occur are:
>on steep hilltops or depressions and in tight
curves
>in tunnels, as the contrast is inherently low
>when the camera lens is dirty
>in dense fog, heavy rain or snowfall
>when displaying very hot objects such as
transformers, car exhausts etc.
>when the image briefly freezes during nor-
mal system adjustment.
BMW Night Vision's potential benefits
can be limited by the driving style of the
driver, the size and relative temperature of the
detected objects, dirt or contamination on the
camera lens, adverse weather like snow, rain, or
fog, and other factors not mentioned here. It will
always be the driver's responsibility to drive at a
speed and in a manner that recognizes potential
hazards and to adjust accordingly.