2008 BMW 760I lock
[x] Cancel search: lockPage 62 of 254

Driving
60 engage the parking brake the moment the vehi-
cle comes to a stop.<
Parking
The parking brake engages automatically when
you stop the vehicle and switch off the engine.
The indicator lamp changes from green to
red.
You can also release the parking brake
manually after the engine is switched off,
as long as the remote control is in the ignition
lock, refer to page59. You can use this function,
for example, in a car wash.
Automatic Hold is deactivated.<
When leaving the vehicle, release the
remote control from the detent in the igni-
tion lock; this precaution prevents children from
disengaging the parking brake etc.<
For your safety
Automatic Hold is automatically deactivated
when:
>the engine is switched off
>the system detects that the driver's seat is
not occupied while the engine is running
>the hood is opened while the engine is run-
ning
>the luggage compartment is opened while
the engine is running and the transmission
is in reverse
>and when the parking brake is used to brake
the vehicle to a stop during driving
The indicator lamp changes from green to
red, and the indication AUTO P on the Info Dis-
play disappears.
Before starting off again, briefly press the but-
ton to disengage the parking brake manually,
refer to page59, or reactivate Automatic Hold,
refer to page59.
Before leaving the vehicle with the engine
running, always move the automatic
transmission's selector lever to position P and
make sure that the parking brake is engaged.
The vehicle could start to roll if you fail to take
these precautions.
tendency for the wheels to spin in response to
slippery road surfaces.
Pay attention to the messages on the Info Dis-
play. For additional information, refer to Check
Control on page80.<
Releasing parking brake manually
In the event of an electrical power loss or elec-
trical malfunction, you can release the parking
brake manually.
Before manually releasing the parking
brake and each time you park the vehicle
without engaging the parking brake, make sure
that the automatic transmission is in position P,
refer to page62. Be sure to pay attention to the
information on the Info Display.
If circumstances should force you to park on a
steeply inclined road surface, it is essential to
take additional precautions against inadvertent
rolling, e.g. by using the chock, refer to
page216. Otherwise, there is the danger of the
vehicle rolling, depending on the incline.<
If it becomes necessary to also unlock the
transmission lock of the automatic transmis-
sion, follow this sequence:
1.If necessary, start by releasing the parking
brake manually.
2.Then release the automatic transmission's
transmission lock manually, refer to
page64.
Jump starting and tow starting information,
refer to section starting on page220.
Page 63 of 254

Controls
61Reference
At a glance
Driving tips
Communications
Navigation
Entertainment
Mobility
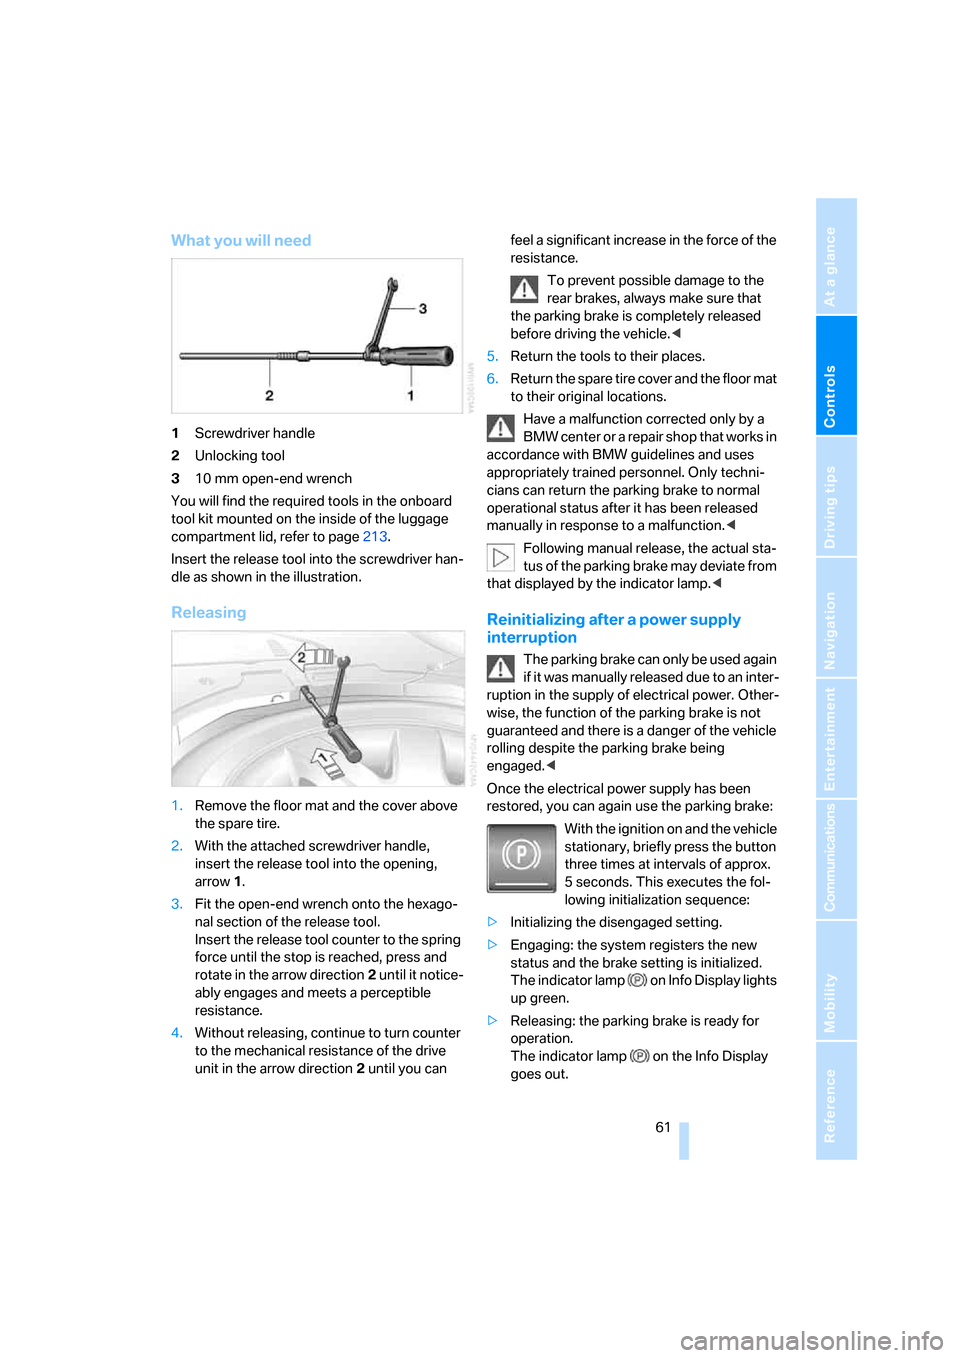
What you will need
1Screwdriver handle
2Unlocking tool
310 mm open-end wrench
You will find the required tools in the onboard
tool kit mounted on the inside of the luggage
compartment lid, refer to page213.
Insert the release tool into the screwdriver han-
dle as shown in the illustration.
Releasing
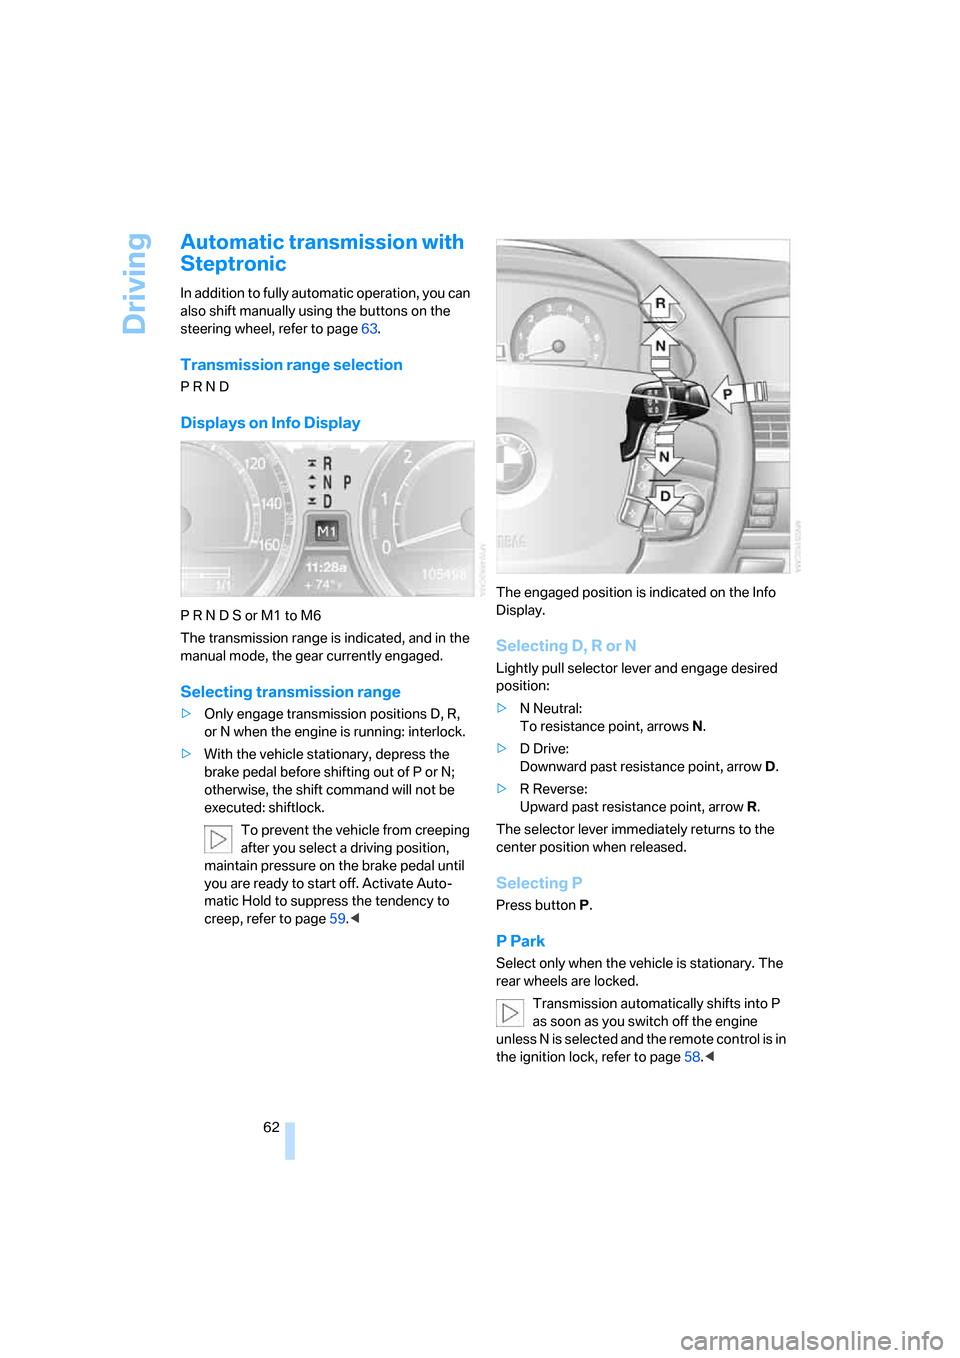
1.Remove the floor mat and the cover above
the spare tire.
2.With the attached screwdriver handle,
insert the release tool into the opening,
arrow1.
3.Fit the open-end wrench onto the hexago-
nal section of the release tool.
Insert the release tool counter to the spring
force until the stop is reached, press and
rotate in the arrow direction2 until it notice-
ably engages and meets a perceptible
resistance.
4.Without releasing, continue to turn counter
to the mechanical resistance of the drive
unit in the arrow direction 2 until you can feel a significant increase in the force of the
resistance.
To prevent possible damage to the
rear brakes, always make sure that
the parking brake is completely released
before driving the vehicle.<
5.Return the tools to their places.
6.Return the spare tire cover and the floor mat
to their original locations.
Have a malfunction corrected only by a
BMW center or a repair shop that works in
accordance with BMW guidelines and uses
appropriately trained personnel. Only techni-
cians can return the parking brake to normal
operational status after it has been released
manually in response to a malfunction.<
Following manual release, the actual sta-
tus of the parking brake may deviate from
that displayed by the indicator lamp.<
Reinitializing after a power supply
interruption
The parking brake can only be used again
if it was manually released due to an inter-
ruption in the supply of electrical power. Other-
wise, the function of the parking brake is not
guaranteed and there is a danger of the vehicle
rolling despite the parking brake being
engaged.<
Once the electrical power supply has been
restored, you can again use the parking brake:
With the ignition on and the vehicle
stationary, briefly press the button
three times at intervals of approx.
5 seconds. This executes the fol-
lowing initialization sequence:
>Initializing the disengaged setting.
>Engaging: the system registers the new
status and the brake setting is initialized.
The indicator lamp on Info Display lights
up green.
>Releasing: the parking brake is ready for
operation.
The indicator lamp on the Info Display
goes out.
Page 64 of 254

Driving
62
Automatic transmission with
Steptronic
In addition to fully automatic operation, you can
also shift manually using the buttons on the
steering wheel, refer to page63.
Transmission range selection
P R N D
Displays on Info Display
P R N D S or M1 to M6
The transmission range is indicated, and in the
manual mode, the gear currently engaged.
Selecting transmission range
>Only engage transmission positions D, R,
or N when the engine is running: interlock.
>With the vehicle stationary, depress the
brake pedal before shifting out of P or N;
otherwise, the shift command will not be
executed: shiftlock.
To prevent the vehicle from creeping
after you select a driving position,
maintain pressure on the brake pedal until
you are ready to start off. Activate Auto-
matic Hold to suppress the tendency to
creep, refer to page59.
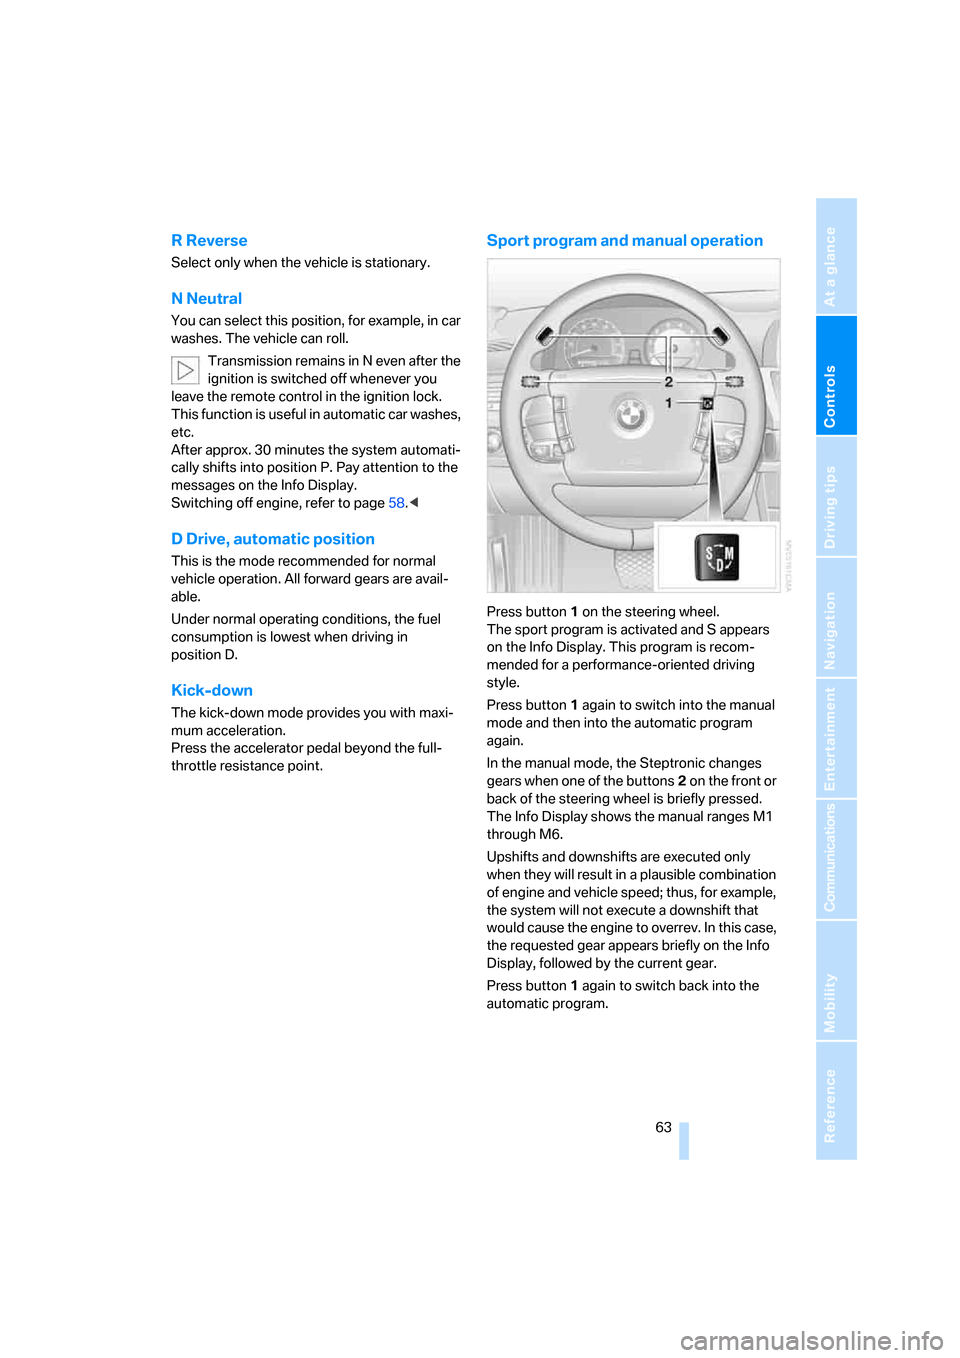
Selecting D, R or N
Lightly pull selector lever and engage desired
position:
>N Neutral:
To resistance point, arrowsN.
>D Drive:
Downward past resistance point, arrowD.
>R Reverse:
Upward past resistance point, arrowR.
The selector lever immediately returns to the
center position when released.
Selecting P
Press button P.
P Park
Select only when the vehicle is stationary. The
rear wheels are locked.
Transmission automatically shifts into P
as soon as you switch off the engine
unless N is selected and the remote control is in
the ignition lock, refer to page58.<
Page 65 of 254

Controls
63Reference
At a glance
Driving tips
Communications
Navigation
Entertainment
Mobility
R Reverse
Select only when the vehicle is stationary.
N Neutral
You can select this position, for example, in car
washes. The vehicle can roll.
Transmission remains in N even after the
ignition is switched off whenever you
leave the remote control in the ignition lock.
This function is useful in automatic car washes,
etc.
After approx. 30 minutes the system automati-
cally shifts into position P. Pay attention to the
messages on the Info Display.
Switching off engine, refer to page58.<
D Drive, automatic position
This is the mode recommended for normal
vehicle operation. All forward gears are avail-
able.
Under normal operating conditions, the fuel
consumption is lowest when driving in
position D.
Kick-down
The kick-down mode provides you with maxi-
mum acceleration.
Press the accelerator pedal beyond the full-
throttle resistance point.
Sport program and manual operation
Press button1 on the steering wheel.
The sport program is activated and S appears
on the Info Display. This program is recom-
mended for a performance-oriented driving
style.
Press button1 again to switch into the manual
mode and then into the automatic program
again.
In the manual mode, the Steptronic changes
gears when one of the buttons2 on the front or
back of the steering wheel is briefly pressed.
The Info Display shows the manual ranges M1
through M6.
Upshifts and downshifts are executed only
when they will result in a plausible combination
of engine and vehicle speed; thus, for example,
the system will not execute a downshift that
would cause the engine to overrev. In this case,
the requested gear appears briefly on the Info
Display, followed by the current gear.
Press button1 again to switch back into the
automatic program.
Page 66 of 254

Driving
64
Manually unlocking and locking the
transmission lock
In the event of a power supply interruption, e.g.
when the battery is dead or disconnected or
when there is an electrical malfunction, the
transmission lock must be released manually;
otherwise, the rear wheels are locked and the
vehicle cannot be towed.
Step on the brake when manually unlock-
ing the transmission lock; otherwise,
there is a danger of the vehicle rolling.<
The transmission lock should only be released
for towing. Reengage the transmission lock
after parking the vehicle at its destination.
If it also becomes necessary to manually
release the parking brake, follow this sequence:
1.Start by manually releasing the parking
brake, refer to page60.
2.Then proceed to manually releasing the
transmission lock.
Releasing
1.Use the vehicle key to release the cover
panel beneath the instrument panel by turn-
ing the lock counterclockwise, then fold
down the cover.2.Pull out the release lever with the loop1
until it locks into place: the transmission
lock is unlocked.
Reengage the transmission lock after
parking the vehicle at its destination. Oth-
erwise, there is a danger of the vehicle rolling.<
Engaging locks
1.Disengage the release lever by pressing it
together with the red locking lever, refer to
arrow.
2.Guide the release lever all the way back into
its original position – the transmission lock
is engaged once more.
3.Fold up and lock the cover panel again. Now
– and not before – the key may be removed.
Jump starting and tow starting information,
refer to section starting on page220.
Page 68 of 254

Driving
66
Activating rain sensor
Briefly press the button, arrow, the wipers move
once across the windshield. The LED lights up.
Adjusting rain sensor sensitivity level
Turn the knurled wheel 5.
Deactivating rain sensor
Briefly press the button again, arrow. The LED
goes out.
Deactivate the rain sensor when passing
through an automatic car wash. Failure to
do so could result in damage caused by undes-
ired wiper activation.<
Cleaning windshield, headlamps and
BMW Night Vision camera*
The system sprays washer fluid against the
windshield and activates the wipers for a brief
period.
With the vehicle lighting switched on, the head-
lamps and the BMW Night Vision camera are
also cleaned simultaneously at suitable inter-
vals.
Do not use the washers if there is any
danger that the fluid will freeze on the
windshield. If you do so, your vision could be
obscured. To avoid freezing, use a washer fluid
antifreeze, refer to Washer fluid.
Avoid using the washer when the reservoir is
empty. Otherwise, you could damage the
pump.<
Windshield washer nozzles
The windshield washer nozzles and the wind-
shield itself in the area around the wipers are heated automatically when the ignition is
switched on.
Pivoting wipers into folded-out
position
This position is important for changing wiper
blades or when folding wiper arms away from
windshield to prevent blades from sticking in
the event of frost.
1.Switch off the engine and remove the
remote control from the ignition lock.
2.Press the wiper lever upward past the resis-
tance point and maintain pressure for about
3 seconds until the wipers stop in a roughly
vertical position: pivot into the folded-out
position.
After folding the wipers back against the wind-
shield you will need to reactivate the wiper sys-
tem:
1.Switch on radio ready state.
2.Briefly press wiper lever downward. The
wipers return to their retracted position and
are ready for normal operation.
To prevent damage to the wipers, always
fold them back against the windshield
before switching on either the radio ready state
or the ignition.<
Washer fluid
Washer fluid antifreeze is flammable.
Always keep it well away from sparks and
open flames, and store it in tightly closed con-
tainers well out of the reach of children. Always
follow the instructions for use provided on the
containers.<
Wiper fluid filler neck
Only refill wiper fluid when the engine is
cool in order to prevent contact with hot
engine components. Otherwise, there is a risk
of burns and personal injury if the fluid spills.<
Page 77 of 254

Controls
75Reference
At a glance
Driving tips
Communications
Navigation
Entertainment
Mobility
Everything under control
Odometer, outside temperature display, clock
1Outside temperature display, clock
2Odometer
3Trip odometer
4Press button:
>with ignition switched on to reset trip
odometer
>with ignition switched off to briefly dis-
play odometer, outside temperature,
and time
Outside temperature display, clock,
date
The outside temperature and the time displays
are active with the ignition lock in radio ready
state or higher.
You can change the units of measure, 7/6,
in the "Settings" menu, refer to page84.
Setting the clock, refer to page84.
The date is displayed in the assistance win-
dow
*, refer to page21.
Setting date, refer to page84.
Outside temperature warning
If the display drops to +377/+36, a signal
sounds and a message appears on the Info Dis-
play. There is an increased danger of ice.
Even at temperatures above +377/
+36, ice can form. Therefore, drive care-
fully, e.g. on bridges and shaded roadways; oth-
erwise, there is an increased accident risk.<
Odometer and trip odometer
The display area is also used for the computer
and the Check Control.
Regardless of the current display, you can
briefly display the odometer for a short time by
briefly pressing button4.
Pressing the button again resets the trip odom-
eter to zero.
Check Control, refer to page80.
Computer, refer to page76.
Tachometer
The orange advance warning field, arrow, is dis-
played as a function of the engine temperature.
The segments disappear in sequence as the
engine temperature increases.
Avoid allowing the engine speed to rise as far as
the orange advance warning field whenever
possible.
Page 86 of 254

Everything under control
84
Settings on Control Display
Setting units of measure and display
format
You can change the units of measure used in
the displays of fuel consumption, distances and
temperatures as well as the display format for
the time and date.
iDrive, for principle details, refer to page16.
1.Press the button to open the start
menu.
2.Move the controller toward "Settings".
3.Select "Units" and press the controller.
4.Select the menu item that you wish to
adjust. Press repeatedly to view a listing of
your selection options.
The setting is stored for the remote control cur-
rently in use.
Setting language
You can select a different language for the text
displays.
iDrive, for principle details, refer to page16.
1.Press the button to open the start
menu.
2.Move the controller toward "Settings".3.Select "Language" and press the controller.
4.Select and activate the desired language.
The setting is stored for the remote control cur-
rently in use.
Time and date
iDrive, for principle details, refer to page16.
1.Press the button to open the start
menu.
2.Move the controller toward "Settings".
3.Select "Clock" and press the controller.
Setting time
1.Select "Time" and press the controller.
The first time setting is activated.
2.Turn to adjust the setting.
3.Press the controller to adopt the setting.
The next setting is selected.
4.Adjust the remaining settings. After the last
adjustment, the time is stored.
Setting date
1.Select "Date" and press the controller.
The first date display setting is activated.
2.Turn to adjust the setting.