2008 BMW 750LI transmission
[x] Cancel search: transmissionPage 64 of 254

Driving
62
Automatic transmission with
Steptronic
In addition to fully automatic operation, you can
also shift manually using the buttons on the
steering wheel, refer to page63.
Transmission range selection
P R N D
Displays on Info Display
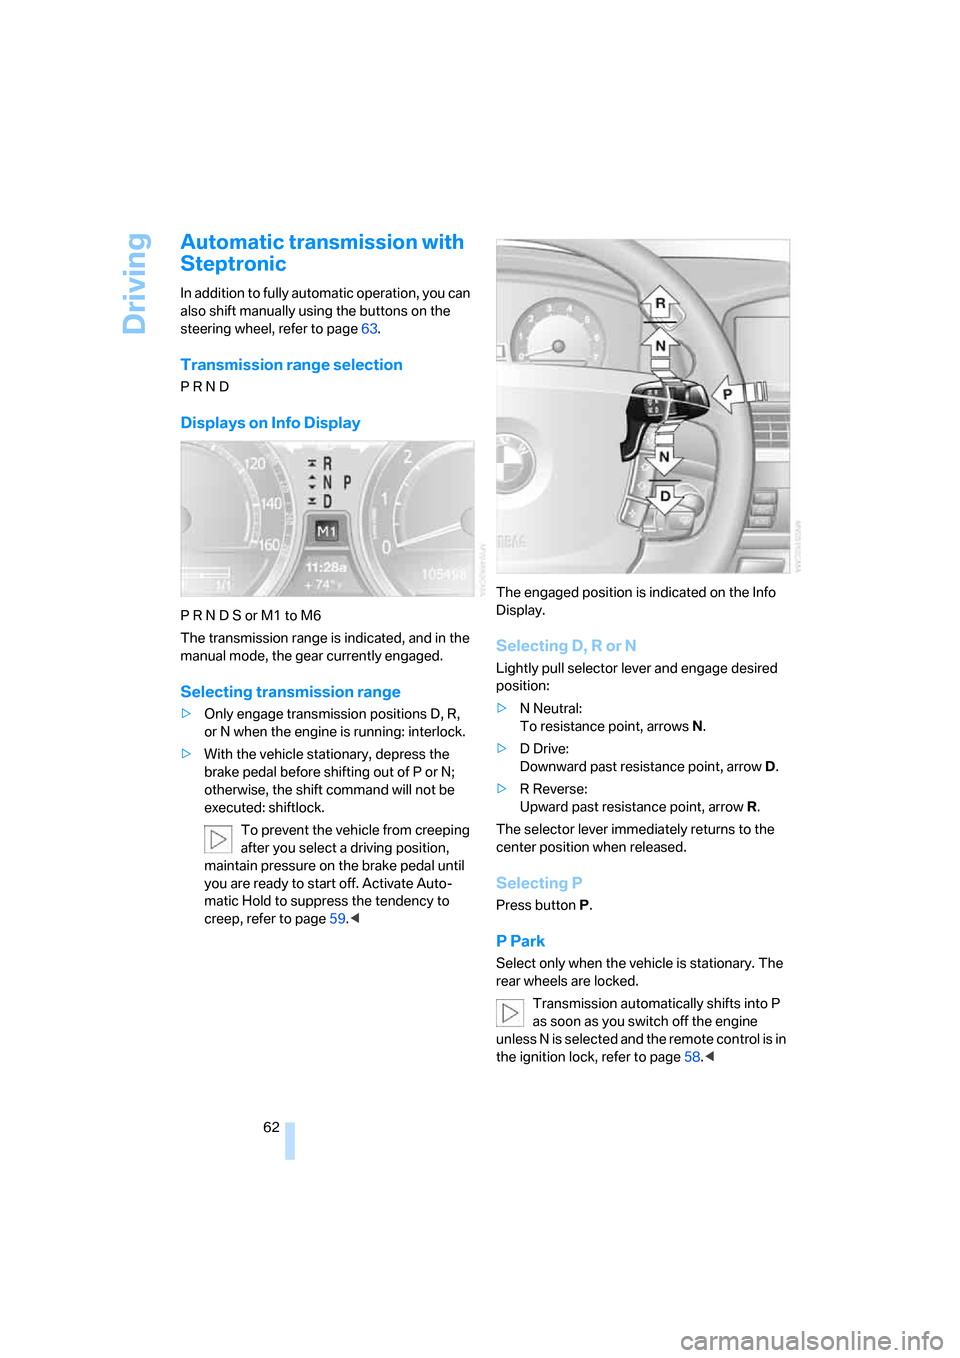
P R N D S or M1 to M6
The transmission range is indicated, and in the
manual mode, the gear currently engaged.
Selecting transmission range
>Only engage transmission positions D, R,
or N when the engine is running: interlock.
>With the vehicle stationary, depress the
brake pedal before shifting out of P or N;
otherwise, the shift command will not be
executed: shiftlock.
To prevent the vehicle from creeping
after you select a driving position,
maintain pressure on the brake pedal until
you are ready to start off. Activate Auto-
matic Hold to suppress the tendency to
creep, refer to page59.
Selecting D, R or N
Lightly pull selector lever and engage desired
position:
>N Neutral:
To resistance point, arrowsN.
>D Drive:
Downward past resistance point, arrowD.
>R Reverse:
Upward past resistance point, arrowR.
The selector lever immediately returns to the
center position when released.
Selecting P
Press button P.
P Park
Select only when the vehicle is stationary. The
rear wheels are locked.
Transmission automatically shifts into P
as soon as you switch off the engine
unless N is selected and the remote control is in
the ignition lock, refer to page58.<
Page 65 of 254

Controls
63Reference
At a glance
Driving tips
Communications
Navigation
Entertainment
Mobility
R Reverse
Select only when the vehicle is stationary.
N Neutral
You can select this position, for example, in car
washes. The vehicle can roll.
Transmission remains in N even after the
ignition is switched off whenever you
leave the remote control in the ignition lock.
This function is useful in automatic car washes,
etc.
After approx. 30 minutes the system automati-
cally shifts into position P. Pay attention to the
messages on the Info Display.
Switching off engine, refer to page58.<
D Drive, automatic position
This is the mode recommended for normal
vehicle operation. All forward gears are avail-
able.
Under normal operating conditions, the fuel
consumption is lowest when driving in
position D.
Kick-down
The kick-down mode provides you with maxi-
mum acceleration.
Press the accelerator pedal beyond the full-
throttle resistance point.
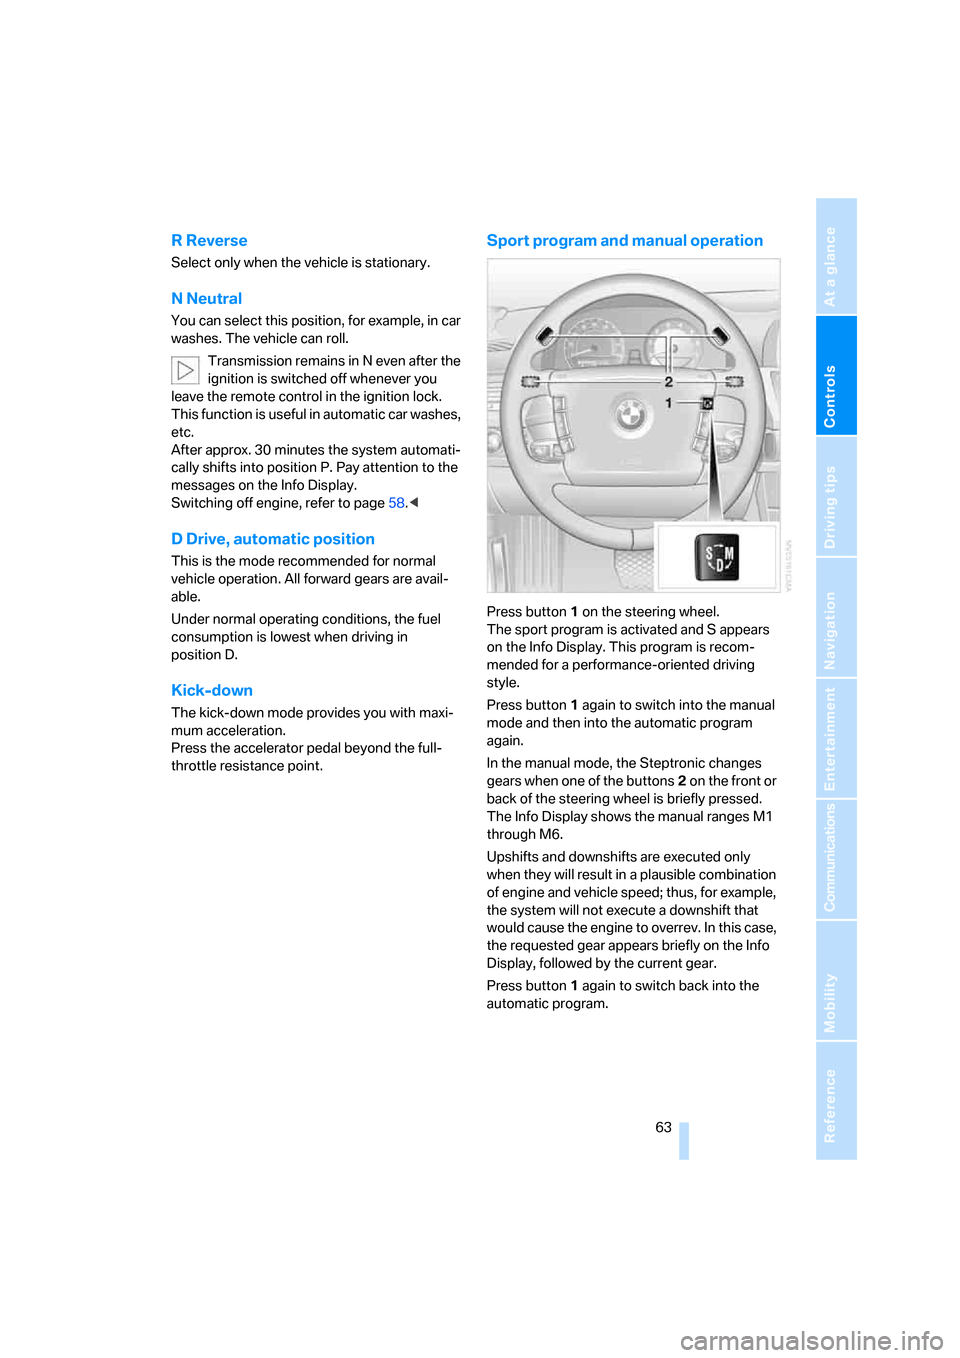
Sport program and manual operation
Press button1 on the steering wheel.
The sport program is activated and S appears
on the Info Display. This program is recom-
mended for a performance-oriented driving
style.
Press button1 again to switch into the manual
mode and then into the automatic program
again.
In the manual mode, the Steptronic changes
gears when one of the buttons2 on the front or
back of the steering wheel is briefly pressed.
The Info Display shows the manual ranges M1
through M6.
Upshifts and downshifts are executed only
when they will result in a plausible combination
of engine and vehicle speed; thus, for example,
the system will not execute a downshift that
would cause the engine to overrev. In this case,
the requested gear appears briefly on the Info
Display, followed by the current gear.
Press button1 again to switch back into the
automatic program.
Page 66 of 254

Driving
64
Manually unlocking and locking the
transmission lock
In the event of a power supply interruption, e.g.
when the battery is dead or disconnected or
when there is an electrical malfunction, the
transmission lock must be released manually;
otherwise, the rear wheels are locked and the
vehicle cannot be towed.
Step on the brake when manually unlock-
ing the transmission lock; otherwise,
there is a danger of the vehicle rolling.<
The transmission lock should only be released
for towing. Reengage the transmission lock
after parking the vehicle at its destination.
If it also becomes necessary to manually
release the parking brake, follow this sequence:
1.Start by manually releasing the parking
brake, refer to page60.
2.Then proceed to manually releasing the
transmission lock.
Releasing
1.Use the vehicle key to release the cover
panel beneath the instrument panel by turn-
ing the lock counterclockwise, then fold
down the cover.2.Pull out the release lever with the loop1
until it locks into place: the transmission
lock is unlocked.
Reengage the transmission lock after
parking the vehicle at its destination. Oth-
erwise, there is a danger of the vehicle rolling.<
Engaging locks
1.Disengage the release lever by pressing it
together with the red locking lever, refer to
arrow.
2.Guide the release lever all the way back into
its original position – the transmission lock
is engaged once more.
3.Fold up and lock the cover panel again. Now
– and not before – the key may be removed.
Jump starting and tow starting information,
refer to section starting on page220.
Page 70 of 254

Driving
68
Maintaining speed, storing, and
decelerating
Pull the lever, arrow2:
Functions in the same way as1, except that the
vehicle speed is decreased.
Interrupting the cruise control
Briefly press the lever up or down, arrow3.
In addition, cruise control is interrupted auto-
matically:
>when you apply pressure to the brake pedal
>when you shift the automatic transmission
into position N
>when the DSC control is operative
Resuming stored speed
Briefly press the button4:
The vehicle accelerates back to and maintains
the stored speed.
Displays in speedometer
5Pointer for stored speed
> Cruise control activated
> Cruise control deactivated
6Mark for stored desired speed in the multi-
level function
Storing desired speeds
With vehicle stationary
1.Switch on the ignition.
2.Press, arrow1, or pull, arrow2, the lever
past the resistance point:
Now you can move the pointer5 with the lever until you have reached your desired
speed:
>Press or pull the lever to the resistance
point again: the pointer slowly moves.
>Press or pull the lever past the resis-
tance point again: the pointer jumps to
the next multiple of 5 mph or 10 km/h
and then further, as long as the lever is
held.
3.Press the button4 for approx. 3 seconds.
The stored desired speed is indicated by a
mark 6.
If six desired speeds have already been stored,
please delete at least one of them before adding
another.
While driving
1.Press, arrow1, or pull, arrow2, the lever
past the resistance point.
2.Press the button4 for approx. 3 seconds.
The current speed is applied as the desired
speed and displayed with6.
If all of the marks 6 flash twice, this indicates
that six desired speeds have already been
stored. You must then delete at least one of
them before adding another.
Deleting desired speeds
1.Select corresponding desired speed6,
refer to section below.
2.Press button4 for approx. 3 seconds.
Activating multilevel preset mode
Press, arrow1, or pull, arrow2, the lever past
the resistance point.
The current driving speed is maintained, stored
and displayed by the pointer5.
Selecting desired speed
Press, arrow1, or pull, arrow2, the lever past
the resistance point:
The next desired speed is selected.
Page 73 of 254

Controls
71Reference
At a glance
Driving tips
Communications
Navigation
Entertainment
Mobility
Distance 1
Distance 2
Distance 3
This distance is always set when
the system is used for the first time
after starting the engine.
Distance 4
Use good judgment to select the appro-
priate following distance given road con-
ditions, traffic, applicable laws and driving rec-
ommendations for safe following distance;
failure to do so can constitute an accident haz-
ard.<
Deactivating cruise control
Press the lever up or down. The displays in the
speedometer go out.
In addition, the system is automatically deacti-
vated:
>when the speed is reduced to below 20 mph
or 30 km/h due to a traffic situation
>when DTC is activated or DSC is deacti-
vated
>when the system does not recognize any
objects for an extended period of time, e.g. on infrequently traveled roads without a
shoulder or guard rails, or if the radar sensor
is covered with dirt, refer to page72
>when you actuate the parking brake during
driving
>when you shift the transmission into posi-
tion N
If the system is deactivated, then it is nec-
essary for the driver to actively intervene
by braking and possibly swerving. Otherwise,
there is the danger of an accident.<
Background lighting
You can switch off the backlighting of the
speedometer and tachometer when the system
is deactivated if no other functions are being
displayed, e.g. the advance warning field in the
tachometer, refer to page75, or the route guid-
ance of the navigation system.
To do so, press the lever up or down for approx.
1second.
Resuming stored desired speed and
distance
Press button4:
The displays appear in the speedometer.
When you switch off the ignition, the stored
desired speed is deleted.
Info Display screen contents
1Stored desired speed display
2Lights up: vehicle detected ahead
3Selected distance to vehicle driving ahead
4The selected desired speed is displayed for
a short time, refer to page70
Page 75 of 254

Controls
73Reference
At a glance
Driving tips
Communications
Navigation
Entertainment
Mobility
of you, for example when approaching a traffic
light or a parked vehicle. Also, the system does
not react to oncoming traffic, pedestrians or
other types of potential traffic such as a rider on
horseback. It is also possible that the system
may not detect smaller moving objects such as
motorcycles or bicycles. Be especially alert
when encountering any of these situations as
the system will neither automatically brake, nor
provide a warning to you. Also, be aware that
every decrease in the distance setting allows
your vehicle to come closer to a vehicle in front
of you and requires a heightened amount of
alertness.<
When your vehicle is actively following a vehicle
in front of you, if the vehicle ahead speeds up or
the lane ahead becomes clear, then your vehi-
cle will accelerate to the speed you have
selected. Be aware that changing to a clear,
unobstructed lane may also result in accelera-
tion of your vehicle.
Be certain to deactivate the system when
you pull into an exit lane for a highway off-
ramp.<
Also, vehicles traveling in a staggered manner
on a highway may cause a delay in the system's
reaction to a vehicle in front of you or may cause
the system to react to a vehicle actually in the
lane next to you. Always be ready to take action
or apply the brakes if necessary.
Active cruise control can only decelerate the
vehicle to approx. 20 mph/30 km/h. If the sys-
tem reduces vehicle speed below 20 mph/
30 km/h or if DSC/ABS is engaged while driving,
the system will automatically deactivate.
Remember, the system cannot stop your
vehicle. In addition, the system is deacti-
vated whenever the driver applies the vehicle
brakes, shifts the transmission from drive/D to
neutral/N, or deactivates DSC. After any deacti-
vation, the system will no longer automatically
activate the vehicle brakes, which means the
driver must intervene and resume manual brak-
ing. You should then reactivate the system only
when you are fully aware of the prior speed and
distance settings.
driver must constantly monitor traffic and inter-
vene if necessary.
When you switch off the engine or ignition,
active cruise control is fully switched off, too,
and any settings you have selected are can-
celed.
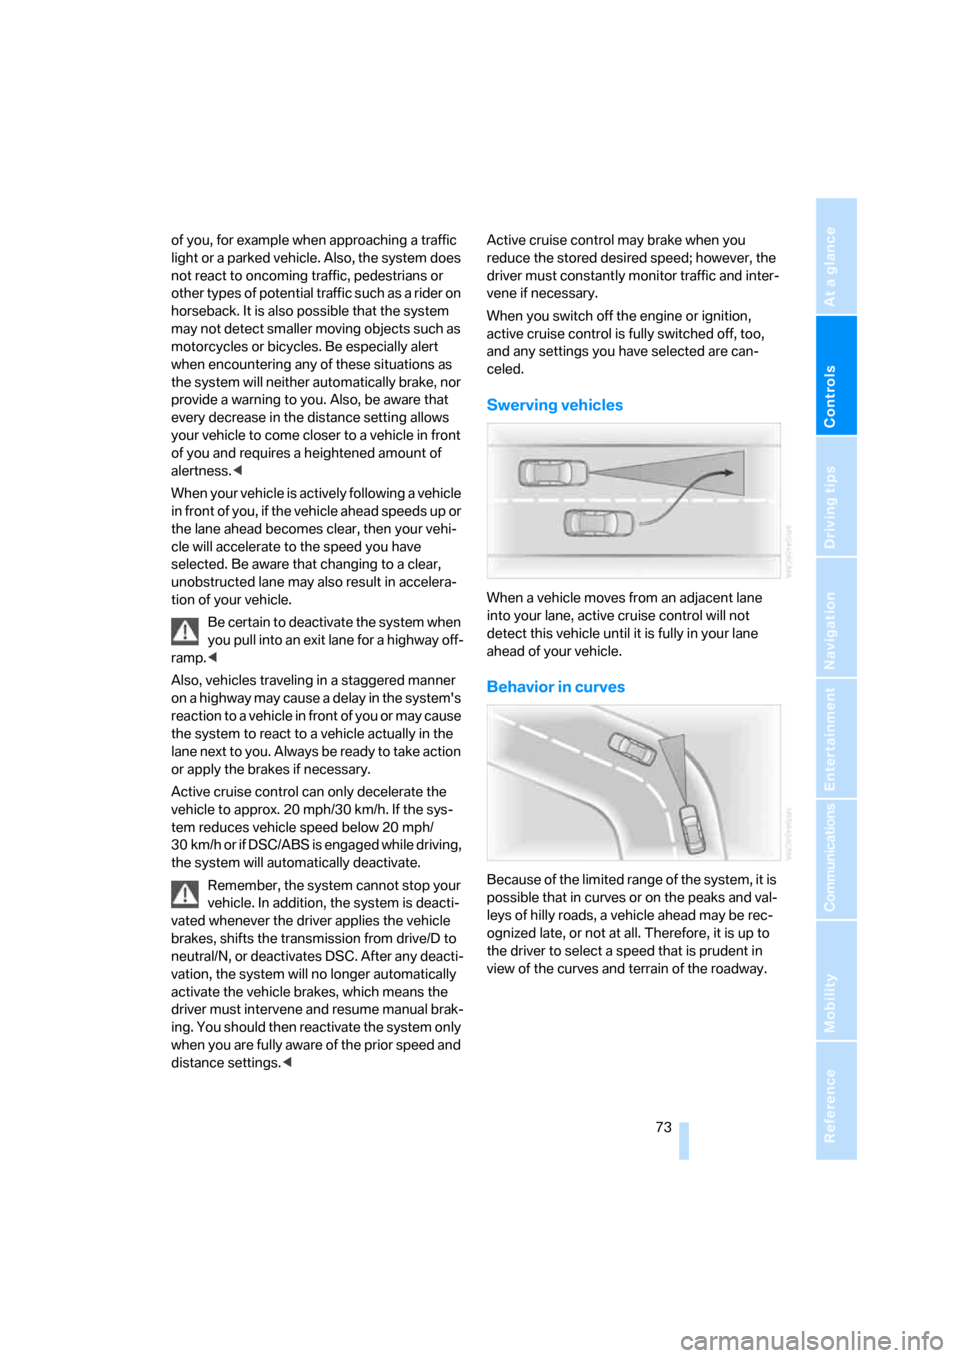
Swerving vehicles
When a vehicle moves from an adjacent lane
into your lane, active cruise control will not
detect this vehicle until it is fully in your lane
ahead of your vehicle.
Behavior in curves
Because of the limited range of the system, it is
possible that in curves or on the peaks and val-
leys of hilly roads, a vehicle ahead may be rec-
ognized late, or not at all. Therefore, it is up to
the driver to select a speed that is prudent in
view of the curves and terrain of the roadway.
Page 88 of 254

Technology for comfort, convenience and safety
86
Technology for comfort, convenience and
safety
PDC Park Distance Control*
The concept
The PDC assists you when you are parking.
Audible signals and an optical display indicate
that you are approaching an object in front of or
behind your vehicle. To measure the distance,
four ultrasonic sensors are provided in each
bumper. The range of these sensors is approx.
6 ft/2 m. However, an acoustic warning begins
to sound for the sensors at the front and at the
two rear corners at approx. 24 in/60 cm, and for
the center rear sensors at approx. 5 ft/1.50 m.
PDC is a parking aid that can indicate
objects when they are approached
slowly, as is usually the case when parking.
Avoid approaching an object at high speed; oth-
erwise, the system may sound the warning of
physical obstacles too late.<
Automatically activating
The system is activated approx. 1 second after
you engage the transmission position R with
the engine running or the ignition switched on.
Wait this short period before proceeding.
Manual activation
Press the button, the LED lights up.
Manual deactivation
Press the button again; the LED goes out.After driving approx. 165 ft/50 m or at over
approx. 20 mph/30 km/h, the system switches
off and the LED goes out. You can reactivate the
system manually as needed.
Signal tones
An intermittent signal indicates the distance of
the vehicle from an object being approached.
Thus, an object detected to the left rear of the
vehicle will be indicated by a signal tone from
the left rear speaker, etc. As the distance
between vehicle and object decreases, the
intervals between the tones become shorter.
The signal tone becomes continuous once the
distance to the nearest object falls below
roughly 1 ft/30 cm.
An intermittent tone is interrupted after approx.
3seconds:
>if you remain in front of an object that was
only detected by one of the corner sensors
>if you drive parallel to a wall
Malfunction
The LED in the button flashes and a message
appears on the Info Display. PDC has failed.
Have the system checked.
To prevent this problem, keep the sensors
clean and free of ice or snow in order to ensure
that they will continue to operate effectively.
When using high-pressure washers, do not
spray sensors for long periods and keep the
sprayer at least 4 in/10 cm away from the sen-
sors.
PDC with visual warning
You can also have the system show distances
to objects on the Control Display. Objects that
are farther away are displayed there before a
signal tone begins to sound.
iDrive, for principle details, refer to page16.
Page 124 of 254

Things to remember when driving
122
Things to remember when driving
Breaking-in
Moving parts need time to adjust to one
another. To ensure that your vehicle continues
to furnish optimized economy of operation
throughout an extended service life, we request
that you devote careful attention to the follow-
ing information.
Engine and differential
Always obey all official speed limits.
Up to 1,200 miles/2,000 km
Drive with changing engine and vehicle speeds,
but do not exceed:
4500 rpm or 100 mph/160 km/h
Avoid full-throttle operation and use of the
transmission's kick-down mode during these
initial miles.
After 1,200 miles/2,000 km
The engine and vehicle speed can gradually be
increased.
Tires
Due to technical factors associated with their
manufacture, tires do not achieve their full trac-
tion potential until after an initial break-in
period. Therefore, drive reservedly during the
first 200 miles/300 km.
Brake system
Brakes require an initial break-in period of
approx. 300 miles/500 km to achieve optimized
contact and wear patterns between brake pads
and rotors.
Following component replacements
Follow the break-in sequence again if compo-
nents addressed above must be replaced again
during subsequent driving.
General driving notes
Closing luggage compartment lid
Operate the vehicle only when the lug-
gage compartment lid is completely
closed. Otherwise, exhaust fumes could pene-
trate into the passenger compartment.<
If special circumstances should make it abso-
lutely necessary to operate the vehicle with the
luggage compartment lid open:
1.Close all windows and the glass sunroof.
2.Adjust the automatic climate control's
blower to supply a high rate of airflow, refer
to page106.
Hot exhaust system
As in all vehicles, extremely high temper-
atures are generated in the exhaust sys-
tem. Do not remove the heat shields installed
adjacent to it, and never apply undercoating to
them. When driving, standing at idle, and park-
ing, take care to avoid possible contact
between the hot exhaust system and any highly
flammable materials such as hay, leaves, grass,
etc. Such contact could lead to a fire, accompa-
nied by the risk of serious property damage and
personal injury.<
Mobile communications devices in
vehicle
BMW does not recommend using mobile
communications devices, e.g. mobile
phones, inside the vehicle without a direct con-
nection to an outside antenna. Otherwise, the
vehicle electronics and mobile communications
device can interfere with each other. In addition,
there is no assurance that the radiation which
results during transmission will be discharged
from the vehicle interior.<