2008 BMW 750I warning
[x] Cancel search: warningPage 74 of 254

Driving
72 If the display ACC --- mph/ACC --- km/h
appears briefly in the speedometer, then
conditions required for operation may not cur-
rently be fulfilled. Retrieving Check Control
messages, refer to page81.<
Warning lamps
The display flashes and a chime
sounds.
The system asks you to intervene
by braking or with an evasive
maneuver. The active cruise control cannot
automatically restore the distance to the vehicle
driving ahead.
The display does not relieve you of the respon-
sibility for adapting desired speed and driving
style to traffic conditions.
Automatic intervention by ABS or
DSC. The active cruise control
intervenes by braking until you
actively intervene.
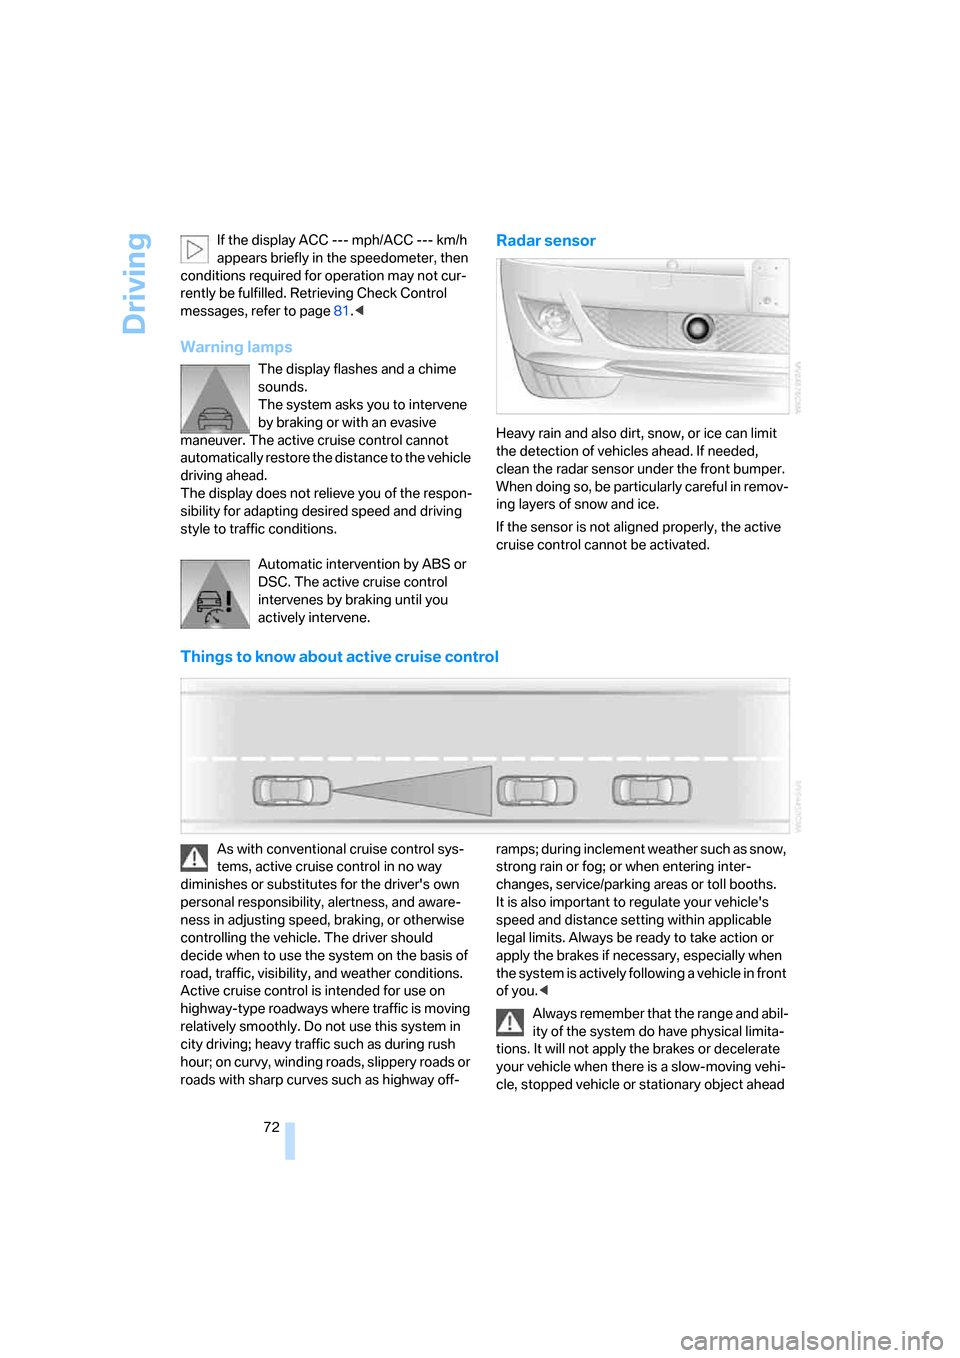
Radar sensor
Heavy rain and also dirt, snow, or ice can limit
the detection of vehicles ahead. If needed,
clean the radar sensor under the front bumper.
When doing so, be particularly careful in remov-
ing layers of snow and ice.
If the sensor is not aligned properly, the active
cruise control cannot be activated.
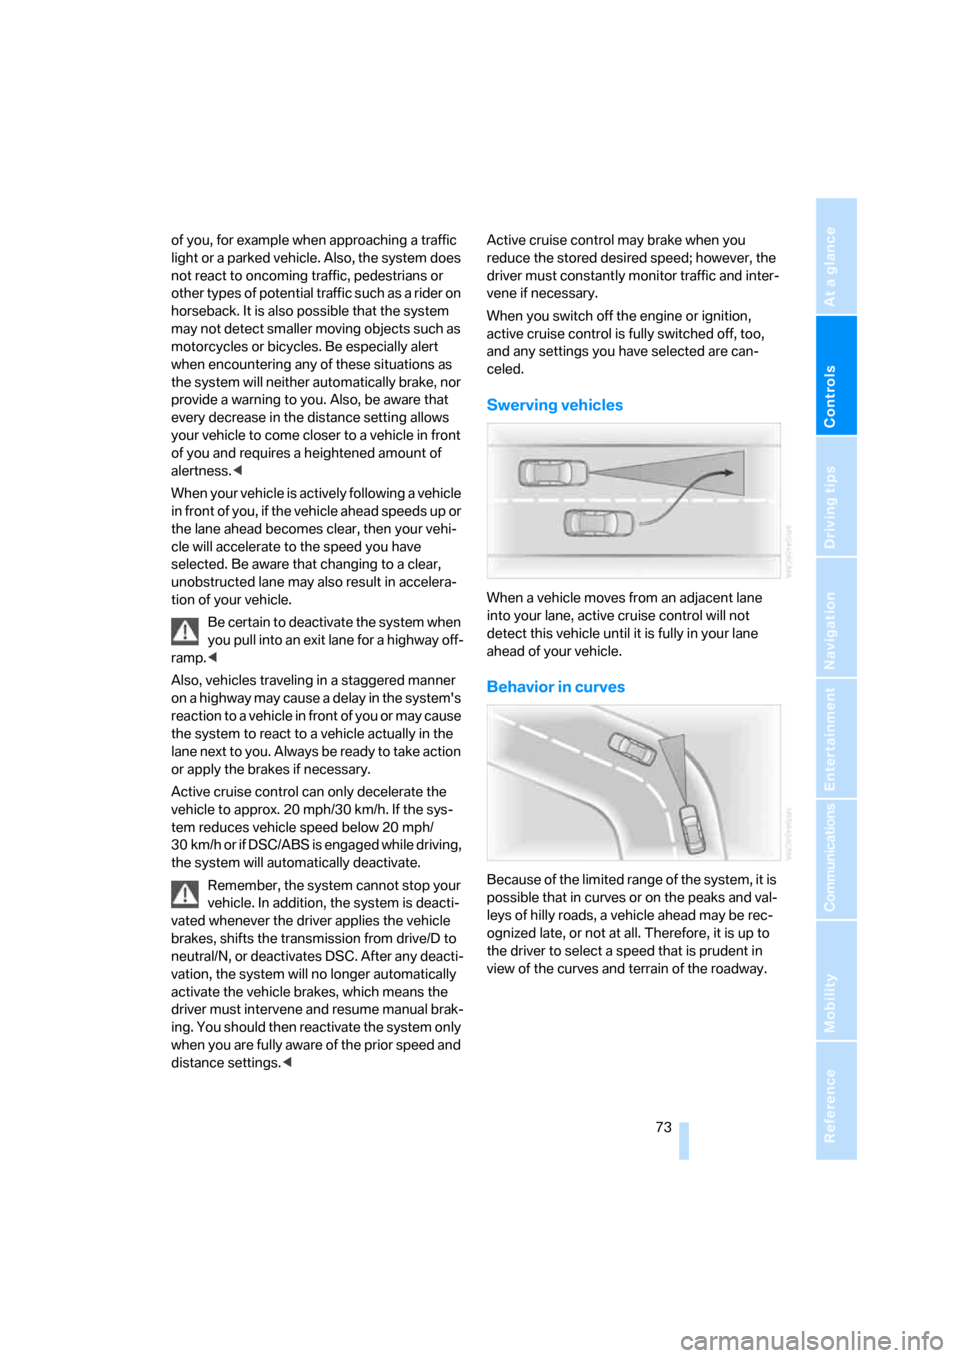
Things to know about active cruise control
As with conventional cruise control sys-
tems, active cruise control in no way
diminishes or substitutes for the driver's own
personal responsibility, alertness, and aware-
ness in adjusting speed, braking, or otherwise
controlling the vehicle. The driver should
decide when to use the system on the basis of
road, traffic, visibility, and weather conditions.
Active cruise control is intended for use on
highway-type roadways where traffic is moving
relatively smoothly. Do not use this system in
city driving; heavy traffic such as during rush
hour; on curvy, winding roads, slippery roads or
roads with sharp curves such as highway off-ramps; during inclement weather such as snow,
strong rain or fog; or when entering inter-
changes, service/parking areas or toll booths.
It is also important to regulate your vehicle's
speed and distance setting within applicable
legal limits. Always be ready to take action or
apply the brakes if necessary, especially when
the system is actively following a vehicle in front
of you.<
Always remember that the range and abil-
ity of the system do have physical limita-
tions. It will not apply the brakes or decelerate
your vehicle when there is a slow-moving vehi-
cle, stopped vehicle or stationary object ahead
Page 75 of 254

Controls
73Reference
At a glance
Driving tips
Communications
Navigation
Entertainment
Mobility
of you, for example when approaching a traffic
light or a parked vehicle. Also, the system does
not react to oncoming traffic, pedestrians or
other types of potential traffic such as a rider on
horseback. It is also possible that the system
may not detect smaller moving objects such as
motorcycles or bicycles. Be especially alert
when encountering any of these situations as
the system will neither automatically brake, nor
provide a warning to you. Also, be aware that
every decrease in the distance setting allows
your vehicle to come closer to a vehicle in front
of you and requires a heightened amount of
alertness.<
When your vehicle is actively following a vehicle
in front of you, if the vehicle ahead speeds up or
the lane ahead becomes clear, then your vehi-
cle will accelerate to the speed you have
selected. Be aware that changing to a clear,
unobstructed lane may also result in accelera-
tion of your vehicle.
Be certain to deactivate the system when
you pull into an exit lane for a highway off-
ramp.<
Also, vehicles traveling in a staggered manner
on a highway may cause a delay in the system's
reaction to a vehicle in front of you or may cause
the system to react to a vehicle actually in the
lane next to you. Always be ready to take action
or apply the brakes if necessary.
Active cruise control can only decelerate the
vehicle to approx. 20 mph/30 km/h. If the sys-
tem reduces vehicle speed below 20 mph/
30 km/h or if DSC/ABS is engaged while driving,
the system will automatically deactivate.
Remember, the system cannot stop your
vehicle. In addition, the system is deacti-
vated whenever the driver applies the vehicle
brakes, shifts the transmission from drive/D to
neutral/N, or deactivates DSC. After any deacti-
vation, the system will no longer automatically
activate the vehicle brakes, which means the
driver must intervene and resume manual brak-
ing. You should then reactivate the system only
when you are fully aware of the prior speed and
distance settings.
driver must constantly monitor traffic and inter-
vene if necessary.
When you switch off the engine or ignition,
active cruise control is fully switched off, too,
and any settings you have selected are can-
celed.
Swerving vehicles
When a vehicle moves from an adjacent lane
into your lane, active cruise control will not
detect this vehicle until it is fully in your lane
ahead of your vehicle.
Behavior in curves
Because of the limited range of the system, it is
possible that in curves or on the peaks and val-
leys of hilly roads, a vehicle ahead may be rec-
ognized late, or not at all. Therefore, it is up to
the driver to select a speed that is prudent in
view of the curves and terrain of the roadway.
Page 77 of 254

Controls
75Reference
At a glance
Driving tips
Communications
Navigation
Entertainment
Mobility
Everything under control
Odometer, outside temperature display, clock
1Outside temperature display, clock
2Odometer
3Trip odometer
4Press button:
>with ignition switched on to reset trip
odometer
>with ignition switched off to briefly dis-
play odometer, outside temperature,
and time
Outside temperature display, clock,
date
The outside temperature and the time displays
are active with the ignition lock in radio ready
state or higher.
You can change the units of measure, 7/6,
in the "Settings" menu, refer to page84.
Setting the clock, refer to page84.
The date is displayed in the assistance win-
dow
*, refer to page21.
Setting date, refer to page84.
Outside temperature warning
If the display drops to +377/+36, a signal
sounds and a message appears on the Info Dis-
play. There is an increased danger of ice.
Even at temperatures above +377/
+36, ice can form. Therefore, drive care-
fully, e.g. on bridges and shaded roadways; oth-
erwise, there is an increased accident risk.<
Odometer and trip odometer
The display area is also used for the computer
and the Check Control.
Regardless of the current display, you can
briefly display the odometer for a short time by
briefly pressing button4.
Pressing the button again resets the trip odom-
eter to zero.
Check Control, refer to page80.
Computer, refer to page76.
Tachometer
The orange advance warning field, arrow, is dis-
played as a function of the engine temperature.
The segments disappear in sequence as the
engine temperature increases.
Avoid allowing the engine speed to rise as far as
the orange advance warning field whenever
possible.
Page 78 of 254

Everything under control
76
Coolant temperature
Should the coolant, and with it the engine
become too hot, a warning lamp lights up. In
addition, a message appears on the Control
Display.
Checking coolant level, refer to page210.
Computer
Requesting functions
You can use the buttons in the turn signal lever
to display the computer information on the Info
Display.
1Info Display on left
2Info Display on right
A new function appears each time you briefly
press the button.
Displays on Info Display
The display sequence:
>Fuel gauge
>Range and distance to destinationThe display sequence:
>Odometer
>Energy Control/current fuel consumption
>Average fuel consumption
>Average speed
>Time of arrival
Hiding messages
Maintain pressure on button1 to hide the com-
puter display. Briefly press the button again to
return to the last display.
It is not possible, though, to hide a Check
Control message.<
Fuel gauge
The fuel gauge mode appears automatically
once the fuel level falls into the reserve range.
The tanks still contains the following quantities
of fuel:
>750i/Li: approx. 2.6 US gal/10 liters.
>760i/Li: approx. 3.1 US gal/12 liters.
If the tilt of the vehicle varies, when you are driv-
ing in mountainous areas, for example, the indi-
cator may fluctuate slightly.
After reaching the reserve quantity, the
Info Display can no longer be hidden.
However, you can still display the remaining
range.<
Fuel tank capacity: approx. 23.2 US gal/
88 liters. You can find information on refueling
on page198.
Refuel well before the tank is empty. If
you drive down to the last drop, engine
functions are not assured and damage can
occur.<
Page 82 of 254

Everything under control
80 5.Turn the controller to select appointment
input.
6.Press the controller.
The month is selected.
7.Turn the controller to adjust the setting.
8.Press the controller to save the setting.
The year is selected.
9.Turn the controller to adjust the setting.
10.Press the controller to save the setting.
11."STORE DATE" is selected. Press the con-
troller to save the setting.
The date entry is saved.
The list of entries is resorted by date.
Display on Info Display
If the deadline for your next state vehicle
inspection is approaching, the remaining dis-
tance and time will appear briefly when you
switch on the ignition.
Your Service Advisor will determine your
vehicle's current service requirements by
reading out the data stored in the remote con-
trol.<
Check Control
The concept
Check Control monitors functions in the vehicle
and generates a message if a malfunction
occurs in the monitored systems. A Check Con-
trol message of this kind includes indicator or
warning lamps on the Info Display and possibly
an acoustic signal and text messages on the
Info Display.
Indicator and warning lamps
Control and warning lamps can light up in vari-
ous combinations and colors.
Explanatory text messages
Text messages on the Info Display explain the
meaning of the indicator and warning lamps
shown.
Page 84 of 254

Everything under control
82 4.Select a message and press the controller.
To exit the menu:
The arrow is selected. Press the controller.
Display of malfunction urgency
Depending on the status of the monitored
systems, the symbol in the status line is dis-
played in different colors.
Yellow or red
Malfunctions are present in the monitored sys-
tems. Depending upon how serious the prob-
lem is, a supplementary message may also
appear on the Control Display.
The symbol also indicates the status of the ser-
vice requirements, refer to Symbols on
page79.
Displays after trip completion
Selected malfunction reports generated during
the trip are shown again consecutively when
you switch off the ignition.
Even with the ignition and display off, you can
display the messages on the Info Display:
Press the CHECK button for approx. 8 seconds,
refer to page81. The stored status reports
appear again in the display. If several messages
are present, you can continue to briefly press
the CHECK button to view them in succession.
The Check Control function is terminated:
>automatically after a brief period
>if you press the CHECK button again for
approx. 8 seconds.
Speed limit
You can enter a speed and a Check Control
message will indicate when you have reached
this speed. This enables you, for example, to
receive warnings if you exceed a speed limit in
an urban area.
You are only warned of reaching this speed a
second time if your speed has dropped to at
least 3 mph/5 km/h slower than this speed limit
since the last warning.
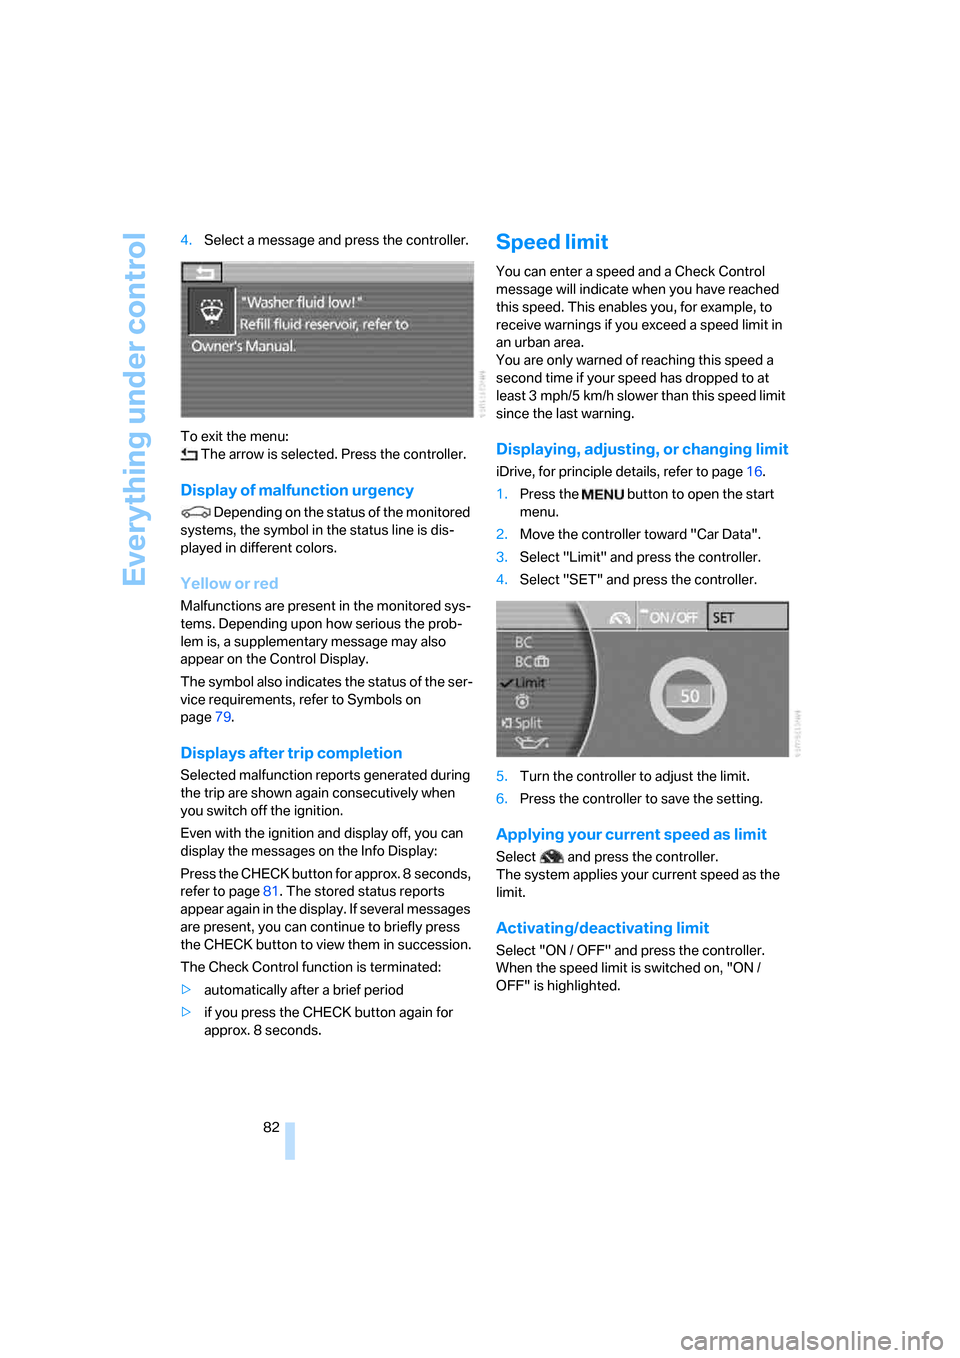
Displaying, adjusting, or changing limit
iDrive, for principle details, refer to page16.
1.Press the button to open the start
menu.
2.Move the controller toward "Car Data".
3.Select "Limit" and press the controller.
4.Select "SET" and press the controller.
5.Turn the controller to adjust the limit.
6.Press the controller to save the setting.
Applying your current speed as limit
Select and press the controller.
The system applies your current speed as the
limit.
Activating/deactivating limit
Select "ON / OFF" and press the controller.
When the speed limit is switched on, "ON /
OFF" is highlighted.
Page 85 of 254

Controls
83Reference
At a glance
Driving tips
Communications
Navigation
Entertainment
Mobility
Limit on Info Display
If, for instance, the advance warning field in the
tachometer is activated, refer to page75, then
the speed limit will be indicated by a warning
field in the speedometer, refer to arrow.
Stopwatch
Starting and stopping
iDrive, for principle details, refer to page16.
1.Press the button to open the start
menu.
2.Move the controller toward "Car Data".
3.Select and press the controller.
4.Select and press the controller. The stop-
watch is reset to 0 and starts.
5.Select and press the controller.
This stops the timer.
Press the controller again to reset the stop-
watch to zero.
All of the remaining functions remain
available at all times while the stopwatch
is running. The stopwatch continues to run in
the background.<
Taking an intermediate time reading
Select "INTERM. TIME" and press the control-
ler. This intermediate time appears below the
ongoing primary stopwatch count.
Assistance window for
onboard data
You can select any of the following computer
functions for display in the assistance window:
>Computer
>Trip computer
>Speed limit
>Stopwatch
Adopting display
iDrive, for principle details, refer to page16.
1.Press the button to open the start
menu.
2.Move the controller toward "Car Data".
3.Select "BC" and press the controller.
4.Select " Split" and press the controller.
The function appears in the assistance win-
dow.
You can also choose to view brief help texts
explaining selected menu items, refer to
page21, or the travel route with a navigation
system, refer to page130.
Page 88 of 254

Technology for comfort, convenience and safety
86
Technology for comfort, convenience and
safety
PDC Park Distance Control*
The concept
The PDC assists you when you are parking.
Audible signals and an optical display indicate
that you are approaching an object in front of or
behind your vehicle. To measure the distance,
four ultrasonic sensors are provided in each
bumper. The range of these sensors is approx.
6 ft/2 m. However, an acoustic warning begins
to sound for the sensors at the front and at the
two rear corners at approx. 24 in/60 cm, and for
the center rear sensors at approx. 5 ft/1.50 m.
PDC is a parking aid that can indicate
objects when they are approached
slowly, as is usually the case when parking.
Avoid approaching an object at high speed; oth-
erwise, the system may sound the warning of
physical obstacles too late.<
Automatically activating
The system is activated approx. 1 second after
you engage the transmission position R with
the engine running or the ignition switched on.
Wait this short period before proceeding.
Manual activation
Press the button, the LED lights up.
Manual deactivation
Press the button again; the LED goes out.After driving approx. 165 ft/50 m or at over
approx. 20 mph/30 km/h, the system switches
off and the LED goes out. You can reactivate the
system manually as needed.
Signal tones
An intermittent signal indicates the distance of
the vehicle from an object being approached.
Thus, an object detected to the left rear of the
vehicle will be indicated by a signal tone from
the left rear speaker, etc. As the distance
between vehicle and object decreases, the
intervals between the tones become shorter.
The signal tone becomes continuous once the
distance to the nearest object falls below
roughly 1 ft/30 cm.
An intermittent tone is interrupted after approx.
3seconds:
>if you remain in front of an object that was
only detected by one of the corner sensors
>if you drive parallel to a wall
Malfunction
The LED in the button flashes and a message
appears on the Info Display. PDC has failed.
Have the system checked.
To prevent this problem, keep the sensors
clean and free of ice or snow in order to ensure
that they will continue to operate effectively.
When using high-pressure washers, do not
spray sensors for long periods and keep the
sprayer at least 4 in/10 cm away from the sen-
sors.
PDC with visual warning
You can also have the system show distances
to objects on the Control Display. Objects that
are farther away are displayed there before a
signal tone begins to sound.
iDrive, for principle details, refer to page16.