2008 BMW 650I COUPE Tail lamp
[x] Cancel search: Tail lampPage 31 of 264
Controls
29Reference
At a glance
Driving tips
Communications
Navigation
Entertainment
Mobility
Personal Profile
The concept
You can set a number of functions of your BMW
individually according to your preferences.
Personal Profile ensures that most of these set-
tings are stored for the remote control currently
in use without you having to do anything. When
the vehicle is unlocked, the corresponding
remote control is detected and the settings
stored for it are called up and carried out.
This means that you will always find your BMW
set to your own personal settings even if
another person with his/her own remote control
and settings has used the vehicle since the last
time you drove it. The individual settings are
stored for a maximum of four remote controls.
Personal Profile settings
Details on the settings are provided on the
specified pages.
>Behavior of the central locking system
when unlocking vehicle, refer to page30
>Automatic locking of the vehicle, refer to
page33
>Programming buttons on steering wheel,
refer to page55
>Displays on Control Display:
>12h/24h clock mode, refer to page83
>Date format, refer to page83
>Brightness of the Control Display, refer
to page83
>Units of measure for consumption,
route/distances, temperature and pres-
sure, refer to page84
>Language on the Control Display, refer
to page84>Lighting settings:
>Triple turn signal activation, refer to
page64
>Welcome lamps, refer to page102
>Pathway lighting, refer to page103
>Daytime running lamps
*, refer to
page103
>High-beam assistant
*, refer to page104
>PDC Park Distance Control
*: optical warn-
ing, refer to page86
>Head-Up Display
*: selection and bright-
ness of display, refer to page97
>BMW Night Vision
*: display settings, refer
to page100
>Automatic climate control: for AUTO pro-
gram and intensity, cooling function, and
automatic recirculated air control/recircu-
lated air mode, temperature, air distribution,
temperature in the upper body region, refer
to page109
>Navigation system
*: voice instructions for
destination guidance, refer to page132
The most recent settings for the following are
also called up during unlocking:
>Programmable memory/direct selection
buttons: selecting stored functions, refer to
page44
>Driver's seat, exterior-mirror and steering-
wheel position, refer to page49
>Audio sources: volume and tone settings,
refer to page159
>Radio: display of stored stations, refer to
page162
>Phone: adjusting volume, refer to page190
Page 32 of 264
Opening and closing
30
Central locking system
The concept
The central locking system is ready for opera-
tion whenever the driver's door is closed.
The system either locks or unlocks all of the fol-
lowing:
>Doors
>Compartment in the front center console
>Luggage compartment lid
>Fuel filler door
Operating from outside
>via the remote control
>via the door lock
>with comfort access
* via the door handles
These actions operate the anti-theft system at
the same time. It prevents the doors from being
unlocked using the lock buttons or door han-
dles. The interior lamps and the courtesy
lamps
* are also switched on and off with the
remote control. The alarm system
is armed/dis-
armed at the same time.
You can find more detailed information on the
alarm system
on page35.
Operating from inside
Via the central locking button, refer to page32.
The fuel filler door
and the compartment in the
front center console are not locked, refer to
page32.
In the event of a serious accident, the central
locking system unlocks automatically. The haz-
ard warning flashers and interior lamps are also
switched on.
Opening and closing:
Using remote control
Persons or animals left unattended in a
parked vehicle can lock the doors from
the inside. Always take along the remote control
when leaving the vehicle so that the vehicle can
then be opened from the outside.<
Unlocking
Press the button.
You can set how the vehicle is unlocked. The
setting is stored for the remote control currently
in use.
iDrive, for operating principle refer to page16.
1.Press the button.
This opens the start menu.
2.Press the controller to open the menu.
3.Select "Settings" and press the controller.
4.Select "Vehicle / Tires" and press the con-
troller.
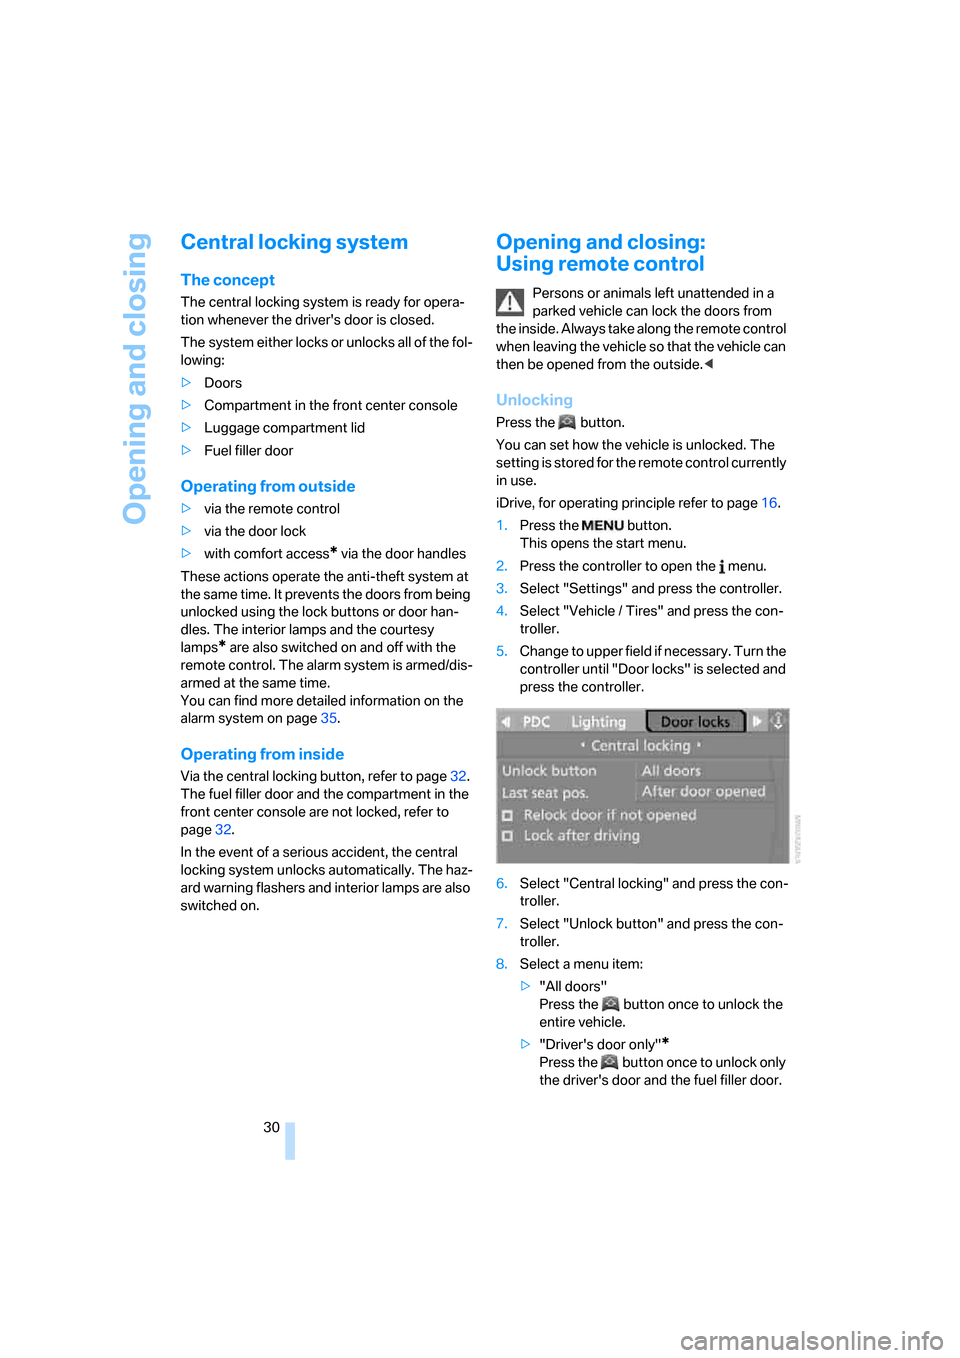
5.Change to upper field if necessary. Turn the
controller until "Door locks" is selected and
press the controller.
6.Select "Central locking" and press the con-
troller.
7.Select "Unlock button" and press the con-
troller.
8.Select a menu item:
>"All doors"
Press the button once to unlock the
entire vehicle.
>"Driver's door only"
*
Press the button once to unlock only
the driver's door and the fuel filler door.
Page 107 of 264

Controls
105Reference
At a glance
Driving tips
Communications
Navigation
Entertainment
Mobility
Manually switching between high
beams and low beams
If you wish or the situation requires, you can
intervene at any time.
>If the high-beam assistant has switched on
the high beams, but you wish to use the low
beams, just switch on the low beams with
the turn signal lever. This deactivates the
high-beam assistant.
In order to reactivate the system, briefly
press the turn signal lever in the high-beam
direction.
>If the high-beam assistant has switched on
the low beams, but you wish to use the high
beams, simply switch on the high beams as
usual. This deactivates the system and it is
up to you to switch back to low beams.
In order to reactivate the system, briefly
press the turn signal lever in the high-beam
direction.
>When the low beams are on, use the head-
lamp flasher as usual.
System limits
The high-beam assistant is designed to
maximize the amount of time that high
beams can be safely used and to quickly switch
back to low beams when traffic approaches.
The system cannot completely replace driver
intervention when unusual conditions are
encountered. For this reason, switch to low
beams when circumstances so dictate. Failure
to do so can pose a safety risk.<
Below are a few examples of situations in which
the system may not react or may only function
to a limited degree, requiring personal interven-
tion:
>in extremely unfavorable weather condi-
tions such as fog or heavy precipitation
>in sensing road users with poor inherent
illumination such as pedestrians, cyclists,
equestrians, horsedrawn vehicles, railroad
or shipping traffic close to the road, and at
deer crossings>in tight curves, on steep crests or dips, with
cross-traffic, or with partially hidden
oncoming traffic on divided highways
>in poorly illuminated areas and in the pres-
ence of highly reflective signs
>in the low speed range
>when the windshield is fogged up, dirty or
covered with stickers, decals etc. in the area
of the inside rearview mirror
>when the sensor is dirty. Clean the sensor
on the front side of the inside rearview mir-
ror with a cloth slightly moistened with glass
cleaner
Moreover, no system can operate without limi-
tations. High-beam assistant operation is sub-
ject to conditions that may reduce the system's
ability to recognize the difference between
actual vehicle head lamps or tail lamps and, for
example, highly reflective signs, markers, and
streetlights. To be on the safe side, the system
may periodically interpret these situations as
conditions that require low beams. Below are
some of the situations in which premature
switching to low beams can occur:
>approaching large and/or highly reflective
signs
>approaching certain lights, such as drive-
way lighting and porch lights
>approaching certain traffic signals
>approaching large reflective markers
In these situations, the system may interpret
the above conditions as a vehicle ahead requir-
ing a switch to low beams. When the conditions
return to normal, the system will reactivate the
high beams.
The high-beam assistant cannot replace the
driver's responsibility for complying with state
laws on high-beam switching or for adapting to
visibility and traffic conditions.
Switching off via iDrive
iDrive, for operating principle refer to page16.
1.Press the button.
This opens the start menu.
2.Press the controller to open the menu.
Page 226 of 264
Replacing components
224
Xenon lamps
The service life of these lamps is very long and
the probability of a failure is very low, provided
that they are not switched on and off an unusual
number of times. If one of these bulbs should
nevertheless fail, it is possible to continue driv-
ing with great caution using the fog lamps, pro-
vided traffic laws in your area do not prohibit
this.
Have work on the xenon lighting system
performed only by your BMW center or a
workshop that works according to BMW repair
procedures with correspondingly trained per-
sonnel. Due to the high voltage involved, there
is a danger to life and limb when work is carried
out improperly.<
Parking lamps, roadside parking
lamps, daytime running lamps
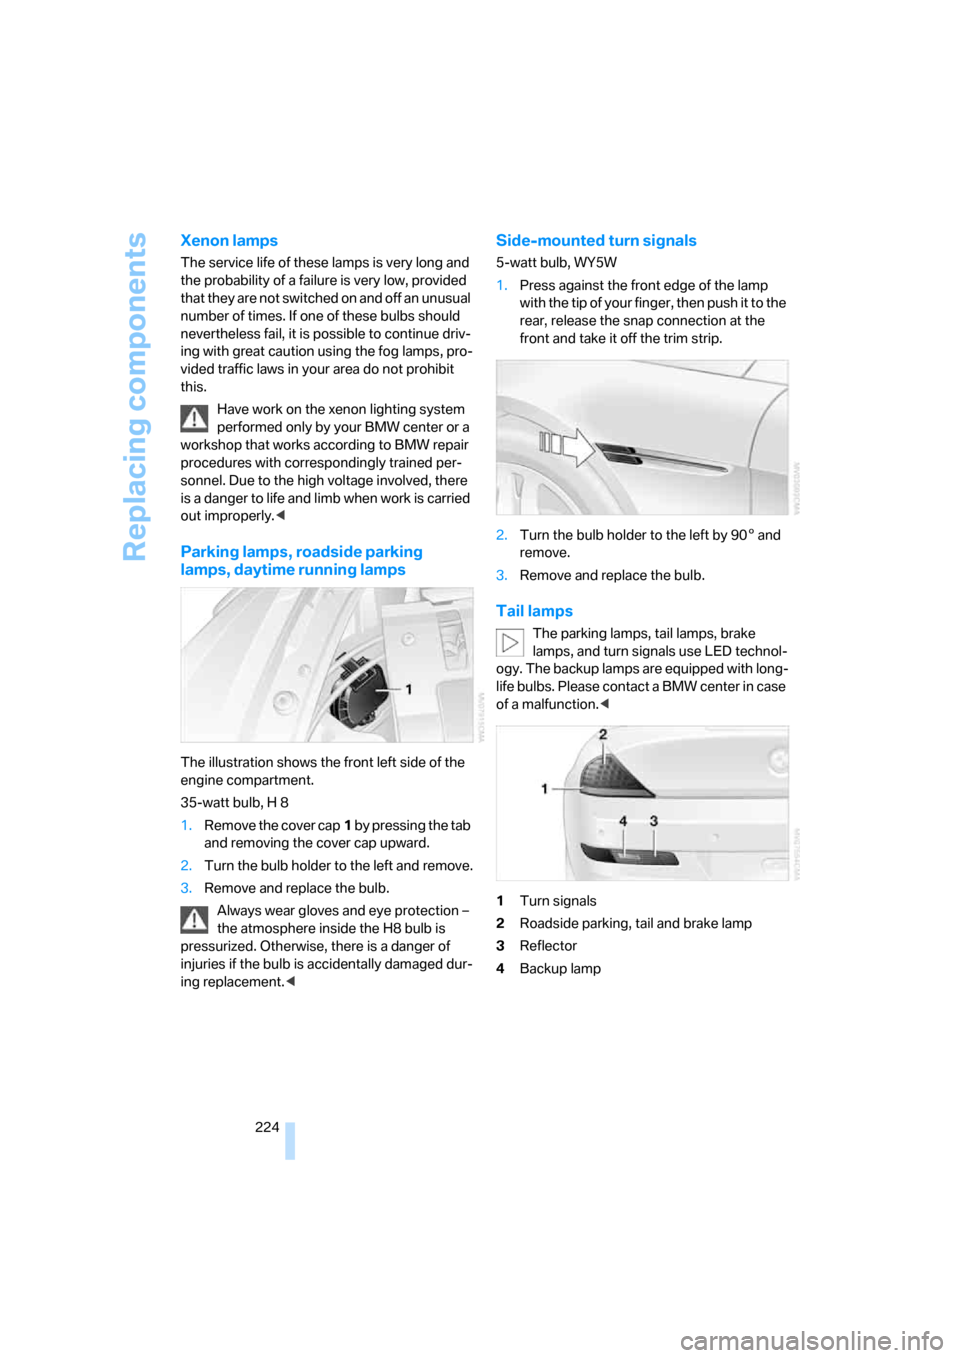
The illustration shows the front left side of the
engine compartment.
35-watt bulb, H 8
1.Remove the cover cap1 by pressing the tab
and removing the cover cap upward.
2.Turn the bulb holder to the left and remove.
3.Remove and replace the bulb.
Always wear gloves and eye protection –
the atmosphere inside the H8 bulb is
pressurized. Otherwise, there is a danger of
injuries if the bulb is accidentally damaged dur-
ing replacement.<
Side-mounted turn signals
5-watt bulb, WY5W
1.Press against the front edge of the lamp
with the tip of your finger, then push it to the
rear, release the snap connection at the
front and take it off the trim strip.
2.Turn the bulb holder to the left by 905 and
remove.
3.Remove and replace the bulb.
Tail lamps
The parking lamps, tail lamps, brake
lamps, and turn signals use LED technol-
ogy. The backup lamps are equipped with long-
life bulbs. Please contact a BMW center in case
of a malfunction.<
1Turn signals
2Roadside parking, tail and brake lamp
3Reflector
4Backup lamp
Page 229 of 264
Mobility
227Reference
At a glance
Controls
Driving tips
Communications
Navigation
Entertainment
Giving and receiving assistance
Emergency request
Conditions for an emergency request:
>Full preparation package mobile phone.
With this equipment, an emergency request
is still possible when no mobile phone is
paired in the vehicle.
>BMW Assist is activated.
Activating BMW Assist, refer to page204.
>Radio readiness is activated.
>The BMW Assist system is logged on to a
mobile phone network.
>The emergency request system is opera-
ble.
Once your service contract for BMW Assist
expires, the BMW Assist system can be deacti-
vated by a BMW center without you having to
visit a workshop. Following deactivation of the
BMW Assist system, no emergency requests
can be made. The BMW Assist system can be
reactivated after concluding a new agreement
at a BMW center.
Initiating an emergency request
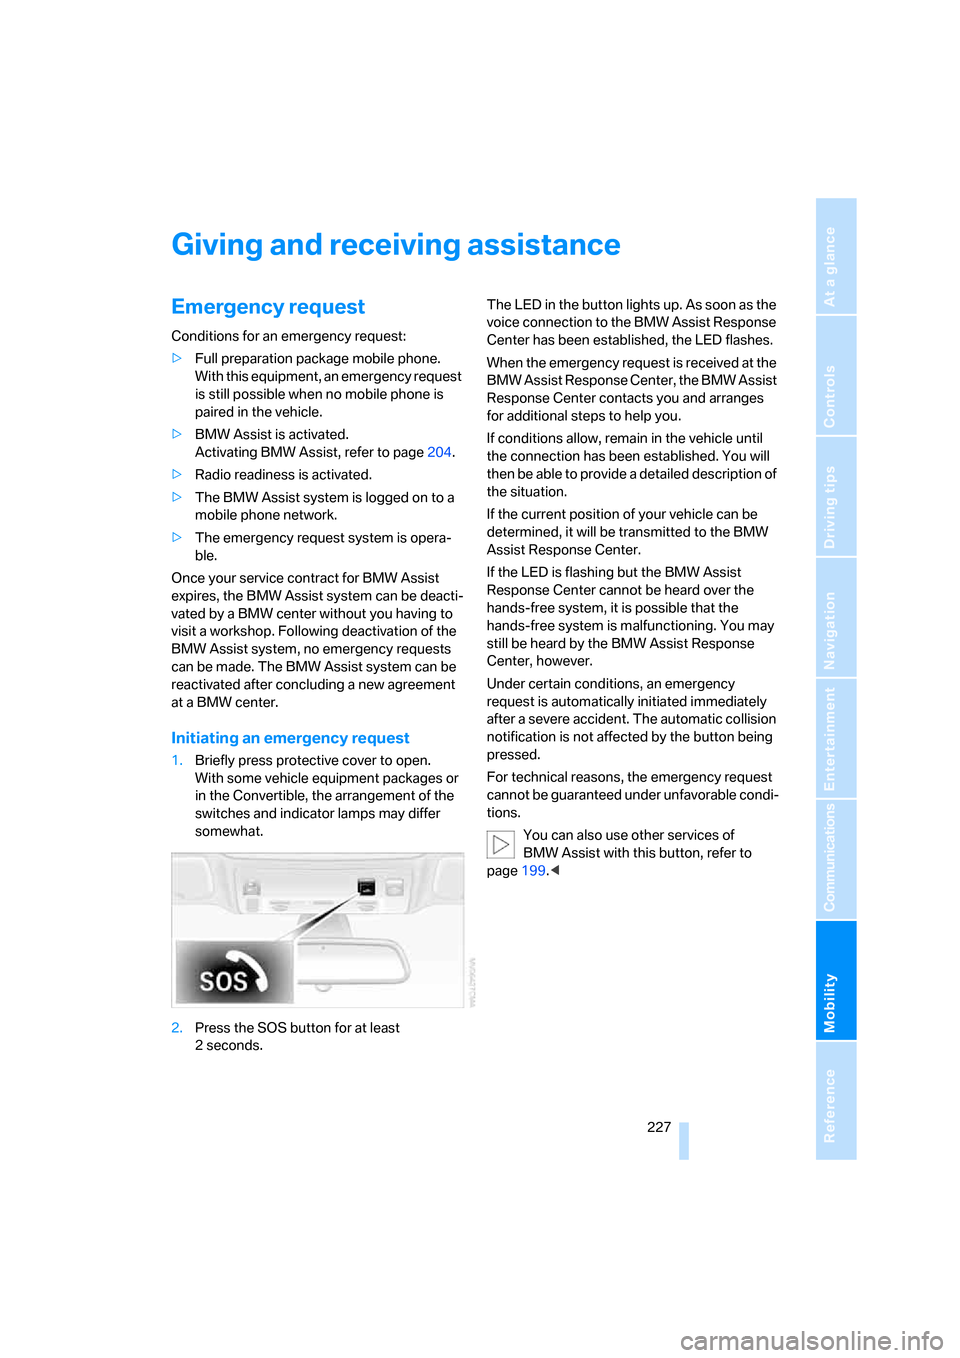
1.Briefly press protective cover to open.
With some vehicle equipment packages or
in the Convertible, the arrangement of the
switches and indicator lamps may differ
somewhat.
2.Press the SOS button for at least
2seconds.The LED in the button lights up. As soon as the
voice connection to the BMW Assist Response
Center has been established, the LED flashes.
When the emergency request is received at the
BMW Assist Response Center, the BMW Assist
Response Center contacts you and arranges
for additional steps to help you.
If conditions allow, remain in the vehicle until
the connection has been established. You will
then be able to provide a detailed description of
the situation.
If the current position of your vehicle can be
determined, it will be transmitted to the BMW
Assist Response Center.
If the LED is flashing but the BMW Assist
Response Center cannot be heard over the
hands-free system, it is possible that the
hands-free system is malfunctioning. You may
still be heard by the BMW Assist Response
Center, however.
Under certain conditions, an emergency
request is automatically initiated immediately
after a severe accident. The automatic collision
notification is not affected by the button being
pressed.
For technical reasons, the emergency request
cannot be guaranteed under unfavorable condi-
tions.
You can also use other services of
BMW Assist with this button, refer to
page199.<
Page 232 of 264
Giving and receiving assistance
230
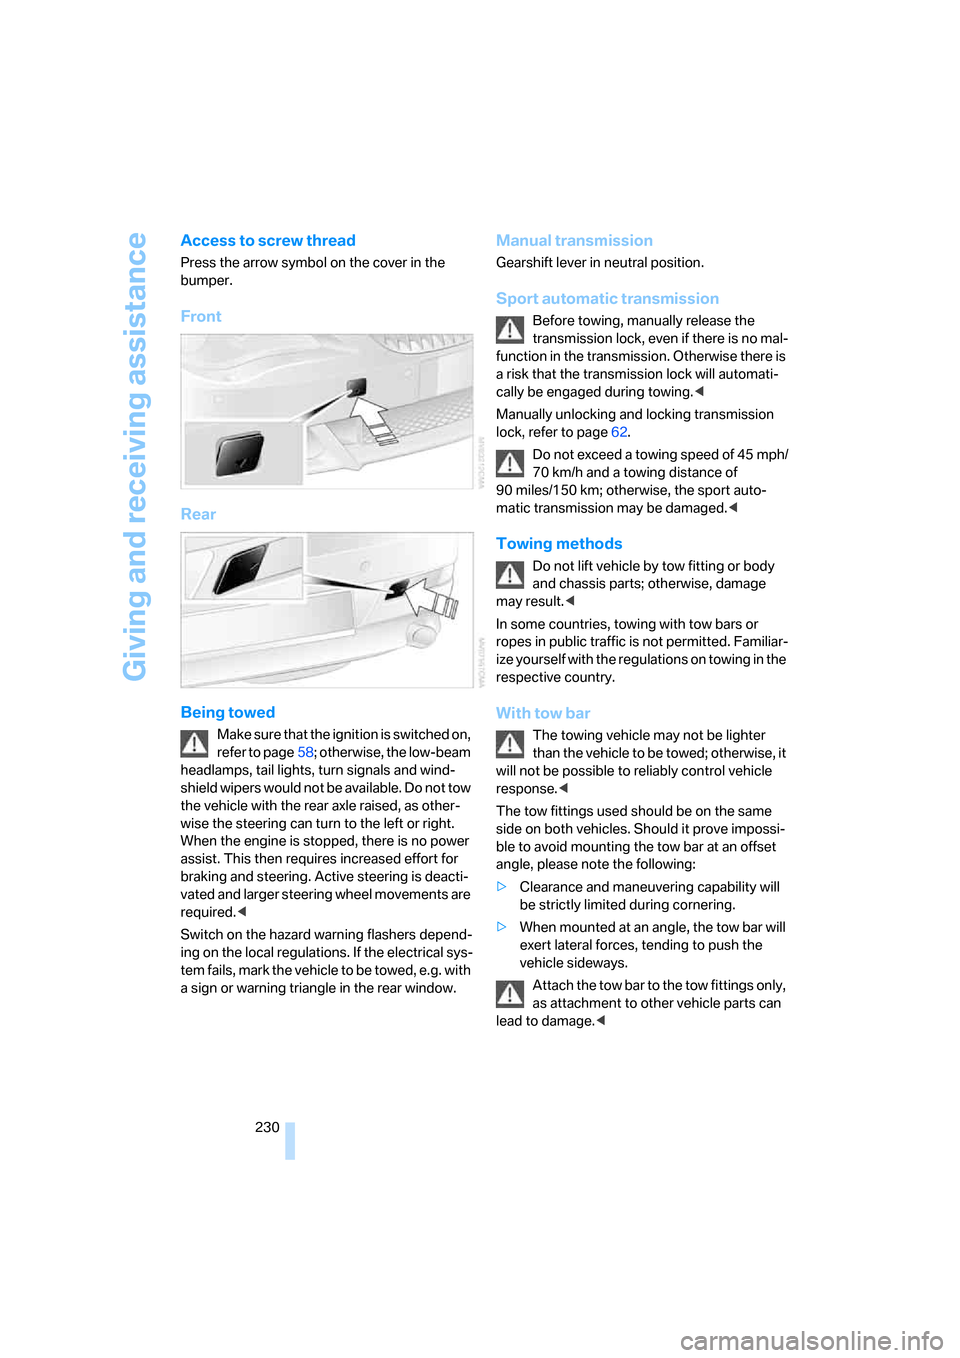
Access to screw thread
Press the arrow symbol on the cover in the
bumper.
Front
Rear
Being towed
Make sure that the ignition is switched on,
refer to page58; otherwise, the low-beam
headlamps, tail lights, turn signals and wind-
shield wipers would not be available. Do not tow
the vehicle with the rear axle raised, as other-
wise the steering can turn to the left or right.
When the engine is stopped, there is no power
assist. This then requires increased effort for
braking and steering. Active steering is deacti-
vated and larger steering wheel movements are
required.<
Switch on the hazard warning flashers depend-
ing on the local regulations. If the electrical sys-
tem fails, mark the vehicle to be towed, e.g. with
a sign or warning triangle in the rear window.
Manual transmission
Gearshift lever in neutral position.
Sport automatic transmission
Before towing, manually release the
transmission lock, even if there is no mal-
function in the transmission. Otherwise there is
a risk that the transmission lock will automati-
cally be engaged during towing.<
Manually unlocking and locking transmission
lock, refer to page62.
Do not exceed a towing speed of 45 mph/
70 km/h and a towing distance of
90 miles/150 km; otherwise, the sport auto-
matic transmission may be damaged.<
Towing methods
Do not lift vehicle by tow fitting or body
and chassis parts; otherwise, damage
may result.<
In some countries, towing with tow bars or
ropes in public traffic is not permitted. Familiar-
ize yourself with the regulations on towing in the
respective country.
With tow bar
The towing vehicle may not be lighter
than the vehicle to be towed; otherwise, it
will not be possible to reliably control vehicle
response.<
The tow fittings used should be on the same
side on both vehicles. Should it prove impossi-
ble to avoid mounting the tow bar at an offset
angle, please note the following:
>Clearance and maneuvering capability will
be strictly limited during cornering.
>When mounted at an angle, the tow bar will
exert lateral forces, tending to push the
vehicle sideways.
Attach the tow bar to the tow fittings only,
as attachment to other vehicle parts can
lead to damage.<
Page 239 of 264

Reference 237
At a glance
Controls
Driving tips
Communications
Navigation
Entertainment
Mobility
Weights
Never exceed either the approved axle loads or
the gross vehicle weight.
Capacities
650i Coupe 650i Convertible
Curb weight lbs./kg 3,814/1,730 4,277/1,940
Approved gross vehicle weight lbs./kg 4,652/2,110 5,049/2,290
Load lbs./kg 838/380 772/350
Approved front axle load lbs./kg 2,337/1,060 2,403/1,090
Approved rear axle load lbs./kg 2,491/1,130 2,778/1,260
Luggage compartment capacity cu ft/l 15.9/450 10.6/300
>with raised convertible top
compartment floor, refer to page35cu ft/l – 12.4/350
Notes
Fuel tank US gal/liters approx. 18.5/70 Fuel specification: page209
including reserve of: US gal/liters approx. 2.6/10
Window and headlamp
wiper system US quarts/liters approx. 5.3/5For details: page65
Page 245 of 264
Reference 243
At a glance
Controls
Driving tips
Communications
Navigation
Entertainment
Mobility
Arrival time
– refer to Computer76
– refer to Starting destination
guidance146
"Arrow display" for navigation
system147
"Arrow display pop-up
instructions"133
Ashtray118
Assist, refer to
BMW Assist199
Assistance systems, refer to
Driving stability control
systems86
Assistance window20
"Assist. window off"21
AUC Automatic recirculated-
air control111
"Audio"159,161,166
Audio158
– controls158
– switching on/off158
– tone control159
– volume159
Audio device, external117
Automatic
– air distribution109
– air volume109
– cruise control65,66
– headlamp control102
– recirculated-air control
AUC111
– service notification201
– steering wheel
adjustment49
– storing stations164
Automatic car washes127
– also refer to Caring for your
vehicle brochure
– also refer to Comfort
access38
Automatic climate control108
– automatic air
distribution109
– convertible program109
– switching on and off112
– ventilation with vehicle
parked112Automatic closing of doors,
refer to Automatic soft
closing34
Automatic curb monitor54
Automatic lighting
– refer to Automatic headlamp
control102
– refer to Daytime running
lamps103
– refer to High-beam
assistant104
– refer to Interior lamps106
– refer to Pathway lighting103
– refer to Welcome lamps102
"Automatic programs"109
Automatic soft closing34
Automatic station search163
"Automatic ventilation"113
AUTO program with
automatic climate
control109
"Autostore" on the
radio162,164
"AUX"158,178,180
– in audio mode178
AUX-In connection117,178
Average fuel consumption75
– setting units84
Average speed75
"Avoid ferries" for navigation
system145
"Avoid highways" for
navigation system144
Avoiding freeways for
navigation144
Avoiding unintentional
alarms36
"Avoid tollroads" for
navigation system145
Axle loads, refer to
Weights237
"A - Z"192
B
Backrest contour, refer to
Lumbar support48
Backrests, refer to Seats48
Backup lamps, replacing
bulbs, refer to Tail
lamps224
"Balance", refer to Tone
control160
Band-aids, refer to First-aid
kit228
Bass, refer to Tone
control159
"Bass", tone control159
Battery
– jump starting228
– refer to Vehicle battery225
Battery replacement, remote
control for comfort
access38
BC button, refer to
Computer75
Being towed230
Belts, refer to Safety belts52
Beverage holder, refer to Cup
holders118
Blower, refer to Air
volume110
"Bluetooth"185
"BMW Assist"200
BMW Assist199
– activating204
– concierge service202
– contacting BMW Customer
Relations202
– displaying vehicle data205
– offered services199
– roadside assistance200
– TeleService201
– updating203
"BMW Contact"194
"BMW Contact
Numbers"194
BMW homepage4
BMW Maintenance
System221