2008 BMW 650I CONVERTIBLE fold seats
[x] Cancel search: fold seatsPage 53 of 264

Controls
51Reference
At a glance
Driving tips
Communications
Navigation
Entertainment
Mobility
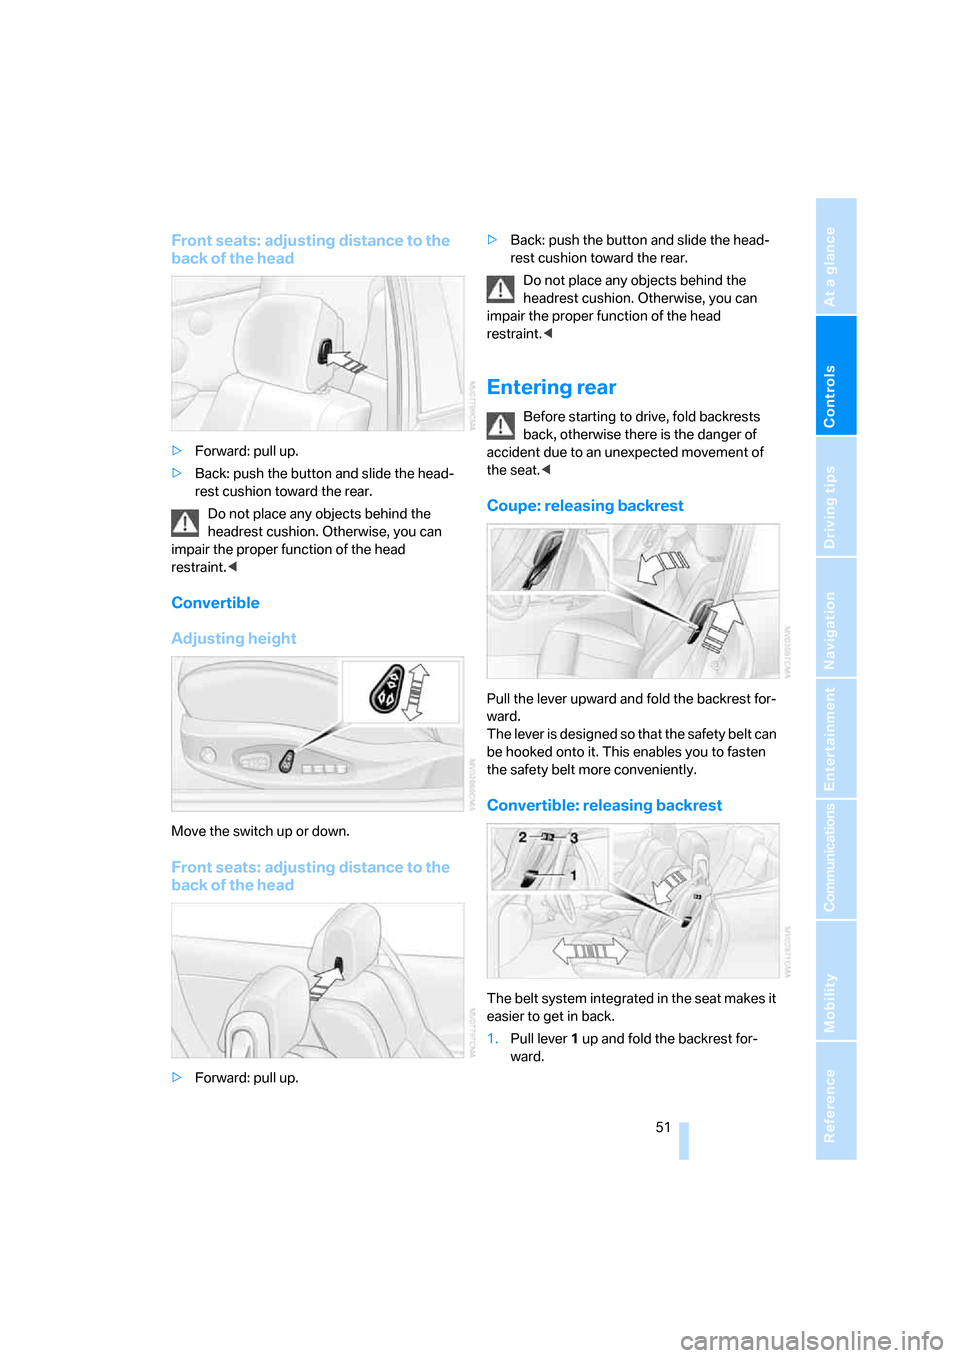
Front seats: adjusting distance to the
back of the head
>Forward: pull up.
>Back: push the button and slide the head-
rest cushion toward the rear.
Do not place any objects behind the
headrest cushion. Otherwise, you can
impair the proper function of the head
restraint.<
Convertible
Adjusting height
Move the switch up or down.
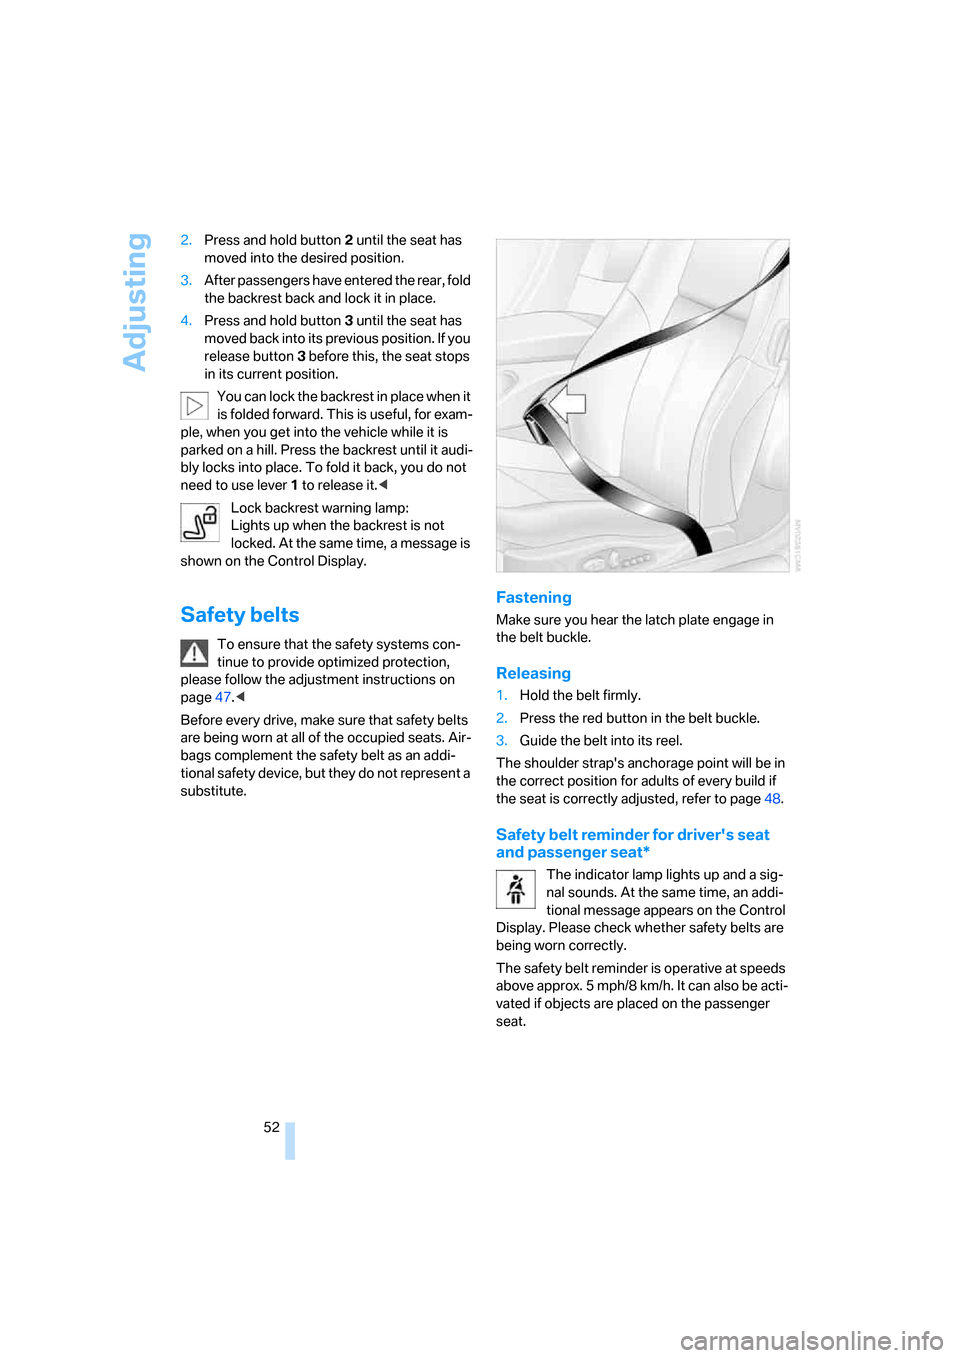
Front seats: adjusting distance to the
back of the head
>Forward: pull up.>Back: push the button and slide the head-
rest cushion toward the rear.
Do not place any objects behind the
headrest cushion. Otherwise, you can
impair the proper function of the head
restraint.<
Entering rear
Before starting to drive, fold backrests
back, otherwise there is the danger of
accident due to an unexpected movement of
the seat.<
Coupe: releasing backrest
Pull the lever upward and fold the backrest for-
ward.
The lever is designed so that the safety belt can
be hooked onto it. This enables you to fasten
the safety belt more conveniently.
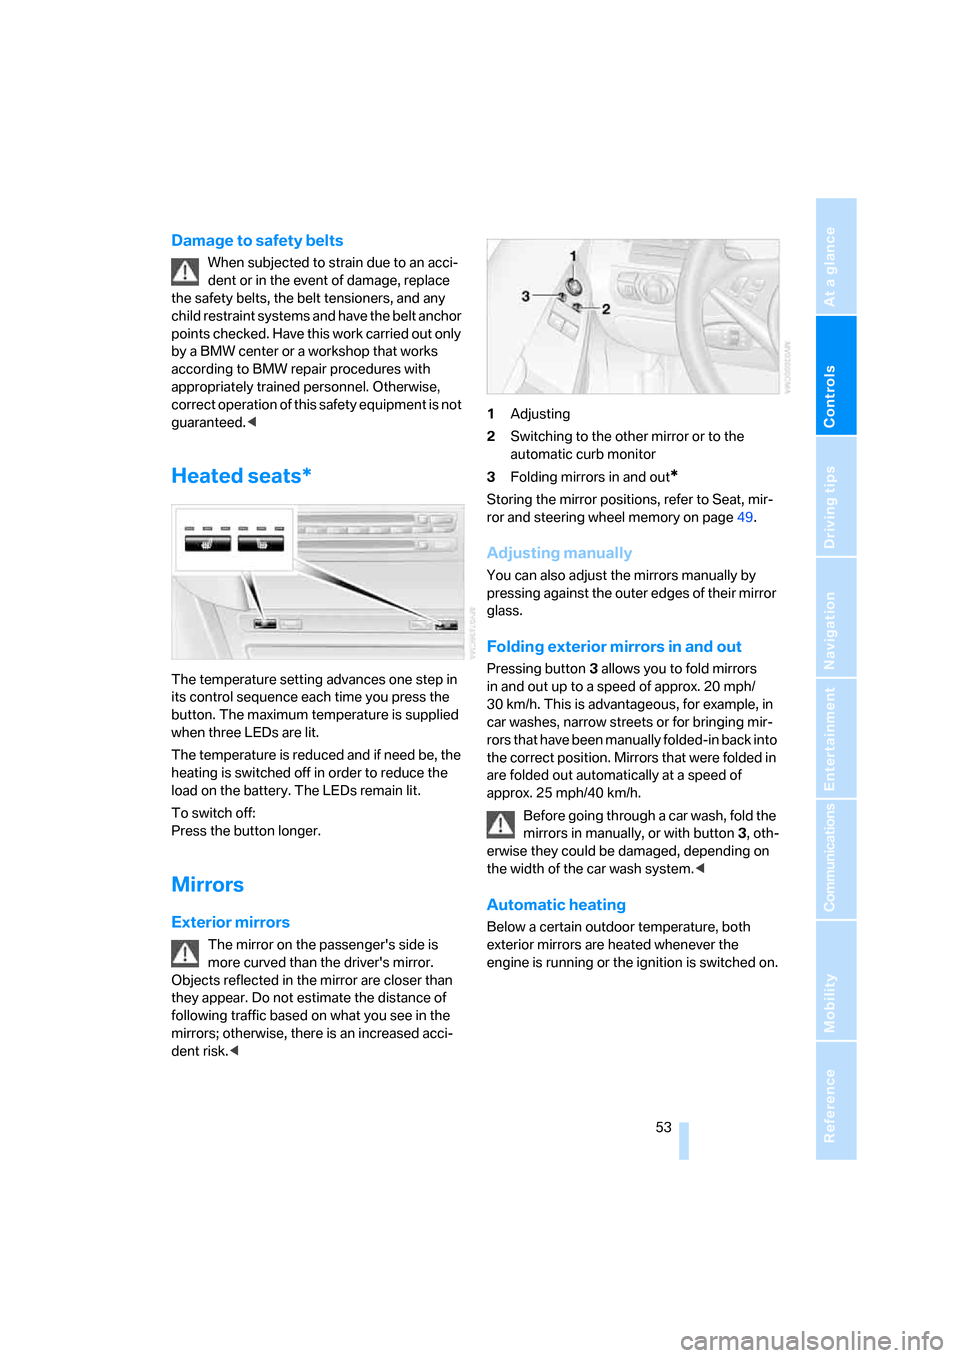
Convertible: releasing backrest
The belt system integrated in the seat makes it
easier to get in back.
1.Pull lever 1 up and fold the backrest for-
ward.
Page 54 of 264

Adjusting
52 2.Press and hold button 2 until the seat has
moved into the desired position.
3.After passengers have entered the rear, fold
the backrest back and lock it in place.
4.Press and hold button 3 until the seat has
moved back into its previous position. If you
release button3 before this, the seat stops
in its current position.
You can lock the backrest in place when it
is folded forward. This is useful, for exam-
ple, when you get into the vehicle while it is
parked on a hill. Press the backrest until it audi-
bly locks into place. To fold it back, you do not
need to use lever 1 to release it.<
Lock backrest warning lamp:
Lights up when the backrest is not
locked. At the same time, a message is
shown on the Control Display.
Safety belts
To ensure that the safety systems con-
tinue to provide optimized protection,
please follow the adjustment instructions on
page47.<
Before every drive, make sure that safety belts
are being worn at all of the occupied seats. Air-
bags complement the safety belt as an addi-
tional safety device, but they do not represent a
substitute.
Fastening
Make sure you hear the latch plate engage in
the belt buckle.
Releasing
1.Hold the belt firmly.
2.Press the red button in the belt buckle.
3.Guide the belt into its reel.
The shoulder strap's anchorage point will be in
the correct position for adults of every build if
the seat is correctly adjusted, refer to page48.
Safety belt reminder for driver's seat
and passenger seat*
The indicator lamp lights up and a sig-
nal sounds. At the same time, an addi-
tional message appears on the Control
Display. Please check whether safety belts are
being worn correctly.
The safety belt reminder is operative at speeds
above approx. 5 mph/8 km/h. It can also be acti-
vated if objects are placed on the passenger
seat.
Page 55 of 264

Controls
53Reference
At a glance
Driving tips
Communications
Navigation
Entertainment
Mobility
Damage to safety belts
When subjected to strain due to an acci-
dent or in the event of damage, replace
the safety belts, the belt tensioners, and any
child restraint systems and have the belt anchor
points checked. Have this work carried out only
by a BMW center or a workshop that works
according to BMW repair procedures with
appropriately trained personnel. Otherwise,
correct operation of this safety equipment is not
guaranteed.<
Heated seats*
The temperature setting advances one step in
its control sequence each time you press the
button. The maximum temperature is supplied
when three LEDs are lit.
The temperature is reduced and if need be, the
heating is switched off in order to reduce the
load on the battery. The LEDs remain lit.
To switch off:
Press the button longer.
Mirrors
Exterior mirrors
The mirror on the passenger's side is
more curved than the driver's mirror.
Objects reflected in the mirror are closer than
they appear. Do not estimate the distance of
following traffic based on what you see in the
mirrors; otherwise, there is an increased acci-
dent risk.<1Adjusting
2Switching to the other mirror or to the
automatic curb monitor
3Folding mirrors in and out
*
Storing the mirror positions, refer to Seat, mir-
ror and steering wheel memory on page49.
Adjusting manually
You can also adjust the mirrors manually by
pressing against the outer edges of their mirror
glass.
Folding exterior mirrors in and out
Pressing button3 allows you to fold mirrors
in and out up to a speed of approx. 20 mph/
30 km/h. This is advantageous, for example, in
car washes, narrow streets or for bringing mir-
r o r s t h a t h a v e b e e n m a n u a l l y f o l d e d - i n b a c k i n t o
the correct position. Mirrors that were folded in
are folded out automatically at a speed of
approx. 25 mph/40 km/h.
Before going through a car wash, fold the
mirrors in manually, or with button 3, oth-
erwise they could be damaged, depending on
the width of the car wash system.<
Automatic heating
Below a certain outdoor temperature, both
exterior mirrors are heated whenever the
engine is running or the ignition is switched on.
Page 59 of 264

Controls
57Reference
At a glance
Driving tips
Communications
Navigation
Entertainment
Mobility
Follow the system manufacturer's
instructions on installation and use of
LATCH child restraint systems in order not to
impair their protective function.<
Anchor points for LATCH mounts
Before attaching the LATCH child's seat, pull
the belt away from the region of the child
restraint fixing system.
Make sure that both of the lower LATCH
mounts have properly clicked into place
and that the child restraint system is resting
snugly against the backrest. Otherwise, the
protective action may be impeded.<
Rear seats
The mounting points for the LATCH anchors
are located at the positions indicated by arrows
in the gap between the seat and the backrest.
Coupe: child restraint system with
tether strap
Only use the top tether-strap mounting
points to secure child restraint systems,
otherwise the mounting points could be dam-
aged.
to arrows.
Placement of tether strap
Make sure that the tether strap is not
routed over sharp edges and does not
twist on its way to the upper mounting point;
otherwise, the belt may not properly secure the
child restraint system in the event of an acci-
dent.<
1Direction of travel
2Head restraints
3Tether strap hook
4Mounting point
5Rear window shelf/luggage compartment
floor
6Backrest
7Tether strap of child restraint system
Before using the mounting points, fold the head
restraint
* into its raised position.
1.Slide the head restraint into the bottom
position.
2.Guide the tether strap over the head
restraint.
3.Attach the tether strap hook to the mount-
ing point.
Page 119 of 264

Controls
117Reference
At a glance
Driving tips
Communications
Navigation
Entertainment
Mobility
Closing
Raise the lid into the closed position.
Rechargeable flashlight*
The flashlight is located on the left side of the
glove compartment.
The flashlight can remain there continuously.
Remove the flashlight from the socket when
needed.
Be sure that the flashlight is switched off
when it is inserted into its socket. Failure
to comply with this precaution could lead to
overcharging and damage.<
Center armrest
A storage compartment is located in the arm-
rest between the front seats. This compartment
is integrated into the central locking system and
can also be locked separately using the hotel
function, refer to page33.
To open the cover:
Pull the left button. The cover opens and can be
folded upward.
Depending on the version, the storage com-
partment can be equipped with a correspond-
ing cradle
* for the telephone or mobile phone.
Connection for external audio device
A connection for an external audio device is
located in the storage compartment. You can,
for example, connect a CD player or an MP3
player, and play the sound via the vehicle loud-
speakers, refer to page178
Adjusting height
The center armrest can be set in two positions.
Pull the right button:
Move the armrest upward or downward and
lock it in the desired position.
Storage compartments
Storage compartments in the
passenger compartment
Storage compartment behind center
armrest
To open, raise the cover at the left or right edge.
The compartment contains the cup holder
and
the lock for the hotel function, refer to page33.
Other compartments and nets
Other compartments are provided in the doors
as well as in the front center console
*.
Page 120 of 264

Practical interior accessories
118 Ticket pockets are located in the sun visors.
Storage nets are located on the backrests of the
front seats and in the passenger footwell
*.
To prevent the risk of injury during an
accident, do not stow hard or sharp-
edged items in the nets.<
Storage compartments in the luggage
compartment
You have the following storage options in the
luggage compartment:
>Storage compartment in the right side trim
panel, which is also suitable, if you so
desire, for accommodating the vehicle liter-
ature.
>Net at the loading lip for smaller items.
Coupe: clothes hooks
To fold down, press at the top edge.
When hanging clothing on the hooks,
ensure that it will not obstruct the driver's
vision. Do not hang heavy objects on the hooks.
If you do so, they could cause personal injury to
occupants during braking or evasive maneu-
vers.<
Cup holders
Use lightweight, unbreakable containers
and do not transport hot beverages. Oth-
erwise, there is an increased risk of injury in the
event of an accident. Do not force unsuitable
containers into the cup holders, as otherwise
damage can result.
one.
The removable cup holder can be inserted into
the side of the center console.
Ashtray
Opening
Press the trim strip of the cover.
Emptying
Press the opened cover beyond the resistance
point, refer to arrow: the ashtray lifts up for
removal.
Page 121 of 264

Controls
119Reference
At a glance
Driving tips
Communications
Navigation
Entertainment
Mobility
Cigarette lighter
Press in the lighter with the engine running or
the ignition switched on.
The lighter can be removed as soon as it pops
back out.
Hold or touch the hot cigarette lighter by
the knob only. Holding or touching it in
other areas could result in burns.
Always take along the remote control when you
leave the vehicle; otherwise, children could, for
example, use the lighter and burn themselves.<
Connecting electrical devices
Socket
With the engine running or the ignition switched
on, the cigarette lighter socket can be used as a
power outlet for hand flashlights, car vacuum
cleaners, etc., with power ratings of up to
approx. 200 W at 12 V. Avoid damaging the
socket by inserting plugs of different shapes or
sizes.
In front passenger footwell
Access to the socket:
Fold open the cover.
Ski bag*
The ski bag permits safe and clean transport of
up to two pairs of standard skis or one snow-
board.
You can use the ski bag to stow skis up to 6.9 ft/
2.10 m long.
Loading
1.Press the button downward and pull the
filler element forward.
2.Extend the ski bag between the front seats.
The zipper gives you easy access to stowed
items and facilitates drying of the ski bag.
3.Press the button in the luggage compart-
ment.
4.Open the loading flap and use the magnetic
holder to secure it to the rear panel.
To stow the ski bag, perform the above steps in
reverse order.
Only stow clean skis in the ski bag. Wrap sharp
edges so that no damage occurs.